This post contains affiliate links. If you purchase through these links, I may earn a small commission at no extra cost to you. Your support helps me keep creating free content like this!
Your golden retriever is begging at your feet (again) while you’re tossing another mystery-ingredient treat from the bag you bought three months ago. You squint at the label—what even is “poultry by-product meal”?
Store-bought dog treats cost $15-$25 per bag, and half the time you can’t pronounce the ingredients. Plus, your pup’s sensitive stomach isn’t loving the fillers and preservatives. …and that scratching? That dull coat? It might be those treats.
Here’s what I discovered after my beagle Bailey had a reaction to store-bought jerky: These 19 homemade dog snack recipes cost under $3 per batch, use ingredients you already have, and your dog will literally do backflips for them. From frozen yogurt bites to crunchy sweet potato chips, every recipe takes 30 minutes or less. I tested each one in my own kitchen (Bailey was a very enthusiastic taste-tester), and honestly? Some of them looked good enough that I had to stop myself from sneaking a bite.
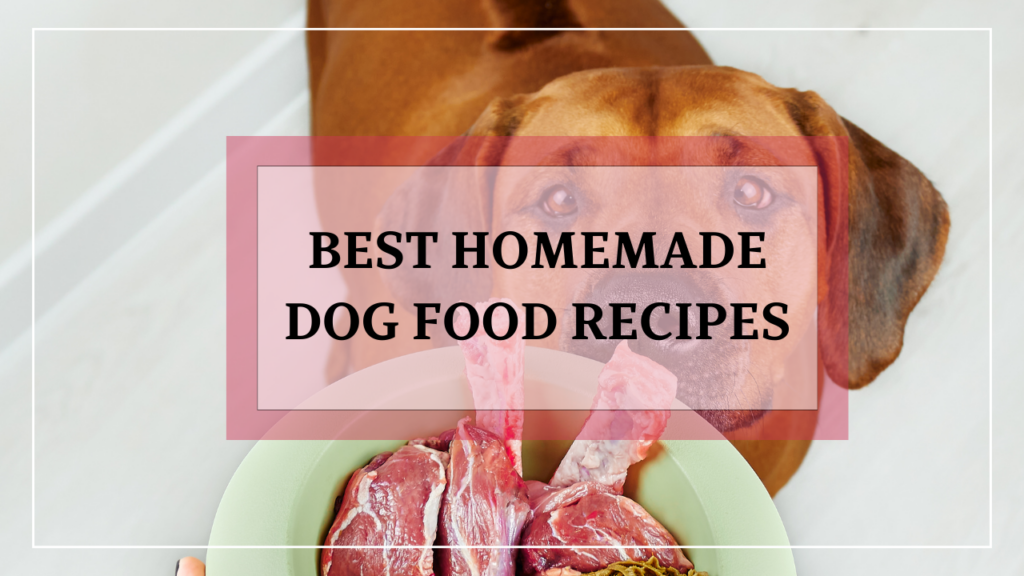
Your home will look Pinterest-perfect with those adorable bone-shaped cookies cooling on your marble counter. Whether you’re batch-prepping Sunday afternoon or whipping up a quick reward before training class, these snacks work for real life. If you’re ready to upgrade your pup’s entire meal plan too, check out these nutritious homemade dog food recipes that pair perfectly with today’s treats. And for even more treat inspiration beyond these 19, browse our collection of healthy homemade dog treats.
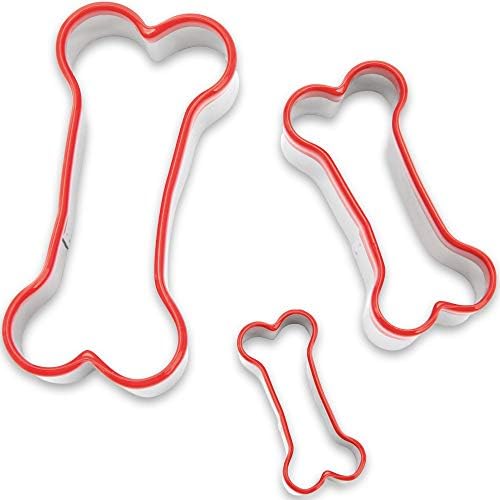
Your Dog Treat Baking Starter Kit
After baking hundreds of batches, here’s what you should keep within arm’s reach in your kitchen:

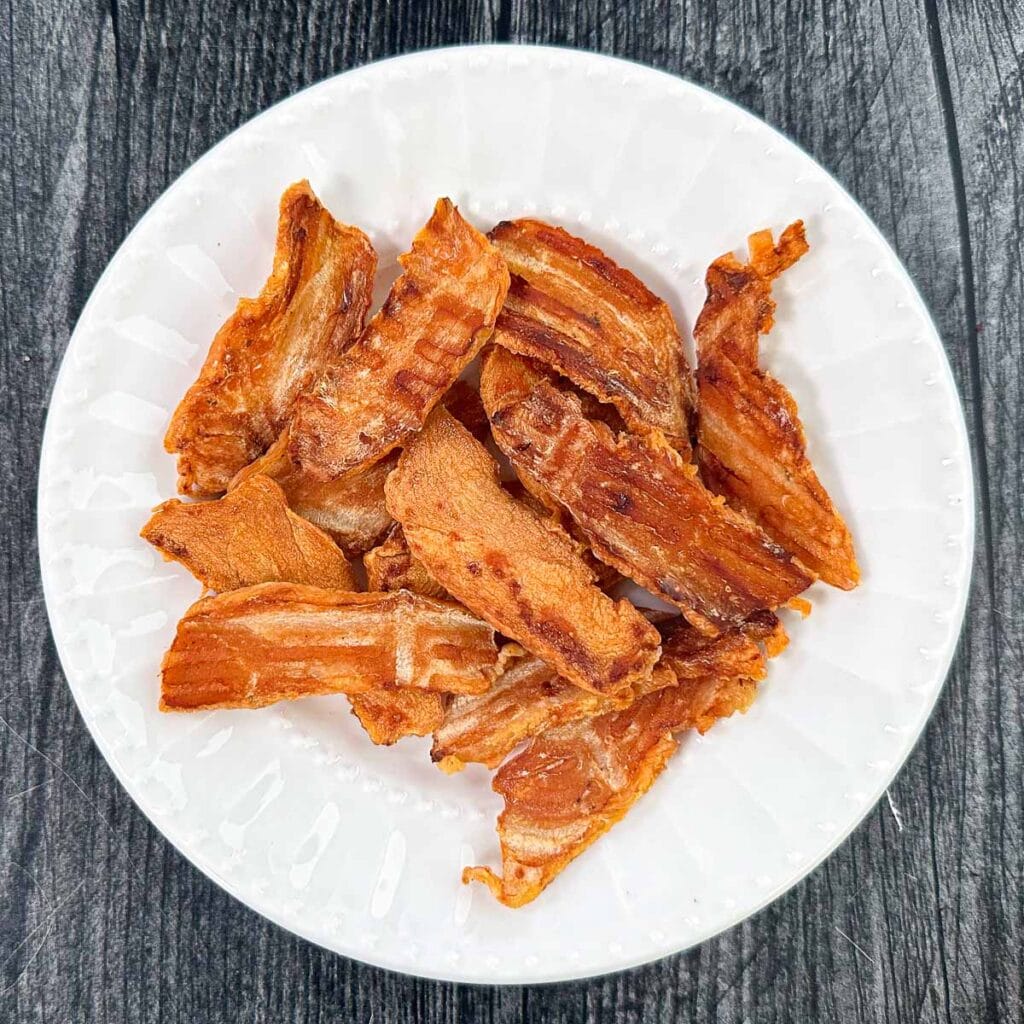
#1: Sweet Potato Chips (Single-Ingredient, Dehydrated)
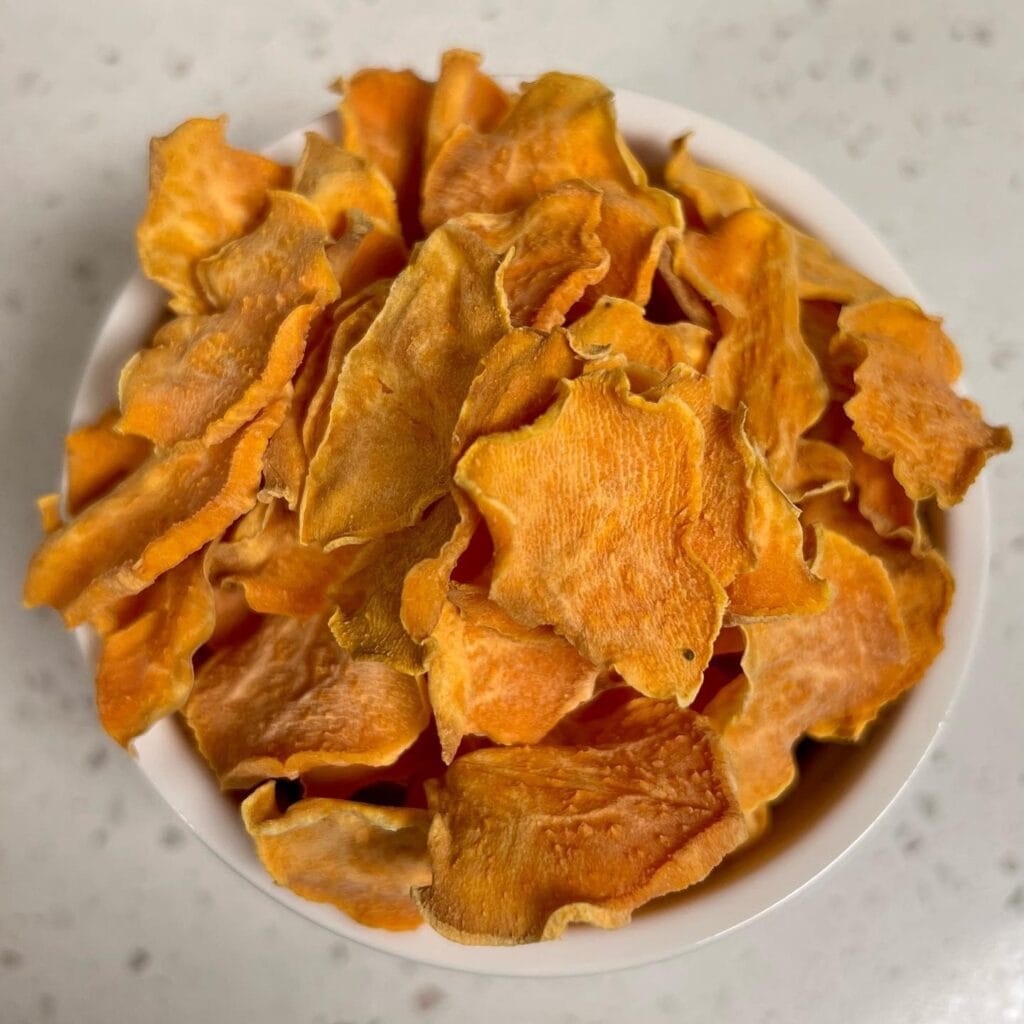
Last Saturday morning, I sliced up two sweet potatoes while my coffee brewed. Three hours later, my golden retriever Rocket wouldn’t stop doing his happy dance—these crunchy chips had him completely obsessed.
Details:
- Ingredients: 2 large sweet potatoes (that’s it!)
- Instructions: Slice ⅛-inch thick (A mandoline slicer makes this ridiculously fast and uniform), arrange on a baking sheet lined with parchment, bake at 250°F for 3 hours (flip halfway through)
- Cost: $1.20 for 30+ chips (vs. $8 for a tiny bag at the pet store)
- Storage: Airtight container on your counter, lasts 2 weeks
These are crunchy SO YOU CAN satisfy even the most aggressive chewers WHICH MEANS your couch cushions finally stay intact. The fiber aids digestion, and beta-carotene makes coats shiny—Rocket’s fur went from dull to glossy in two weeks flat.
You can speed up the process with a high-velocity food dehydrator that cuts drying time in half. Keep them crispy in this airtight food storage container that looks gorgeous sitting on your kitchen counter.
Actionable tip: Leave the skin on for extra fiber and nutrients—just scrub them clean first.
For more gut-friendly recipes, pair these with our homemade probiotics for dogs to keep digestion running smooth.
Recipe inspiration from Instagram: @adayintheliferocketmabeldaisy
#2: Cheesy Carrot Crunches (Grain-Free, High-Protein)
My beagle Bailey’s ears perked up the second these came out of the oven. The smell of melted cheddar filling the kitchen? She literally sat in front of the cooling rack for fifteen minutes straight.
Details:
- Ingredients: 1 cup grated carrots, 1 cup shredded cheddar cheese, 1 egg, 1 cup oat flour
- Instructions: Mix all ingredients in a bowl until combined, roll into ½-inch balls, flatten with a fork, bake at 350°F for 15 minutes until golden
- Cost: $4 for 40 treats (about 10¢ each vs. $1+ per store-bought treat)
- Shelf life: 1 week in the fridge, 3 months frozen
Carrots clean teeth naturally SO YOU CAN skip that $200 dental cleaning your vet keeps mentioning WHICH MEANS more money for that gorgeous new dog bed you’ve been eyeing. The cheese adds protein while the carrots give a satisfying crunch that keeps tails wagging.
Measure precisely with these stainless steel measuring cups for consistent results every time. Freeze extras in portion-sized silicone molds so you can grab-and-go for training sessions.
Actionable tip: Use a mini cookie scoop to make perfectly uniform balls in half the time.
For more veggie-packed recipes your pup will actually eat, check out our guide on herbs dogs can eat for flavor boost ideas.
Recipe inspiration from Instagram: @allisterbwh
#3: Pumpkin Oat Biscuits (Digestive Support)
These bone-shaped beauties saved my sanity during Bailey’s upset stomach phase last month. She went from refusing food to doing her signature spin-three-times trick just to get one more.
Details:
- Ingredients: 1 cup canned pumpkin (NOT pie filling—check the label), 2½ cups oat flour, 1 egg, 1 tsp cinnamon
- Instructions: Preheat your oven to 350°F. In a large mixing bowl, combine the pumpkin and egg until smooth. Add the oat flour and cinnamon, stirring until a thick dough forms (it should pull away from the bowl’s sides). Lightly flour your countertop, then roll the dough to ¼-inch thickness. Use cookie cutters to cut shapes, placing them 1 inch apart on a parchment-lined baking sheet. Bake for 25 minutes until the edges turn golden brown. Let cool completely on a wire rack before serving.
- Texture: Crunchy exterior with a slightly soft, chewy center
- Storage: Airtight container at room temperature for up to 2 weeks
Pumpkin regulates digestion naturally SO YOU CAN stop cleaning up midnight accidents WHICH MEANS your white carpet stays pristine. The soluble fiber soothes sensitive stomachs while the cinnamon adds a warm, cozy flavor dogs go crazy for.
Cut adorable bone shapes that’ll photograph beautifully for your Instagram feed. If you’re dealing with digestive issues too, pair these with our guide to homemade dog food for digestive problems for complete gut support. And if your pup loves pumpkin as much as mine does, you’ll want to see our full collection of homemade pumpkin dog treats
These treats pair perfectly with JustFoodForDogs’ sensitive stomach recipes for dogs dealing with ongoing digestive issues. Use these biscuits as training rewards while their main meals handle the heavy lifting of gut repair.
.
Actionable tip: Freeze the dough for up to 3 months—slice off what you need and bake fresh treats anytime.
Recipe inspiration from Instagram: @anka_mydlanka
#4: Peanut Butter Banana Bites (3-Ingredient, No-Bake)
The first time I made these, my Corgi Mochi wouldn’t leave my side while they froze. She sat at the freezer door like a furry little statue for twenty minutes straight.
Details:
- Ingredients: 2 ripe bananas (brown spots = extra sweet), ½ cup natural peanut butter (no xylitol!), 1 cup plain Greek yogurt
- Instructions: Peel and mash the bananas in a medium bowl until smooth with minimal lumps. Add the peanut butter and Greek yogurt, stirring vigorously until you get a creamy, uniform mixture. Pour the mixture into silicone molds or ice cube trays, filling each cavity about ¾ full. Tap the tray gently on the counter to release air bubbles. Freeze for at least 2 hours until solid. Pop them out and store in a freezer-safe container between sheets of parchment paper.
- Prep time: 5 minutes | Freeze time: 2 hours
- Shelf life: 3 months in the freezer
These frozen treats keep your pup cool on scorching days SO YOU CAN prevent overheating during summer afternoon walks WHICH MEANS more outdoor adventures together. The potassium in bananas supports healthy muscle function, and the probiotics in Greek yogurt boost gut health—Mochi’s digestion has never been better.
Actionable tip: Use mini silicone molds for training-sized portions, or regular ice cube trays for after-walk rewards.
Need more frozen treat ideas? Check out our frozen dog treats guide for year-round cooling snacks. And if you’re ready to upgrade your pup’s full meal plan, try these easy homemade dog food recipes
Recipe inspiration from Instagram: @bengandsnowy
#5: Dehydrated Beef Liver Training Treats (High-Value, Stinky But Worth It)

Fair warning: your kitchen will smell like a meat factory for about two hours. But the way my rescue pup finally learned “come” at the dog park? Worth every single nose-wrinkling minute.
Details:
- Ingredients: 1 lb fresh beef liver
- Instructions: Rinse the liver under cold water and pat completely dry with paper towels. Using a sharp knife, slice it into ½-inch thick pieces (they’ll shrink as they dry). Line a baking sheet with parchment paper and arrange the liver pieces in a single layer without touching. Preheat your oven to 275°F. Bake for 1 hour, then flip each piece with tongs. Continue baking for another 45-60 minutes until the liver feels dry and slightly crispy—it should bend without snapping. Let cool completely, then cut into pea-sized training pieces using kitchen shears.
- Texture: Leathery, slightly crispy edges
- Storage: Airtight container in the fridge for 1 week, or freeze for up to 3 months
This is the ultimate training motivator SO YOU CAN finally teach reliable recall at the dog park WHICH MEANS off-leash freedom and peace of mind. The liver is packed with vitamin A, iron, and B vitamins that support energy and immune health.
On days when you’re too busy to whip up frozen treats, JustFoodForDogs’ fresh meals provide that same probiotic support with zero prep time. I keep a few pouches in the fridge for chaotic weeks.
Store these in a smell-proof treat container so your whole house doesn’t smell like a butcher shop. Toss them in a portable treat pouch for training sessions at the park.
Actionable tip: Freeze half the batch immediately—they’ll last longer and you won’t be tempted to eat through them too fast during training.
For more protein-packed options, browse our collection of homemade meat dog treats that’ll make your pup work for every bite.
Recipe inspiration from Instagram: @border_leto_
#6: Coconut Yogurt Frozen Hearts (Dairy-Free, Probiotic-Rich)
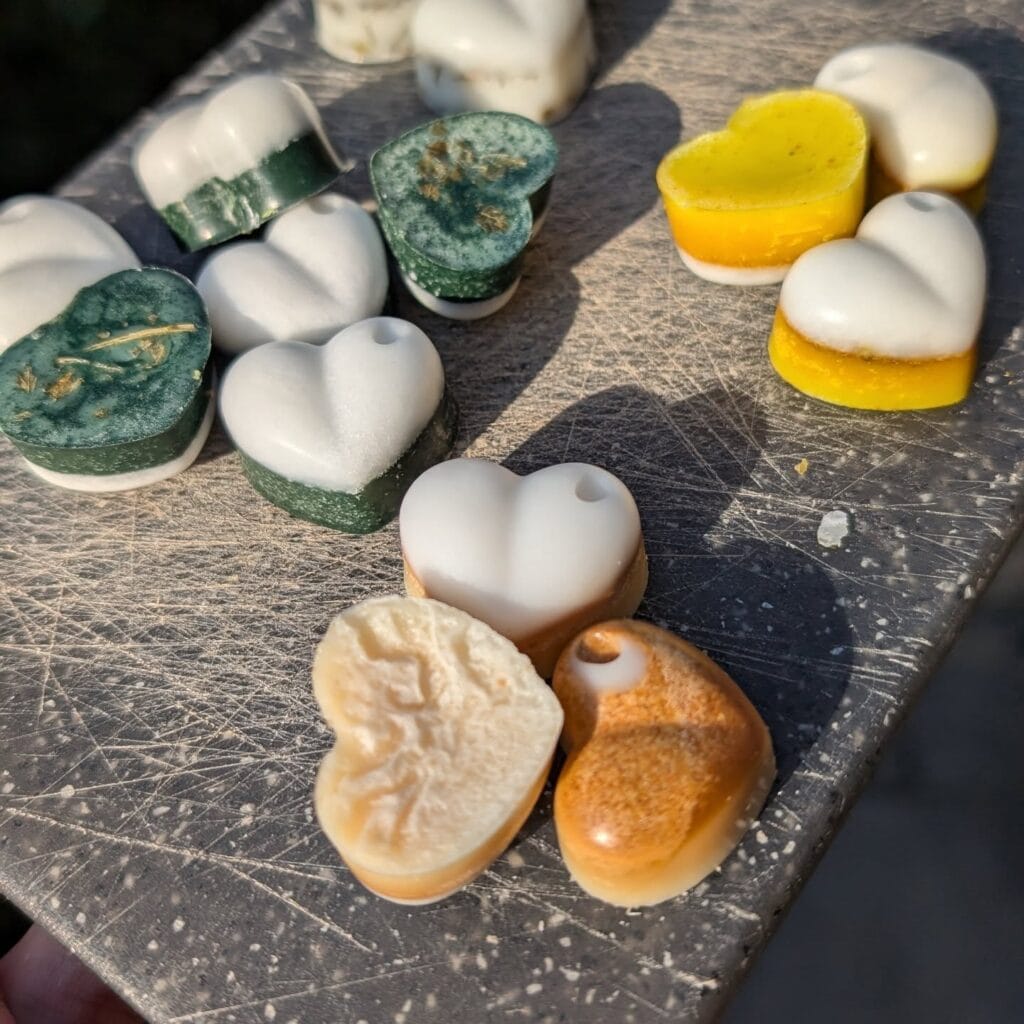
These pastel-colored frozen hearts look so aesthetic on my marble counter that I almost didn’t want to give them to my dog. Almost.
Details:
- Ingredients: 1 cup coconut yogurt (unsweetened), ½ cup fresh blueberries, ½ cup diced mango, 1 tbsp honey (optional)
- Instructions: In a blender, combine coconut yogurt with either blueberries or mango (blend them separately for different colors). If your pup likes extra sweetness, add honey. Blend until smooth—about 30 seconds. Pour each flavor into separate heart-shaped silicone molds, filling halfway. Use a toothpick to swirl the colors if you’re feeling fancy. Freeze for 3 hours until completely solid. Run warm water on the bottom of the mold for 5 seconds to release the hearts easily.
- Prep time: 10 minutes | Freeze time: 3 hours
- Best served: Outdoor summer days
Probiotics support digestion SO YOU CAN reduce gassiness and tummy troubles WHICH MEANS fewer middle-of-the-night wake-up calls. The blueberries add antioxidants while mango provides vitamins A and C for immune support.
Actionable tip: Layer different fruit flavors in the same mold for an Instagram-worthy ombré effect that’ll get you all the likes.
If your pup has a sensitive stomach, pair these with our homemade dog food for digestive problems for complete gut support.
Recipe inspiration from Instagram: @blackgummybeaar
#7: Peanut Butter Heart Cookies (Kid-Friendly, Valentine’s Day Special)
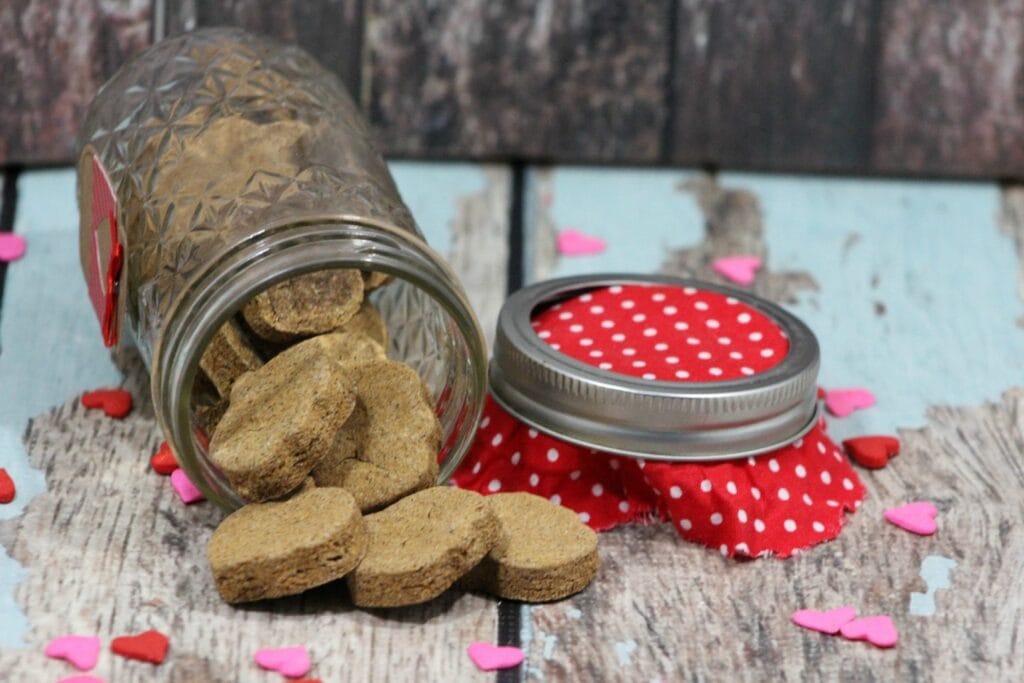
My seven-year-old daughter helped me make these last week, and now she asks to bake them every Sunday. Those cute heart shapes in mason jars? They’re sitting on my kitchen counter right now looking like Pinterest gold.
Details:
- Ingredients: 2 cups whole wheat flour, ½ cup natural peanut butter (check the label for xylitol—it’s toxic), 2 eggs, ½ cup water
- Instructions: Preheat oven to 350°F and line two baking sheets with parchment paper. In a large bowl, combine peanut butter and eggs, mixing until smooth and creamy. Add flour gradually, alternating with water, stirring until a firm dough forms. If the dough feels too sticky, add flour one tablespoon at a time. Lightly flour your work surface and roll dough to ¼-inch thickness. Use heart-shaped cookie cutters to cut shapes, re-rolling scraps as needed. Place cookies 1 inch apart on prepared sheets. Bake for 20-22 minutes until edges turn golden brown. Cool completely on wire racks before storing.
- Makes: About 35 heart-shaped cookies
- Storage: Airtight jar on the counter for 2 weeks, or freeze for 3 months
Peanut butter provides healthy fats and protein SO YOU CAN fuel active dogs before park playtime WHICH MEANS they’ll have energy for all those fetch sessions. Kids love helping with the cookie-cutter part—it’s basically arts and crafts that your dog can eat.
Actionable tip: Package these in clear mason jars tied with twine for gorgeous homemade dog gifts that’ll make you the hero at your next doggy playdate.
For more peanut butter recipes your pup will obsess over, explore our homemade peanut dog treats collection with endless flavor variations.
Recipe inspiration from Instagram: @dogvills
#8: Dehydrated Chicken Strips (Protein-Packed, Travel-Friendly)
I made a batch of these before our road trip to the mountains, and they kept my two Dobermans occupied for the entire four-hour drive. Zero whining. Zero “are we there yet?” energy.
Details:
- Ingredients: 2 lbs boneless, skinless chicken breasts
- Instructions: Trim any excess fat from the chicken breasts. Slice the chicken lengthwise into ¼-inch thick strips—the thinner they are, the crispier they’ll get. Arrange strips in a single layer on dehydrator trays (or parchment-lined baking sheets if using an oven). Set dehydrator to 165°F and dry for 6-8 hours, checking at the 6-hour mark. For oven method, bake at 200°F for 3-4 hours, flipping halfway through. The strips are done when they’re completely dry and snap when bent. Let cool fully before storing.
- Texture: Chewy-to-crispy, depending on drying time
- Storage: Refrigerate in airtight container for 2 weeks, or freeze for 6 months
High protein content SO YOU CAN support muscle maintenance in active or senior dogs WHICH MEANS they stay strong and energetic longer. These are lightweight and don’t need refrigeration for short trips, making them perfect for hiking or beach days.
Speed up the process with a high-quality food dehydrator that handles large batches. Keep them fresh in silicone storage bags that fit perfectly in your backpack or car console.
Actionable tip: Make double batches—you’ll go through these faster than you think, and your dog will give you “the stare” when they run out.
Looking for more travel-friendly recipes? Check out our guide to chicken and rice dog food recipes that work for meal prep too.
Recipe inspiration from Instagram: @doberman.duo
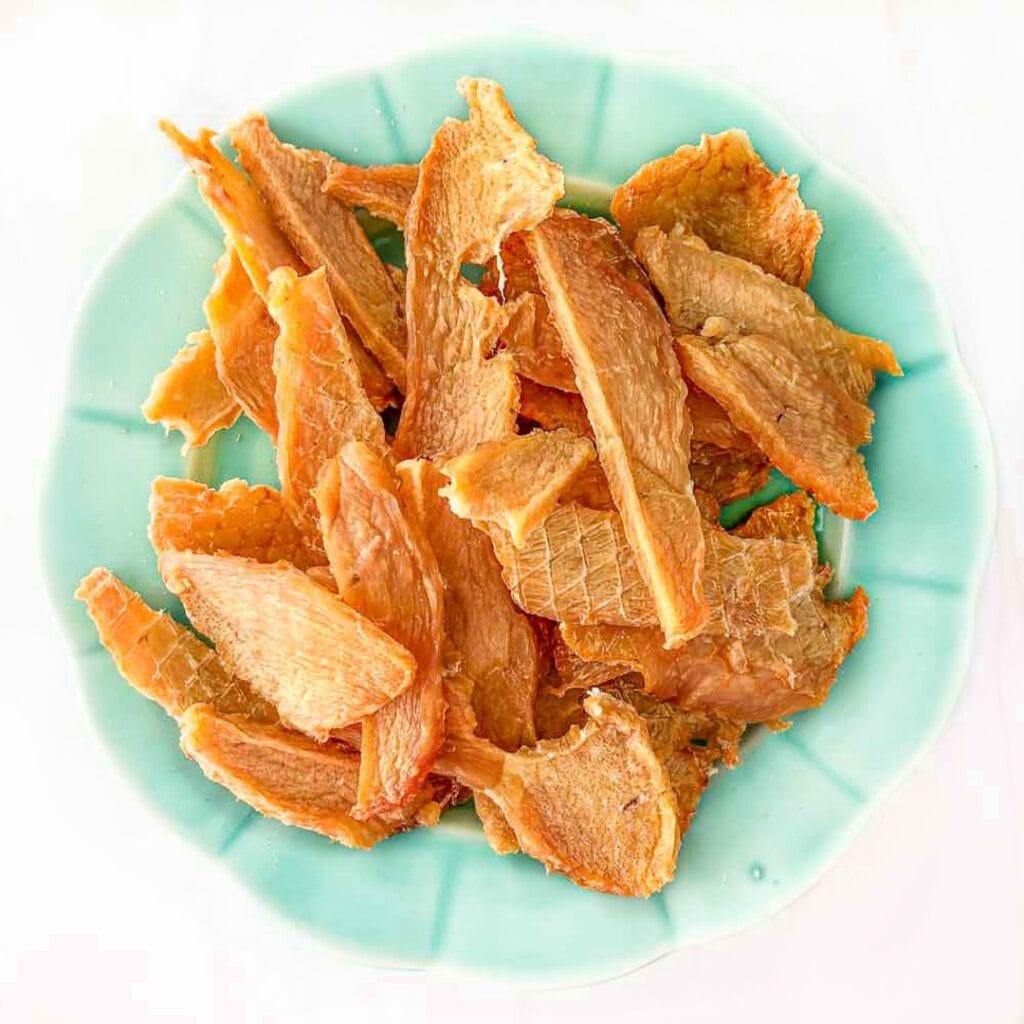
#9: Salmon Jerky Strips (Omega-3 Rich, Coat-Boosting)
My rescue mutt’s coat was so dull and flaky when I first adopted her. Three weeks of these salmon strips as training treats? Her fur is now so shiny that strangers at the park ask what I’m feeding her.
Details:
- Ingredients: 1 lb fresh salmon fillet (skin removed)
- Instructions: Pat the salmon completely dry with paper towels—moisture is the enemy of crispy jerky. Using a sharp knife, slice salmon against the grain into ¼-inch thick strips. Line a baking sheet with parchment paper and arrange strips without overlapping. Preheat the oven to 200°F. Bake for 2 1⁄2-3 hours until the salmon is dry and firm to the touch but still slightly flexible. For extra-crispy jerky, add another 30 minutes. Cool fully before breaking into bite-sized pieces.
- Texture: Chewy with crispy edges
- Storage: Refrigerate up to 1 week, freeze up to 4 months
Omega-3 fatty acids make coats glossy and reduce inflammation SO YOU CAN skip expensive fish oil supplements WHICH MEANS more money for that chic dog bed you’ve been eyeing. The salmon also supports brain health and joint function.
Actionable tip: Check for any tiny pin bones before slicing—run your fingers along the fillet and remove any you feel with tweezers.
Want more fish-based recipes? Dive into our full homemade salmon dog food recipes guide for complete meal ideas.
Recipe inspiration from Instagram: @denisezwright
When Homemade Treats Aren’t Enough: Complete Meal Solutions
Love making treats but don’t have time to prep balanced meals every day? I get it. Between work, kids, and three dogs, some weeks I barely have time to feed myself.
That’s where JustFoodForDogs fresh meals come in. They’re the ONLY fresh dog food brand I trust when I can’t cook—veterinarian-formulated, human-grade ingredients, and actually backed by research (not just marketing hype).
My hybrid approach:
- Monday-Friday: JFFD fresh meals for breakfast (zero prep)
- Weekends: Homemade meals from my healthy dog food recipes
- All week: These homemade treats for training and snacks
The best part? They offer DIY nutrient blend packets so you can make their exact recipes at home using grocery store ingredients—like a “semi-homemade” middle ground. Each packet makes 19 lbs of balanced food and includes cooking guides for slow cookers or Instant Pots.
Bailey (my beagle) gets JFFD’s Turkey & Macaroni recipe for her sensitive stomach, while Rocket (my golden) thrives on their Chicken & Rice. Both are AAFCO-compliant for long-term feeding.
Try JustFoodForDogs with 50% off your first order here
#10: Crispy Bacon Strips (Special Occasion, High-Reward)
I save these for the really tough training moments—like teaching my food-motivated Lab not to counter-surf. One whiff of these bacon strips and she’s suddenly a model student.
Details:
- Ingredients: 12 strips uncured bacon (no added sugar, nitrates, or preservatives)
- Instructions: Preheat oven to 375°F. Line a rimmed baking sheet with aluminum foil for easier cleanup, then place a wire cooling rack on top. Arrange bacon strips in a single layer on the rack without overlapping—this allows fat to drip away and air to circulate for even crisping. Bake for 25-30 minutes, checking at 25 minutes. You want them crispy and deep golden-brown, not burnt. Remove from the oven and transfer immediately to paper towels to drain excess grease. Let cool completely (they’ll crisp up more as they cool), then break into 1-inch pieces.
- Prep time: 5 minutes | Cook time: 30 minutes
- Storage: Refrigerate in paper towel-lined container for 5 days
These are ultimate high-value rewards SO YOU CAN nail challenging training commands like “leave it” WHICH MEANS better impulse control and safer walks. Use sparingly—bacon is rich and should be an occasional treat, not a daily staple.
Actionable tip: Save the bacon grease! Let it cool and drizzle a teaspoon over your pup’s regular food as a flavor boost (once a week max).
For more bacon-based treats your dog will do anything for, check out our homemade bacon dog treats recipes
with creative variations.
Recipe inspiration from Instagram: @denisezwright
#11: Roasted Green Pea Crisps (Low-Calorie, Veggie-Packed)
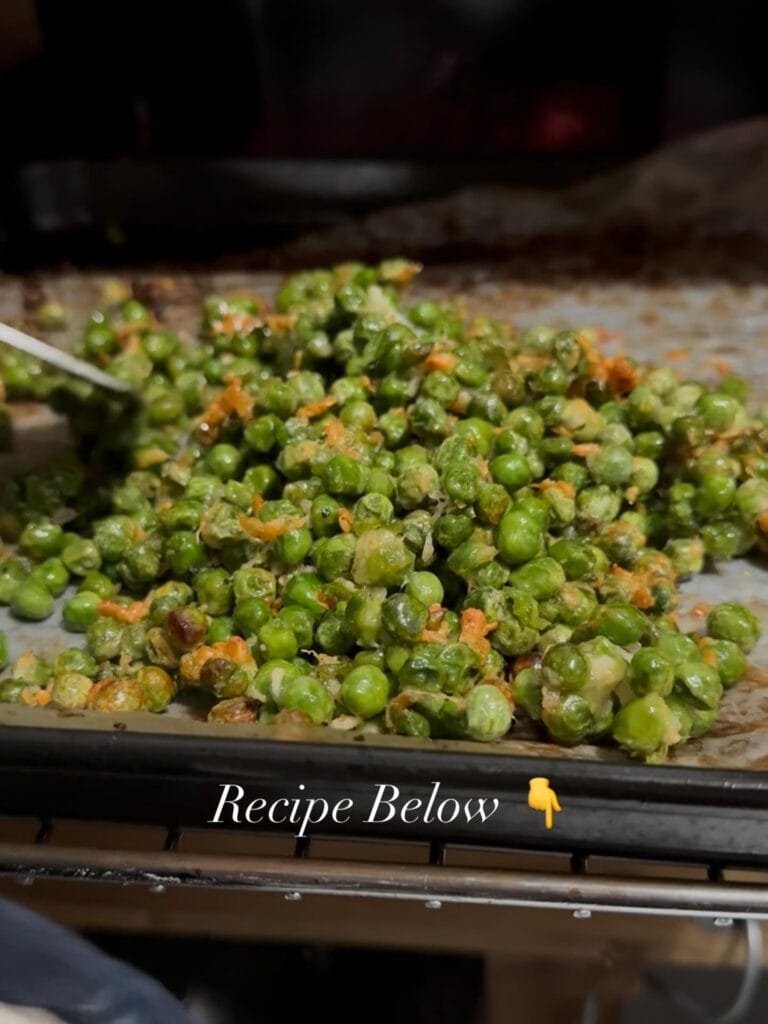
My chubby Labradoodle is on a diet (aren’t they all?), and these green pea crisps let me give her treats without the guilt. She gets her crunchy snack fix, and I don’t sabotage her weight-loss goals.
Details:
- Ingredients: 2 cups fresh or frozen green peas, 1 tbsp olive oil, 1 tsp dried parsley, ½ tsp garlic powder (use sparingly—too much garlic is toxic)
- Instructions: If using frozen peas, thaw completely and pat very dry with paper towels. Preheat oven to 400°F. In a bowl, toss peas with olive oil, parsley, and a light sprinkle of garlic powder until evenly coated. Spread peas in a single layer on a parchment-lined baking sheet—don’t crowd them or they’ll steam instead of crisp. Roast for 30-35 minutes, shaking the pan every 10 minutes to ensure even browning. They’re done when shriveled and crispy with golden-brown spots. Let cool completely before serving.
- Texture: Crunchy, pop-in-your-mouth bites
- Storage: Airtight container at room temperature for 1 week
Only 8 calories per ¼ cup SO YOU CAN give multiple treats during training without derailing your pup’s diet WHICH MEANS guilt-free snacking all day long. Peas provide plant-based protein, fiber, and vitamins A, K, and B.
Actionable tip: Skip the garlic powder entirely if you’re nervous about quantity—the peas taste great with just olive oil and parsley.
Need more low-calorie snack ideas for your chunky pup? Our balanced homemade dog food guide has portion-controlled meal plans too.
Recipe inspiration from Instagram: @cheff.minnie
#12: Triple-Meat Dehydrator Sampler (Protein Variety Pack)
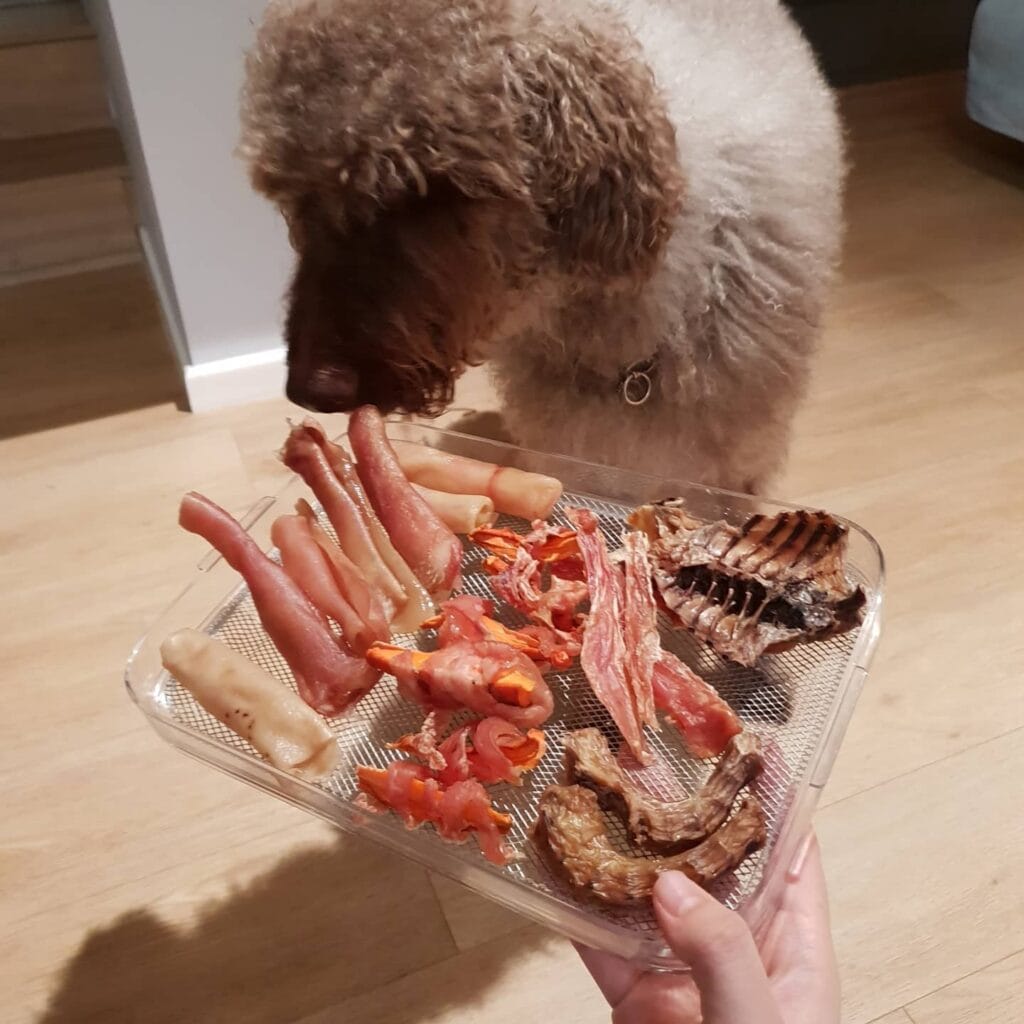
When I opened the dehydrator after making this batch, all three of my dogs—a Lab, a Beagle, and a Chihuahua mix—came running from different rooms like I’d just opened a portal to heaven.
Details:
- Ingredients: 1 lb chicken breast, 1 lb beef liver, 1 lb turkey breast (all boneless and trimmed)
- Instructions: Pat all meats completely dry with paper towels. Slice each meat type into ¼-inch thick strips, keeping them separate. Arrange each meat on different dehydrator trays to prevent flavor mixing. Set dehydrator to 165°F. Chicken and turkey will take 5-6 hours; liver takes 3-4 hours due to its thinner texture. Check hourly after the 4-hour mark—strips should be dry, leathery, and snap when bent. Remove each type as it finishes. Cool completely before mixing and storing in separate containers or one mixed batch.
- Yield: About 4 cups mixed jerky strips
- Storage: Airtight container in fridge for 2 weeks, freezer for 6 months
Different proteins provide varied amino acids SO YOU CAN offer complete nutrition in treat form WHICH MEANS better muscle support and energy levels. Rotating proteins also prevents food sensitivities from developing.
Actionable tip: Label each meat type before dehydrating so you know what finished first—they all look similar when dried!
Want to turn these proteins into complete meals? Check our healthy homemade dog food recipes for balanced dinner ideas.
Recipe inspiration from Instagram: @durianini
#13: Birthday Pupcake with Yogurt Frosting (Celebration-Worthy)
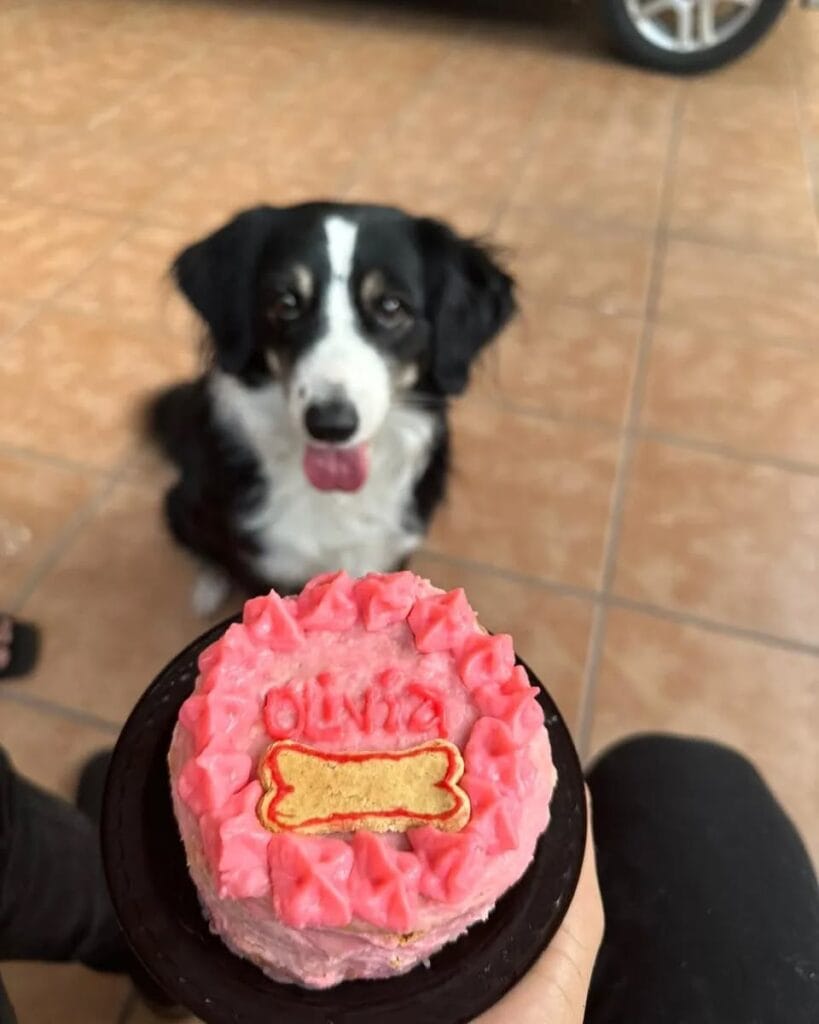
I made this for my Australian Shepherd’s third birthday party, and honestly? The other dog owners at the park were more excited about it than their pups were. It was photographed beautifully for Instagram.
Details:
- Ingredients for cake: 1 cup whole wheat flour, 1 tsp baking soda, ¼ cup peanut butter, ¼ cup honey, 1 egg, ½ cup grated carrots, ½ cup unsweetened applesauce
- Ingredients for frosting: 8 oz plain Greek yogurt, 2 tbsp peanut butter, 1 tbsp honey
- Instructions: Preheat oven to 350°F and grease a 6-inch round cake pan. In a large bowl, whisk flour and baking soda. In another bowl, beat peanut butter, honey, egg, and applesauce until smooth. Fold in grated carrots. Add wet to dry ingredients, stirring just until combined. Pour batter into prepared pan. Bake 30-35 minutes until a toothpick inserted in center comes out clean. Cool in pan 10 minutes, then turn out onto a wire rack to cool completely (at least 2 hours). For frosting, whip all ingredients together until fluffy. Frost cooled cake and decorate with dog-safe toppings like blueberries or small bone-shaped biscuits.
- Serves: 8-10 dog party guests
- Storage: Refrigerate unfrosted cake for 5 days, frosted for 3 days
Want to go all-out for your pup’s birthday? Serve this pupcake as dessert alongside JustFoodForDogs’ variety pack so your dog (and their party guests) can enjoy a full fresh-food feast. Their shelf-stable JustFresh pouches make party planning ridiculously easy.
Special occasion treats SO YOU CAN celebrate Gotcha Days, birthdays, and adoption anniversaries WHICH MEANS Instagram-worthy moments and happy memories. The carrots and applesauce keep it moist while adding natural sweetness and vitamins.
Actionable tip: Freeze individual slices for up to 2 months—perfect for spontaneous puppy playdates.
Looking for more celebration ideas? Our best dog gift ideas guide has party inspiration your pup will love.
Recipe inspiration from Instagram: @mandispetbakery
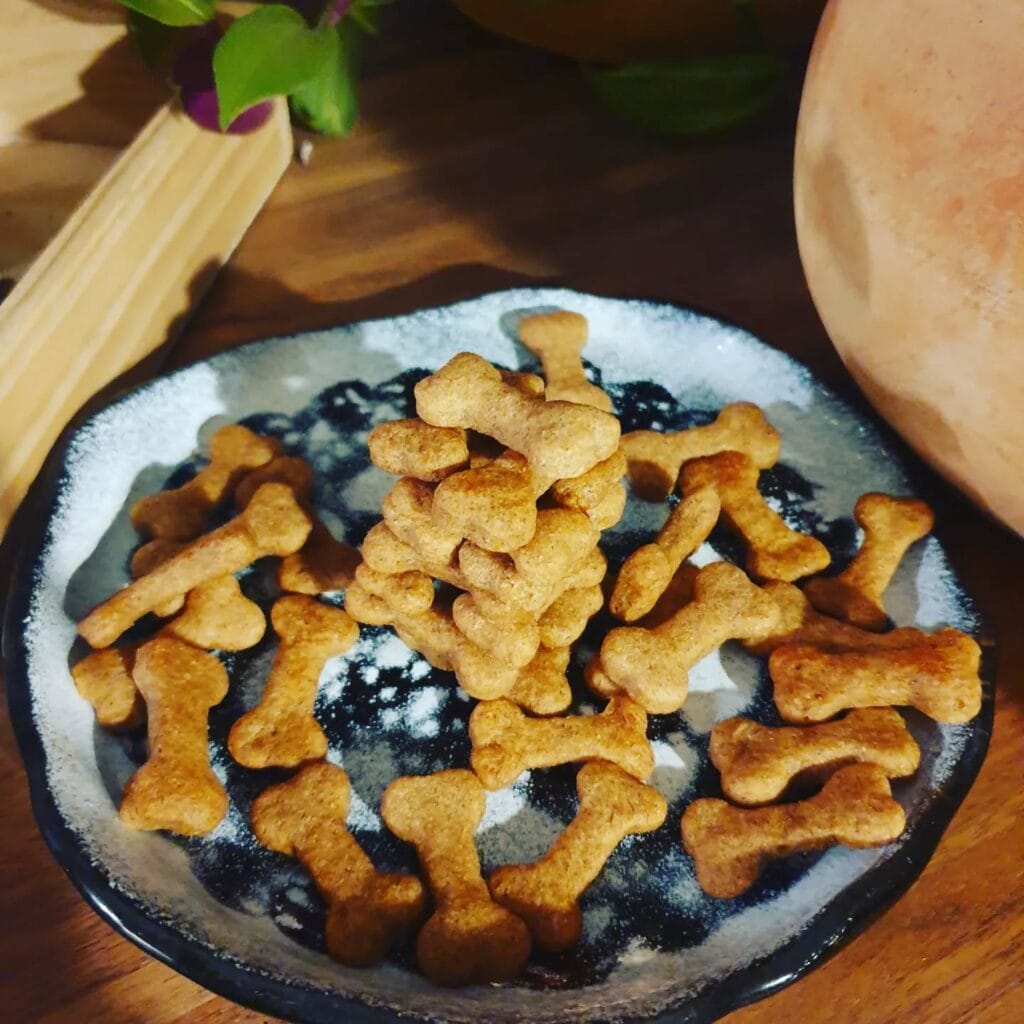
#14: Simple Shaped Training Treats (Heart & Fish Cutouts)
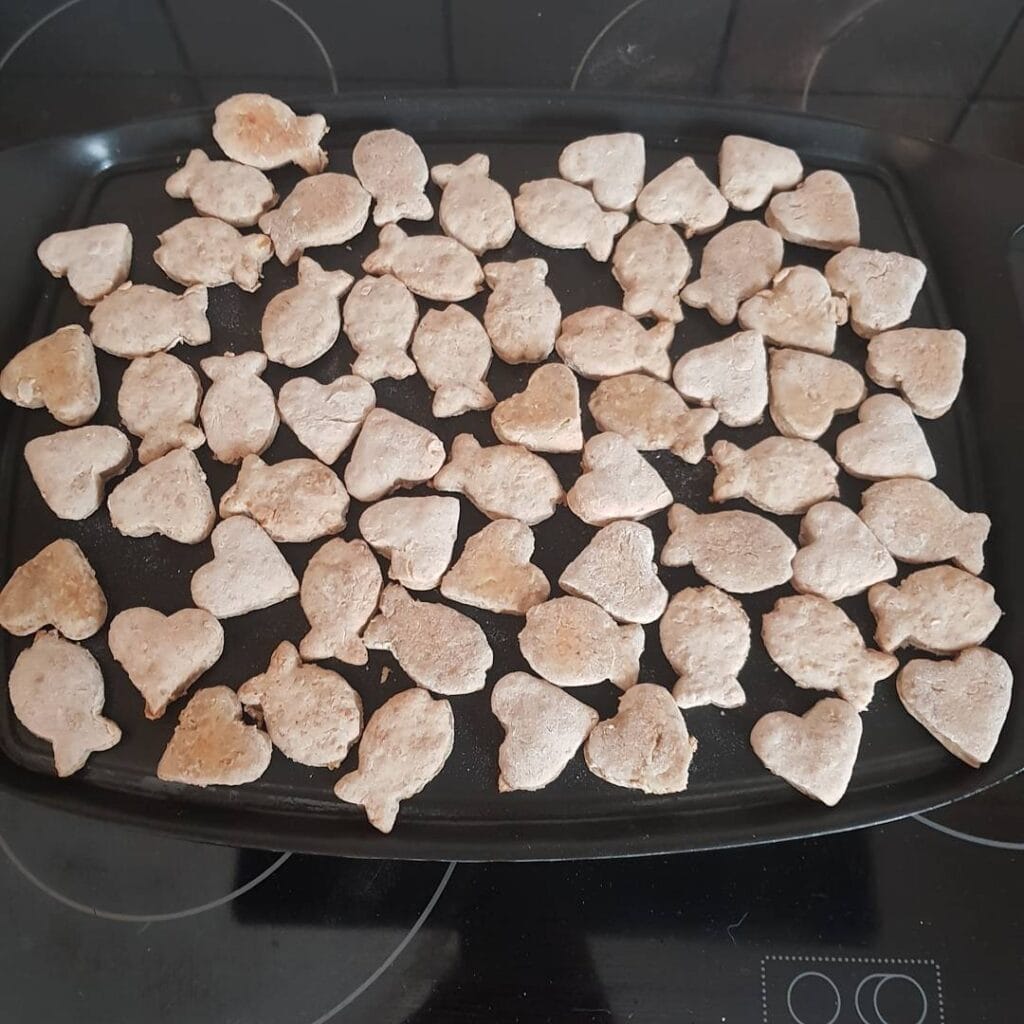
These tiny heart and fish shapes are so perfectly bite-sized that my Pug literally does backflips when she sees me grab the treat jar. I made a triple batch last Sunday and we went through them in four days flat.
Details:
- Ingredients: 2 cups whole wheat flour, ½ cup rolled oats (pulsed into flour), 1 egg, ⅓ cup unsweetened applesauce, 3 tbsp water
- Instructions: Preheat the oven to 350°F and line a large baking sheet with parchment paper. In a food processor, pulse oats until they become fine flour. In a large bowl, mix both flours together. In a separate bowl, whisk egg, applesauce, and water until smooth. Pour wet ingredients into dry, stirring until a firm dough forms—it should be playdough-like and not sticky. If too dry, add water 1 teaspoon at a time. Roll dough between two sheets of parchment to ⅛-inch thickness for training-sized treats. Use mini heart and fish cookie cutters (about 1 inch wide) to cut shapes. Place shapes ½ inch apart on prepared baking sheet—they won’t spread. Bake 20-25 minutes until edges are golden and treats feel firm. Cool completely on the pan before storing.
- Makes: About 100 mini treats
- Storage: Airtight container at room temperature for 3 weeks
Tiny portions SO YOU CAN reward frequently during training without overfeeding WHICH MEANS faster learning and better focus. The applesauce keeps them soft enough to break in half for even smaller rewards.
Actionable tip: Use mini cookie cutters in multiple shapes so you can differentiate between “high-value” rewards (fish) and “good job” rewards (hearts) during training sessions.
For more training-focused recipes, check out our homemade dog training treats guide with bite-sized options.
Recipe inspiration from Instagram: @lilypug_be
#15: Savory Veggie Crackers (Multi-Ingredient, Party-Worthy)
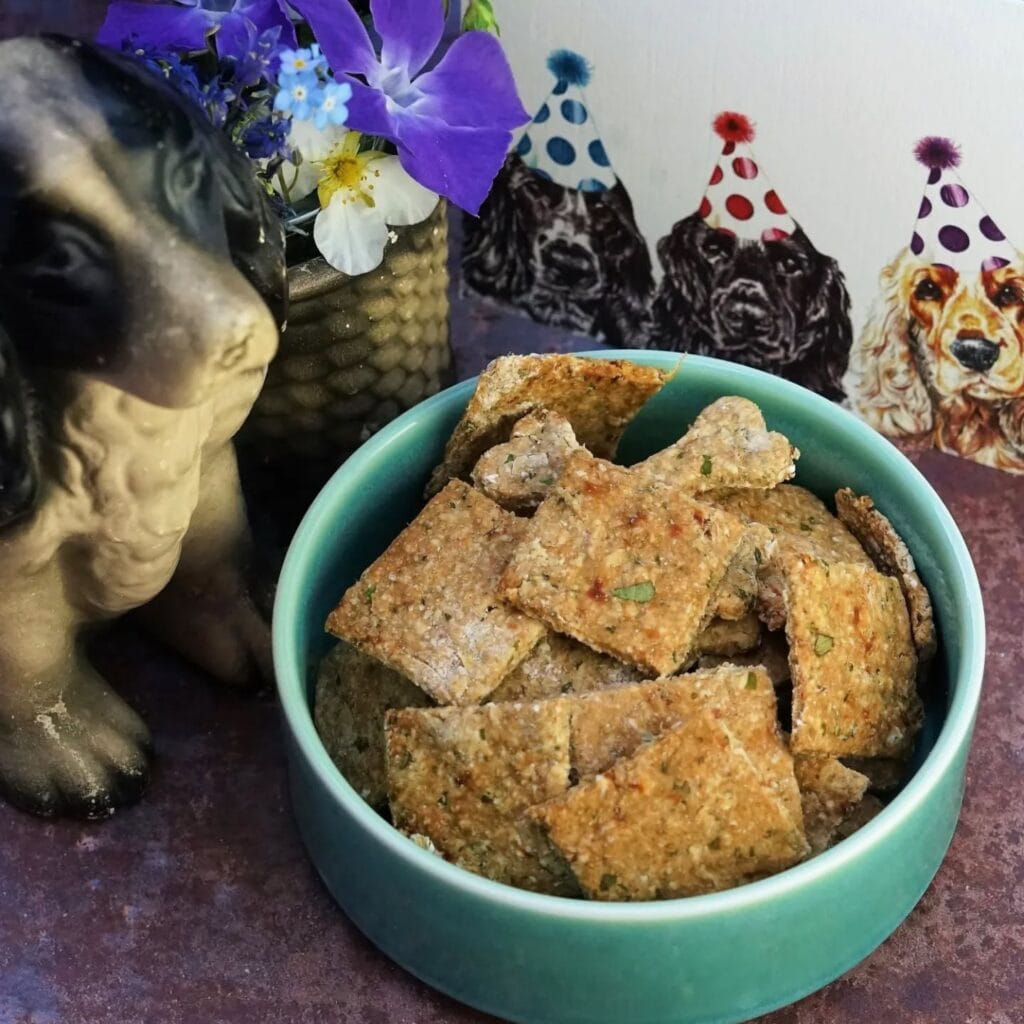
My Cocker Spaniel stared at these crackers in the teal bowl for a solid three minutes like she was trying to decode if they were actually for her. Spoiler: she inhaled five of them in under thirty seconds.
Details:
- Ingredients: 1½ cups whole wheat flour, ½ cup chickpea flour, ¼ cup nutritional yeast, 2 tbsp fresh parsley (minced), 1 tbsp dried basil, ½ tsp garlic powder (use sparingly), 1 egg, ⅓ cup olive oil, ¼ cup water
- Instructions: Preheat oven to 350°F and line two baking sheets with parchment paper. In a large bowl, whisk together both flours, nutritional yeast, parsley, basil, and garlic powder. In a separate bowl, beat egg with olive oil and water until well combined. Pour wet ingredients into dry, stirring until a crumbly dough forms. Knead with your hands for 1-2 minutes until dough holds together smoothly. Divide dough in half. Roll each half between two sheets of parchment to ⅛-inch thickness. Remove top parchment and use a pizza cutter or sharp knife to score dough into 1-inch squares or rectangles. Transfer bottom parchment with scored dough onto prepared baking sheets. Bake 25-30 minutes until edges are deeply golden and crackers feel crispy. Cool completely on the pan—they’ll harden further as they cool. Break apart along scored lines.
- Makes: About 70 crackers
- Storage: Airtight container at room temperature for 2 weeks
Nutritional yeast adds a cheesy, umami flavor SO YOU CAN satisfy picky eaters without dairy WHICH MEANS dogs with lactose intolerance can finally enjoy savory treats. The herbs provide natural antioxidants and breath-freshening benefits.
Display these in a stylish ceramic dog treat jar that doubles as kitchen decor on your countertop.
Actionable tip: Cut them into fun shapes using mini cookie cutters instead of squares for an extra aesthetic touch at dog birthday parties.
Want more savory recipes? Our homemade dog food seasoning guide shows which herbs boost flavor safely.
Recipe inspiration from Instagram: @moorlandseater
#16: Veggie-Loaded Savory Squares (Nutrient-Dense, Snap-in-Half)
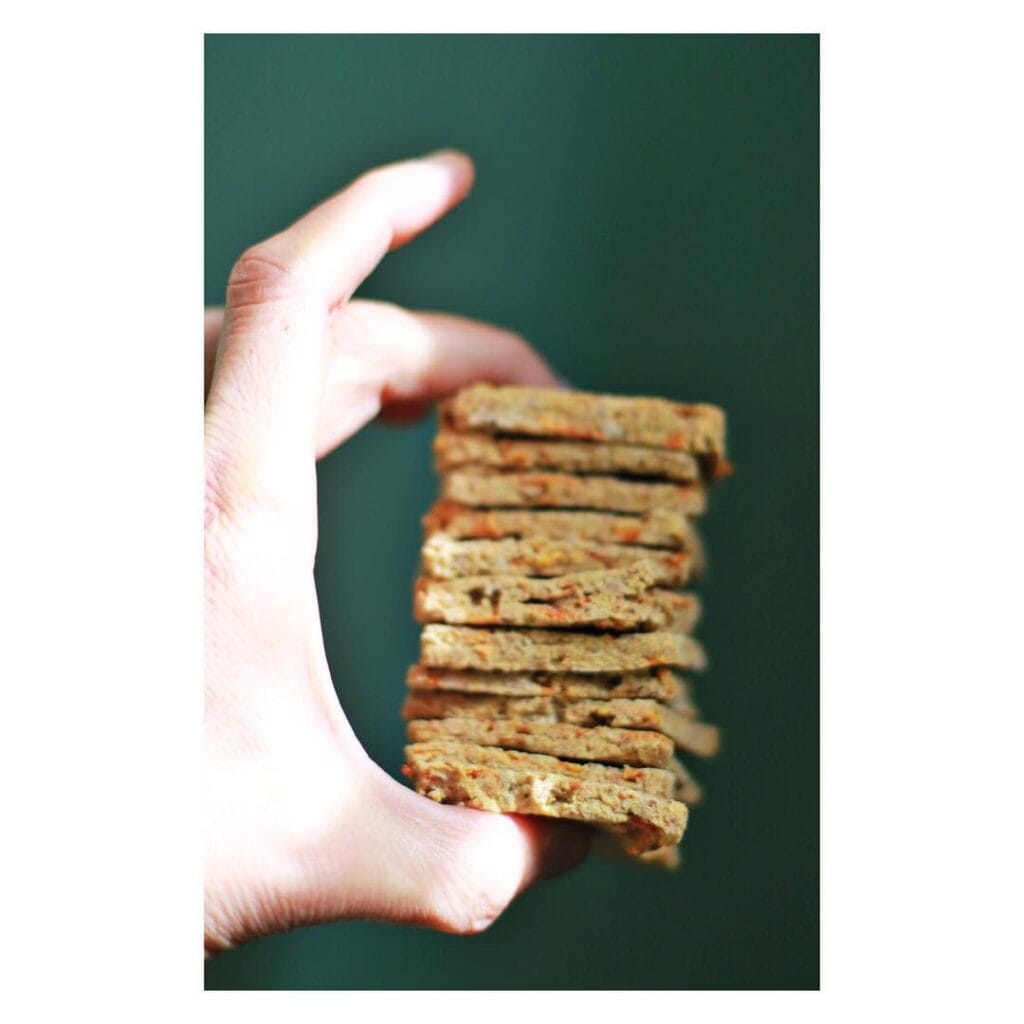
These veggie-packed squares stack so beautifully in my hand that I actually took fifteen photos before giving one to my Aussie. She didn’t appreciate the photoshoot delay, but Instagram sure did.
Details:
- Ingredients: 1½ cups whole wheat flour, ½ cup chickpea flour, ¼ cup finely grated carrots, ¼ cup finely chopped spinach (squeezed dry), 2 tbsp ground flaxseed, 1 egg, ⅓ cup olive oil, ¼ cup low-sodium vegetable broth
- Instructions: Preheat oven to 350°F and line a large baking sheet with parchment paper. In a large bowl, combine both flours and flaxseed. In a separate bowl, whisk egg with olive oil and vegetable broth until smooth. Squeeze the spinach in a clean kitchen towel to remove all excess moisture—this step is crucial or your dough will be too wet.
Add spinach and carrots to the wet ingredients, stirring to combine. Pour wet ingredients into dry, mixing until a firm dough forms that holds together when pressed. Divide dough in half. Roll each portion between two sheets of parchment to ⅛-inch thickness for extra-crispy crackers.
Remove top parchment and use a pizza cutter or sharp knife to score dough into 1½-inch squares. Transfer bottom parchment with scored dough onto the baking sheet. Bake 28-32 minutes until edges are deeply golden and crackers feel dry to the touch. Cool completely on the pan—they’ll become crunchier as they cool. Break apart along scored lines.
- Makes: About 50 squares
- Storage: Airtight container at room temperature for 2 weeks
Vegetables add fiber and vitamins SO YOU CAN sneak extra nutrients into treat time WHICH MEANS better overall health without your pup even knowing they’re eating their greens. Flaxseed provides omega-3s for coat health.
Actionable tip: These snap cleanly in half, making them perfect for portion control during training sessions—one square becomes two rewards.
For more veggie-forward recipes, explore our vegetable-based dog food guide with meal prep ideas.
Recipe inspiration from Instagram: @my_aim_is_thu
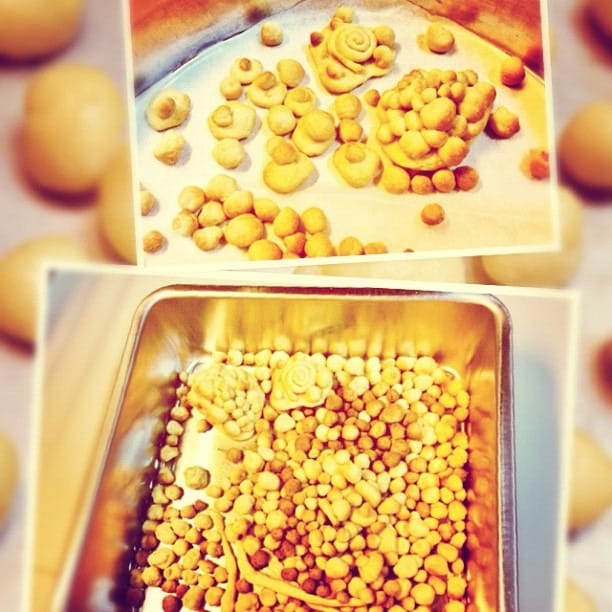
#17: Silicone Mold Extravaganza (Bones, Paws & Flowers)
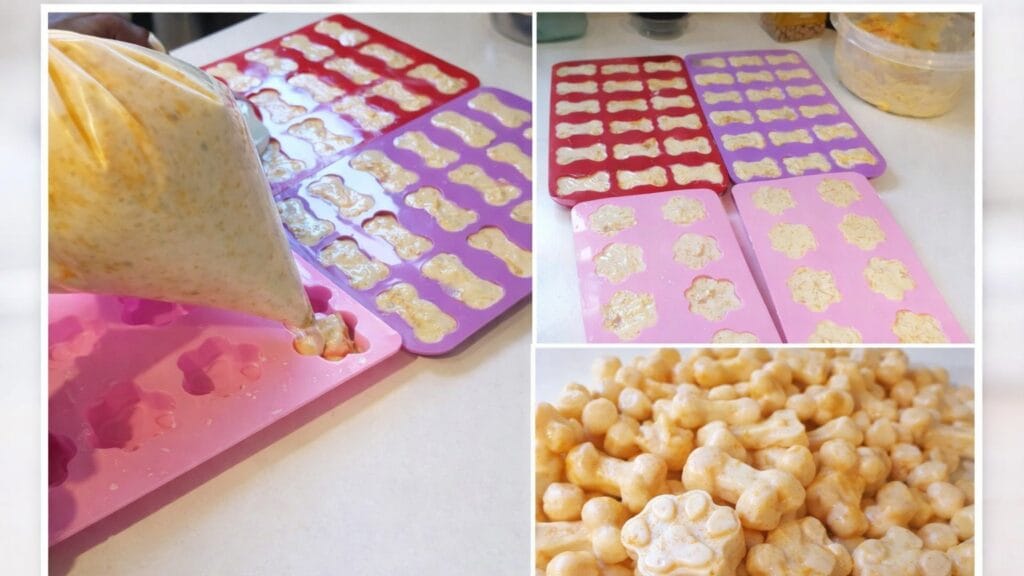
Last Sunday I filled every silicone mold I own—bones, paws, and flowers—and my entire kitchen counter looked like a Pinterest board came to life. My Goldendoodle didn’t care about the aesthetics, but my Instagram followers went wild.
Details:
- Ingredients: 2½ cups oat flour, ½ cup natural peanut butter, 1 egg, ⅓ cup water, 2 tbsp honey (optional)
- Instructions: Preheat the oven to 325°F. In a large bowl, mix oat flour and set aside. In a separate bowl, whisk together peanut butter, egg, water, and honey until smooth and creamy. Pour wet ingredients into flour, stirring until a thick, moldable dough forms—it should feel like playdough. If too dry, add water 1 teaspoon at a time; if too sticky, add more oat flour.
Take small portions of dough and press firmly into silicone molds, filling each cavity completely. Use the back of a spoon or your fingers to smooth the tops flush with the mold. Place filled molds on a baking sheet for stability. Bake for 22-25 minutes until the treats feel firm when touched. Let cool in molds for 10 minutes, then gently pop out by pushing from the bottom of each cavity. Transfer to a wire rack to cool completely.
- Makes: 40-50 treats depending on mold sizes
- Storage: Airtight container at room temperature for 3 weeks
Uniform shapes SO YOU CAN control portion sizes perfectly during training WHICH MEANS consistent calorie tracking for weight management goals. Plus, those adorable paw prints make gift-giving effortless.
Press dough into these colorful silicone molds for zero-stick releases every time. Package finished treats in clear treat bags tied with twine for gorgeous homemade gifts.
Actionable tip: Make a double batch and freeze half the dough—press it directly from frozen into molds for fresh-baked treats anytime.
Want more creative shaping ideas? Our DIY dog treat guide has mold recommendations and flavor twists.
Recipe inspiration from Instagram: @mydogrecipe
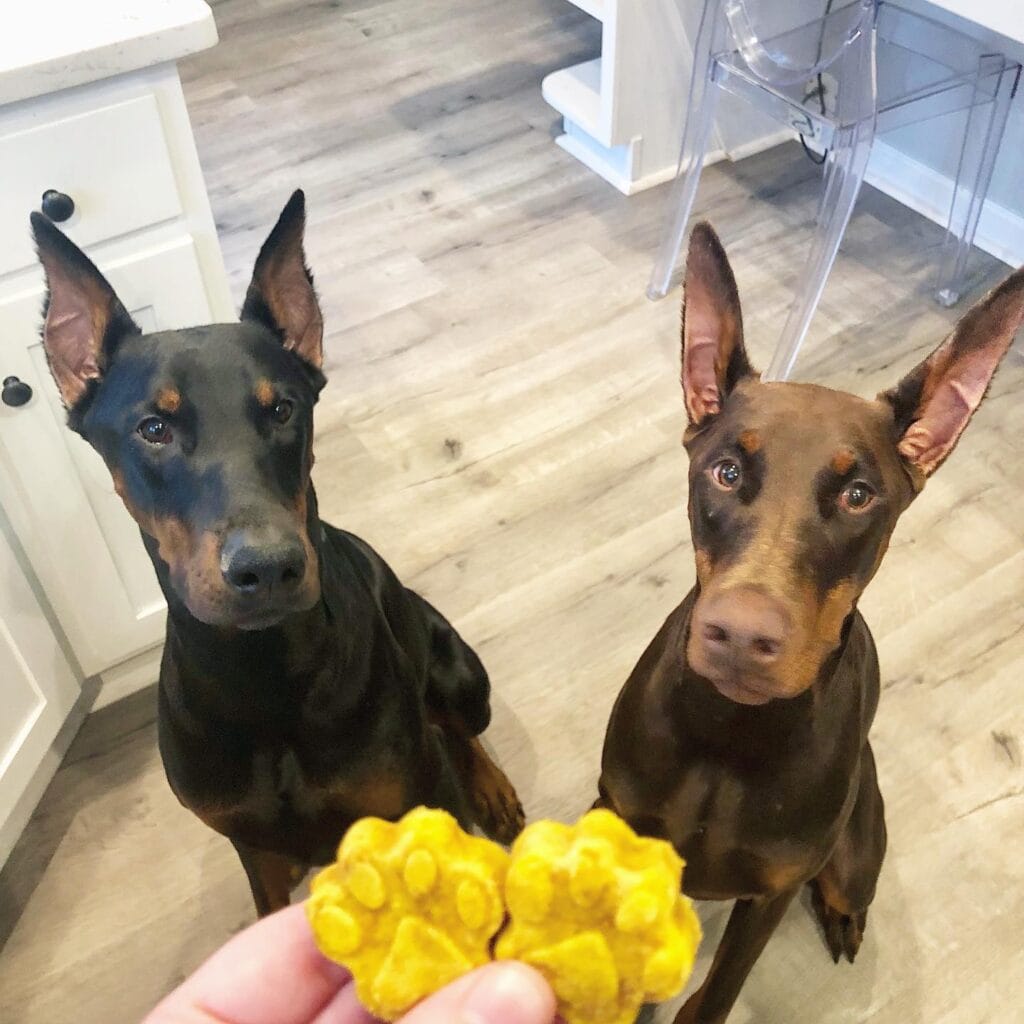
#18: Golden Turmeric Training Treats (Anti-Inflammatory Bites)

These golden-yellow treats stained my fingers for two days, but watching my senior Lab move more freely after a week of eating them made the temporary turmeric tattoos totally worth it.
Details:
- Ingredients: 2 cups whole wheat flour, 1 cup rolled oats (pulsed into flour), 2 tsp turmeric powder, ½ tsp black pepper, ¼ tsp cinnamon, 1 egg, ⅓ cup coconut oil (melted), ½ cup low-sodium chicken broth
- Instructions: Preheat the oven to 350°F and line two baking sheets with parchment paper. Pulse oats in a food processor until they resemble coarse flour. In a large bowl, whisk together both flours, turmeric, black pepper, and cinnamon. In a separate bowl, beat egg with melted coconut oil and broth until smooth.
Pour wet ingredients into dry, stirring until a firm, golden dough forms. If too crumbly, add broth 1 tablespoon at a time. Roll dough between two sheets of parchment to ¼-inch thickness. Use small bone or circle cookie cutters to cut shapes—these are training treats, so keep them thumbnail-sized. Place shapes ½ inch apart on prepared sheets. Bake 20-22 minutes until edges are golden and treats feel firm. Cool completely on wire racks.
- Makes: About 100 mini training treats
- Storage: Airtight container for 3 weeks, freezer for 4 months
Black pepper boosts turmeric absorption by 2000% SO YOU CAN maximize anti-inflammatory benefits for achy joints WHICH MEANS your senior dog stays active longer. The small size makes these perfect for rapid-fire training rewards.
Actionable tip: These will turn everything yellow—use a dedicated cutting board and wear gloves if you’re precious about your manicure.
Looking for more joint-supporting recipes? Our senior dog food guide has complete meal plans for aging pups.
Recipe inspiration from Instagram: @recesteele
#19: Oven-Baked Meat Trio for Meal Prep (Bulk Batch Dehydrating)
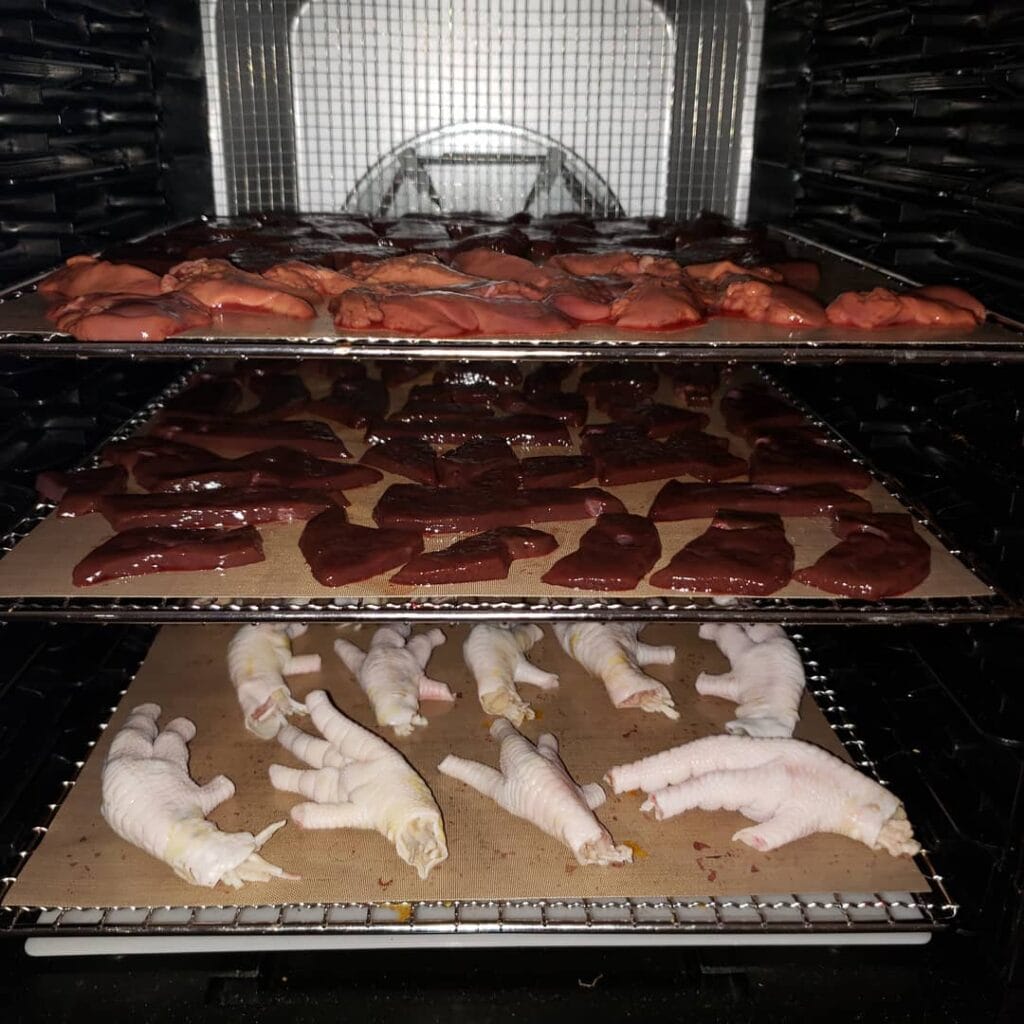
Sunday afternoon is my sacred meal-prep time. I loaded up my oven with three full trays of different meats, hit start, and six hours later had enough protein treats to last my two Springer Spaniels an entire month.
Details:
- Ingredients: 2 lbs chicken breast, 1.5 lbs beef liver, 1.5 lbs turkey tenderloin (all trimmed and patted dry)
- Instructions: Preheat oven to 200°F—low and slow is key for even dehydration. Line three baking sheets with parchment paper or silicone baking mats. Slice chicken and turkey into ¼-inch thick strips against the grain. Slice liver into ½-inch pieces (it shrinks more than muscle meat). Arrange each protein type on separate trays in a single layer without touching—air circulation prevents steaming.
Place chicken on the top rack, liver in the middle, turkey on the bottom. Bake for 4-6 hours, checking every hour after the 4-hour mark. Rotate trays halfway through for even drying. Chicken and turkey are done when they feel leathery and bend without breaking; liver should be crispy-dry. Remove each tray as it finishes—liver typically finishes first around 4 hours, poultry takes 5-6 hours. Cool completely on the trays before storing.
- Yield: About 6 cups total mixed jerky strips
- Storage: Separate airtight containers in fridge for 2 weeks, or freeze for 6 months
Bulk batch cooking SO YOU CAN save hours every week on treat prep WHICH MEANS more time for actual dog park visits instead of kitchen duty. Having variety on hand prevents boredom during training sessions.
Real talk: Some weeks you won’t have 6 hours for meal prep. I keep JustFoodForDogs’ frozen meals as my backup plan—just thaw and serve. No shame in the convenience game when life gets crazy. Their new JustFresh shelf-stable pouches don’t even need freezer space.
Actionable tip: Label each container with the protein type and date—after dehydrating, they all look surprisingly similar and you’ll forget which is which.
For complete meal prep strategies, check our weekly dog food prep guide with time-saving batch cooking tips.
Recipe inspiration from Instagram: @springerbros_moose_sprocket
Pin Your Favorite Recipe
Which of these 19 homemade dog treat recipes are you baking first this weekend? Save this post to your Pinterest board so you can find it during your next kitchen session—your pup will thank you with tail wags and sloppy kisses.
Every recipe here proves that healthy, gorgeous treats don’t require a culinary degree or a specialty kitchen. Just real ingredients, a little time, and the kind of love that makes your dog’s eyes light up when you walk toward the treat jar.
Which recipe caught your eye? Drop a comment below and let me know if you’re Team Sweet Potato Chips or Team Peanut Butter Hearts—I’m always curious which flavors your pups go crazy for!

Amr Mohsen is a software engineer who traded his keyboard for a leash — at least on weekends. His love for dogs inspired him to share what he learns as a dog owner and enthusiast, bringing a detail-oriented, research-driven perspective to every article he writes. If it’s about dogs, he’s probably already looked it up twice.