Okay so hear me out — you love your golden, your home looks like a Pinterest board came to life, and somehow you still end up surrounded by cat stuff that looks like it belongs in a dollar store bargain bin.
Your cat deserves better. And honestly? So does your living room.
I had this moment last fall where my cat, Luna, knocked her sad plastic bowl off the counter for the third time that week. I stood there looking at it and thought — why am I not just making something better?
That’s when the cat DIY crafts obsession started for me, and girl, I never looked back.
Here’s the trick: the right projects pull double duty. They keep your cat happy and keep your home looking like you actually tried.
These 7 cat DIY crafts are exactly that — cute, doable, and they actually belong in a home you’re proud of.
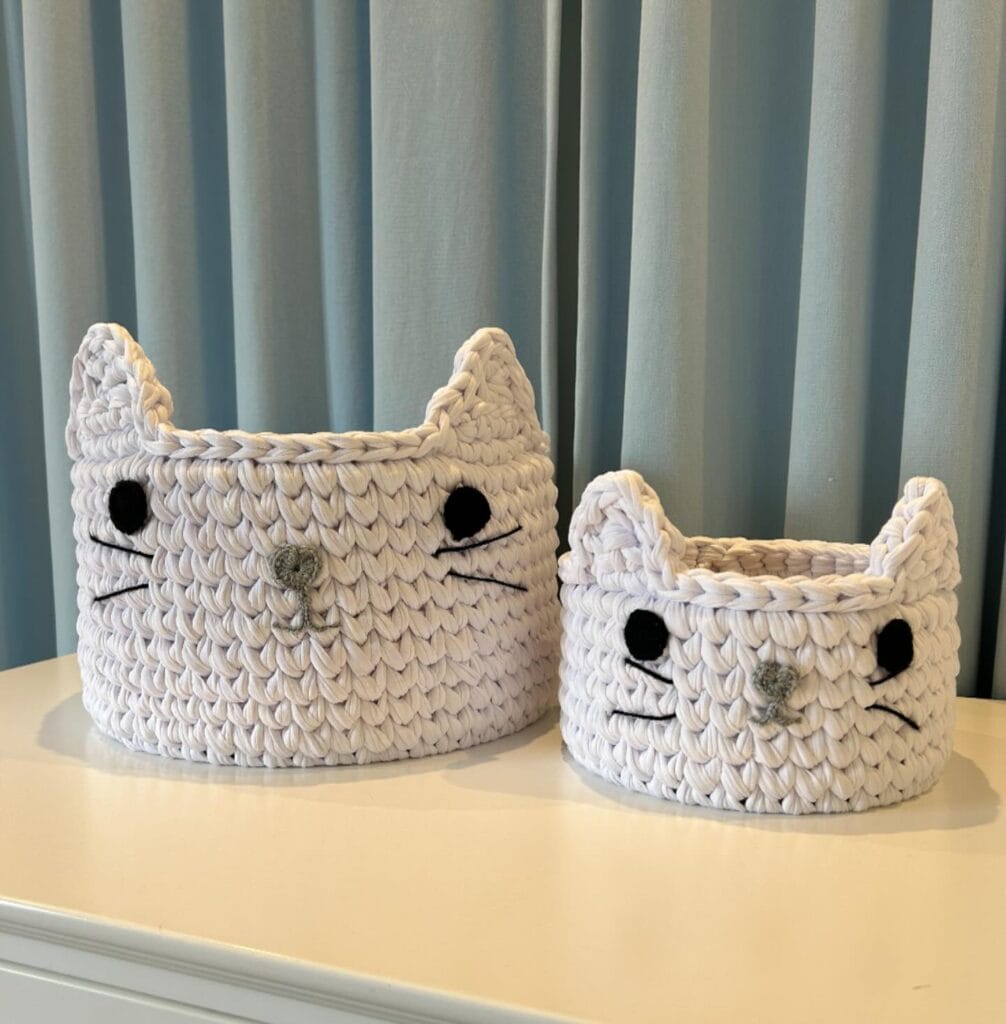
#1: Crochet Cat Baskets (The Cutest Storage You’ll Actually Use)
Okay, you know that moment when you’re trying to find a spot for Bella’s tennis balls, her leash, that random rope toy she’s obsessed with — and everything just ends up in a pile on your entryway table? That chaos. That’s what we’re solving today.
These chunky knit cat-face baskets are everything. Made from cotton t-shirt yarn in a soft light gray/white colorway, they’re crocheted into a round basket shape with pointed cat ears at the rim and an embroidered face featuring black felt eyes, a small gray pom-pom nose, and stitched whiskers. And they come as a matching set — a large and small basket — so you can actually organize by size.
Materials & Tools:
– T-shirt yarn (cotton, approx. 200g for large / 100g for small)
– Size 10mm crochet hook
– Black felt (for eyes)
– Gray pom-pom (for nose)
– Black embroidery thread + needle (for whiskers/mouth)
– Scissors, stitch markers
Instructions
Start with a magic ring, then single crochet 6 stitches into the ring and pull tight. Round 2: increase every stitch — 12 stitches total. Continue increasing every other stitch each round until your base measures roughly 8 inches diameter for the large basket (5 inches for small). Switch to straight single crochet rows (no increases) to build the walls up — aim for 5–6 inches tall for the large, 3–4 inches for the small.
Here’s where it gets fun. For the ears, work two small triangles directly onto the rim — pick up stitches at your desired ear position and decrease every row until you have a sharp point. The t-shirt yarn holds its shape, so the ears stand up on their own without any stuffing.
Once you finish the body, hand-stitch your black felt circles for eyes. Hot-glue or sew your gray pom-pom centered just below. Use black embroidery thread to stitch two short diagonal lines for whiskers on each side, and a small curved line underneath for the mouth. Keep your tension loose — it mimics a relaxed, sleepy cat face.
T-shirt yarn crochets tight and firm, which means the basket holds its structure even when Bella drops a slobbery rope toy inside — wipe it clean with a damp cloth and it’s good as new.
Prep Time: 10 min | Active Project Time: 4–6 hours per basket | Difficulty Level: Intermediate
The two-basket set gives you built-in organization — keep the large one by the door for dog gear and the small one on your nightstand for remotes and hair ties. Pure Pinterest gold without sacrificing function.
If you already love making things for your pets, 7 Durable DIY Cat Scratcher Ideas Saving Furniture is worth a look for your next weekend project.
Block your finished baskets lightly with a damp towel and let them air dry flat — this keeps the base from curling up at the edges over time.
📸 Photo credit: Instagram @crochet_by_fk
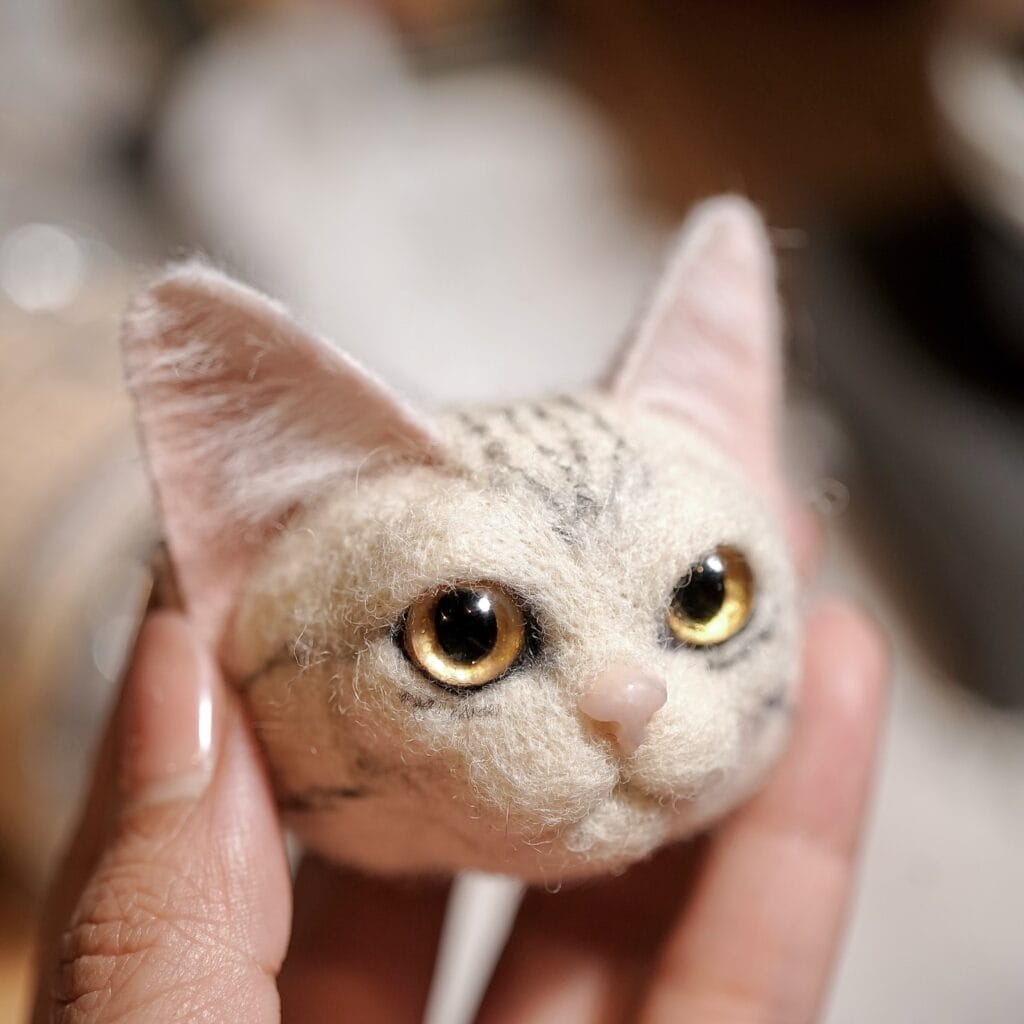
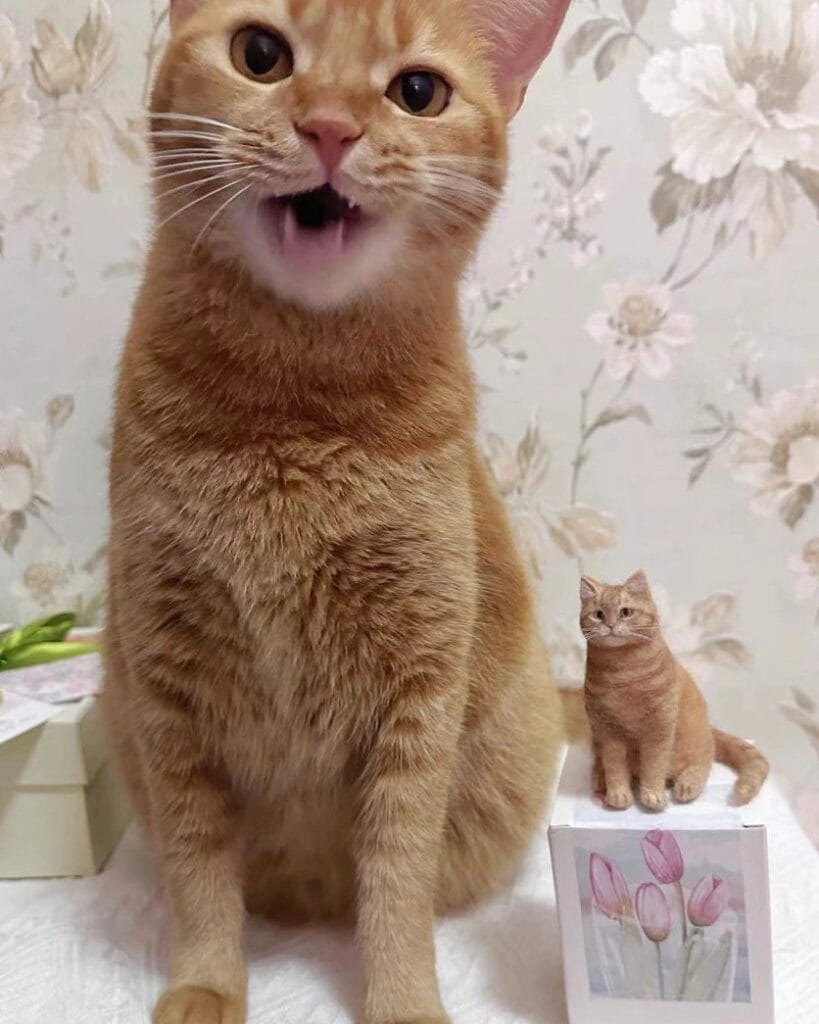
#2: Needle Felted Miniature Cat Portrait (A Tiny Twin For Your Tabby)
Okay, so you know how you have that one photo of your dog that’s just perfect — the lighting, the pose, everything? Now picture that, but as a little sculpture sitting on your bookshelf. That’s exactly what this is, and I’m genuinely obsessed.
This project recreates your cat as a needle felted miniature figurine, roughly 2-3 inches tall, sitting in a classic upright pose. The one in the photo is a dead ringer for that orange tabby — same striped coat, same little pink nose, same “I own this house” energy.
Materials & Tools:
– Merino wool roving in orange, cream, and brown (for tabby stripes)
– Felting needles (sizes 36 and 40)
– Foam felting pad
– Wire armature (for poseable legs)
– Black glass bead eyes (4mm)
– Small scissors and a reference photo of your cat
Instructions
Start by twisting your wire armature into a basic cat body shape — four legs, a torso, and a tail stub. Wrap it tight with a base layer of cream merino roving, then stab repeatedly with your size 36 needle to lock the fibers together. Build up volume in the belly and chest first before touching the head.
Roll a separate ball of wool for the head — slightly larger than you think you need. Felt it firm, then attach it to the body with extra roving and aggressive needle work at the neck joint. This connection point is where most beginners lose the shape, so take your time here.
Layer the orange roving over the cream base, using your size 40 needle for detail work. Pull thin wisps of darker brown wool and felt them in short strokes to mimic tabby stripes. The stripes on the back and forehead need the most attention — those are what make the portrait recognizable.
Press the glass bead eyes into the head while the wool is still workable, then felt around them to secure. Snip tiny triangles of pink wool for the inner ears and felt those in place. A few wisps of white roving around the muzzle area add that realistic depth.
The finished figurine sits on any surface without support, which means it looks incredible on a small gift box or a shelf vignette — exactly like in this photo.
Sealing with a fabric stiffener spray keeps the shape long-term and prevents shedding.
Prep Time: 15 min | Active Project Time: 3–4 hours | Difficulty Level: Intermediate
📸 Photo credit: Instagram @elijahhandcraf
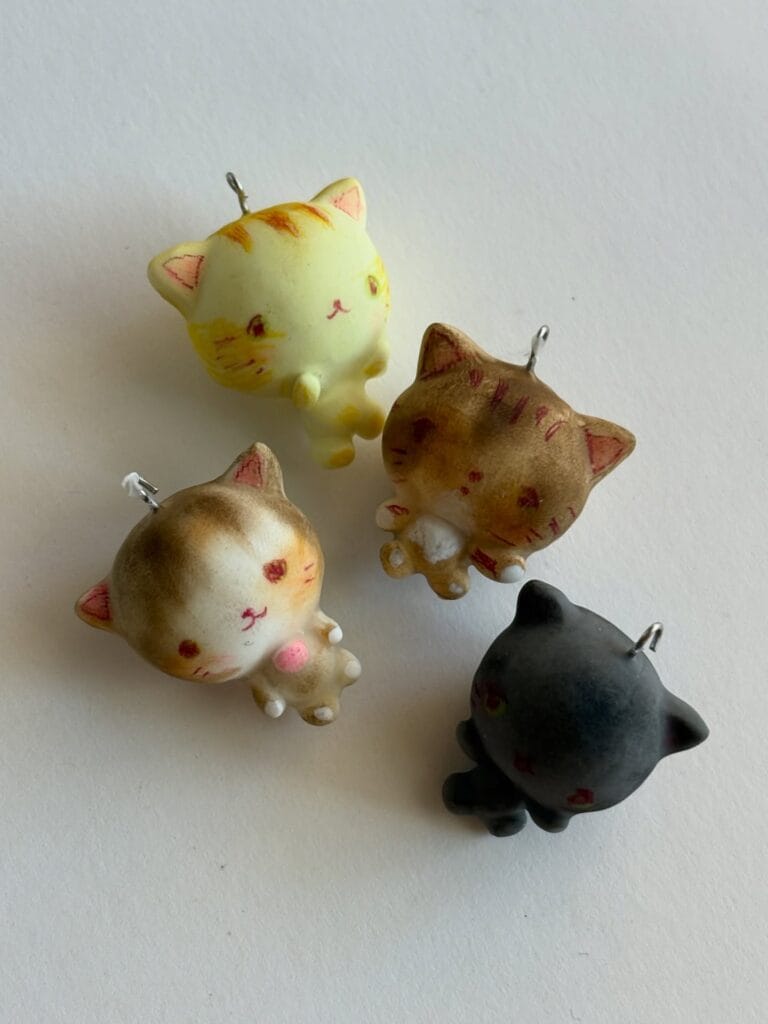
#3: DIY Clay Cat Charm Pendants (The Cutest Little Things I’ve Ever Made)
Okay so you know how you’ll spend like an hour on Pinterest saving “cute cat crafts” and then never actually do any of them? Yeah. I was that person — until I tried these tiny clay cat charms and honestly could not stop making them.
My cousin came over and immediately wanted four of them. Four.
Materials & Tools:
– Air-dry clay or polymer clay (white, yellow, brown, and black)
– Small metal jump rings (silver, approximately 8mm)
– Fine-tip red and pink paint markers
– Toothpick or clay sculpting tool
– Small round mold or your hands for shaping
– Sandpaper (220 grit) for smoothing
Prep Time: 20 min | Active Project Time: 1.5 hours | Difficulty Level: Beginner-Friendly
Instructions
Roll your clay into a round ball roughly the size of a large grape — that chunky, squished shape is what makes these so irresistible. Pinch two small triangle ears at the top. Press gently, don’t pull.
Use your toothpick to carve tiny paw details underneath. Push your jump ring into the top before the clay dries — this is the step people skip and then regret.
The red paint marker adds stripes and whisker marks after drying. Pink goes on the nose and inner ears. And because each color tells a different cat personality (the black one gives total mysterious vibes), making a set of four feels like collecting little characters.
Jump rings mean these pendants attach to keychains, necklaces, or bag clips — one craft, multiple uses, zero wasted effort.
Store finished charms away from direct sunlight so the colors stay sharp longer.
📸 Photo credit: Instagram @heymugi
#4: DIY Calico Cat Figurine With Daisy and Goldfish Base
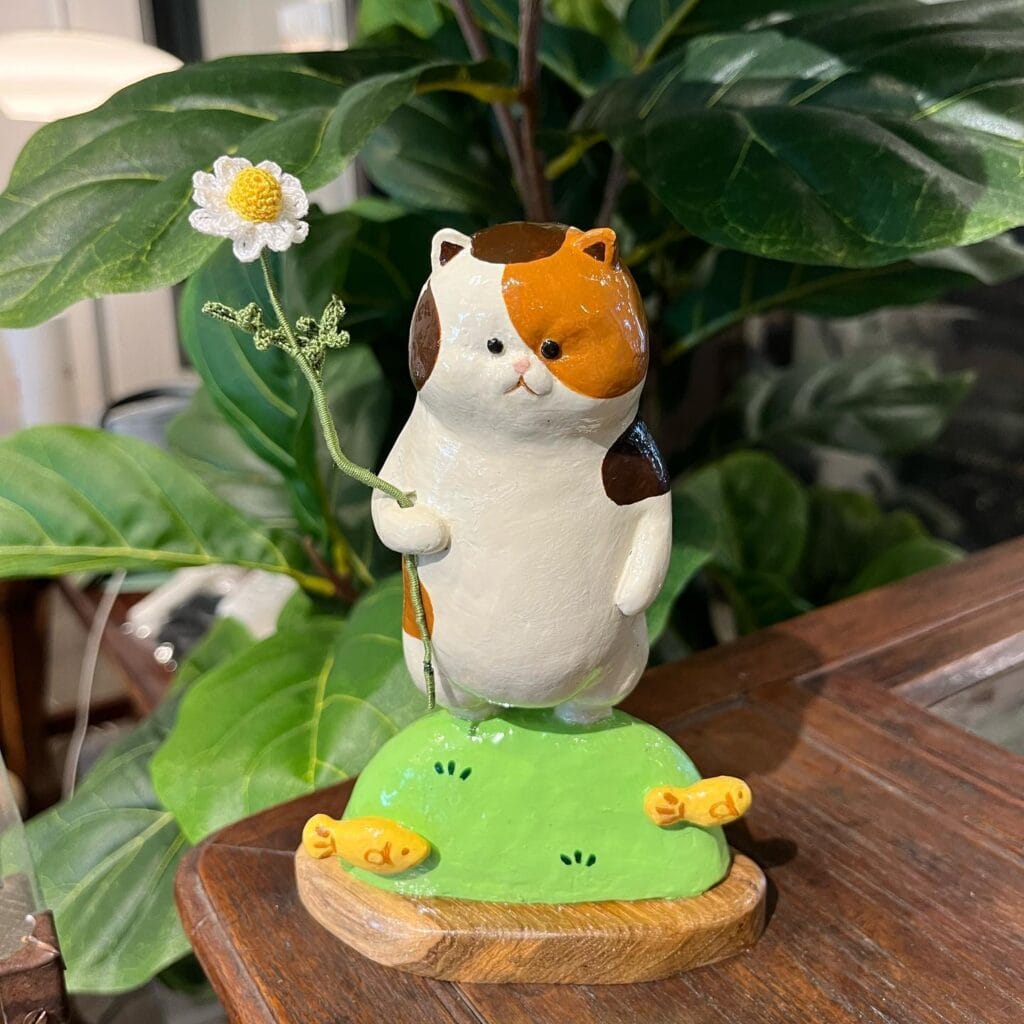
Okay so you know how your golden is always knocking over your little decor pieces on the coffee table? And you just keep buying new ones hoping one will survive? Girl, I feel that. My cousin’s lab destroyed three of my favorite shelf pieces in one afternoon. That’s exactly why I started making my own — heavier base, cuter design, and honestly? Way more satisfying.
This one is based on a calico resin cat figurine standing on a bright green painted base with two tiny yellow goldfish on the sides. The cat holds a crocheted daisy flower on a wrapped wire stem. It’s giving Pinterest board and craft project all in one.
Materials & Tools:
– Air-dry clay or two-part epoxy resin
– Acrylic paints: white, burnt orange, dark brown, green, yellow
– Thin floral wire (22-gauge)
– White, yellow, and green embroidery thread for the crocheted daisy
– Glossy resin sealer or Mod Podge Dimensional Magic
– Small wooden disc base (approx. 3–4 inches diameter)
– Fine detail brushes (size 0 and 00)
– Sandpaper (220 grit)
– Strong craft glue or E6000 adhesive
Prep Time: 30 minutes | Active Project Time: 3–4 hours + drying | Difficulty Level: Intermediate
Instructions
Start by sculpting your cat body from air-dry clay. Shape a round, chubby torso first — think wide belly, short stubby arms, and a flat bottom so it sits stable. The head goes on top with two small triangle ears. Press a shallow cup shape into the top of the head if you want it to double as a pen holder like the original.
Let the clay dry for 24 hours before you touch it again. Seriously, don’t rush this part — any bending at this stage cracks the whole piece later.
Once dry, sand the surface lightly with your 220-grit sandpaper to smooth out fingerprints. Then paint the base coat white across the entire body. After that dries, layer in the burnt orange patches across the top of the head and back, and add a dark brown patch on one side. These patches give it that classic calico look — uneven and natural, not perfectly symmetrical.
Paint the face details next: two tiny black eyes, a small pink nose triangle, and the faintest curved smile. The glossy sealer you apply at the end will make those details pop in a way that looks almost store-bought.
For the base, mix green acrylic paint with a tiny drop of yellow to get that fresh grass tone. Paint your wooden disc and top it with the green mound shape (a small flattened clay dome works great). Press two small clay fish shapes onto the sides, paint them yellow-orange, and add little dot eyes.
The crocheted daisy is the part people always ask about. Use a size 2.5mm crochet hook and white embroidery thread. Chain 4, slip stitch to form a ring, then single crochet 12 petals around the center. Stuff the yellow center with a tight French knot cluster using yellow thread. Attach it to your 22-gauge wire stem, wrap the stem in green thread, and bend the base into a small loop that the cat’s clay hand can grip.
The wire stem feature keeps the flower separate from the figurine — so if your golden does knock it over, the daisy detaches instead of shattering the whole piece. That’s the payoff right there.
Seal everything with two coats of glossy resin sealer, letting each coat dry fully. Glue the cat to the green base using E6000 and hold it for 60 seconds. Done.
Keep your painted patches slightly overlapping at the edges instead of leaving a hard line — it makes the coloring look hand-painted and intentional, not patchy. And if your crocheted daisy feels floppy, a tiny drop of fabric stiffener on the petals fixes it in under a minute.
📸 Photo credit: Instagram @zomjeen_handmade
#5: Crochet Amigurumi Cat Plushies (The Cutest Handmade Gift Your Cat-Loving Friend Needs)
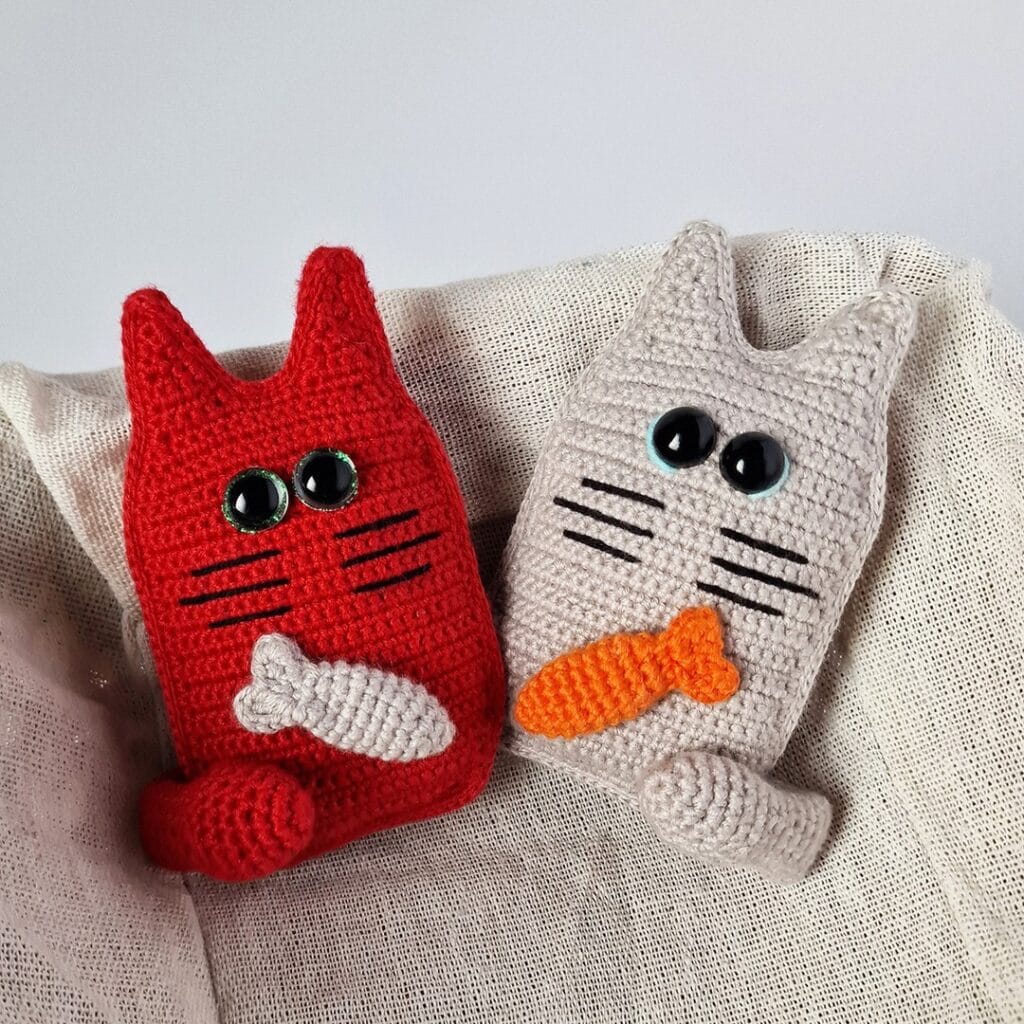
Okay so you know how your golden is always stealing stuffed animals off the couch and just… destroying them? I bought my niece this fancy plush toy once and it was gone in four minutes flat. That’s exactly why I started making my own — and honestly, these little crochet cats are too cute to give to a dog anyway. These are for you, babe.
Materials & Tools:
– Red and light gray worsted weight yarn (acrylic works best)
– Small amounts of white, orange, and beige yarn for the fish and bone accessories
– 12mm black safety eyes (2 per cat)
– Colored safety eye backings — green sparkle for the red cat, light blue for the gray cat
– Size 3.5mm crochet hook
– Polyfill stuffing
– Black embroidery floss and needle (for whiskers)
– Scissors and stitch markers
Prep Time: 30 min | Active Project Time: 4–6 hours | Difficulty Level: Intermediate
Instructions
Start with a magic ring and work 6 single crochets into the center — this creates the base of the body. Increase each round by 6 stitches until you hit a 24-stitch circumference, which gives you that chunky rectangular shape you’re seeing in the photo. My grandma taught me to always count out loud on increases. Seriously, don’t skip that.
Work straight (no increases) for about 12 rounds to build the body height. Before you close it up, attach your 12mm safety eyes roughly one-third down from the top of the body — the colored backings are what create that green or blue “iris” glow effect. Insert your stuffing now, before you forget and have to rip back three rows like I did my first time.
For the ears, crochet two small triangles in your main color using 3 rows of decreasing single crochets, starting with 6 stitches. Sew them directly to the top corners of the body — placement matters here, wider apart looks more cartoon-like and expressive.
The accessories are what make these irresistible. The bone (for the red cat) is two small circles connected by a short chain, all in beige yarn. The orange fish shape uses simple increases and decreases over 8 rows, with a small split tail. Both get sewn onto the front of the body, centered low, like the cats are proudly holding their little trophies.
Use black embroidery floss to stitch three short horizontal lines on each side of the face for whiskers. Keep your stitches tight and parallel — sloppy whiskers are the thing that’ll make this look homemade in a bad way.
These cats are about 4 inches tall when finished, which makes the safety eyes look proportionally huge and that’s exactly the point. Big eyes = maximum charm. That size also means they work as keychain charms, ornaments, or little shelf decor — feature-wise they’re small and portable, which means you can gift them without worrying about shipping, and that payoff is huge if you’re an Etsy seller or just a generous human.
Leave a long yarn tail when you finish each piece so seaming stays secure — weave it through at least 4–5 stitches in different directions before trimming.
📸 Photo credit: Instagram @amigurumitoday
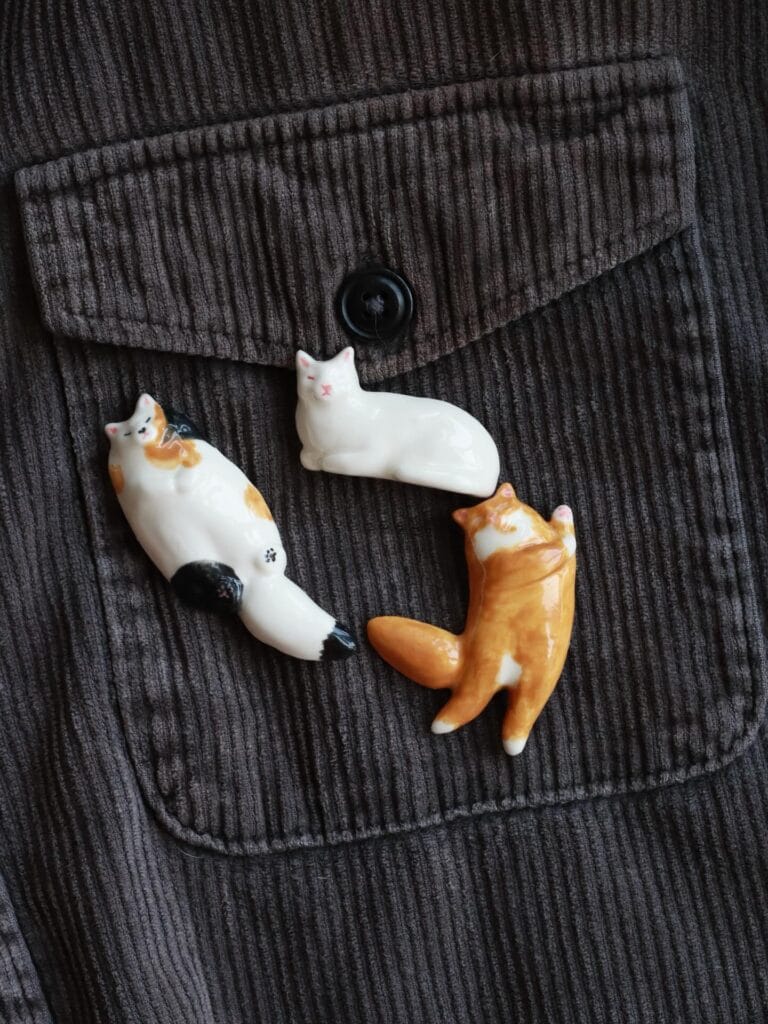
#6: DIY Ceramic-Style Cat Brooch Pins (And They Look Exactly Like Real Cats)
Okay so you know how you’re always pinning those aesthetic flat lays on Pinterest and thinking why does my life not look like this? Girl, I felt that. My cousin came over last month wearing the cutest little cat pin on her jacket and I literally stopped mid-sentence just staring at it.
These hand-painted polymer clay cat brooches are everything.
Materials & Tools You’ll Need:
– White, black, orange, and brown polymer clay (Sculpey III works great)
– Pin backs (at least 1 inch long)
– Fine-tip acrylic paint brushes (sizes 0 and 00)
– Acrylic paint in pink, black, white, and orange
– Strong adhesive glue (E6000 works best)
– Sandpaper (220 grit for smoothing edges)
– Oven (standard kitchen oven, 275°F)
– Parchment paper
– Clear gloss sealant spray
Instructions
Start by conditioning your clay until it’s warm and pliable — cold clay cracks, and nobody wants a broken cat mid-sculpt. Roll your base color into a smooth oval body shape, roughly 1.5 to 2 inches long. Think loaf. Think sleepy cat energy.
For the calico brooch (the one lounging on its back showing its little paw print belly), layer small black and orange patches directly onto the white base before baking. Press them gently so edges blend but colors stay distinct. That realistic patchy look? That’s the whole vibe.
Shape a small rounded head, tiny tucked paws, and a curved tail separately, then attach them before baking by scoring the connection points with a toothpick and pressing firmly.
For the all-white brooch, keep the shape simple — a tucked, resting position with the head slightly turned. The magic is all in the painting after baking. Use your size 00 brush to dot on the pink nose, faint closed eyes, and those little whisker dots.
The orange tabby brooch facing away? Sculpt the back haunches first, then attach the tail curving outward. Bake everything on parchment at 275°F for 30 minutes.
Once cooled, paint all fine details with acrylics. Seal with two coats of gloss sealant — this protects the paint and gives that polished ceramic look you see in the photo. Glue your pin backs on after the sealant fully dries (wait a full hour).
Feature: the layered clay-and-paint technique. Benefit: you get that glossy, store-bought ceramic finish. Payoff: people will genuinely stop you to ask where you bought them.
And honestly? Make extras. These disappear fast when people see them.
Store finished brooches flat to protect the pin backs from bending. If your orange patches are blending too much into the white during sculpting, chill the piece in the freezer for 5 minutes — it firms right back up without cracking.
Prep Time: 20 minutes | Active Project Time: 1.5 hours | Difficulty Level: Intermediate
📸 Photo credit: Instagram @faunaclay
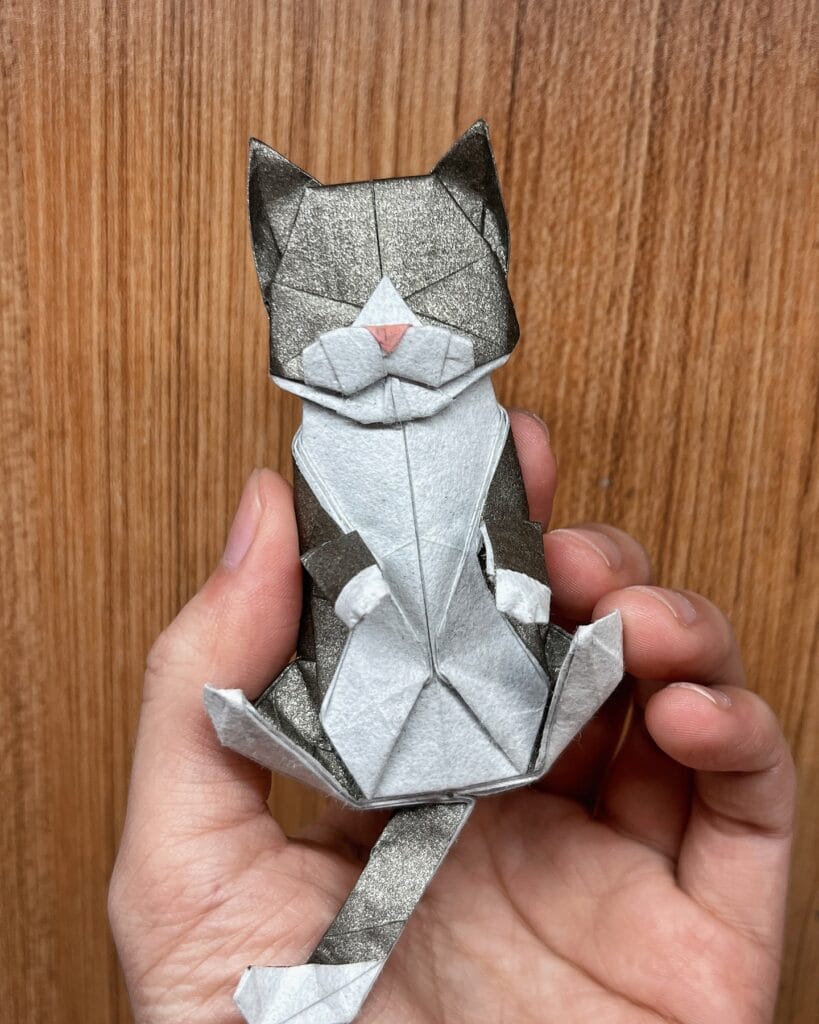
#7: Fold Your Own Origami Cat — A Surprisingly Meditative DIY That Actually Looks Stunning
Okay, so I know you’re usually knee-deep in golden retriever fur and Pinterest mood boards — but hear me out. This one’s so worth a Sunday afternoon.
I tried origami for the first time last winter when my cousin brought over this tiny folded paper fox, and I genuinely couldn’t stop thinking about it. There’s something about creating a whole creature with just your hands and one flat sheet that feels almost like magic.
This origami cat is folded from a single sheet of two-toned washi paper — dark charcoal metallic on one side, soft white on the other — which is exactly what creates that tuxedo cat effect you see here. The pink nose? That’s a tiny hand-drawn detail added with a fine-tip red marker after folding. Chef’s kiss.
Materials & Tools:
– One 15×15 cm sheet of two-toned metallic washi paper (dark gray/white)
– Fine-tip red or pink marker
– Bone folder tool
– Flat, clean work surface
Instructions
Start with the white side facing up. Fold your square diagonally both ways, then fold all four corners to the center point — this creates your base kite shape. Fold the top two corners down at an angle to form the ears, pulling them slightly outward for that alert, perky cat ear shape. Flip the paper over and fold the bottom third upward to shape the body. Now work the front — fold the lower sides inward to suggest front paws, tucking the edges cleanly underneath. The tail gets pulled from the back layer and shaped into a gentle curve extending forward. The two-sided paper does all the color work for you — the dark side wraps the back and sides naturally while the white front creates the chest. Add your pink nose dot last, once everything is locked in place.
Prep Time: 5 min | Active Project Time: 30–45 min | Difficulty: Intermediate
The washi paper’s slight texture gives you grip during tricky folds — meaning fewer slips and cleaner crease lines, so your finished cat actually holds its shape instead of flopping.
Spray a light mist of clear matte fixative over your finished piece to stiffen it and keep those folds crisp for months.
📸 Photo credit: Instagram @guitar_chiang
The One Mistake That Ruins Most Cat DIY Projects (And How to Skip It)
Okay, real talk — most people grab sisal rope for their cat scratching posts and wrap it tight with even spacing. Looks gorgeous on Pinterest. Fails within two weeks.
Here’s the pro secret nobody mentions: leave micro-gaps between each rope wrap.
Cats don’t just scratch — they hook and pull. That pulling motion catches the rope fibers. Without tiny gaps, the tension builds and the whole wrap unravels from one loose end, taking your whole project down fast.
Common mistake: buying rope that’s too thin. Go for 3/8 inch minimum. Anything thinner shreds before your cat even gets properly obsessed with it.
I learned this the hard way after my cousin’s cat destroyed a post I spent an entire Saturday building. The rope was beautiful, tight as a drum — gone in nine days.
One more thing — hot glue is your enemy on rope projects. Use staples on the anchor points instead. The hold is stronger and survives actual cat aggression, not just gentle batting.
Your Golden Deserves a Spot That Looks Good AND Survives Him
Pick one idea from this list and just start. Seriously, don’t overthink it. Even a painted crate with a simple cushion makes a huge difference in how your space feels.
The mud, the hair, the chaos — none of that has to mean ugly. Your home can still look Pinterest-worthy AND hold up to a 70-pound dog who thinks he’s a lap dog.
If you want to go deeper, 14 stylish DIY dog crate furniture ideas and creative dog crate topper ideas are worth a look.
So tell me — which idea is your golden getting first? 🐾

Amr Mohsen is a software engineer who traded his keyboard for a leash — at least on weekends. His love for dogs inspired him to share what he learns as a dog owner and enthusiast, bringing a detail-oriented, research-driven perspective to every article he writes. If it’s about dogs, he’s probably already looked it up twice.

