
Okay so hear me out — your cat has been staring out the window for like the third hour in a row, and you just know she wants outside. But you’re not about to let her roam free and come back with, I don’t know, a bird or something.
That was me last spring with my cat Juniper. She’d press her little nose against the glass and I felt genuinely guilty every single time.
And the thing is, you already put so much love into your home. Your space looks like a Pinterest board came to life. The last thing you want is some bulky, ugly cage situation ruining that vibe.
Here’s what actually works: a cat patio DIY that looks good and keeps her safe. These 7 ideas give your girl fresh air without the chaos — and honestly, they’re way cuter than you’d expect.
#1: DIY Enclosed Cat Pergola With Mesh Panels (The Pinterest-Worthy Outdoor Setup Your Cat Will Actually Use)
Okay so you know that feeling when your dog tracks mud across your new rug and you just stand there staring at it? That’s me every time my cat Naya escapes into the neighbor’s yard — pure panic, zero chill.
This enclosed pergola setup is what finally fixed that for me.
Materials & Tools You’ll Need:
– Aluminum pergola frame (dark charcoal/anthracite finish, approx. 10ft x 10ft)
– Galvanized welded wire mesh panels (1/2 inch grid, rust-resistant)
– Black powder-coated steel posts (4 corner posts)
– Cable ties or stainless steel clips for mesh attachment
– Drill, wire cutters, measuring tape, level
Prep Time: 2 hours | Active Project Time: 6–8 hours | Difficulty Level: Intermediate
Instructions
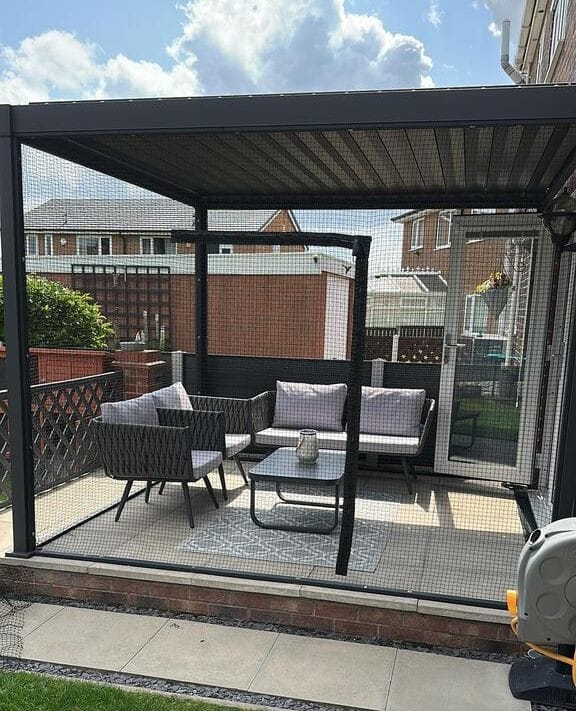
Start by assembling your pergola frame first — lay out all four aluminum posts and connect the overhead louvered roof panels. The louvered roof here is charcoal-colored and adjustable, which means your cat gets shade and you get rain protection without losing the open-sky feel.
Once the frame stands solid, cut your welded wire mesh panels to match each open side. The 1/2 inch grid keeps even sneaky cats inside while letting airflow through — enclosed structure, breathable environment, zero escape attempts.
And here’s where people mess up: they skip tensioning the mesh. Pull it taut before clipping. Loose mesh sags and creates gaps.
Attach panels using stainless steel clips every 6 inches along each post. Work from the bottom up so the mesh stays straight.
The louvered roof panels block direct rain, so your cat can stay outside even on cloudy days. That’s a real game-changer if you’ve got an indoor-outdoor cat like mine who refuses to come inside after 3pm.
Inside, this setup fits a full seating arrangement — think woven rope chairs with gray cushions and a small square coffee table centered on a geometric outdoor rug. Your cat roams freely while you actually sit outside without chasing her across three gardens.
If your cat is also destroying your furniture indoors, 7 Durable DIY Cat Scratcher Ideas Saving Furniture pairs so well with this project.
Keep the mesh seam where two panels meet behind a post — it looks cleaner and hides any minor gaps from sight lines.
📸 Photo credit: Instagram @catnetsusa
#2: How to Build a Full Enclosure Catio with a Cat Tree, Hammock & Tunnel (Step-by-Step)
Okay, so you know that moment when your golden is sprawled across your clean laundry, and you think “at least she has somewhere cozy to just… be”? That’s exactly what this catio build gave my neighbor’s two tabby cats. A whole little world of their own — and honestly, I was a little jealous.
Materials & Tools You’ll Need:
– Black knotted nylon netting (heavy-duty, 1.5-inch mesh)
– Square steel frame tubing — enough for a 6x6x6 ft cube structure
– Artificial turf mat (cut to fit the floor)
– Multi-level cat tree with sisal-wrapped posts and plush platforms
– Hanging mesh hammock (black, corner-mounted)
– Blue and yellow fabric play tunnel
– Stainless steel double feeding bowls on a low tray
– Open litter box (uncovered, placed in the far corner)
– Corner zip ties, carabiners, bungee cords, drill, zip screws
Prep Time: 2 hours | Active Project Time: 6–8 hours | Difficulty Level: Intermediate
Instructions
Start by building your steel frame first. Cut your square tubing into 6 ft lengths — you’ll need 12 pieces total — then bolt them into a cube shape using corner brackets. This frame carries everything, so make sure it’s level before you move on.
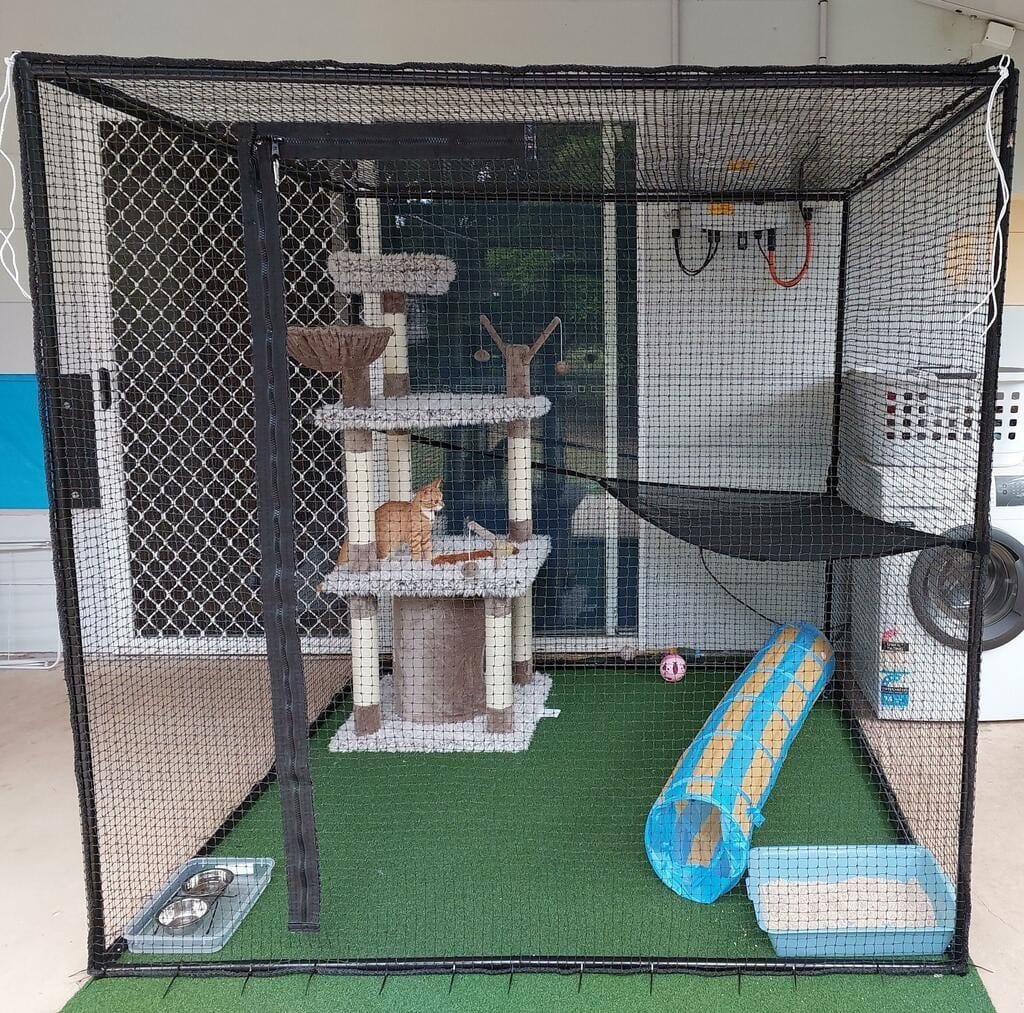
Once the frame stands solid, stretch your black knotted nylon netting over all four sides and the top. Pull it taut and zip-tie every 6 inches along each frame edge. The netting in this build creates a completely escape-proof barrier — that means your cat gets fresh air and a view without any chance of bolting into traffic.
Lay down your artificial turf mat across the entire floor. Cut it cleanly to the interior dimensions so there are no exposed edges. The turf gives traction and feels way more inviting than bare concrete — and it’s easy to hose down.
Position your multi-level cat tree slightly left of center, like you see in the photo. The three platforms at different heights let cats claim their own spot — and a cat tree with sisal posts means they’re scratching that, not your sofa cushions. And that payoff alone is worth the whole build.
Attach your black mesh hammock diagonally in the upper right corner using carabiners clipped to the frame. Keep it angled so a cat can slide in and really sink. If you love this hammock idea, 7 Relaxing DIY Cat Hammock Projects for Lounging has even more designs worth bookmarking.
Roll out your blue and yellow fabric tunnel on the right side of the floor. Set the double bowl tray near the front left corner and the litter box in the far right corner — opposite ends matter for hygiene and for keeping your cat comfortable eating near their bathroom.
Connect the catio to your home through an existing window or small cat flap cut into the netting. Reinforce that access point with a zippered panel — just like the one visible on the left side of this build — so you can get in for cleaning without dismantling anything.
Mounting the catio close to your laundry or utility area (like in this photo) actually makes cleaning simple. You’ve got hose access, a drain nearby, and the whole thing wipes down in minutes.
One thing to remember: anchor your frame to an exterior wall with two or three L-brackets. Wind gets under these enclosures faster than you’d expect, and the last thing you want is the whole structure shifting while your cat’s inside.
📸 Photo credit: Instagram @catnets
#3: Two-Story Chicken Wire Catio With Interior Ramp
My cousin built something like this last summer and honestly? I was shook. Because it looks exactly like something you’d pin on a Saturday morning with your coffee still hot.
Prep Time: 2 hours | Active Project Time: 6–8 hours | Difficulty Level: Intermediate
Materials & Tools:
– 2×4 lumber (pine or spruce)
– OSB board (for the floor platforms)
– Chicken wire / hex mesh (standard 1-inch hex)
– Staple gun with 1/2-inch staples
– Wood screws (2.5-inch and 1.5-inch)
– Circular saw, drill, measuring tape, safety gloves
Instructions
Cut your 2x4s into the main vertical posts first — you’ll need four at roughly 60 inches tall to give the upper level enough headroom.
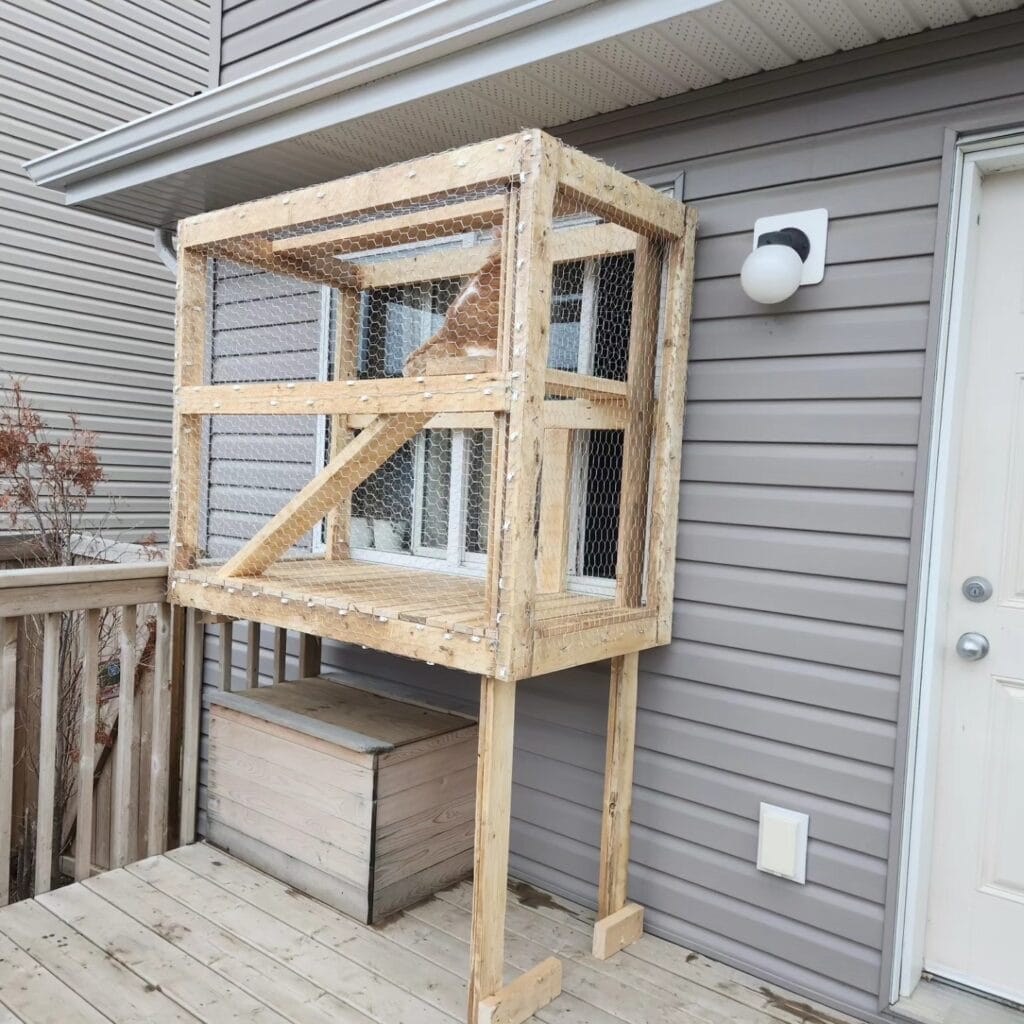
Build two separate rectangular frames using 2x4s: one for the upper enclosure and one for the lower open shelf. The lower shelf sits around 30 inches off the deck floor, giving your cat a launching point before reaching the top.
Sand every cut edge before assembling. Splinters are nobody’s friend.
Attach your OSB board floor panels to both levels. The lower level in the image uses slatted boards instead — that gap design lets rain drain right through, which means zero puddle buildup after a storm.
The interior ramp is the real feature here. Cut a 2×4 diagonal brace at roughly 45 degrees, then staple chicken wire across it so paws actually grip. Ramp access means your cat climbs independently — no lifted-in, no frustrated yowling at 6am.
Wrap all four sides and the top of the upper enclosure in chicken wire, pulling it taut before stapling every 2 inches along the frame. Loose wire sags and creates gaps.
Mount the finished structure against your house siding using L-brackets anchored into a stud. This catio in the image leans right against the wall — stable, compact, and it doesn’t eat up the whole deck.
If you’re in a colder climate and want to think ahead about winterizing a build like this, 7 Warm DIY Outdoor Cat Shelter Winter Designs has some seriously good insulation ideas worth bookmarking now.
The two-story layout means your cat gets vertical territory — which burns energy and keeps them mentally busy — so you get a calmer, happier cat by dinnertime. That’s the payoff.
Leave the lower shelf partially open on one side. It doubles as storage for a small covered litter box or a dry food bin, which is a detail most first-time catio builders skip and then regret.
📸 Photo credit: Instagram @jeffcott
#4: Build a Two-Story Catio Attached to Your House Window

My neighbor did this last summer and I literally could not stop staring at it every time I walked past her place. She took what looked like a boring side entrance and turned it into this gorgeous, tall wood-and-wire outdoor enclosure that connects right to her window. No more door-dashing escape attempts. No more “where is the cat” panic.
And honestly? If you’ve got a side door or a window with steps leading outside, you’ve got everything you need to start.
Materials & Tools:
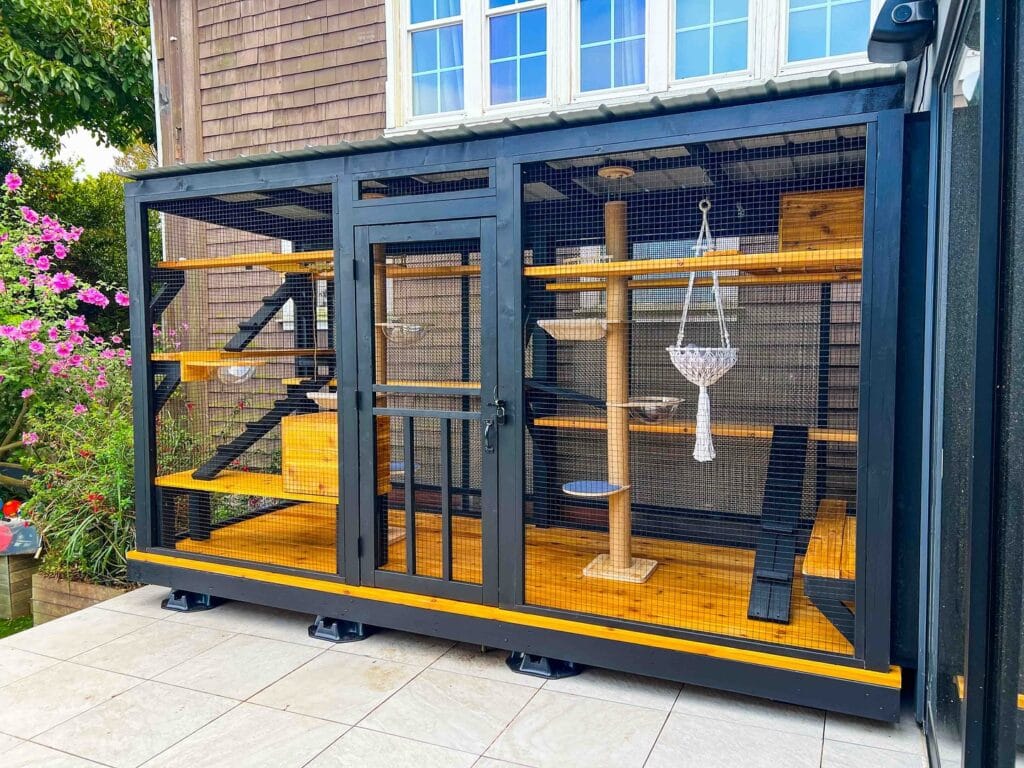
– Pressure-treated 2×4 lumber (orange-stained, like the image — cedar stain works beautifully)
– Hexagonal chicken wire mesh (standard 1-inch hex, galvanized)
– Heavy-duty staple gun + staples
– Gate hinges x2 and a barrel bolt latch
– Concrete screws for anchoring to steps
– Wood stain (warm cedar/orange tone)
– Circular saw, drill, measuring tape, level
Instructions
Start by measuring your window height — this build runs two full stories tall, so map out your frame in sections. Cut your 2x4s into vertical posts and horizontal crossbars for each level. Stain every piece before assembly so no raw wood shows through the wire later.
Stand your posts and anchor the base frames into your concrete steps using concrete screws — this keeps the whole structure from shifting when your cat jumps between levels. Attach the crossbars to create rectangular panels, then stretch your hexagonal chicken wire across each panel and staple it tight every 3 inches along the frame edge. Loose wire sags fast, so pull it firm before stapling.
Frame a door panel separately using the same 2x4s, attach it with heavy-duty hinges, and add your barrel bolt latch at mid-height. The door placement on the left side (like you see here) gives you easy access without disrupting the window connection.
Cut an opening in your window screen or leave the window cracked so your cat can move freely between indoors and the enclosure. Add wooden shelves inside at staggered heights — that vertical space, paired with the wire mesh, means your cat gets real climbing room, which burns energy and reduces indoor restlessness.
Seal all exterior wood joints with waterproof wood glue before the first rain hits.
⏱ Prep Time: 2 hours | Active Project Time: 6–8 hours | Difficulty Level: Intermediate
For more outdoor build inspiration, 7 Secure DIY Cat Enclosure Ideas for Outdoors has some really solid designs worth browsing before you finalize your layout.
The diagonal corner braces you see in the image aren’t just decorative — they prevent racking (that side-to-side wobble) when the structure gets tall. Add them at every corner junction for a build that stays square for years.
📸 Photo credit: Instagram @tc_custom_designs
#5: The Two-Section Catio With Built-In Levels Your Cat Will Actually Use
Okay, so you know how your golden just stares out the back door like she’s missing out on something huge? My cats do the exact same thing. And after months of watching them press their little noses against the glass, I finally built them this — a dual-section outdoor catio with black powder-coated steel framing and natural pine wood shelving throughout.
Materials & Tools You’ll Need:
– 2×4 pine lumber (shelves, platforms, floor base)
– Black welded wire mesh (1/2 inch grid, hardware cloth)
– Black-painted wood framing for the outer structure
– Adjustable plastic deck feet (leveling base)
– Corrugated metal roofing panels
– One center door with latch and hinges
– Natural sisal rope cat tree post (center column, floor-to-ceiling)
– Macramé hanging basket with stainless steel bowl insert
– Angled staircase ramp with black painted steps
– Small hammock-style bowls mounted to shelving
– Drill, screws, wire cutters, level, saw
Prep Time: 2–3 hours | Active Project Time: 2 full weekends | Difficulty Level: Intermediate
Instructions
Start by building your rectangular outer frame using pressure-treated 4×4 posts at each corner. This gives you the structural backbone everything else attaches to. Connect the top and bottom rails with 2×4 pine, then run your black welded wire mesh across all four sides and secure it with staple gun and washers.
Cut your pine shelving boards to span the width of each section. Mount them at staggered heights — roughly 12 inches apart vertically — so your cat can hop between levels without needing Olympic-level jumps. The left section gets the angled stair ramp running from floor to the top shelf, which means even older or lazier cats can reach the upper levels without struggling.
And the center column? That’s your floor-to-ceiling sisal post, set into a 12×12 inch pine base and screwed up into the ceiling frame. Cats can scratch it, climb it, and use it as their anchor point between the two sections.
Install your corrugated metal roof panels last, overlapping each sheet by at least 2 inches to keep rain out. The adjustable plastic feet under the base let you level the whole structure on uneven patio tile — no wobbling, no rocking.
Hang your macramé basket from a ceiling hook on the right side. Drop a stainless steel bowl inside it for feeding or treats. The suspended height keeps food off the ground, which reduces bugs and keeps things cleaner between visits.
The two-section layout with a latched center door means you can section off one side for a new cat introduction — exactly the kind of flexibility multi-cat households need, and the kind of thing you don’t think about until it’s too late.
If you love this kind of layered, enrichment-focused setup, 7 Active Indoor DIY Cat Playground Setups has some seriously wild ideas for bringing that same energy inside.
Paint your outer frame before attaching the mesh — you’ll thank yourself later when you’re not trying to cut in around hundreds of tiny wire squares.
📸 Photo credit: Instagram @thecattopia
#6: How to Build a Two-Story Catio With a Metal Roof (The One That’ll Make Your Neighbors Stop and Stare)
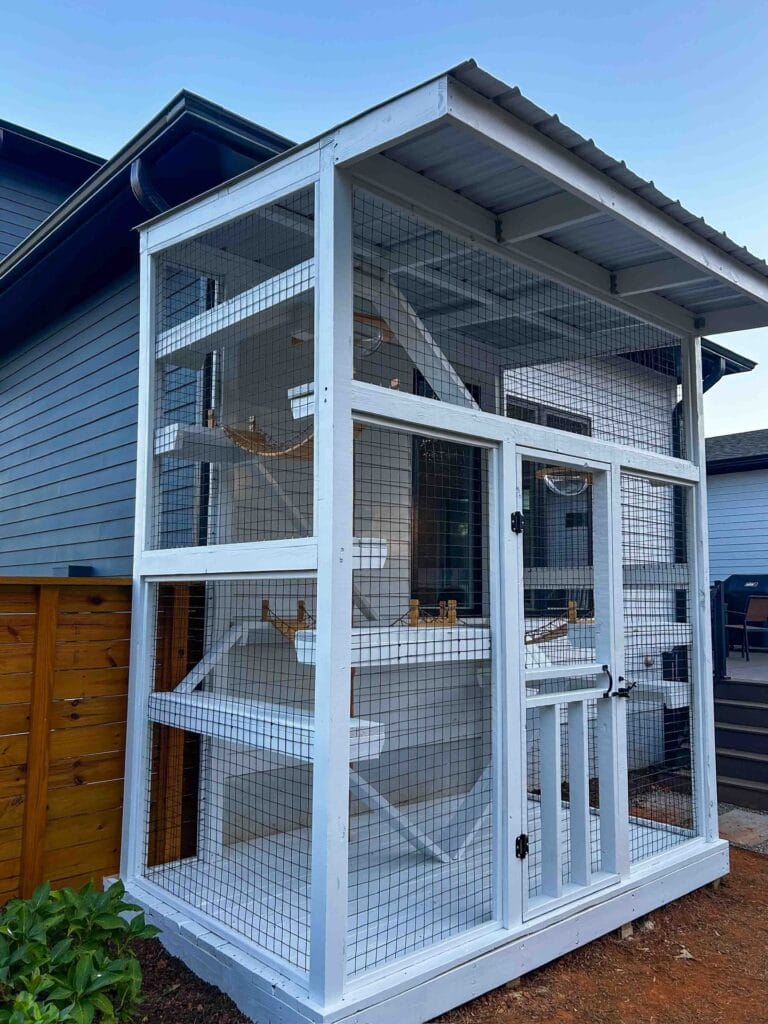
My cousin built something like this last summer and I literally stood in her backyard for twenty minutes just staring at it. Meanwhile your golden is probably pressed against the back door watching the neighbor’s cat lounge around like royalty — and honestly? That cat deserves a palace like this.
Materials & Tools You’ll Need:
– 2×4 white-painted lumber (frame construction)
– 1×6 cedar planks for interior shelving and ramps
– Hardware cloth/wire mesh (1/2 inch galvanized, black-coated)
– Corrugated metal roofing panels (silver/galvanized)
– Black hardware — hinges, door latches, hook-and-eye closures
– Wood screws (2.5 inch and 3 inch)
– Rope/sisal for hammock suspension
– Exterior white paint (weather-resistant latex)
– Circular saw, drill, staple gun, level, measuring tape
Instructions
Build your base frame first using 2×4 lumber, cutting a 6×4 foot rectangular footprint. Assemble four corner posts standing 7 feet tall — this height is what gives you that dramatic two-story feel you’re seeing in the photo.
Frame out your mid-level floor at 3.5 feet using 2×4 horizontal crossbars, then secure 1×6 cedar planks across them to create the interior platform. Cedar resists moisture and holds up through rain season without warping — that’s the feature that keeps this build looking crisp for years, not just months.
Staple your black-coated 1/2 inch hardware cloth to every open panel using a heavy-duty staple gun, pulling it taut before securing. Start from the bottom and work up so your seams stay tight and predator-proof.
The ramp you see inside? Cut a 1×8 board at a 35-degree angle between levels and nail small 1×1 wood dowel rungs across it every 6 inches for grip. And the rope hammock hanging in the upper section — just drill two anchor points into opposite corner posts and lace 3/4 inch sisal rope in a crisscross pattern.
Build your door frame into the front right panel using 2×2 lumber, then hang it with black gate hinges and secure it with a sliding bolt latch at both top and bottom.
Finish by screwing your corrugated metal panels across the roof frame, letting them overhang by 6 inches on the open front side for shade coverage.
Paint everything two coats of exterior white latex and let it cure for 48 hours before use.
Prep Time: 2 hours | Active Project Time: 12–16 hours | Difficulty Level: Intermediate
The overhang roof is everything — it keeps the interior dry during rain so your cat (or honestly, the neighborhood cat your golden has adopted) can stay outside longer without you worrying. If you love the idea of a fully enclosed outdoor run but need something sized for your dog instead, 17 Creative DIY Dog Run Ideas for Your Furry Friend has some seriously good builds worth bookmarking.
When you’re painting the wire mesh panels, use a foam roller instead of a brush — it gets into the grid gaps faster and gives you that clean, store-bought look without the brush marks.
📸 Photo credit: Instagram @thecattopia
#7: Build a Cedar Catio With Multi-Level Platforms Your Cat Will Never Want to Leave
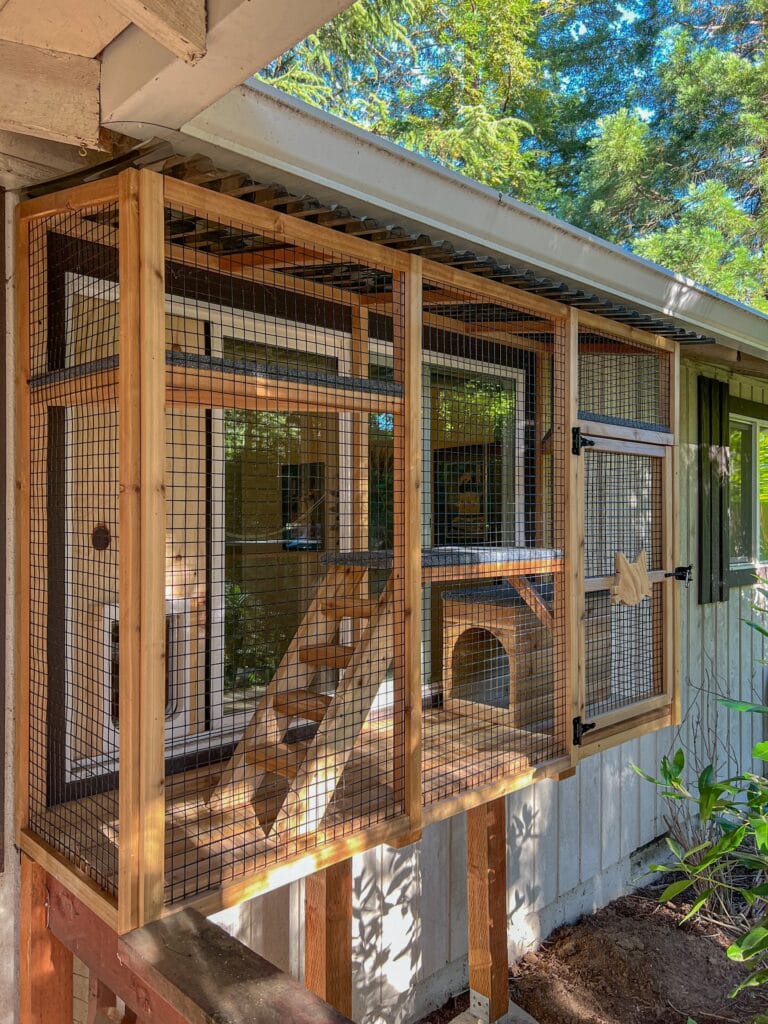
Okay, so you know that moment when your golden is finally napping and the house goes quiet — and you realize your cat has been staring out the window for three hours straight? Like, full-on hunting mode, tail twitching, watching squirrels live their best lives. That’s what this build is for.
This catio is built right against the house siding, which means your cat gets outdoor access without you cutting into your actual living space.
Materials & Tools:
– Cedar 2x4s and 4×4 posts (naturally weather-resistant)
– Black welded wire mesh (½-inch grid, 16-gauge)
– Corrugated metal roofing panels
– Galvanized hardware cloth staples
– Black gate latches and hinges (x2 door panels)
– Carpet-lined shelf boards for platforms
– Wooden cat arch tunnel (cut from ¾-inch plywood)
– Drill, circular saw, staple gun, level, measuring tape
Instructions
Start by measuring the wall section where your catio will attach — this build spans roughly 10 feet long by 3 feet deep and sits at window height so cats can walk straight through an existing window opening. Frame your base rectangle using cedar 2x4s, then add 4×4 corner posts anchored into the ground or deck surface below.
Once your frame stands, attach the corrugated metal roof panels across the top — they overhang the house roofline here, which keeps rain out without blocking light. Run your black welded wire mesh across every open panel face, pulling it taut before stapling. Loose mesh sags and creates escape gaps.
And this is where the interior gets good. Install two horizontal shelf platforms at staggered heights using carpet-lined boards — cats use the height variation for jumping and lounging. Drop in the arched plywood tunnel at floor level for hide-and-seek play. The staggered layout means your cat stays active, which keeps them mentally sharp and way less destructive inside your house.
Hang your two access doors with black latch hardware — one for the cat tunnel window entry, one for your cleaning access. Seal all frame joints with exterior wood glue before final mesh stapling.
Staining the cedar in a warm honey tone (visible in this build) protects the wood and looks gorgeous against white siding.
Prep Time: 2 hours | Active Project Time: 1.5–2 days | Difficulty Level: Intermediate
📸 Photo credit: Instagram @thecatiocompany
The One Structural Mistake That’ll Make Your Catio Collapse (And How to Skip It)
Okay, real talk — most DIY catio builders forget to account for wood expansion. I learned this the hard way when my neighbor built this gorgeous catio last spring, and by August, the whole frame had warped and the mesh panels were popping loose.
Here’s the pro secret: leave a ¼-inch gap between your wood panels when attaching mesh. Wood swells in humidity and heat. Skip that gap, and you’re basically building a slow-motion disaster.
Also, use hardware cloth instead of chicken wire. Chicken wire looks fine on Pinterest but it rusts fast and cats can push through the gaps. Hardware cloth holds shape, resists rust, and predators can’t claw through it.
Quick note: anchor your catio frame into concrete footings, not just soil — even for a small structure. Wind gets under these things, and one good storm will shift everything.
One more thing — attach your access door with a double-latch system. Your golden girl might not care, but curious cats are escape artists.
Your Dog’s Space Deserves This Glow-Up
Okay, so here’s the thing — your golden already runs this house. You might as well make his corner look as good as the rest of your feed.
Pick one idea from this list and just start. Seriously, that’s it. You don’t need a whole weekend project. Even a simple DIY dog crate with furniture-style finishes can make your living room feel intentional instead of “my dog kind of took over.”
Small change, big win: a cozy, Pinterest-worthy dog space means less chaos and more “wait, did you make that?” energy from every guest who walks in.
So — what’s your golden’s space looking like right now? 👀

Amr Mohsen is a software engineer who traded his keyboard for a leash — at least on weekends. His love for dogs inspired him to share what he learns as a dog owner and enthusiast, bringing a detail-oriented, research-driven perspective to every article he writes. If it’s about dogs, he’s probably already looked it up twice.

