Did you know about 50% of cat owners worry about how to hide that litter box? You’ve got a fuzzy little companion, and they’re adorable, but their bathroom habits can be a bit of an eyesore. Imagine transforming that litter box into part of your décor; it sounds impossible, right? Well, stick around because I’ve got seven clever ideas that’ll make your home stylish while giving your kitty the private space they deserve.
Clever Litter Box Designs
Ever wondered how to make your kitty’s litter box not just functional but also a part of your home’s decor?
You can express your creativity with some clever DIY cat litter box ideas hidden around your space. Try converting an old cabinet into a chic litter box haven. Cut out a small door on one side, add a cute mat inside, and voilà—your kitty has privacy!
Or, how about a stylish bench that doubles as a litter box? Just slide a hidden pan underneath. Trust me, your guests won’t even know it’s there.
And hey, if you’re feeling adventurous, you might even paint it to match your favorite room.
Boring litter boxes are so yesterday, right?
Our Collection
Let’s take a peek at our collection of creative litter box ideas that blend style and function.
You might find a stylish coffee table that doubles as a cozy hideaway for your cat, or a whimsical ottoman that’s just begging to be a part of your living room.
There are even vintage suitcases and hidden bookcases that keep the litter a secret—because who wants to see that mess, right?
1. Stylish Coffee Table Litter Box
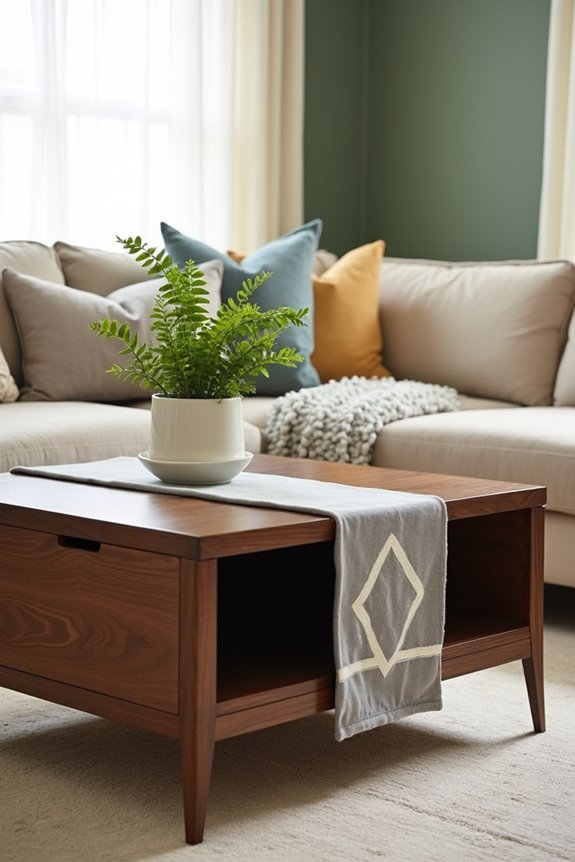
Are you tired of the unsightly litter box that ruins your home’s vibe? Say goodbye to that eyesore and hello to a stylish coffee table litter box.
This DIY project isn’t only functional but also chic. It cleverly conceals your cat’s space while enhancing your living room. Plus, by creating it yourself, you save some cash and make your home look more put together.
Materials Needed
- A sturdy wooden coffee table (you can find one at thrift stores)
- Sandpaper (medium and fine grit)
- Non-toxic wood stain or paint (in a color that suits your décor)
- A cat litter box (that fits inside)
- A variety of cat litter
- Basic tools (screwdriver, saw if adjusting the size)
- Hinges (two or more, depending on your design)
- Drill
- Measuring tape
Step-by-Step Instructions
- Choose Your Table: Start with a solid coffee table that’s the right size for your living space. Make certain there’s enough room for your cat’s litter box to fit comfortably inside.
- Prepare the Table: Remove any hardware from the table (like knobs, drawer pulls, etc.) and sand down rough areas. This guarantees a smooth finish for your stunning new creation—don’t want splinters when you’re channeling your inner decorator.
- Create an Entry Hole: Measure and mark where you want to cut an opening for your cat to enter. Aim for a spot that’s comfortably low for your feline friend. Use a saw to cut this out, going slowly—you want a neat hole, not a cat-sized disaster.
- Finish the Table: Optionally, stain or paint the table to match your decor. Use non-toxic products since you want this to be safe for your pet. Allow it to dry completely—patience is key here.
- Add Hinges: Attach hinges to the top or side of the table (depending on your design) so you can lift it to change the litter. It’s handy and keeps things from getting messy—it helps you avoid those awkward “litter chores” moments.
- Insert the Litter Box: Place the litter box inside the table, making sure it fits snugly. You want the box to be accessible but also hidden from view.
- Customize: Add a decorative element, like some faux plants on top or a beautiful table runner. Cats love hiding their stuff, and after all, who doesn’t appreciate some greenery?
Optional Add-ons/Variations
- Color It Up: Use bright paint or funky patterns to give your coffee table a unique flair. Who says you can’t have fun with a litter box?
- Cushioned Top: Add some padding on top of the coffee table for a comfy place to put your feet up—just make sure the design is durable enough to stand up to your pet’s antics.
Pro Tip
Always double-check that your paint or stain is non-toxic, especially around pets. You might think they’ll steer clear of wet paint, but the lure of curiosity is real.
Saving on litter is great, but not so much when you’re making trips to the vet because Fluffy decided to “test” that fresh coat.
2. Decorative Plant Stand Litter Box

Are you looking for a creative way to manage your cat’s litter while keeping your living area stylish and inviting? This DIY decorative plant stand litter box is the perfect solution. Not only does it cleverly camouflage your cat’s essentials, but it also brings a touch of nature indoors, making your home feel fresher and more vibrant.
Plus, it’s budget-friendly and guaranteed to impress your guests—who doesn’t love a multifunctional piece that stands out?
Materials Needed
- An unfinished wooden plant stand (you can find one at craft stores or online)
- Non-toxic wood stain or paint (to match your home décor)
- A cat litter box (make sure it fits the dimensions of the stand)
- A variety of cat litter
- Basic tools (screwdriver, saw if adjusting the size)
- Hinges (to create an opening for easy access)
- Drill
- Measuring tape
- Cute faux plants or real ones (to decorate the top)
Step-by-Step Instructions
- Select Your Plant Stand: Look for a sturdy, lightweight plant stand that has an open design to accommodate your cat’s litter box. It needs to be tall enough to keep your feline’s business out of sight while remaining reachable for you.
- Prepare the Stand: If necessary, sand any rough edges to guarantee a smooth finish. A well-polished surface is important because, let’s face it, no one wants to get splinters while dealing with cat duties.
- Create an Access Opening: Measure where the litter box will be placed and confirm you mark a spot for an entry hole for your cat. Use your saw to carefully cut out an opening that’s large enough for your kitty, but not so big that the litter spills out into your living space.
- Stain or Paint: Now is your opportunity to add a splash of color or a rustic finish. Apply non-toxic wood stain or paint sparingly, and let it dry completely. Remember, safety first—your pet will be near this.
- Attach Hinges: Secure the hinges on one side of the plant stand. This will allow you to lift the top easily for cleaning the litter box. Trust me, you’ll appreciate having easy access, especially during those “why is the house getting all stinky?” moments.
- Insert the Litter Box: Slide the litter box inside the stand. Make sure it fits snugly to prevent any unwelcome litter spills. This will be your cat’s little secret, cleverly concealed yet comfortable.
- Add Décor: Finally, embellish the top with faux plants or fresh greenery—perhaps something that your cat can’t chew on. Not only does it elevate the look, but it also adds life to your space. A lovely arrangement can make anyone forget there’s a litter box lurking below.
Optional Add-ons/Variations
- Paint It Bright: Don’t shy away from bright colors or fun patterns. This is your chance to put a personal stamp on the piece. Experiment with stencils or decals for some quirky touches.
- Lighting Accents: Consider adding small LED lights around the base of the plant stand or within the foliage—this can create a cozy ambiance in the evenings while showcasing your creativity.
Pro Tip
When it comes to choosing a litter box, opt for one with a lid or high edges to minimize mess. You’ll be thanking yourself later for not having to battle stray litter all over your living room floor.
And remember to clean the box regularly—nobody wants to share their chic piece of furniture with unpleasant odors.
This decorative plant stand litter box isn’t just a clever way to manage your cat’s needs; it’s a delightful addition to your home that showcases your love for both design and your furry friend.
Happy crafting!
3. Whimsical Ottoman Litter Box
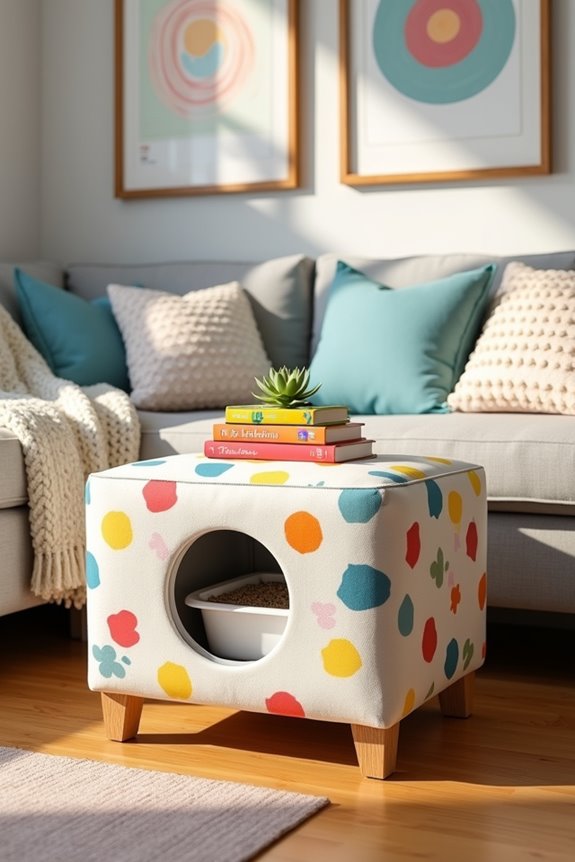
If you’re a cat owner, you know how tricky it can be to maintain a tidy living space while giving your feline friend the freedom to do their thing. Enter the whimsical ottoman litter box—a clever blend of décor and functionality. This DIY project allows you to have a stylish piece of furniture that double as a litter box, keeping things neat and stylish.
Your guests will never guess what’s hidden inside, and you’ll enjoy more comfort, improved aesthetics, and a touch of whimsy in your home.
Materials Needed
- A sturdy ottoman (make sure it has a removable top)
- A cat litter box (choose a size that fits inside the ottoman)
- Litter (choose your cat’s favorite type)
- Cutter (like a utility knife or scissors)
- Non-toxic paint or fabric (optional for customization)
- Measuring tape
- Pencil or marker
Step-by-Step Instructions
- Choose Your Ottoman: Start by picking a cute and durable ottoman that fits your style. Make sure the top can come off easily. You want something that doesn’t scream “litter box” the moment you walk in the room.
- Measure the Inside: Use your measuring tape to determine the inner dimensions of the ottoman. This will help you know what size litter box you can fit inside without cramming.
- Cut an Access Hole: Mark out a spot on the side of the ottoman (the one that faces away from your guests). You want to cut a hole that’s big enough for your kitty to hop in and out without a wrestling match. Carefully cut the hole using your utility knife. Take your time—this isn’t a race.
- Insert the Litter Box: Slide the litter box into the ottoman through the new opening. Make sure it’s snug and fits nicely, or else your cat may find an alternate location to do their business.
- Customize Your Ottoman: Now’s the fun part! If you’d like, style your ottoman with non-toxic paint or wrap it in fabric that matches your home décor. A whimsical pattern can add a cheerful touch and distract from its secret purpose.
- Fill with Litter: Add the cat litter to the box. Trust me, a well-placed sprinkle will transform your ottoman into a feline paradise.
- Position and Decorate: Place the ottoman in a cozy corner of your living space. You can put a few decorative items, like a cute throw or a couple of books, on top to make it look like a regular piece of furniture.
Optional Add-ons/Variations
- Try using a patterned fabric cover that coordinates with the rest of your living space. You could even change it seasonally for a little freshness.
- Consider adding a removable liner to the litter box for easier cleaning. It can save time and keep the inside of your ottoman looking spick and span.
Pro Tip
Before getting started, consider sealing the inside of the ottoman with a waterproof liner to avoid any unfortunate spills. Cats can be unpredictable—think of it as your insurance policy against messy surprises.
Also, keep a small broom or dustpan nearby for quick clean-ups. You’ll thank yourself later.
With just a bit of creativity and effort, you can create something that not only keeps your home looking good but also keeps your cat happy.
Who’d have thought that a whimsical ottoman could be your best ally in the never-ending war against litter?
4. Vintage Suitcase Litter Box

Ever thought about turning that old suitcase gathering dust in the attic into a stylish litter box? This DIY project is perfect for cat owners who want to blend practicality with a touch of vintage charm. With this whimsical litter box, you can keep your kitty’s business hidden while adding character to your home. Plus, it’s a clever way to upcycle something that might otherwise be forgotten.
Materials Needed
- Vintage suitcase (the sturdier, the better)
- A small, lightweight litter box (once again, size matters)
- Cat litter (your pet’s preferred type)
- Faux grass mat or fabric (optional for a chic look)
- Hinges (if you want to create a lid)
- Screwdriver (or drill for hinges)
- Measuring tape
- Pencil or marker
Step-by-Step Instructions
- Find Your Suitcase: Start with a vintage suitcase that has some character, whether it’s a stylish leather piece or a fun floral design. Inspect it for durability because you want this to last. Embrace the beauty of a little wear and tear—just like us, it adds personality!
- Measure It Up: Use the measuring tape to check the interior dimensions of the suitcase. This is essential as you need to know which size litter box fits best. Imagine your cat trying to do acrobatics to fit into something cramped—no one wants that.
- Cut an Entrance: Choose one of the shorter sides of the suitcase to create an entrance for your cat. Use your screwdriver (or drill) to make a small hole, then gently cut out an oval or square shape. Don’t forget that the goal is for your kitty to gracefully strut in and out.
- Position the Litter Box: Place the litter box inside the suitcase through the newly cut opening. It should fit snugly without wobbling. If it seems to move too easily, consider using some non-slip mats to keep it in place. Your cat can’t use it well if it’s sliding everywhere.
- Optional Hinged Lid: If you want more versatility, attach hinges to the top of the suitcase. This makes it easier to access for cleaning and can keep things more organized. Just think of it as revealing a hidden treasure trove.
- Fill with Litter: Pour in your cat’s favorite litter. They’ll appreciate a nice, fresh spot to do their business, and your living space will still look chic. Don’t skimp—cats like a little depth in their litter.
- Position & Style: Set your suitcase litter box in a cozy corner, ideally where your cat already likes to hang out. Dress it up with plants, a funky lamp, or a small decorative pillow on top. Now, it’s chic and functional, and your guests will think it’s just a stylish suitcase.
Optional Add-ons/Variations
- Want to add some pizzazz? Consider painting the suitcase with chalk paint or a color that harmonizes with your living space.
- Or, if fabric is your thing, line the interior with a cool vintage fabric to complement your suitcase’s style.
- For an extra touch, add a faux grass mat to the inside of the suitcase. This gives your kitty something to play on and makes the whole arrangement more inviting.
Pro Tip:
When choosing a suitcase, go for one with a solid handle or sturdiness, as your cat might come bounding out at high speed, and we wouldn’t want a flimsy lid flying off.
Regularly check inside for any clean-up needs; trust me, the litter box will thank you, and so will your nose.
5. Hidden Bookcase Litter Box
If you love books and appreciate a clutter-free home, this DIY hidden bookcase litter box project is just for you. Transforming your cat’s toilet into a secret bookshelf not only hides the litter box but also elevates your home decor. Plus, you’ll save money while guaranteeing your kitty has a cozy spot to do their business without sacrificing your aesthetic.
Materials Needed
- Old bookshelf or wooden crates
- Lightweight, low-profile litter box
- Cat litter (your furball’s favorite kind)
- Drill or screwdriver
- Measuring tape
- Wood glue (or screws for extra stability)
- Sandpaper (if you want a smooth finish)
- Paint or wood stain (optional, for a fresh look)
Step-by-Step Instructions
1. Choose Your Bookshelf: First things first, find an old bookshelf or some wooden crates in your home. Opt for something that’s sturdy enough to house a litter box while still looking good—no one wants a wobbly shelf as a toilet.
2. Measure and Mark: Use your measuring tape to assess where the litter box will sit. It’s essential to guarantee that the box fits without any awkward gymnastics required by your cat. Mark the dimensions on the shelf using a pencil.
3. Cut Out an Entrance****: On one of the sides of the bookshelf (ideally one that isn’t the top), use a drill or screwdriver to create an entrance for your kitty. Make a small hole and start cutting out a door for easy access.
Think of it as a grand little gateway to their personal hideaway.
4. Fit the Litter Box: Place the litter box inside the bookshelf through the entrance you just created. Make sure it fits snugly, as you wouldn’t want it sliding around every time your cat makes a move. If necessary, use some non-slip material to anchor the box.
5. Give it Some Class: Using wood glue or screws, secure the shelf structure to prevent any accidental tipping. If you’re feeling fancy, you can sand the edges for that smooth finish and even add a coat of paint or stain to match your decor.
A fresh look always adds charm—just like a cat in a sunbeam.
6. Fill with Litter: Pour in your cat’s favorite litter. It’s important to create a comfortable spot for them, so don’t skimp on quality here. Who wants a litter box cluttered with tiny granules and armed with smells? Not you, and certainly not your feline friend.
7. Position and Decorate: Finally, place your new hidden litter bookcase in a quiet corner of your home, ideally near where your cat likes to hang out. Decorate the top with actual books, plants, or decorative items to keep up the illusion.
Your guests will marvel at your clever feline furniture.
Optional Add-ons/Variations
- Custom Paint: Get a little creative and paint the outside of the bookshelf with a fun pattern or color that matches your decor. Think of stripes, polka dots, or even cat-themed artwork if you’re feeling playful.
- Book Covers: Craft unique covers or labels for some faux books to stack on top. It’s a great way to disguise the fact that there’s a litter box hiding beneath.
Pro Tip
Before you explore this project, consider taking a moment to line the inside of your litter box with a disposable litter box liner. It makes clean-up way easier.
Plus, you’ll save on the scrubbing, and we all know that nobody wants to live in a litter box equivalent of a tiny disaster zone.
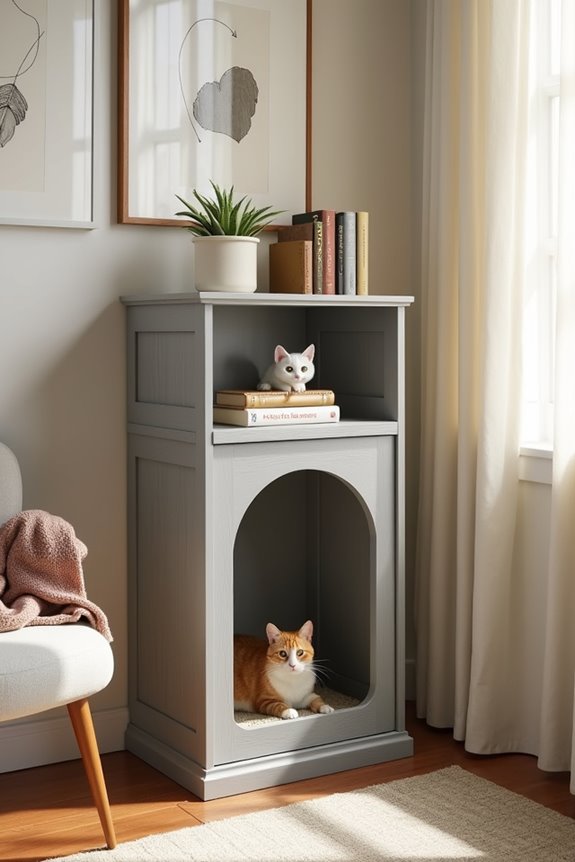
6. Charming Side Table Litter Box
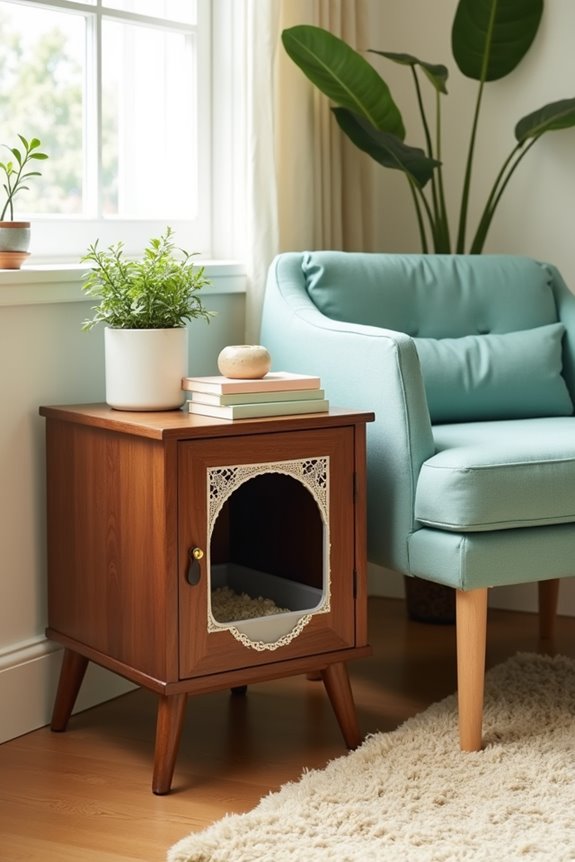
If you’re looking for a DIY project that combines style and function, this charming side table litter box is just the thing. Not only will it cleverly disguise your cat’s litter needs, but it will also add a touch of elegance to your living space.
Say goodbye to ugly litter boxes and hello to a sophisticated addition to your home that’s friendly to your furry companion and your decor.
Materials Needed
- Sturdy side table with a drawer or shelf
- A shallow litter box that fits inside
- Cat litter (your kitty’s favorite)
- Measuring tape
- Drill or screwdriver
- Sandpaper (for any rough edges)
- Paint or wood stain (optional, if you’re feeling fancy)
- Fabric (optional, to decorate the exterior)
Step-by-Step Instructions
1. Select Your Side Table: Start by choosing a side table that has a drawer or a shelf to keep it practical. Look for one that speaks to your aesthetic—modern, rustic, or anything in between works!
2. Measure Your Litter Box: Grab your measuring tape and find the ideal spot for the litter box inside the table. Make sure to choose an opening that allows your feline friend easy access while guaranteeing the box fits nicely inside.
3. Create an Access Point****: If your side table has a drawer, you might consider modifying it to create an entrance.
Alternatively, if the table has an open shelf, simply place the litter box there. If you have to cut an access hole, drill a small entry point on one side—you can always make it larger if needed.
4. Fit the Litter Box: Place the litter box inside the designated area. Ensure it’s secured enough that it won’t slide around—because we don’t want any litter drifts happening during those enthusiastic digs.
5. Spruce It Up: Talk about customization! If you want to paint or stain the table, do it now. A fresh coat can add character and blend beautifully with your decor.
And don’t forget to smooth any rough edges with sandpaper—it’d be tragic to snag a kitty leg.
6. Fill It Up: Pour in the litter—enough so your cat feels at home, but not so much that it spills out whenever they make a dramatic entrance.
7. Accessorize and Position**: Now for the fun part**—if you want, wrap the sides of the table with fabric or lace for an extra touch of charm.
And finally, set the table in whatever corner of your room feels right, perhaps near a cozy chair where you can both relax.
Optional Add-ons/Variations
– Color Palette Twist: Feel free to paint the table in a bold color to make it pop or go for soft pastels for a calmer vibe.
The fabric can be a patterned fun print or something that matches your living decor.
– Decorative Accents: Add a small potted plant or a stack of books on top to further disguise the purpose of the table while creating a homely touch.
Pro Tip
To maintain a fresh environment, consider using a litter mat underneath the box to catch any stray litter.
Not only will it keep your space neat, but it’ll also make cleaning a breeze. Remember, less mess equals a happy cat—and a happier you.
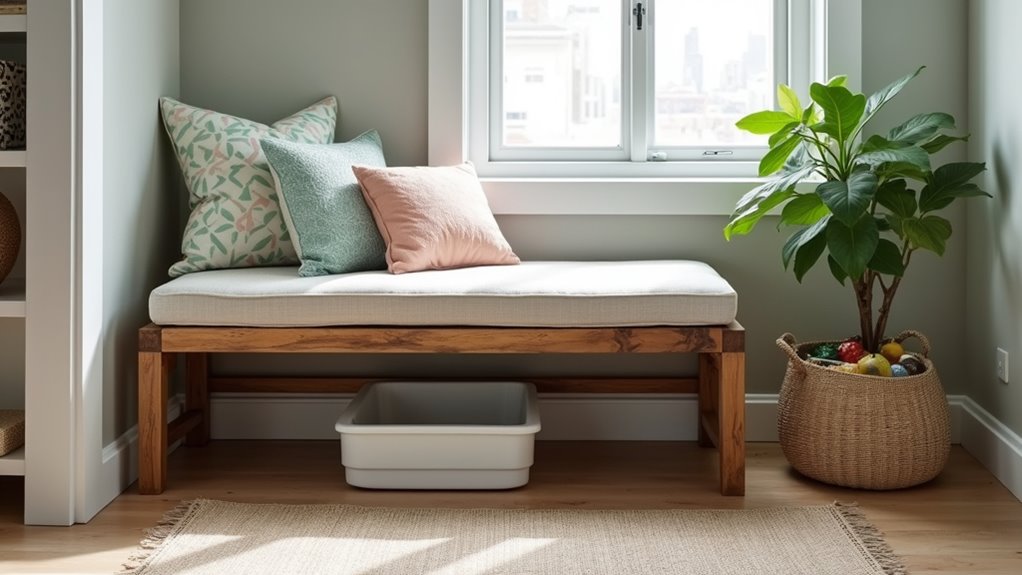
7. Underneath a Bench Litter Box
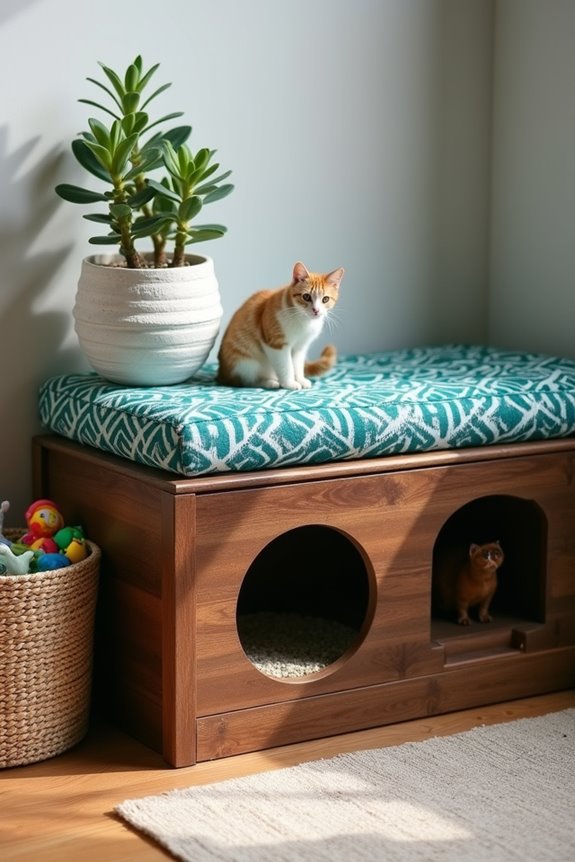
If you’re looking for a clever way to hide your cat’s litter box while enhancing your home decor, the underneath-a-bench litter box solution is perfect for you. Not only does it keep your cat’s potty area discreet, but it also turns a simple bench into a multifunctional piece.
Imagine having a stylish seat for you and a cozy spot for your kitty all in one—now that’s what I call efficiency!
Materials Needed
- Sturdy bench or console table
- A shallow litter box (make certain it fits underneath)
- Cat litter (the kind your kitty loves, of course)
- Measuring tape (don’t skip this—measure twice, cut once)
- Saw (if you need to create an entry point)
- Sandpaper (to smooth rough edges)
- Paint or wood stain (optional for flair)
- Decorative fabric or cushion (optional for style)
Step-by-Step Instructions
1. Choose Your Bench: Pick a bench that’s robust enough to handle some sit-downs and also has enough space underneath for your litter box. Any style will do—rustic, contemporary, or even something vintage that’s been collecting dust!
2. Measure the Space: Grab your measuring tape and get the dimensions of your litter box and the area beneath the bench. You want to make sure it fits perfectly. No one wants a litter box doing the limbo under there.
3. Create an Access Hole****: If your bench has a solid base, you might need to cut a small access hole for your cat to get in. Use a saw carefully, or enlist a handy friend if the thought makes you squeamish. Remember, safety first.
4. Place the Litter Box: Slide the litter box into its new home under the bench. Make sure it’s secure and won’t shimmy out when your cat goes rummaging for treasures in the litter.
5. Finishing Touches: If you’re feeling crafty, give the bench a fresh coat of paint or stain. Go wild; perhaps a bright blue to match that one accent wall you’ve been meaning to repaint every weekend.
Don’t forget to sand down any rough edges—smooth sailing is best for those paws.
6. Fill It Up: Pour in the litter, giving your cat a comfy cushion to dig around in. Not too much though—you’ll appreciate your kitty’s fluffy little footprints less when they’re all over your floor.
7. Accessorize: Top your new bench with a cushion or some decorative fabric to take it up a notch. Maybe even throw in a cute basket for extra storage—it could handle toys, treats, or that yoga mat that’s also collecting dust.
Optional Add-ons/Variations
- Swap out the cushion for a funky patterned fabric to add some pizzazz. You could even use a faux fur or an eco-friendly material to showcase your style.
- Consider using a colorful paint technique, like a distress or ombre effect, to make the bench a statement piece in your room.
Pro Tip
Think about using a washable liner inside the litter box. This simple step makes cleaning a breeze and keeps things more hygienic.
Trust me—your future self will thank you when it’s time to clean up. After all, less mess and more happiness for both you and your kitty is the ultimate goal.
Extra Tips & Ideas
While your cat may not care whether the litter box looks like a million bucks or just a million messes, there are plenty of fun and practical tweaks you can make to enhance their bathroom experience—and let’s be honest, yours too.
Think about adding a decorative screen around the box; it can add charm and hide the mess. You could also use a hanging planter to stash litter supplies—who knew plants could have so many uses?
Regularly using baking soda can help minimize odors, and adding cat grass nearby gives your furry friend a treat. A few cute signs, maybe one that says “Keep it Clean,” can bring a chuckle. We all need a little charm in the chaos, right?
Frequently Asked Questions
How Do I Train My Cat to Use a Hidden Litter Box?
To train your cat to use a hidden litter box, place it in an accessible area, gradually introduce your cat to it, and reward them with treats for using it. Consistency and patience are key!
What Materials Are Best for DIY Litter Box Projects?
For DIY litter box projects, you’ll want sturdy materials like plywood or particle board, waterproof liners, and hinges. Consider using decorative paint or fabric for aesthetics, ensuring everything is safe and easy to clean for your cat.
How Often Should I Clean a Hidden Litter Box?
You should clean a hidden litter box daily to maintain hygiene and prevent odors. Scoop out waste and clumps, and do a deeper clean weekly. Your cat will appreciate a clean space, and so will you!
Can Hidden Litter Boxes Accommodate Multiple Cats?
Yes, hidden litter boxes can accommodate multiple cats, but guarantee there’s enough space for each cat to enter comfortably. Consider providing more than one box to help reduce territorial disputes and maintain cleanliness.
What if My Cat Refuses to Use the Hidden Litter Box?
If your cat refuses to use the hidden litter box, try placing it in a familiar location, ensuring it’s clean and accessible. You might need to adjust the entrance or provide different litter options.
Conclusion
So there you have it—seven clever ways to hide your cat’s litter box while keeping your home looking stylish. It’s like giving your kitty their own little secret hideaway, right? Plus, who knew you could turn a coffee table or an ottoman into something so practical? Try a few of these ideas, mix in your style, and make litter box duty feel less like a chore and more like a design opportunity. Happy crafting, and may your cat be both stylish and cozy!

Hi, I’m Ali Tarek, the founder of Animalsman. I’ve always been passionate about pets, especially dogs and cats, and I created this website to share practical tips, easy recipes, and helpful care advice for fellow pet lovers. My goal is to make pet care simple, enjoyable, and accessible for everyone. When I’m not writing or curating content, you’ll usually find me spending time with my furry friends or learning new ways to keep them happy and healthy.

