So, you’re tired of your pup’s food and water bowls sitting on the floor, just waiting for a clumsy spill or a messy mealtime? You’re in luck. DIY dog bowl stands not only tidy things up but also add a little flair to your home. Imagine this: a rustic wooden stand or a quirky vintage suitcase. Intrigued? Let’s explore some creative ideas that’ll make your furry friend’s dining experience both stylish and functional.
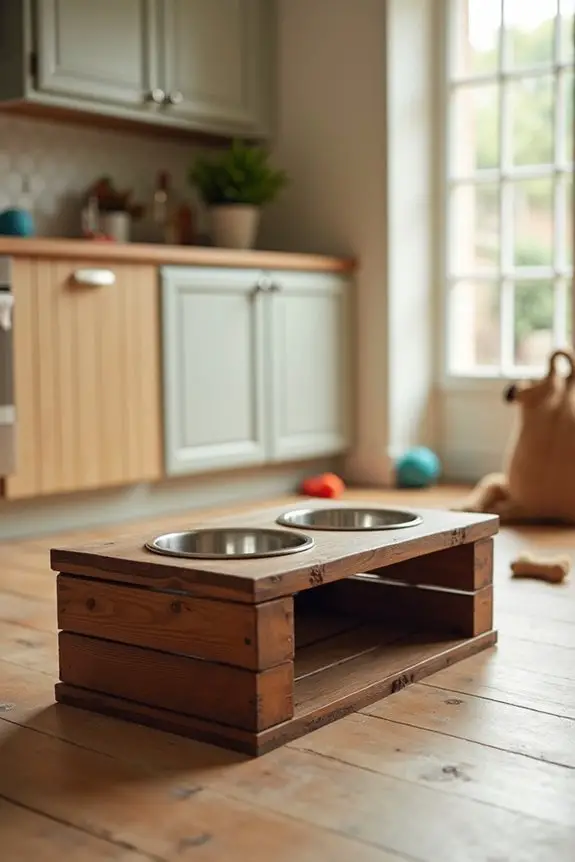
Elevate With Repurposed Wood
When it comes to creating a DIY dog bowl stand, using repurposed wood isn’t just eco-friendly; it’s also a way to add a unique touch to your furry friend’s dining area.
Think about it—your pup deserves something special. You might find an old pallet or some leftover boards in the garage.
First, cut them to the right height for your dog, ensuring they won’t have to awkwardly bend down.
Sand the edges to avoid splinters; trust me, nobody wants that.
Then, attach bowls using brackets or just place them in cut-outs.
It’s simple, and you’ll feel proud every time you see your dog happily munching.
Plus, who knew you could make something so stylish without breaking the bank?
Our Collection
In our collection, you’ll find some truly creative dog bowl stands that’ll make your pup’s dining experience feel extra special.
From unique painted mason jars to a vintage suitcase stand, there’s something for every style.
Plus, who wouldn’t want an adjustable height metal stand or a charming wooden crate design?
1. Unique Painted Mason Jars
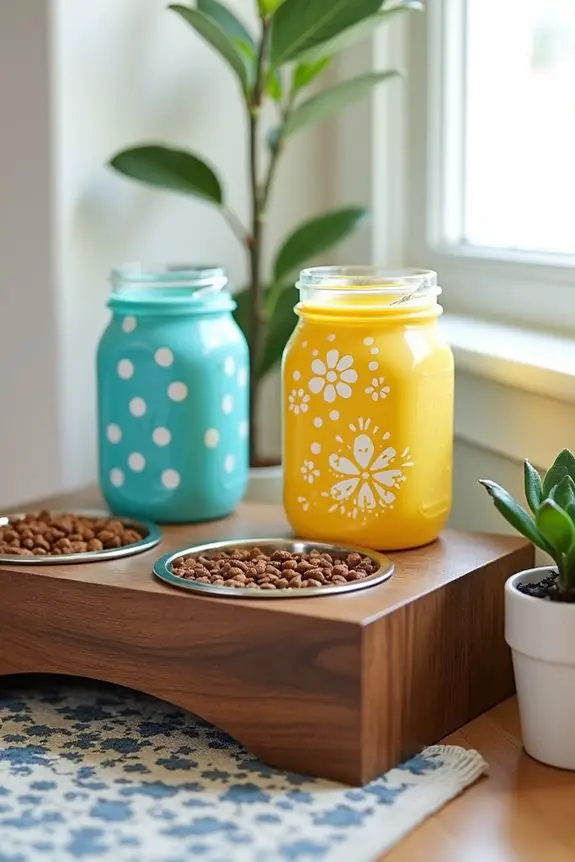
If you’re looking for a charming and functional way to elevate your dog’s dining experience, why not turn some plain ol’ mason jars into stylish dog bowl stands? Not only do these jars add a pop of personality to your home, but they also save you money—no need to buy expensive, fancy pet bowls. Plus, your pup will appreciate the comfort of having their food and water at just the right height. Let’s get painting!
Materials Needed:
- 2 mason jars (quart size works great)
- Non-toxic acrylic paint (choose your favorite colors)
- Paintbrushes (one for each color)
- Clear acrylic sealer (to protect your design)
- Stencils (optional for designs)
- Painters tape (to create clean lines)
- A small piece of wood (to attach jars and elevate them)
- Sandpaper (if using wood)
- A hot glue gun and glue sticks
Step-by-Step Instructions:
- Clean the Jars: Start by washing and drying your mason jars thoroughly. You want a clean surface for the paint to stick to.
- Choose Your Design: Decide if you want to freehand your design or use stencils. If you’re feeling adventurous, go for some fun patterns or even your dog’s name.
- Tape Off Sections (Optional): If you’re using painters tape, apply it generously to create neat lines or sections on the jar. This helps keep your design tidy.
- Start Painting: Using your paintbrush, start applying the acrylic paint to the jars. Don’t be afraid to mix colors or create fun designs. If you make a mistake, no worries—just paint over it.
- Let it Dry: Once you’re happy with your masterpiece, let the jars dry completely. This might take a couple of hours. Patience is a virtue, right?
- Seal the Deal: After the paint is dry, spray or brush on a layer of clear acrylic sealer to protect your design. This step is vital, especially if your dog has a tendency to be a bit messy during mealtime.
- Attach the Jars to the Wood: Using your hot glue gun, carefully attach the jars to the piece of wood. Make sure they’re secure so that your pup doesn’t accidentally knock them over during their enthusiastic eating sessions.
Optional Add-ons/Variations:
Feeling a little extra? How about adding some cute fabric around the base of the mason jars? You can even paint the wood base to match or contrast your jars for a bold statement.
If you’re crafty, try decoupage with dog-themed images or quotes for a personalized touch.
Pro Tip:
Always use non-toxic materials, especially when it comes to anything your dog might lick or chew on. Also, consider the height; make sure the jars are at a comfortable level for your dog to eat and drink without straining their neck.
Additionally, using premium dog supplies can enhance your pet’s dining experience even further.
Happy crafting, and may your dog dine in style!
2. Ceramic Tile Base
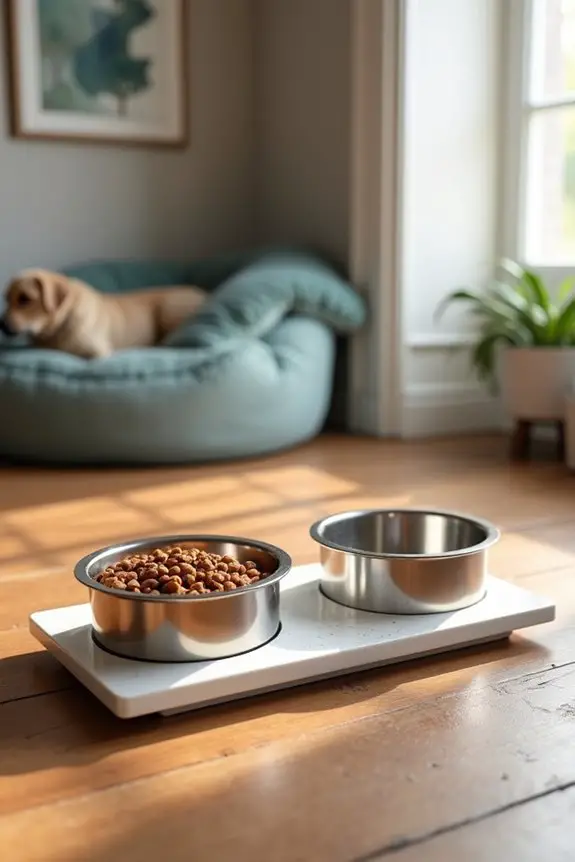
If you’re looking for a sturdy and stylish way to elevate your dog’s dining experience, a ceramic tile base for their bowls might just be the perfect DIY project for you. Not only does it provide a solid foundation that prevents spills and sliding, but it also adds a touch of elegance to your home décor. Plus, it’s an affordable way to keep your furry friend comfortable during mealtime by raising their bowls to a more ergonomic level. Let’s jump in!
Materials Needed:
- 2 ceramic tiles (12″x12″ works well)
- Non-toxic adhesive or silicone caulk
- 2 stainless steel dog bowls (one for food, one for water)
- Paint or contact paper (optional for customization)
- A sponge or cloth (for cleaning)
- Measuring tape
- Pencil (for marking)
- Level (to confirm even placement)
Step-by-Step Instructions:
- Clean the Tiles: Start by giving your ceramic tiles a good wash. Use a sponge or cloth to remove any dust or debris. You want the adhesive to stick well, so cleanliness is key.
- Measure and Mark: Use the measuring tape to find the center of each tile. Mark it lightly with your pencil. This is where you’ll position the bowls later.
- Attach the Bowls: Apply a generous amount of non-toxic adhesive or silicone caulk to the bottom of each dog bowl. Carefully place the bowls on the marked center of each tile, pressing down gently to create a strong bond.
- Let it Set: Give the adhesive some time to cure. Check the instructions on your adhesive for the recommended drying time. It’s best to let them sit for at least 24 hours—patience pays off here.
- Level It Out: Once the adhesive is dry, use a level to confirm that the tiles are even. If one side is higher than the other, adjust accordingly by adding small felt pads or adjusting the tile placement.
- Customize (Optional): If you want to add a personal touch, you can paint the edges of the tiles or wrap them with contact paper. This is a fun way to add some flair and make your dog’s dining area truly yours.
Optional Add-ons/Variations:
Want to take it up a notch? Consider adding a rubber mat underneath the ceramic tiles for extra grip and to catch any spills.
You could also paint the tiles with non-toxic paint in fun colors or patterns that match your home décor. How about a paw print design? Let your creativity shine.
Pro Tip:
For easy cleaning, make sure to choose bowls that are dishwasher safe. This way, you can keep your dog’s dining area fresh and tidy without too much hassle.
Also, consider the height of the stand—ideally, your dog should be able to eat comfortably without having to bend down too much. If you have a larger breed, you might want to look for taller tiles or even stack a couple for that extra lift.
Adding luxury dog accessories can further enhance your pet’s dining experience, making it even more stylish and comfortable.
3. Adjustable Height Metal Stand
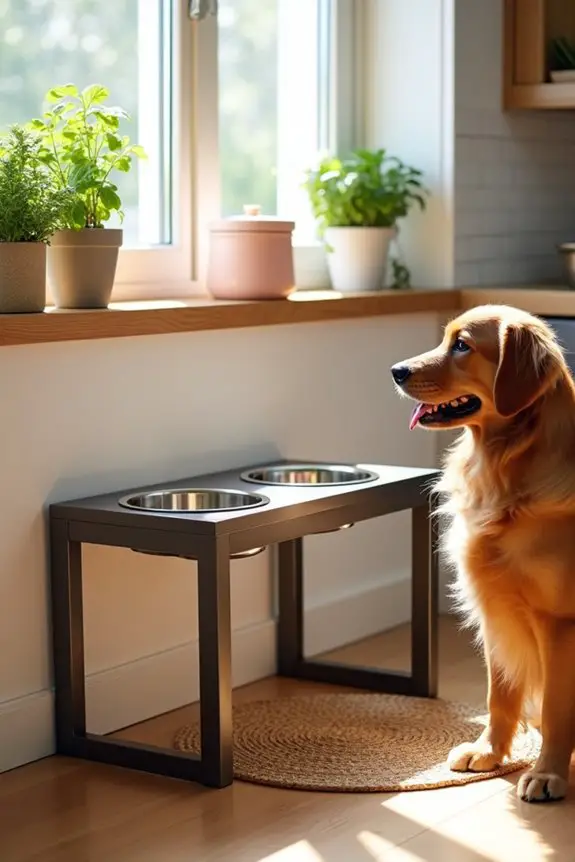
If you want to give your dog a dining experience that’s as comfortable as it’s stylish, search no further than an adjustable height metal stand for their bowls. This DIY project isn’t only practical, but it also saves you the hassle of constantly bending over to feed your furry friend. Plus, with the ability to adjust the height as your dog grows, it’s a great investment for any pup parent. Let’s get started on this simple yet effective project.
Materials Needed:
- 2 stainless steel dog bowls (one for food, one for water)
- Adjustable metal stand (you can find these at most home improvement stores or online)
- Rubber feet or pads (for stability)
- Measuring tape
- Screwdriver (if needed for assembly)
- Level (to guarantee it stands evenly)
Step-by-Step Instructions:
- Choose Your Stand: Head to your local home improvement store or browse online to find an adjustable metal stand that suits your needs. Make sure it’s sturdy enough to hold the weight of the bowls and your pup’s enthusiasm.
- Assemble the Stand: If your stand requires assembly, follow the manufacturer’s instructions to put it together. Typically, it involves screwing pieces together and adjusting the height. This part should be straightforward, but if you find yourself in a battle with an Allen wrench, take a deep breath—you’re not alone.
- Attach the Bowls: Once the stand is assembled, place your stainless steel bowls into the designated holders. Make sure they fit snugly but can still be easily removed for cleaning.
- Adjust the Height: Depending on your dog’s size, adjust the height of the stand accordingly. You want it to be comfortable for your dog, so they don’t have to strain their neck while eating or drinking. A good rule of thumb is that their bowls should be at about chest level.
- Add Stability: To prevent any slipping or sliding, attach rubber feet or pads to the bottom of the stand. This will keep it in place and also protect your floors.
- Level It Out: Use a level to check that the stand is even. An uneven stand can lead to spills, and we all know how much dogs love to splash around during mealtime.
- Final Touches: Once everything is set up, take a step back and admire your handiwork. Adjust the height one last time if needed, and make sure everything is secure before introducing your dog to their new dining station.
Optional Add-ons/Variations:
Feeling creative? Consider painting the metal stand with non-toxic spray paint in fun colors that match your home décor. You could even wrap the legs in decorative fabric or jute for a more rustic look. Personal touches make it feel like a part of your home.
Pro Tip:
Always check the stability of the stand after adjusting the height. If it wobbles at all, recheck the assembly and tighten any screws. A stable feeding station means a happier, less messy mealtime for both you and your pup. Plus, it helps keep those bowls in their happy place—where they belong.
Additionally, consider elevating your pup’s mealtime experience with premium dog fashion accessories, which can complement their new dining setup beautifully.
4. Wooden Crate Design
If you’re looking to combine functionality with a touch of rustic charm, a wooden crate dog bowl stand is the perfect DIY project for you. Not only does it create a designated dining area for your pup, but it also adds a unique decorative element to your home. Plus, using a crate means you can save some cash while upcycling materials. Let’s plunge into this fun and easy project. Additionally, using a premium dog food subscription can ensure your pup enjoys high-quality meals that complement their dining experience.
Materials Needed:
- 1 wooden crate (size depending on your space)
- 2 stainless steel dog bowls (one for water, one for food)
- Sandpaper (medium and fine grit)
- Paint or wood stain (optional for finishing)
- Paintbrush (if applying stain or paint)
- Measuring tape
- Drill with hole saw attachment (to create bowl openings)
- Level (to verify it stands evenly)
Step-by-Step Instructions:
- Choose Your Crate: Find a wooden crate that’s the right size for your space and your dog. You can often find these at thrift stores, craft stores, or online marketplaces. Aim for a crate that’s sturdy but also fits the aesthetic of your home.
- Prepare the Crate: Give your crate a good cleaning. If it has any rough edges or splinters, sand it down using medium-grit sandpaper first, followed by fine-grit to make it super smooth. You want your pup to dine comfortably, after all.
- Measure and Mark: Use your measuring tape to determine where you want the bowls to go. Typically, placing the bowls on the top of the crate is ideal, but you can get creative! Mark the spots for the bowl openings with a pencil.
- Drill the Bowl Openings: Using your drill with the hole saw attachment, carefully drill out the circles where you marked. Make sure the openings are just the right size for your bowls to sit snugly—nobody wants a bowl doing the cha-cha across the floor during dinner time.
- Finishing Touches: If you want to add a splash of color or protect the wood, this is the time to apply your paint or stain. Use a paintbrush to cover the entire crate, and let it dry completely before moving on. This step is optional, but it can really make your stand pop and match your home’s decor.
- Assemble Your Stand: Place the stainless steel bowls into the openings you created. Make sure they fit well and don’t wobble. If needed, you can add some rubber bumpers or felt pads around the edges to secure them in place.
- Level It Out: Finally, set the crate on the floor and use a level to check that it’s even. An unsteady dog bowl stand can lead to spills and messy mealtimes, so take a moment to verify everything is balanced.
Optional Add-ons/Variations:
Want to add some flair? Consider painting the crate in your dog’s favorite color or adding stencils of paw prints. You could also line the inside with a fun fabric or even add wheels to the bottom for easy maneuverability. The possibilities are endless!
Pro Tip:
When drilling the bowl openings, start with a smaller hole first and gradually work your way up to the final size. This way, you can verify a perfect fit without going too big and ending up with wobbly bowls. Plus, it’s a good way to practice your drilling skills without risking a huge mistake.
Creating a wooden crate dog bowl stand is a fulfilling project that not only enhances your dog’s dining experience but also allows you to express your personal style. So roll up your sleeves, and let’s get crafting!
5. Vintage Suitcase Stand
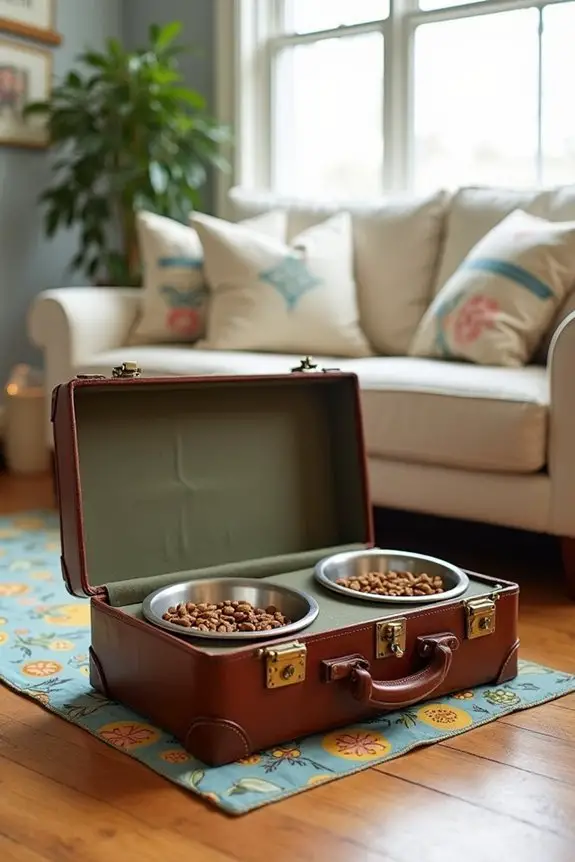
If you’re on the lookout for a quirky and charming way to set up your pup’s dining area, a vintage suitcase dog bowl stand is just the ticket. Not only does it save you money by repurposing an old suitcase, but it also adds a unique touch to your home décor. Plus, your furry friend will appreciate having their own stylish dining space. To ensure your dog is getting the best nutrition, consider pairing this project with some premium dog food brands that focus on high-quality ingredients.
Let’s explore this fun project that’s as practical as it’s pretty!
Materials Needed:
- 1 vintage suitcase (make sure it’s sturdy)
- 2 stainless steel dog bowls (one for food, one for water)
- Sandpaper (medium and fine grit)
- Paint or fabric (optional for customizing the suitcase)
- Measuring tape
- Scissors (if using fabric)
- Drill (if you need to make new bowl openings)
- Felt pads or rubber bumpers (to prevent slipping)
Step-by-Step Instructions:
- Find Your Suitcase: Scour thrift stores, flea markets, or your local online marketplace for a vintage suitcase. Look for one that’s not only cute but also heavy enough to support the bowls without tipping over.
- Clean and Prep: Once you’ve got your suitcase, give it a good cleaning both inside and out. If it has any rough patches, use sandpaper to smooth them out. Your pup deserves a comfortable dining experience, after all.
- Measure for Bowls: Open the suitcase and decide where you want to place the bowls. You can put them directly on the inside of the lid or on the bottom. Mark where the bowls will go with a pencil.
- Drill Bowl Openings (if needed): If your suitcase doesn’t have enough depth to hold the bowls securely, you might need to drill some openings. Use your drill to create holes that are just big enough for the bowls to fit snugly. Be careful—nobody wants a runaway bowl during mealtime.
- Customize (optional): If you want to jazz up your suitcase, now’s the time. You can paint it, or if you’re feeling crafty, cover it with fabric. Just make sure it’s securely attached and won’t peel off when your dog digs in.
- Add Bowls: Place the stainless steel bowls in the openings you created. Make sure they fit well and aren’t wobbly. If you need to, use felt pads or rubber bumpers around the edges to keep them in place.
- Final Touches: Set the suitcase on the floor in your desired location and make sure it’s stable. Adjust as needed. It’s time for your pup to enjoy their new dining setup.
Optional Add-ons/Variations:
- Fabric Fun: Instead of paint, consider covering the suitcase with a fun fabric that matches your home. You could use a cheerful pattern or even a classic plaid. Just make sure it’s durable and easy to clean.
- Personalized Touches: Add a small nameplate or cute stickers with your dog’s name on it. It’s a little personal flair that makes it uniquely theirs.
Pro Tip:
To keep things tidy, consider using a placemat underneath the suitcase. This way, any spills or crumbs from meal times can be easily cleaned up in a jiffy. Plus, it can add an extra layer of style to your dog’s dining area.
And there you have it—a delightful vintage suitcase dog bowl stand that’s practical, stylish, and oh-so-easy to make. Your pup will love it, and you can feel great about saving some cash while getting creative.
Happy crafting!
6. Hanging Shelf With Bowls

If you’re looking to save space while giving your furry friend a stylish dining area, a hanging shelf with bowls is a brilliant DIY project. Not only does it keep your dog’s dining essentials off the floor, but it also adds a modern touch to your home décor. Plus, you’ll feel pretty proud of yourself for creating something unique and functional.
Let’s explore how to make this chic dog bowl stand.
Materials Needed:
- 1 sturdy wooden shelf (about 1-2 feet long)
- 2 stainless steel dog bowls
- 2 brackets (for hanging)
- 2 screws (to attach the brackets)
- Drill or screwdriver
- Measuring tape
- Sandpaper (medium grit)
- Paint or stain (optional for customizing the shelf)
- Level (to verify it’s straight)
- Felt pads (optional for bowl bottoms)
Step-by-Step Instructions:
- Select Your Shelf: Choose a wooden shelf that’s sturdy enough to hold your dog’s bowls. Look for one that matches your home’s style—whether it’s rustic, modern, or somewhere in between.
- Prep the Shelf: Give your shelf a good sanding to smooth out any rough edges. This will keep both you and your pup safe from splinters. If you want to add a splash of color, now’s the time to paint or stain it. Let it dry completely before moving on.
- Measure Placement: Decide where you want to hang the shelf. It should be at a height that’s comfortable for your dog to reach. Use your measuring tape to find the ideal height, then mark the wall where the brackets will go.
- Attach the Brackets: Use your drill or screwdriver to attach the brackets to the wall at the marks you made. Make sure they’re level—nobody wants a tilted bowl situation. If you’re feeling extra cautious, you can use a level tool to double-check.
- Secure the Shelf: Once the brackets are in place, carefully place the shelf on top of them. Make sure it sits securely and doesn’t wobble. If you feel it needs extra stability, you can use additional screws to secure it down.
- Add Bowls: Place the stainless steel bowls on the shelf. If your bowls are prone to sliding around, consider adding felt pads to the bottoms to keep them in place.
- Final Check: Step back and admire your work. Make sure everything is secure and positioned correctly. Now, it’s time for your pup to enjoy their elevated dining experience.
Optional Add-ons/Variations:
- Color Pop: Instead of a single color, why not use a fun pattern or two-tone paint job for the shelf? It can really make the whole setup pop.
- Personal Touch: Add your dog’s name or a cute paw print design to the front of the shelf for a personalized look.
Pro Tip:
When hanging your shelf, consider the height of your dog. If you have a pup who tends to jump or climb, make sure the shelf is high enough to prevent any accidental spills or messes. Plus, a little extra stability will go a long way in making mealtime a breeze.
With just a few materials and some simple steps, you can create an eye-catching and functional dog bowl stand that your furry friend will love, and you’ll enjoy showing off.
Happy DIYing!
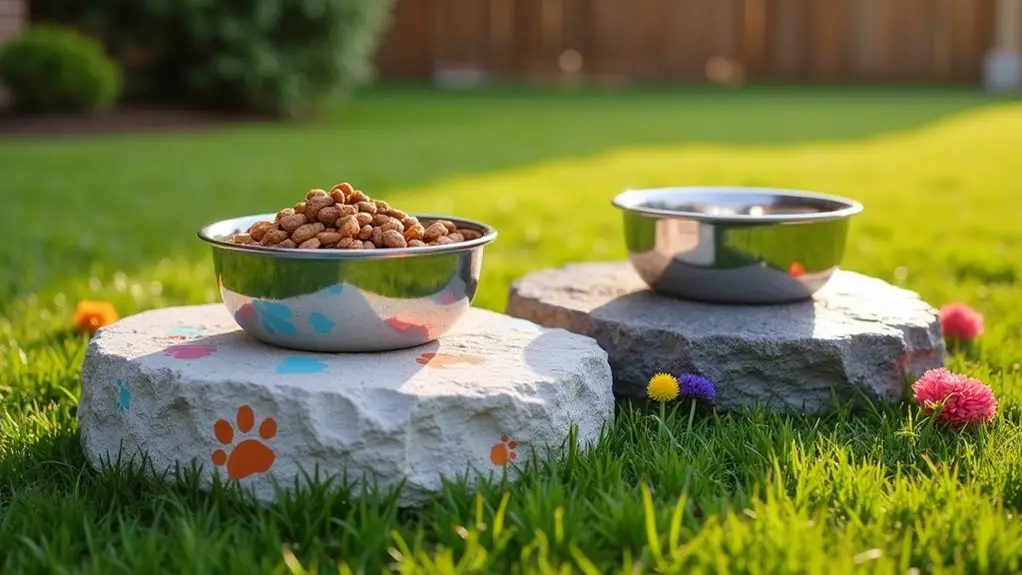
7. Decorative Stone Bowl Holders
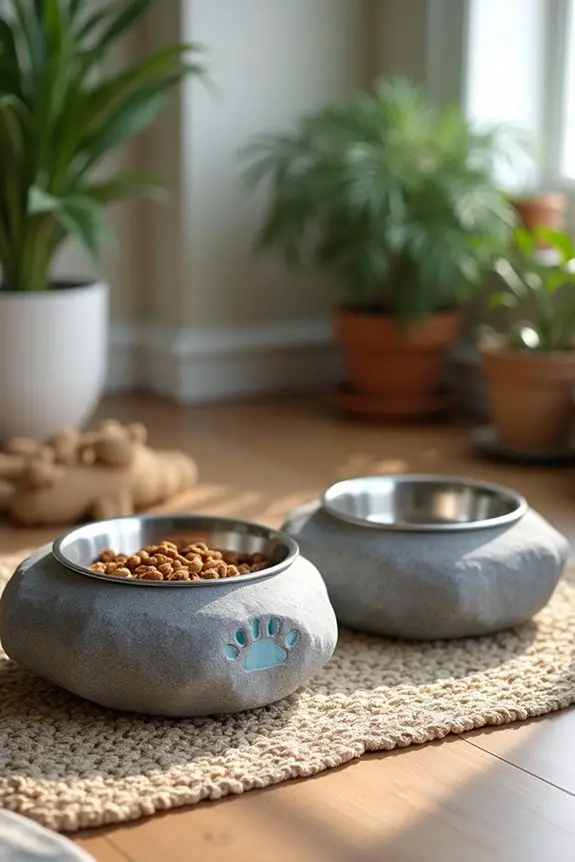
If you want to elevate your dog’s dining experience while adding a touch of elegance to your home, decorative stone bowl holders are the perfect DIY project. These stands not only look beautiful but also keep your dog’s bowls at a comfortable height. Plus, they’re easy to make, saving you money on store-bought options and allowing for some creative expression. Let’s explore how to create these stunning stone bowl holders.
Materials Needed:
- 2 large flat stones (confirm they’re smooth and sturdy)
- 2 stainless steel dog bowls (size according to your dog)
- Outdoor adhesive (like epoxy or construction glue)
- Sandpaper (medium grit)
- Measuring tape
- Paint (optional, for personalization)
- Clear sealant (optional, for weatherproofing)
Step-by-Step Instructions:
- Choose Your Stones: Head outside or to your local garden center to find two large, flat stones. They should be heavy enough to support the bowls and have a smooth surface. Think of them as the canvas for your dog’s dining masterpiece.
- Prep the Stones: Give your stones a good sanding with medium-grit sandpaper to remove any sharp edges. This will help prevent any nasty surprises for your pup while they’re enjoying their meal.
- Measure and Mark: Use your measuring tape to find the center of each stone. This is where you’ll place the bowls. Mark the spot lightly with a pencil so you know exactly where to glue.
- Apply Adhesive: Following the adhesive instructions, apply a generous amount to the bottom of each bowl, then press them onto the marked areas on the stones. Make sure they’re centered and balanced. It’s like sticking a big cupcake on a plate—no one wants it to tip over.
- Let It Cure: Allow the adhesive to cure for the time specified on the package. This is essential; you wouldn’t want a bowl flying off during dinner time, right?
- Personalize (Optional): If you’re feeling crafty, grab some outdoor paint and add a fun design or your dog’s name to the stones. Just remember to let the paint dry completely before using them.
- Seal the Deal: For those who want extra durability, apply a clear sealant over the stones and paint. This will protect them from the elements if you decide to use them outside.
Optional Add-ons/Variations:
- Color Customization: Mix and match paint colors to create a vibrant design that fits your home décor. You could even go for a rustic look by using natural stone with no paint at all.
- Pattern Play: Consider adding stencils to create fun shapes or patterns on your stones. Think paw prints or hearts—perfect for showcasing your love for your furry friend.
Pro Tip:
When selecting stones, look for ones that are naturally water-resistant (like granite or slate) if you plan to use them outside. This little hack will confirm your dog’s dining area remains stylish and functional, rain or shine.
Plus, keeping everything elevated can help deter pests from snacking on leftovers.
Now that you have your decorative stone bowl holders ready, your pup can dine in style, and you can sit back and admire your handiwork. Who knew a little stone could bring so much joy?
Extra Tips & Ideas
Creating the perfect dog bowl stand doesn’t just stop at the basics; there are plenty of extra tips and ideas to elevate your project.
Consider adding a splash of color with paint or stain. It’s amazing what a little hue can do, right? You could even personalize it with your pup’s name—because who doesn’t love a custom touch?
If you’re feeling crafty, try incorporating hooks for leashes or treats. It’s like a two-for-one deal.
And let’s be real, we all know how messy feeding time can get, so think about adding a removable mat underneath. It’ll save you from that post-dinner clean-up struggle.
Happy crafting, and may your DIY adventure be a little less chaotic than mine usually is.
Frequently Asked Questions
What Materials Are Best for a DIY Dog Bowl Stand?
For a DIY dog bowl stand, you’ll want to use sturdy materials like wood or PVC. They’re durable and easy to work with, ensuring your stand supports your dog’s bowls securely and lasts over time.
How Can I Ensure Stability in My Dog Bowl Stand?
To guarantee stability in your dog bowl stand, use sturdy materials like wood or metal, reinforce joints with screws or brackets, and add non-slip feet or a weighted base to prevent tipping during meals.
What Size Should the Dog Bowl Stand Be for My Pet?
Your dog’s bowl stand should match their height—how ironic, right? A stand too low or high could lead to awkward eating postures. Measure your pet from the ground to their shoulders for the perfect fit.
Can I Customize the Height of the Dog Bowl Stand?
Yes, you can customize the height of the dog bowl stand. Measure your pet’s shoulder height, then adjust the stand accordingly. This guarantees your dog eats comfortably without straining their neck while enjoying their meals.
Are There Any Safety Concerns With DIY Dog Bowl Stands?
When crafting your dog bowl stand, it’s wise to contemplate potential pitfalls. Guarantee stability, avoid sharp edges, and use non-toxic materials. This way, you’re creating a safe and delightful dining experience for your furry friend.
Conclusion
So, you see, creating a stylish dog bowl stand isn’t just about function; it’s a fun way to show off your creativity. Picture your pup happily munching away, bowls elevated just right, maybe even a splash of color from those painted mason jars. With these DIY ideas, you’re not just improving their dining experience—you’re adding a personal touch that makes your space feel more like home. Now, grab those tools, release your imagination, and let’s get crafting. Your furry friend will thank you.

