If you’ve ever wrestled with a bulky dog food bag or watched treats scatter across your kitchen floor, you know the struggle. Isn’t it about time you upgraded your storage game? Let’s explore some creative DIY dog food storage solutions that are both stylish and practical. From charming vintage crates to sleek metal bins, you can turn your dog’s munchies into a home decor highlight. Curious about what’s next? Stick around for some inventive ideas that could change your dog-owning life.
Unique Container Ideas
When it comes to storing dog food, you don’t have to settle for plain old bins that look like they belong in a boring pantry.
Why not jazz things up with a DIY dog food storage container? Picture repurposing an old cereal dispenser. With a bit of elbow grease, you can transform it into a quirky food station, adding some flair to your kitchen.
Ever thought about using decorative jars? They not only look fab but also keep your pup’s kibble fresh.
You can even paint wooden crates for a rustic touch. Got an old suitcase? Fill it with food to create an eye-catching storage piece.
It’s functional and fun. Plus, your friends might just be a little envious of your creative chops.
Our Collection
When it comes to storing your pup’s food, style matters just as much as functionality.
Think vintage wooden crates for a rustic feel, or sleek metal bins that scream modern chic.
Trust me, mixing and matching things like glass mason jars or decorative ceramic bowls can turn your pet’s food storage into a conversation starter—because who doesn’t want their dog food station to look fabulous?
1. Vintage Wooden Crates
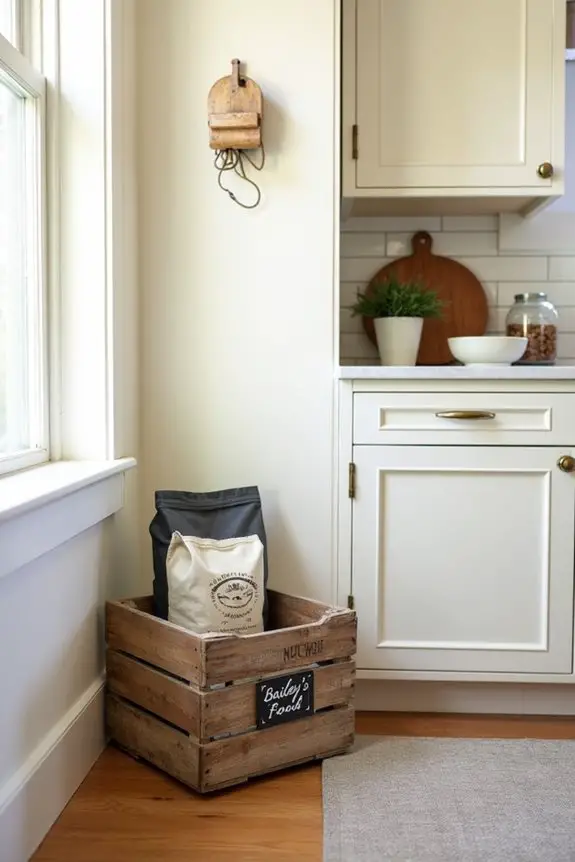
Have you ever tripped over a bag of dog food in your kitchen or struggled to find matching containers for your pup’s snacks? Enter the vintage wooden crate! This DIY project not only gives you a stylish and organized way to store your dog’s food, but it also adds a whimsical charm to your home. Plus, it can save you money by keeping food fresh longer and reducing waste. Did you know that premium dog food subscription can help ensure your pup’s diet is balanced and nutritious? Additionally, using a dog ear infection device can prevent common health issues while ensuring your pup stays happy and healthy. Let’s get crafting!
Materials Needed:
- Vintage wooden crates (you can find these at flea markets, thrift shops, or online)
- Sandpaper (medium and fine grit)
- Wood stain or paint (choose your favorite color)
- Clear sealant (optional, for extra durability)
- Paintbrush (if you’re painting)
- Clean cloth
- Measuring tape
- Decorative handles (optional, for ease of carrying)
Step-by-Step Instructions:
- Choose Your Crate: Find a vintage wooden crate that speaks to you. Look for one that’s the right size to fit your dog’s food bags. Don’t be afraid to mix and match—different crates can tell unique stories.
- Clean and Prep: Before you get started, wipe down your crate with a clean cloth to remove dust and debris. If it’s really grungy, gently scrub it with soap and warm water. Let it dry completely.
- Sand It Down: Grab your medium-grit sandpaper and give the crate a good sanding. Focus on rough edges and splintered areas to make it smooth. Switch to fine-grit paper for a polished finish. Remember, no one wants their furry friends getting poked by a wayward splinter.
- Stain or Paint: If you’re feeling adventurous, apply a wood stain to enhance the natural beauty of the crate. If you prefer a pop of color, go for paint. Use your brush to apply an even layer and let it dry per the instructions. You could even include some fun patterns or designs if your artistic side is suddenly calling out to you.
- Protect It: Once dry, apply a clear sealant to protect your masterpiece from spills or moisture. This is especially handy if your pup tends to leave a trail of crumbs (which, let’s be honest, is basically every dog).
- Add Handles: If you want to make lugging that hefty bag of kibble around a bit easier, attach decorative handles to the sides of your crate.
- Fill ‘Er Up: Finally, place your crate in a convenient spot—preferably away from your foot traffic zone—and fill it with your dog’s food. Voila! You have a stylish storage solution that keeps the dog food secure and blends beautifully with your decor.
Optional Add-ons/Variations:
- Personal Touch: Consider adding your dog’s name to the crate with some fun stenciling or decals. It’s a great way to make it their very own.
- Color it Up: Swap out the wood stain for colored paints or even chalkboard paint. You can write reminders or clever messages to yourself—like “Puppy treat time!”
Pro Tip:
For added comfort for your dog, consider placing a doggy mat beneath the crate. It helps to catch any spills and keep their feet cozy. Plus, on days when your dog’s food is dished out with more flair (read: mess), you’ll be grateful for the easy clean-up.
Now you have a beautifully organized space for your pup’s food, and maybe even a little less chaos in the kitchen. Plus, how great will it feel to show off your creative side to friends (and your dog)? Happy crafting!
2. Metal Storage Bins
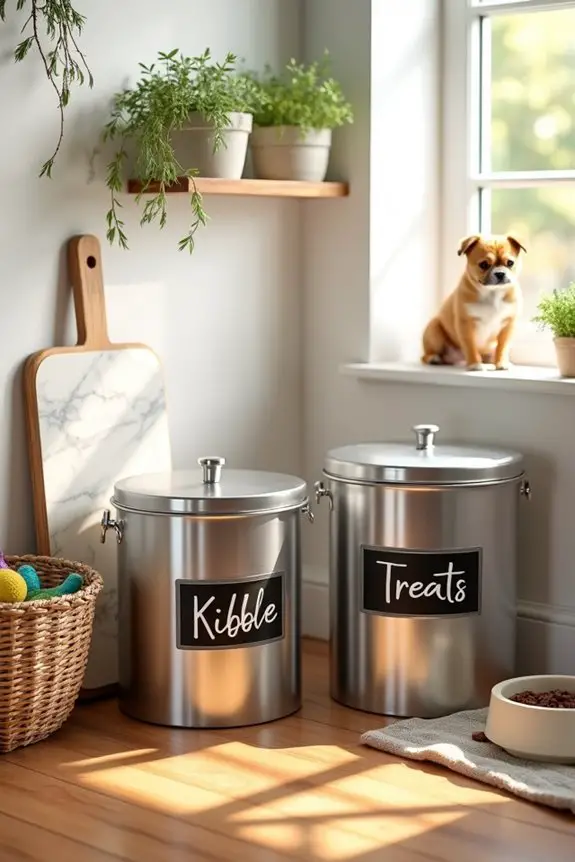
If you’re a dog owner, you know how important it’s to keep your furry friend’s food fresh and safe from pesky little critters. Metal storage bins offer a sleek and durable way to do just that! Not only do they keep dog food airtight and away from moisture, but they also look great in your home. Additionally, investing in a quality storage solution can help reduce dog food spoilage**** and save you money in the long run.
Plus, investing in professional dog agility equipment can save you money in the long run by reducing spoilage and waste. Ready to take your dog food storage game up a notch? Let’s explore!
Materials Needed:
- Metal storage bins (choose the size that suits your dog’s food needs)
- Label maker or chalkboard labels (for easy identification)
- Clear sealing spray (optional, to keep it shiny)
- Soft cloth (for wiping down)
Step-by-Step Instructions:
- Choose Your Bins: Start by selecting the right size metal storage bins for your dog food. Consider getting a larger bin for kibble and a smaller one for treats. They can be found at home goods stores or online, so pick what feels right for your space and style.
- Clean the Surface: Before you use the bins, wipe them down with a soft cloth to get rid of any dust or residue from the packaging. This makes sure your bins are fresh and ready to hold your pup’s precious cargo.
- Label It Up: Grab your label maker or chalkboard labels and mark each bin clearly. You’ll want to distinguish between their regular food and treats, so nobody gets confused during snack time—trust me; it can lead to a very disappointed pup.
- Seal for Shine (Optional): If you want that shiny new look to last, a clear sealing spray could really do the trick. Just give each bin a light mist and let it dry. This can also provide a protective layer that makes your bins easier to clean over time.
- Fill ‘Em Up: Now comes the fun part. Pour your dog’s food into the big bin and treats into the smaller one. Make sure to leave a little space at the top to avoid spills during scooping.
- Store with Style: Find a cozy corner in your home to showcase your new storage solution. You can put them next to your dog’s feeding station or stash them in your pantry if you’d like to keep things out of sight. They’re stylish enough to blend right in with your decor!
Optional Add-ons/Variations:
- Color Me Crazy: If you really want to personalize your bins, consider spray painting them a color that matches your home decor. Just be sure to use a non-toxic, pet-safe paint.
- Decorative Touch: You could also add some fun decals or stickers that show off your dog’s personality. Whether it’s paw prints, their name, or their favorite cartoon character, this will give your bins a little flair.
Pro Tip:
Always keep the lid of your metal bin tightly sealed to maintain freshness and protect your dog’s food from pests. If you notice any moisture in the bin, it might be time to invest in a desiccant pack to help keep things dry. Your pup will thank you when their food stays crispy and delicious.
Now that you have a stylish and functional way to store your dog’s food, let’s move on to our next storage solution: the practical and lightweight plastic airtight food jars. They might just be a game-changer for your doggie dining experience!
3. Plastic Airtight Food Jars
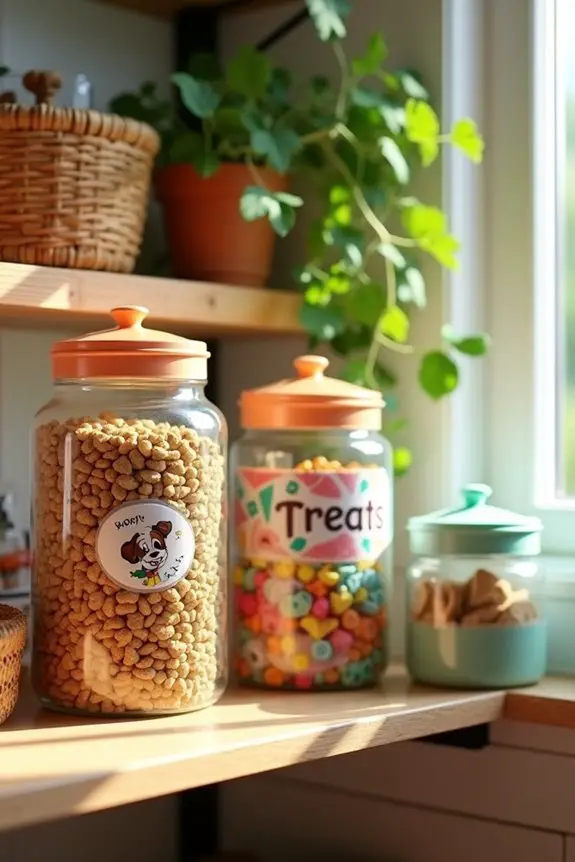
Are you tired of your dog’s food going stale too quickly? Search no more than our plastic airtight food jars! These jars are an excellent DIY project that not only keeps your pup’s food fresh and tasty but also saves you money by reducing waste. They’re lightweight, easy to handle, and add a pop of fun to your storage area. Let’s explore this simple and useful project that’ll make you and your dog happy.
Materials Needed:
- Airtight plastic jars (various sizes for different types of food)
- Permanent markers or a label maker
- Decorative stickers or washi tape (optional for personalization)
- Soft cloth for cleaning
- Measuring cup for scooping
Step-by-Step Instructions:
- Select Your Jars: Start by choosing the perfect airtight plastic jars. You might want a couple of larger jars for kibble and a smaller one for treats. Make sure they’ve airtight seals to lock in freshness. Check your local store or online for options.
- Clean Up: Before you put anything inside, give the jars a good wipe-down with a soft cloth to eliminate any dust or leftover packaging residue. Trust me, your food will thank you for the clean start.
- Label with Love: Whether you decide to use permanent markers or a label maker, be sure to clearly label each jar. Write “Kibble” for the main meals and “Treats” for those special rewards. You want to avoid any mix-up that could lead to your dog getting a little too excited during dinner time.
- Personalize: If you’re feeling crafty, grab some decorative stickers or washi tape and give your jars a personal touch. Maybe add your dog’s name or some fun designs to the jars, so they feel special too.
- Fill Them Up: It’s time for the fun part. Carefully pour your dog’s kibble into the larger jar and treats into the smaller one. Use a measuring cup to avoid spills—although, let’s be real, spills are just part of the adventure, right?
- Seal and Store: Once filled, securely close each jar with its lid. Store them in a cool, dry place. A little corner in the pantry or beside your dog’s feeding station works perfectly.
Optional Add-ons/Variations:
- Color Your World: Purchase jars in fun colors that match your home decor. Or, if you have plain jars, consider painting them with non-toxic spray paint for a whole new look.
- Mix and Match: Use different sizes of jars for variety and better organization. It’s like a little tower of treats and kibble.
Pro Tip:
Consider using a small measuring cup within each jar for easy scooping. It not only makes food prep smoother but also helps control portions, making sure your pup stays on a healthy diet. Plus, it minimizes the mess of transferring food out of the jar.
Embrace this DIY project, and you’ll not only keep your dog’s meals fresh but also add a bit of charm to your home. Happy crafting, and give your furry friend an extra treat for helping you through the process!
4. Glass Mason Jars
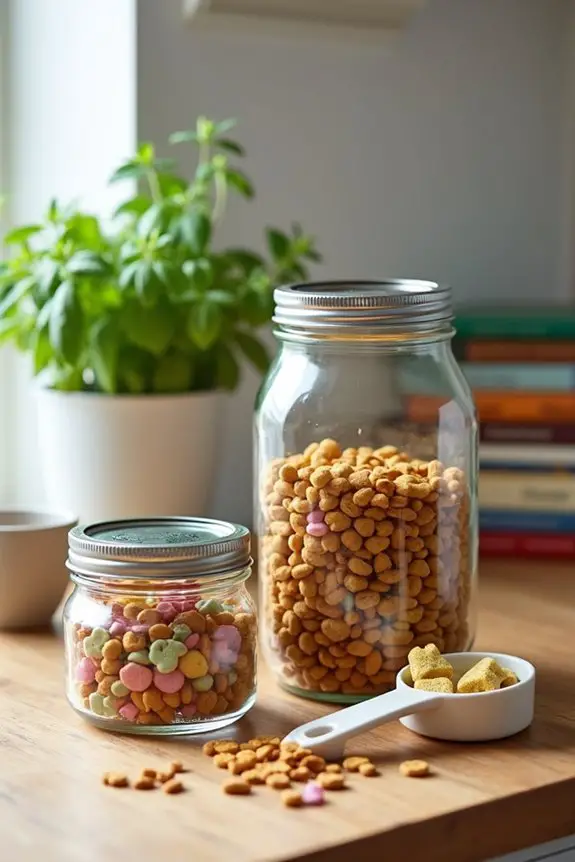
Are you looking for an elegant yet practical way to store your furry friend’s food? Welcome to the world of glass mason jars! These jars not only preserve your dog’s meals longer, but they also give your home a rustic, stylish touch.
Plus, using glass means fewer plastic materials floating around. It’s a win-win for you and the planet!
Materials Needed:
- Glass mason jars (various sizes – quart jars for kibble, pint jars for treats)
- Waterproof labels or chalkboard stickers
- Chalk marker or permanent marker
- Soft sponge or cloth for cleaning
- Measuring cup for scooping
Step-by-Step Instructions:
1. Choose Your Jars: Start by picking out your glass mason jars. Consider using quart-sized jars for kibble and pint-sized jars for treats. They should all have secure lids—no one wants a surprise mess!
2. Give Them a Good Wash: Before you get started, clean your jars thoroughly. A little soap and water, followed by a rinse, will do the trick. This step is essential to avoid any yucky tastes lingering around.
3. Label Like a Pro: Grab your waterproof labels or chalkboard stickers. Write “Kibble” on the larger jar and “Treats” on the smaller one. This will save you from an oatmeal-and-canned-carrot dinner faux pas when you’re bleary-eyed at 7 AM.
4. Fill ‘em Up: Carefully pour your dog’s kibble into the quart jar and the treats into the pint jar. Use your measuring cup to keep things neat.
And if you spill a few kibble pieces? Consider it an unplanned treat for the floor critters.
5. Seal the Deal: After filling each jar, tightly secure the lids. Store these lovely jars in a cool, dry place, perhaps on a shelf or in a pantry corner. It’s like a VIP section for your dog’s food.
6. Show Them Off: We all know glass jars can be pretty. Why not showcase them? Place them on a shelf where they can be a centerpiece in your kitchen.
Optional Add-ons/Variations:
- Color it Up: Consider painting the tops of the mason jars with some non-toxic paint to match your home decor. A little color can go a long way toward personalizing your storage.
- Mix and Match: Use mason jars of different shapes and sizes to create a charming display. The more unique they are, the better the conversation starter when guests come over.
Pro Tip:
Stay safe by checking the lids regularly for any cracks or signs of wear. A damaged lid could lead to a leaky surprise—nobody wants that.
Plus, it’s great practice to measure your dog’s food portions to help maintain a healthy diet. Buddy wouldn’t mind fitting into that cute new sweater he saw, right?
5. Decorative Ceramic Bowls
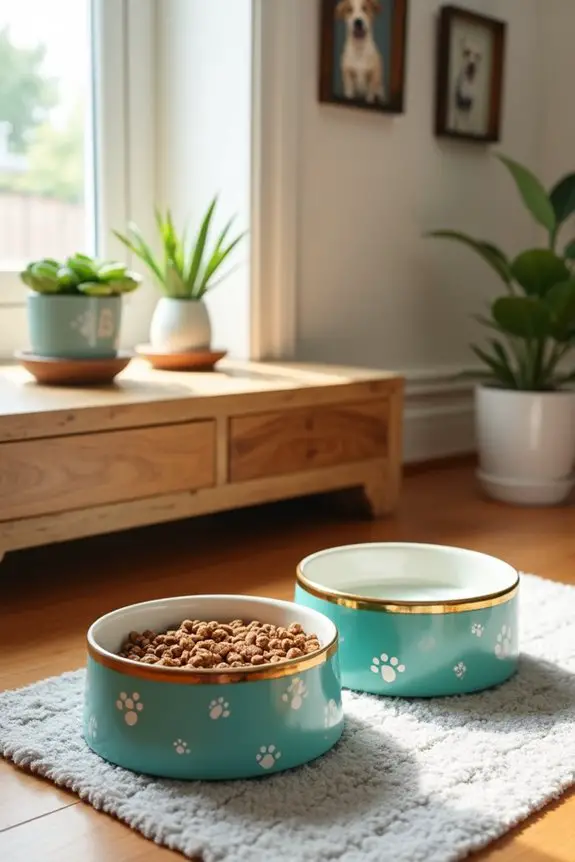
Looking for a stylish way to serve up your pup’s meals? Enter decorative ceramic bowls! These beauties not only enhance your dog’s dining area but also come in various designs that reflect your taste while keeping your dog comfortable during mealtime.
Plus, they’re more durable and often easier to clean than some plastic alternatives. It’s time to treat your furry buddy to a dining experience that elevates their everyday routine, and your home aesthetics along with it!
Materials Needed:
- Decorative ceramic bowls (preferably microwave and dishwasher safe)
- Food-safe sealer (for personalizing your bowls)
- Non-toxic paint or ceramic markers (if you want to customize)
- Soft sponge or cloth for cleaning
Step-by-Step Instructions:
- Pick Your Bowls: Start by selecting ceramic bowls that appeal to your aesthetic. Confirm they’re deep enough for your dog’s food but lovely enough to fit in with your decor. A cute paw print design? How adorable.
- Clean First: Before you get personal, give those bowls a good wash. Use warm, soapy water with a soft sponge. Nothing says “let’s eat” like shiny, clean bowls—plus, you avoid any lingering factory smells.
- Customize Your Creations: If you’re feeling adventurous, take your non-toxic paint or ceramic markers and start personalizing! Write your dog’s name, draw paw prints, or even doodle little hearts. Just remember to allow the paint to dry completely before using the bowls.
- Seal the Deal: If you painted your bowls, go ahead and apply a food-safe sealer over the designs. This will protect your artwork and make your bowls last longer. Do follow the instructions on the product for the best results.
- Fill with Love (and Food): After everything is dry and secure, it’s time to fill those stylish bowls with your pup’s favorite kibble or even a delicious homemade meal. I mean, who wouldn’t want to dine like royalty?
- Show Off Your Work: Place your beautiful bowls in an inviting spot—maybe a dedicated feeding station with a mat underneath to catch any stray kibble. It’s a perfect blend of style and functionality, and trust me, your guests will notice.
Optional Add-ons/Variations:
- Pattern Play: Want more flair? Consider using different colors for each bowl. Pair a bright red bowl for kibble with a calm blue one for water—this not only looks great but makes it easy to distinguish between the two.
- Accessorize: Create matching placemats in a fabric or color that complements your bowls. Your dog’s dining setup will look so good, you might even want to take a picture for Instagram.
Pro Tip:
When choosing ceramic bowls, always look for one with a sturdy base to prevent tipping during mealtime. After all, we want all that delicious food to stay in the bowl and not end up decorated across your kitchen floor.
Plus, who needs an accidental “doggy buffet” when you can avoid it with a non-tip design? Happy decorating!
6. Bamboo Stackable Storage Boxes
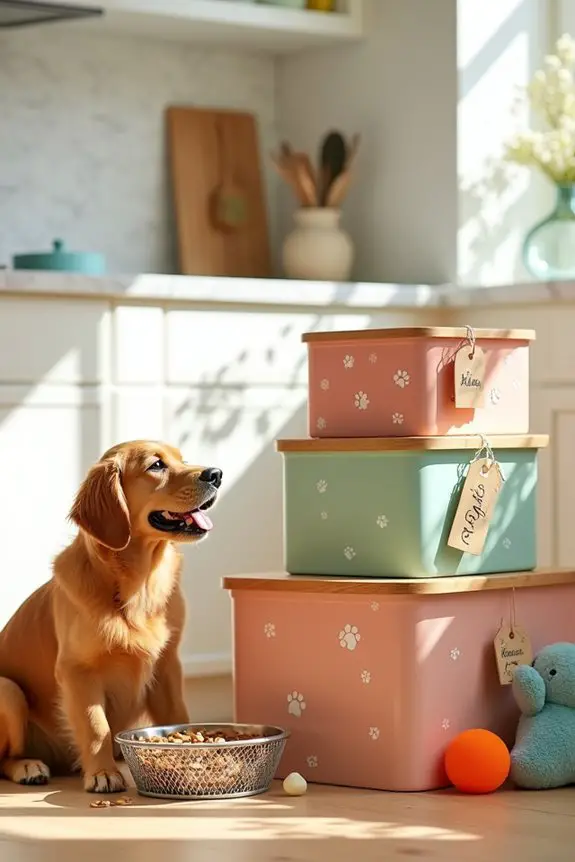
Looking for a chic and functional way to organize your dog’s food and treats? Say hello to bamboo stackable storage boxes! Not only do these boxes keep your dog’s snacks fresh, but they also look great in your home. By making your own, you save money and add a touch of your personality to your pet’s supplies. Plus, they’re incredibly easy to use—who wouldn’t want that?
Materials Needed:
- Bamboo square storage boxes (available at home goods stores)
- Sandpaper (fine grit)
- Non-toxic wood paint or wood stain (your color choice)
- Paintbrush (for applying paint/stain)
- Decorative labels or a label maker (to identify contents)
- Measuring tape (to guarantee proper fit)
- Optional: Clear sealant (for added durability)
Step-by-Step Instructions:
- Choose Your Boxes: Pick out the bamboo storage boxes that suit your needs. Think about what you’ll be storing—treats? Kibble? Having various sizes is a great idea to keep everything organized.
- Sand the Surface: Use fine grit sandpaper to lightly sand the boxes. This will smooth out any rough edges and help the paint or stain stick better. Just a gentle rub will do—the goal is a nice, smooth finish.
- Add Color: If you want your boxes to pop, apply a coat of non-toxic wood paint or stain using your paintbrush. Take it slow and cover all sides—trust me, the first coat may look a little spotty, but don’t worry, another coat will fix that. Let this dry completely.
- Personalize with Labels: Once your boxes are dry, it’s time to label! Use decorative labels or a label maker to mark what goes inside each box. It’s a cute way to keep things organized and prevents any “mystery snack” situations.
- Seal the Deal: If you’ve painted your boxes, consider applying a clear sealant for added durability. Follow the product instructions for application, and you’ll extend the life of your storage boxes.
- Stack It Up: Now comes the fun part—arrange those boxes in a stack! Find a convenient spot in your home where they can be easily accessed. How about right by your pup’s feeding station?
Optional Add-ons/Variations:
- Mix and Match: Want a fun twist? Use different colors for each box. A bright green for kibble and a soft pink for treats could bring a lively, playful vibe to your space.
- Add a Personal Touch: If you want to channel your inner Picasso, paint little dog paw prints on each box for extra flair.
Pro Tip:
For a budget-friendly option, check local thrift stores or online marketplaces. Sometimes, you can find gently used wooden boxes that might just need a quick sand and a splash of paint. It’s a nice little win-win, saving cash while crafting something beautiful for your furry friend.
Now, doesn’t organizing your dog’s supplies feel like a rejuvenating start? Just imagine, no more rummaging through half-open bags to find the good stuff. Your dog will appreciate it—maybe with extra tail wags. Happy crafting!
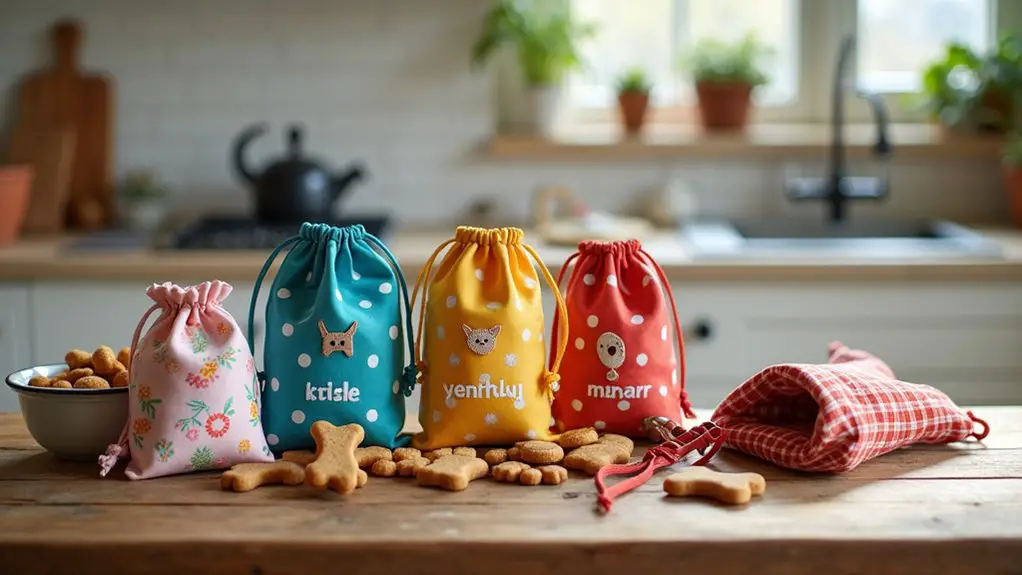
7. Fabric Pet Treat Bags
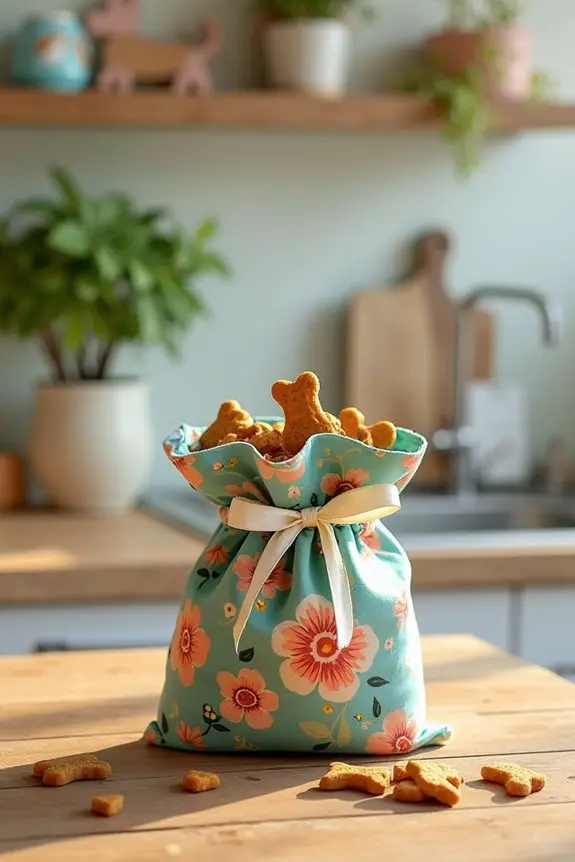
Are you tired of rummaging through your pantry or bag for those precious dog treats? Enter the DIY fabric pet treat bags! These handy little bags aren’t just great for keeping your pup’s treats organized; they’re also cute, customizable, and can save you a few bucks in the long run. Plus, they reduce waste by giving you a reusable option that looks just as good as it’s functional.
Ready to get sewing (or measuring, if you’re like me and barely know the difference)? Let’s jump in!
Materials Needed:
- Fabric (cotton, canvas, or any sturdy material)
- Scissors
- Measuring tape or ruler
- Fabric marker or chalk
- Sewing machine or needle and thread (if hand-sewing)
- Ribbon or drawstring (for closure)
- Iron (optional, for smoothing out fabric)
- Pins (optional, to hold fabric in place while sewing)
Step-by-Step Instructions:
- Measure and Cut: Decide how big you want your treat bag to be. A good standard size is about 8 inches by 10 inches. Use your measuring tape to mark out your fabric, then cut your pieces. Remember, measure twice, cut once—or you might end up with a mini bag that can’t even hold a treat!
- Fold the Top Edge: Take the top edge of your fabric piece, fold it down about an inch, and press it lightly with an iron if you like. This creates a nice clean edge for the opening of your bag. Plus, it makes for easier sewing…or at least that’s what I’ve been told.
- Sew the Sides: Place your fabric right sides together, aligning the edges. Use pins if you want to be extra fancy. Sew down the side edges, leaving the top open. A straight stitch is your best friend here—don’t forget to backstitch at the start and end to secure your seams. If you’re feeling brave, challenge yourself to make it a zig-zag stitch for some extra flair (or just because you missed the sewing class).
- Turn It Inside Out: Once everything’s sewn, flip that bag inside out so the seams are hidden. A long pen or a pencil can help poke out those corners if needed. Now it should look like a little sack waiting for some goodness to fill it.
- Create Closure: At the top, thread your ribbon or drawstring through the folded over edge – just like threading a shoelace! Tie it off to guarantee your treats won’t escape.
- Personalize: Here comes the fun part! You could sew on a cute patch or write your dog’s name on the bag with fabric paint. Make it fun. I mean, why not? Your dog deserves a stylish snack carrier, right?
Optional Add-ons/Variations:
- Different Patterns: Use fun fabric patterns that match your dog’s personality. Think polka dots for a bubbly pup, or maybe a chic plaid for the refined sofa snuggler in your life.
- Size Variations: Don’t stop at just one size. Make a mini bag for small treats or a larger one for on-the-go snacks during long walks. Trust me, your dog will thank you (with those adorable puppy eyes).
Pro Tip:
Make sure to use washable fabric if you expect those treat bags to get a little messy. A quick spin in the washing machine can save you from a sticky situation. And hey, nobody wants to explain to their friends why they’re carrying around a treat bag that smells like… well, you know.
Extra Tips & Ideas
Have you ever found yourself wrestling with a bag of dog food that seems determined to make a mess of your kitchen? Yeah, we’ve all been there. To keep things tidy, consider using an airtight container. You’ll keep the food fresh and your space clean.
If you’re feeling crafty, decorate that container with pet-themed stickers. Who doesn’t love a little flair?
And hey, why not add a scoop to the inside? This way, you’re not spilling kibble everywhere during mealtime madness.
Got an old bookshelf? Repurpose it as a stylish food station. Your living room just got a new look and you scored major points with your dog—win-win, right?
Sometimes, it’s the little things that make feeding time easier and more fun.
Frequently Asked Questions
What Materials Are Safe for Dog Food Storage Containers?
Safe materials for dog food storage containers include stainless steel, glass, and BPA-free plastic. These materials won’t leach harmful chemicals into the food, ensuring your dog’s meals stay fresh and safe for consumption.
How to Prevent Pests in Dog Food Storage?
To prevent pests in your dog food storage, always use airtight containers, keep storage areas clean, and consider adding bay leaves or essential oils. Regularly check for any signs of infestation and discard affected food promptly.
Can I Use Repurposed Containers for Dog Food?
Using repurposed containers for dog food is like giving a second life to something old. Just guarantee they’re clean, airtight, and safe, so your pup’s meals stay fresh and tasty. You’re being eco-friendly too!
How Do I Clean Dog Food Storage Containers?
To clean dog food storage containers, empty them first, then wash with warm soapy water. Rinse thoroughly and dry completely before refilling. For deeper cleaning, use a vinegar-water solution to eliminate odors and bacteria.
What Size Container Is Best for My Dog’s Food?
For your dog’s food, choose a container that holds at least a month’s supply; larger breeds need bigger sizes. Balancing space and accessibility, you want something that’s both practical and aesthetically pleasing in your home.
Conclusion
So there you have it—10 fun and functional ways to store your pup’s food. Imagine transforming a vintage suitcase into a quirky storage solution; just picture that charming design sitting pretty in your kitchen. With a bit of creativity, your dog’s food can look as good as it tastes. And hey, you might just impress your friends during the next dinner party when they see that stylish treat bag hanging nearby. Your dog’s treats deserve it, don’t they?

Amr Mohsen is a software engineer who traded his keyboard for a leash — at least on weekends. His love for dogs inspired him to share what he learns as a dog owner and enthusiast, bringing a detail-oriented, research-driven perspective to every article he writes. If it’s about dogs, he’s probably already looked it up twice.

