Losing a beloved dog is one of the most difficult experiences any pet owner can face. Dogs aren’t just pets; they become family members who fill everyday life with loyalty, laughter, and unconditional love. When they are gone, the quiet moments at home can feel overwhelming, and many people search for meaningful ways to honor the memory of their faithful companion.
Creating something with your own hands can be a powerful way to celebrate the life of a dog who meant so much. Handmade memorials allow you to reflect on the joyful memories you shared while preserving a lasting tribute that keeps their spirit close.
These diy dog memorial ideas offer thoughtful and creative ways to remember your furry friend. Each project is simple enough to make at home yet meaningful enough to become a cherished reminder of the bond you shared.
#1: Hand-Painted Dog Portrait Memorial
When a dog has been part of your life for years, their face becomes unforgettable. The way they tilt their head, their curious eyes, or the unique markings on their fur can instantly bring back warm memories. A painted portrait is a beautiful way to capture those details and display them in your home as a permanent tribute.
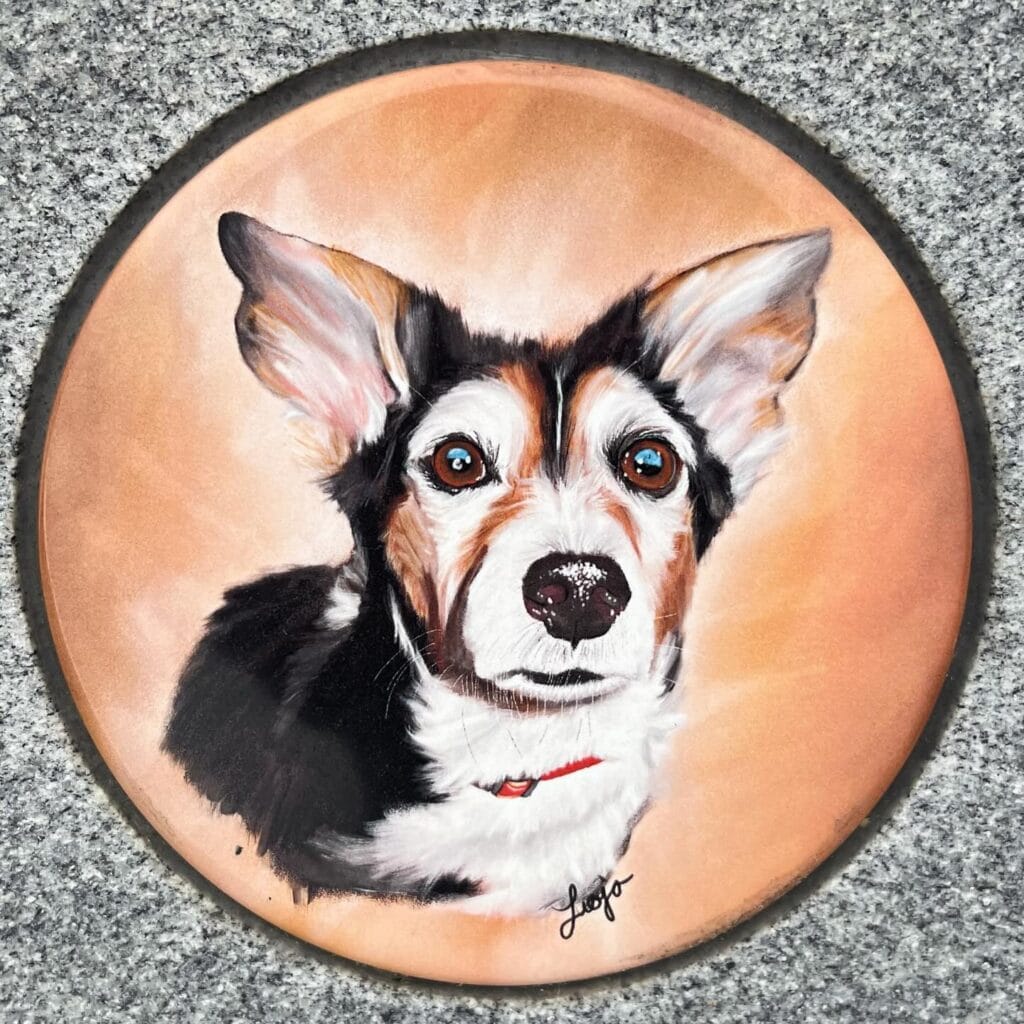
The image shows a detailed painting of a dog’s face on a round wooden plaque. The soft shading and expressive eyes make the artwork feel alive, transforming a simple piece of wood into a heartfelt memorial.
Materials & Tools You’ll Need:
- Round wooden plaque or wood panel
- Acrylic paints in multiple colors
- Paint brushes in different sizes
- Pencil for sketching
- Clear protective varnish
- Reference photo of your dog
Prep Time: 20 minutes | Active Project Time: 2–4 hours | Difficulty Level: Intermediate
Instructions
Begin by selecting a clear photograph of your dog that shows their face and unique markings. Lightly sketch the outline of the dog’s head onto the wooden plaque using a pencil. Focus on positioning the eyes, ears, and nose accurately, as these features give the portrait its personality.
Start painting the background first using a neutral or warm color that complements your dog’s fur. Allow this layer to dry completely before moving on to the dog itself. Using a medium brush, block in the main fur colors while gradually adding darker and lighter tones to create depth.
Switch to a smaller brush when working on the facial features. Carefully paint the eyes, adding highlights to give them a lifelike shine. Slowly build up layers of paint to replicate the texture and color variations of the fur.
Once the painting is finished and fully dry, apply a clear protective varnish. This seals the paint and protects the portrait so it can last for many years.
A portrait like this provides a comforting reminder of your dog’s presence and can help preserve the memory of their unique personality.
Tip: Work slowly in thin paint layers rather than thick ones. This helps achieve smoother blending and more realistic fur textures.
📸 Photo credit: Instagram @photosofpetcemeteries
#2: Framed Photo Tribute With Personalized Message
Many pet owners find comfort in displaying a favorite photograph of their dog. Turning that photo into a decorated memorial frame can transform a simple picture into a meaningful tribute that tells a story.
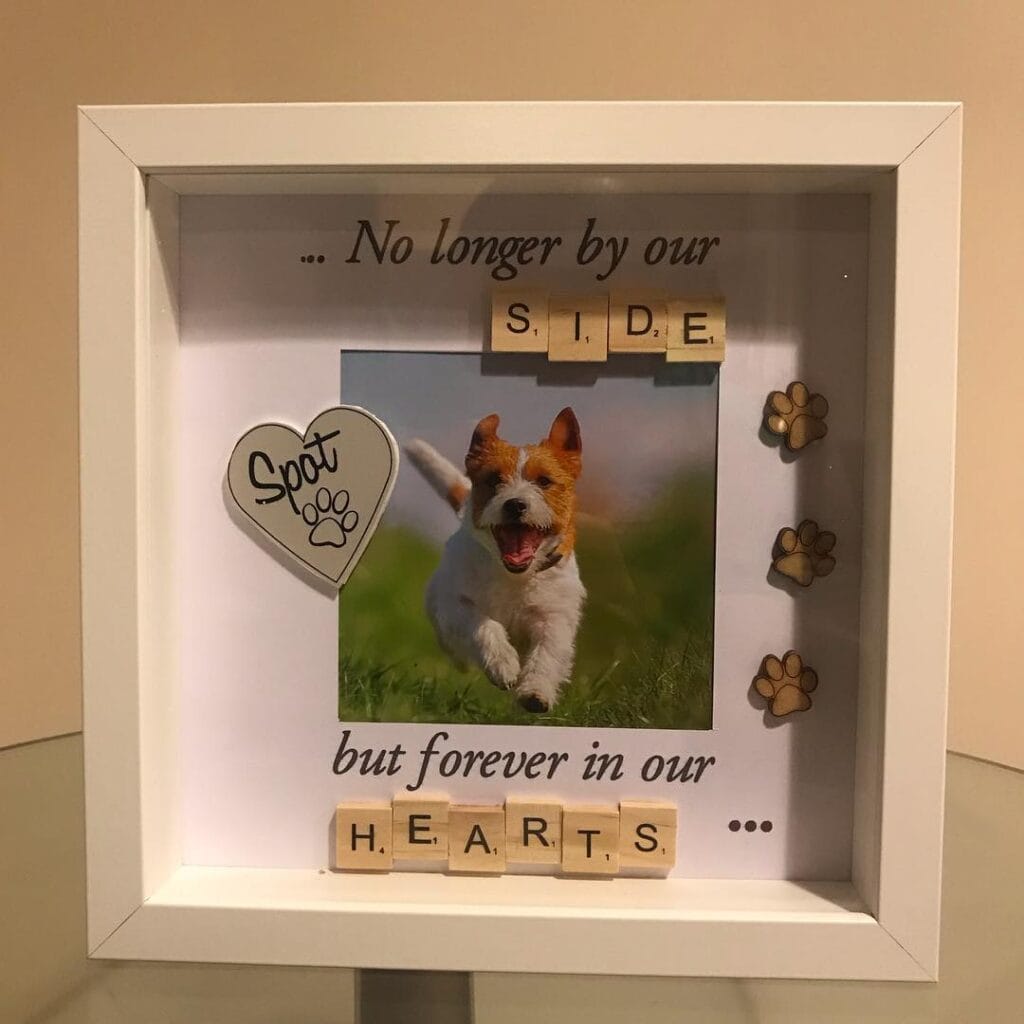
The image shows a shadow box frame containing a photo of a happy dog along with decorative letters, paw prints, and a heartfelt message that reads “No longer by our side, but forever in our hearts.”
Materials & Tools You’ll Need:
- Shadow box frame
- Printed photo of your dog
- Wooden letter tiles or decorative letters
- Craft glue
- Decorative paw print embellishments
- Cardstock or scrapbook paper
Prep Time: 15 minutes | Active Project Time: 1–2 hours | Difficulty Level: Beginner
Instructions
Start by selecting a photo that captures your dog’s personality. Place the photo inside the shadow box frame and experiment with different layout ideas before gluing anything permanently.
Arrange decorative elements such as wooden letter tiles or small paw prints around the photo. Many people choose to include their dog’s name or a short memorial message to personalize the display.
Once you are satisfied with the arrangement, carefully glue the decorations in place using craft glue. Make sure each piece is securely attached before closing the frame.
Finally, assemble the frame and place it somewhere meaningful in your home, such as a living room shelf or bedside table.
This type of memorial display provides a comforting visual reminder of happy moments shared with your dog.
Tip: Choose a photo where your dog appears relaxed or joyful, as it will evoke positive memories every time you see it.
📸 Photo credit: Instagram @4allyouroccasions
#3: Personalized Dog Memorial Ornament
Holiday traditions can feel bittersweet after losing a pet, but incorporating their memory into seasonal decorations can bring a sense of warmth and remembrance.
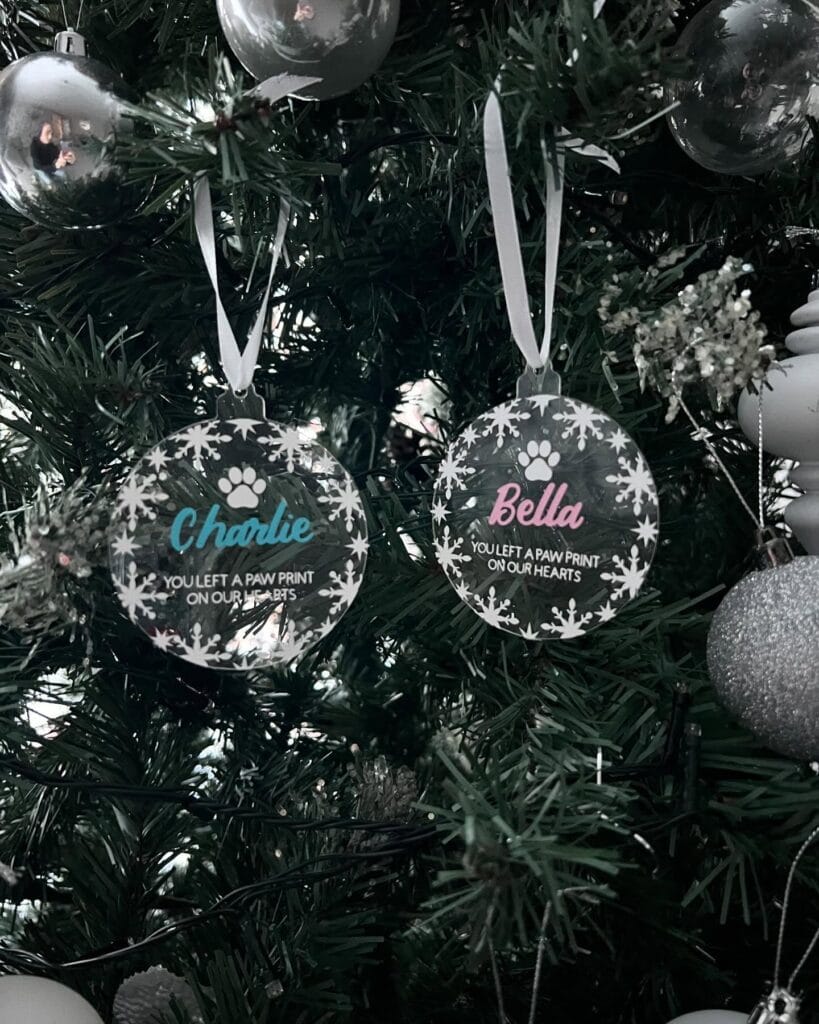
The image shows personalized clear ornaments hanging on a Christmas tree. Each ornament includes a dog’s name and a small paw print design, creating a touching memorial decoration.
Materials & Tools You’ll Need:
- Clear acrylic ornament discs
- Vinyl lettering or paint markers
- Ribbon or ornament hooks
- Small paw print decals or stickers
- Transfer tape (if using vinyl)
Prep Time: 10 minutes | Active Project Time: 45–60 minutes | Difficulty Level: Beginner
Instructions
Begin by cleaning the ornament surface to ensure the lettering adheres properly. Decide on the design and placement of your dog’s name before applying any vinyl or writing with paint markers.
Carefully apply the lettering or hand-write the name onto the ornament. Add small decorative elements such as snowflakes or paw prints around the edges.
Allow the paint or vinyl to set completely before attaching the ribbon. Hang the ornament on a Christmas tree or display it year-round as a decorative memorial.
These ornaments create a special way to remember your dog during holidays and family gatherings.
Tip: Use contrasting colors for the lettering so the name stands out clearly against the ornament.
📸 Photo credit: Instagram @arcustoms237
#4: Engraved Wooden Garden Memorial Sign
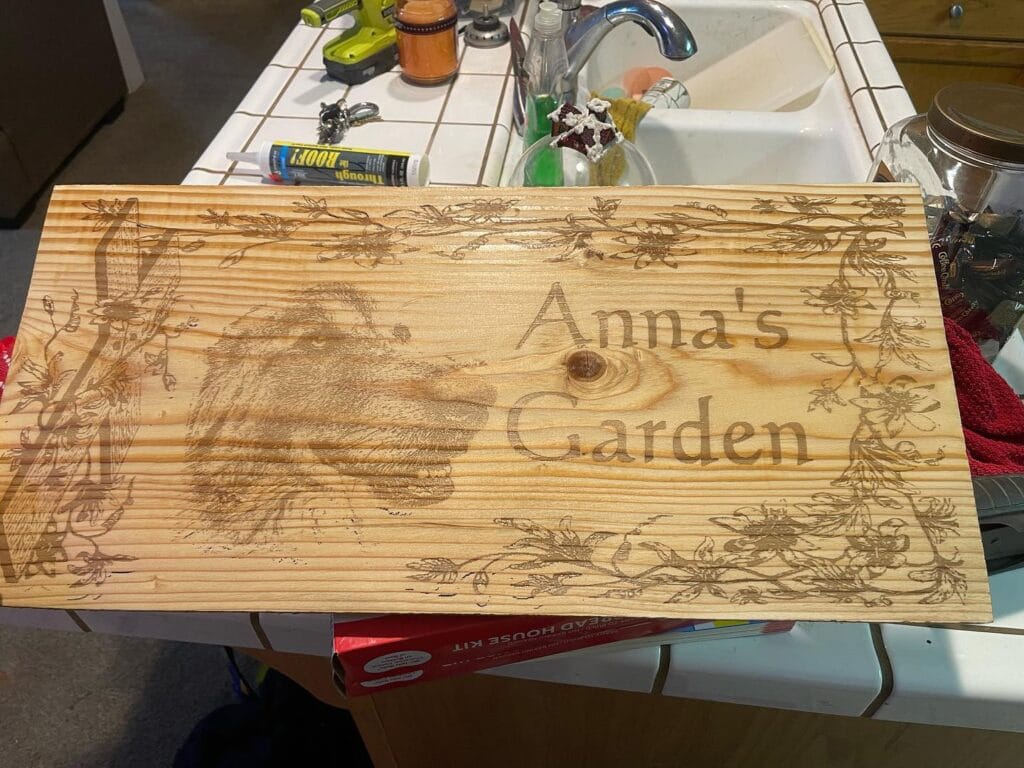
For dogs who loved exploring outdoors, a garden memorial can be a peaceful way to honor their memory.
The image shows a beautifully engraved wooden board with decorative carvings and a personalized message, making it perfect for a memorial garden.
Materials & Tools You’ll Need:
- Wooden plank or board
- Wood burner or engraving tool
- Sandpaper
- Pencil
- Outdoor wood sealant
Prep Time: 30 minutes | Active Project Time: 2–3 hours | Difficulty Level: Intermediate
Instructions
Start by sanding the wooden board until the surface is smooth. Sketch your design lightly with a pencil, including your dog’s name, decorative borders, or a short message.
Use a wood burner or engraving tool to carefully trace over the design. Work slowly and steadily to maintain consistent lines and depth.
Once the engraving is complete, wipe away dust and apply an outdoor sealant to protect the wood from weather damage.
Place the finished sign in your garden, near a tree, or beside a favorite spot where your dog loved to relax.
This project creates a peaceful outdoor space where you can reflect on cherished memories.
Tip: Practice engraving on scrap wood before starting the final design.
📸 Photo credit: Instagram @brandons_custom_carvings
#5: Mini Dog Sculpture Memorial Display
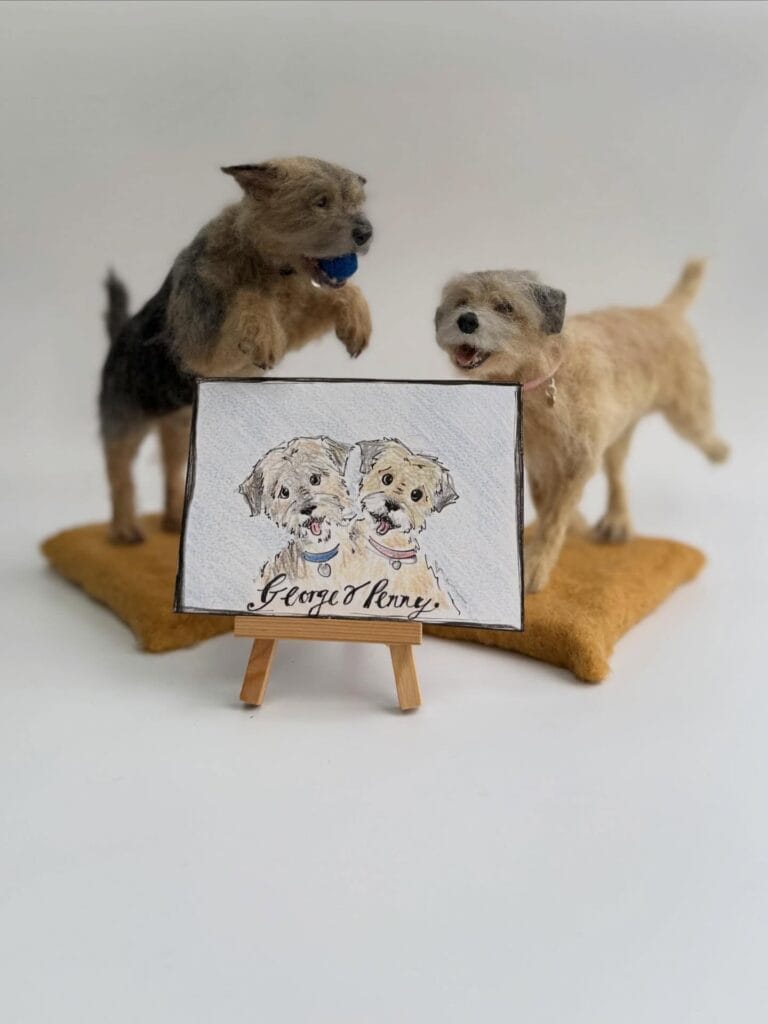
Some people prefer three-dimensional keepsakes that capture the playful spirit of their dog. Small sculptures or figurines can be displayed on shelves or desks as daily reminders of beloved companions.
The image shows miniature dog figures placed beside a small illustrated portrait, forming a charming memorial arrangement.
Materials & Tools You’ll Need:
- Air-dry clay or felt
- Sculpting tools
- Acrylic paints
- Small display base
- Printed illustration or photo
Prep Time: 20 minutes | Active Project Time: 2–3 hours | Difficulty Level: Intermediate
Instructions
Begin by shaping the clay or felt into the basic body and head of your dog. Focus on capturing recognizable features such as ear shape and tail position.
Allow the sculpture to dry or set completely before painting. Carefully paint the fur colors and markings to match your dog’s appearance.
Once the sculpture is finished, place it on a small display base beside a photo or illustration of your dog. This combination creates a small memorial scene that reflects your dog’s playful personality.
Tip: Use reference photos from multiple angles to capture your dog’s unique shape.
📸 Photo credit: Instagram @curlyjocreation
#6: Paw Print Impression Memorial
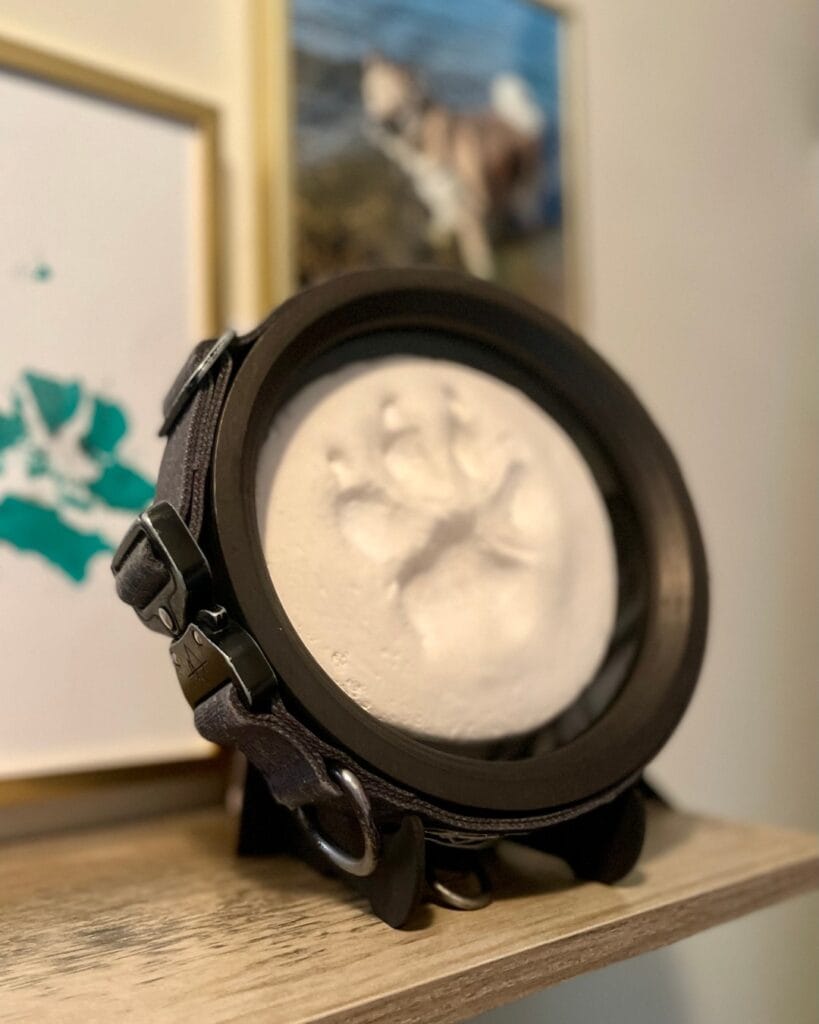
A paw print is one of the most personal keepsakes you can preserve. Just like a fingerprint, every dog’s paw print is unique.
The image shows a preserved paw impression displayed inside a decorative frame, creating a lasting memorial.
Materials & Tools You’ll Need:
- Air-dry clay or plaster kit
- Rolling pin
- Frame or display stand
- Clear sealant
Prep Time: 10 minutes | Active Project Time: 1 hour | Difficulty Level: Beginner
Instructions
Roll out the clay until it forms a smooth, even surface. Gently press your dog’s paw into the clay to create a clear imprint.
Carefully lift the paw away and smooth any rough edges around the impression. Allow the clay to dry completely according to the product instructions.
Once dry, apply a protective sealant and place the impression inside a frame or display stand.
This simple yet meaningful project preserves a physical imprint of your dog that can be treasured forever.
Tip: Press the paw evenly but gently to avoid smudging the impression.
📸 Photo credit: Instagram @lapofloveveterinaryhospice
#7: Paw Print and Fur Memory Frame
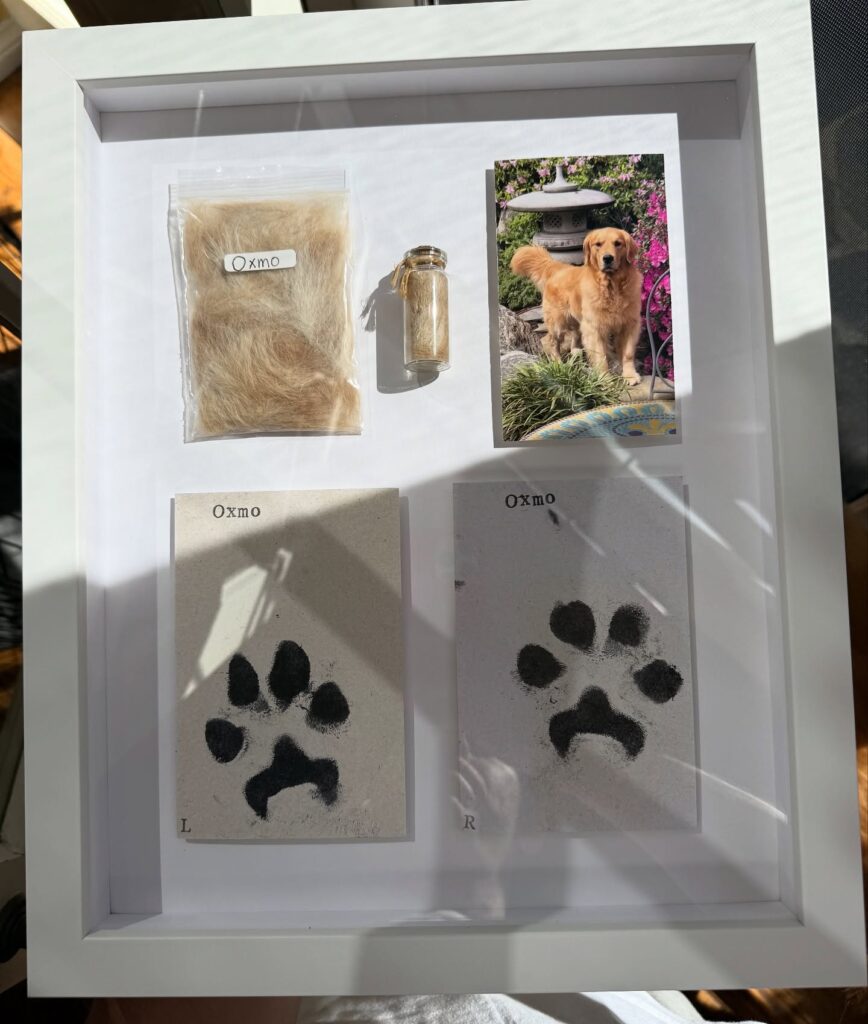
Combining several keepsakes into one frame can create a deeply personal tribute.
The image shows a framed display containing a dog’s photograph, paw prints, and even preserved fur in a small vial.
Materials & Tools You’ll Need:
- Large shadow box frame
- Printed photo of your dog
- Paw print ink pad
- Small glass vial
- Fur keepsake
- Craft glue
Prep Time: 20 minutes | Active Project Time: 1–2 hours | Difficulty Level: Beginner
Instructions
Start by placing your dog’s photograph inside the shadow box frame. Arrange the paw print cards and the small vial containing fur around the photo to create a balanced layout.
Secure each item using craft glue or adhesive mounts. Adjust the arrangement until everything fits comfortably within the frame.
Close the frame and display it somewhere meaningful in your home.
This type of memorial keeps multiple memories together in one place, helping you preserve different parts of your dog’s life story.
Tip: Label each item with your dog’s name or dates to add a personal touch.
📸 Photo credit: Instagram @ness_thegolden
Conclusion
Remembering a beloved dog is never easy, but creating something meaningful can bring comfort during the grieving process. These diy dog memorial ideas offer thoughtful ways to celebrate the joy, loyalty, and love that dogs bring into our lives.
Whether you choose a painted portrait, a paw print keepsake, or a personalized ornament, each project becomes a lasting tribute to a companion who will always hold a special place in your heart.

Amr Mohsen is a software engineer who traded his keyboard for a leash — at least on weekends. His love for dogs inspired him to share what he learns as a dog owner and enthusiast, bringing a detail-oriented, research-driven perspective to every article he writes. If it’s about dogs, he’s probably already looked it up twice.

