Have you ever thought about turning your backyard into a doggy water wonderland? Imagine this: your pup splashing around in a vibrant kiddie pool, surrounded by colorful floating toys and maybe even an inflatable slide. Sounds like a dream, right? With just a few fun designs, you can create a perfect spot for your furry friend to beat the heat. Curious about how to make it a reality? Let’s splash into those designs that can get your tail-wagging!
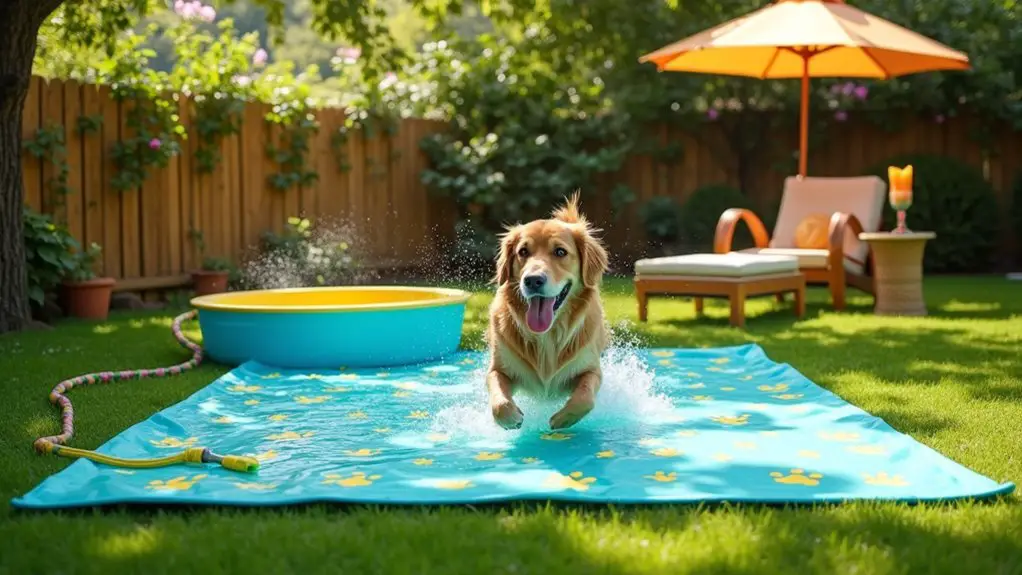
Puppy-Friendly Splash Pad Ideas
When you think about keeping your puppy cool and entertained on a hot summer day, creating a splash pad is a fantastic idea.
Sure, you could buy one, but where’s the fun in that? A DIY dog pool can become the splash zone of your backyard dreams. Start with a kiddie pool, and add fun attachments like sprinklers or water jets.
If you’re feeling artsy, why not decorate it with non-toxic paint? Toss in some floating toys, and voila, you’ve got instant happiness! Your pup will splash around, and you’ll be the coolest human on the block.
Don’t forget to snap some photos because, honestly, who doesn’t want to see a soggy puppy? It’ll be a summer memory to cherish.
Our Collection
Let’s check out our collection of fun dog pool ideas that’ll make your pup’s summer unforgettable.
From floating toys that keep their tail wagging to a giant inflatable water slide that promises hours of delight, there’s something for every furry friend.
You can even set up a customizable poolside play area, complete with a kiddie pool featuring a sunshade—perfect for those sunny afternoons when you need a break, too.
1. Floating Toys for Water Fun
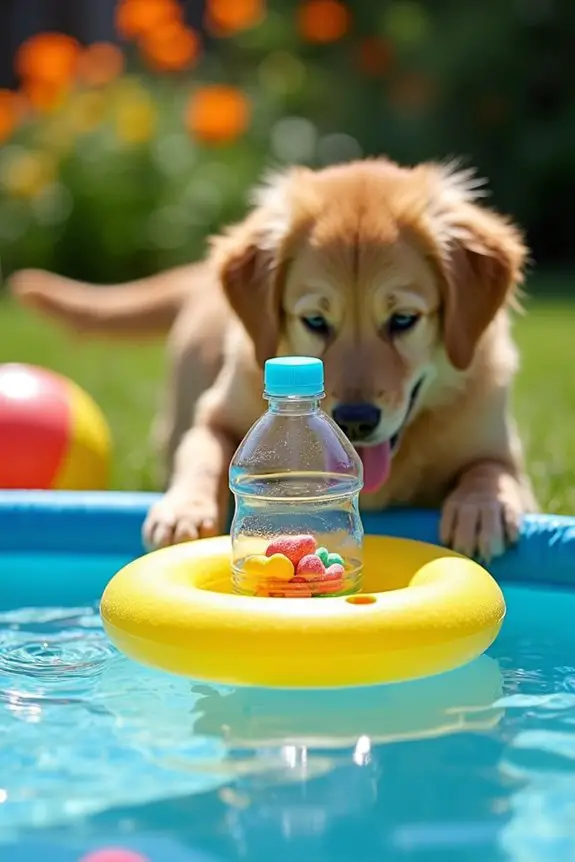
If your dog loves splashing around in their pool, why not add some extra fun with a DIY floating treat and toy dispenser? This simple project not only entertains your furry friend but also encourages them to stay engaged in the water, making pool time even more enjoyable. Plus, you can indulge your pup with a luxury dog treat dispenser that provides a high-quality treat experience, using a premium dog treat maker. Having a dedicated giant breed dog food station can also complement your dog’s feeding routine effectively.
Materials Needed
- A clean, empty plastic bottle (like a soda or water bottle)
- Lightweight pool noodle (or two, depending on size)
- Dog-friendly treats (like small kibble or special dog snacks)
- Scissors
- Tape or glue (optional, for securing parts)
- X-Acto knife or sharp utility knife (for creating holes)
Step-by-Step Instructions
- Prepare the Bottle: Rinse out the empty plastic bottle and remove any labels. Cut a few small holes around the bottle at the mid-section. These holes should be just big enough for the treats to fall through but small enough that your dog can’t easily reach in.
- Create the Noodle Base: Cut the pool noodle to the same length as your bottle. You want this to support the bottle while it floats on water. If you’re feeling crafty, cut the noodle lengthwise first to create a better fit on the bottle’s circumference.
- Attach the Bottle to Noodle: Slide the bottle into the pool noodle. Make sure it fits snugly; you can use tape or glue to hold the bottle in place if it’s a bit wobbly.
- Load It Up: Fill the bottle with your dog’s favorite treats. Before you screw the cap back on, test dropping a couple of treats to see if they easily fall out. Adjust holes if they’re too small.
- Let It Float: Place the dispenser in your dog’s pool! Watch as they figure out how to get those treats out. You might even need to keep an eye out – you know how dogs can be sneaky.
- Encourage Play: Show your pup how to nudge the bottle with their nose or paws. Celebrate each successful treat retrieval to boost their confidence.
Optional Add-ons/Variations
- Decorate: Use non-toxic paint or dog-safe decorations to personalize the bottle. Adding your pup’s name or fun patterns can make it look cute and one-of-a-kind.
- Change the Bobbing Effect: If you’ve got extra pool noodles lying around, you can add more to the sides for a taller floating dispenser. This way, it bobs and weaves more in the water, adding an extra challenge.
Pro Tip
Make sure to supervise your dog while they’re playing with this floating toy. You want to guarantee it’s a safe, fun experience.
And if they somehow manage to nip the bottle and start trying to chew it, just smoothly intervene. Their safety, after all, should always be the priority—no matter how much fun they’re having!
2. Giant Inflatable Water Slide
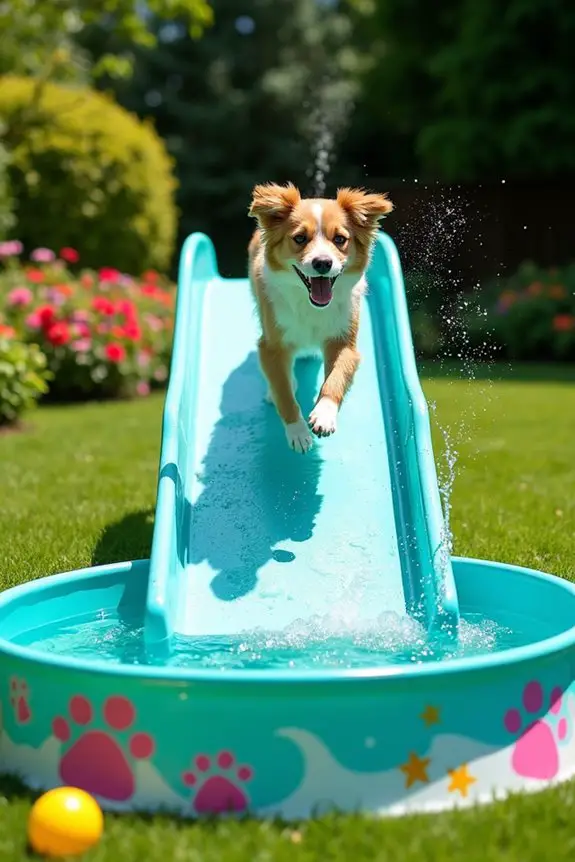
Have you ever watched your pup make a daring leap into the kiddie pool and thought, “Oh, if only they’d a slide”? Well, you’re in luck! This DIY dog pool slide isn’t only a fun addition to your backyard a perfect way to elevate your dog’s swimming experience but also a great way to make it easier for older dogs or those with mobility issues to join in on the fun.
Let’s jump in and create a splash-tastic addition for your furry friend.
Materials Needed
- Plastic storage or garden shelving (at least 4 feet long)
- Non-slip mat or rubberized coating (for traction)
- Adjustable screws or brackets
- Outdoor adhesive (like Gorilla Glue)
- Sandpaper or file (to smooth edges)
- Outdoor paint (optional for decoration)
- Ruler or measuring tape
- Saw (if you need to cut the shelving)
- Drill with bits
Step-by-Step Instructions
- Select Your Shelf: Find a sturdy plastic shelving unit that can withstand some splashes. Look for one that’s slightly angled or can be adjusted to create a gentle incline.
- Prep the Surface: If needed, use sandpaper to smooth any sharp edges. No one wants a splintered pup, so take your time on this step.
- Create the Slide: If the shelf needs shortening or adjusting, use the saw to cut it down to about four feet in length. This length is perfect for your dog, giving them enough room to have fun without the “steep hill” scare.
- Add Non-slip Grip: Cut the non-slip mat to size and adhere it to the slide surface with the outdoor adhesive. This provides extra traction, making it safer for your dog when they zoom down.
- Secure the Slide: Position the shelf at an angle leading into the pool, and use the brackets or adjustable screws to secure it in place. Make sure it’s stable; nobody wants their slide to slide away.
- Customize: If desired, give the slide a pop of color with outdoor paint. Let it dry completely before you set it up. You could even paint fun designs—think paw prints or waves.
- Test It Out: Encourage your dog to give it a try. It might take a little coaxing, a few treats, and lots of cheer. We all know how cautious pups can be, right?
Optional Add-ons/Variations
- Add Splash Features: Consider attaching a small pool fountain or sprinkler at the top of the slide for extra fun. Watching your dog joyfully chase down the water will definitely be a highlight of pool days.
- Color-Coded Decor: Use different colored non-slip mats for a funky look or to match your dog’s accessories. You could go for a beachy vibe or something bold and bright – the options are endless!
Pro Tip
Always supervise your dog while they’re using the slide. Even with a non-slip surface, accidents can happen.
Also, if your pup is hesitant, try placing their favorite toys at the bottom of the slide to encourage them to venture down. Happy sliding!
Creating this simple dog pool slide is an easy way to add joy to your pup’s pool time while ensuring they’ve safe access to their own private water park.
3. Customizable Poolside Play Area
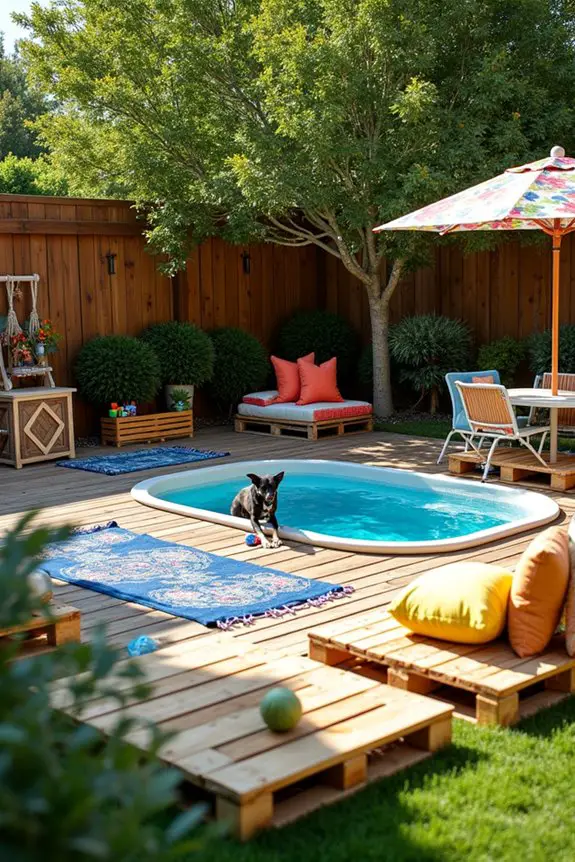
Imagine transforming your mundane backyard into a haven of fun and relaxation for your dog. With a customizable poolside play area, you can create a safe, inviting space that enhances your dog’s enjoyment during hot summer days. Consider complementing this setup with a luxury elevated pet feeder to further elevate your pet’s experience.
Perfect for splashes, snuggles, and sunbathing, this DIY project not only keeps your pup entertained but saves you money on expensive commercial options. Plus, it adds a personal touch to your outdoor space, making it a true oasis for both you and your furry friend. Additionally, incorporating essential dog training equipment can help ensure your pup is well-disciplined while having fun.
Materials Needed
- Wooden pallets or large pavers (for the base)
- Outdoor rugs or mats (for comfort)
- Wooden beams or fencing (for a border)
- Non-toxic sealant or wood treatment (to protect from weather)
- Decorative cushions or pet-friendly outdoor furniture
- Rope or chain (if creating a shade structure)
- Canopy or outdoor umbrella (optional for shade)
- Outdoor storage box (for toys and supplies)
Step-by-Step Instructions
- Choose Your Location: Pick a sunny spot near your pet pool, making sure it’s free from debris and sharp objects. Your dog will appreciate a spacious area to lounge and play.
- Lay the Foundation: Use wooden pallets or large pavers to create a stable foundation. Arrange them in a square or rectangle around your pool to define your play area.
- Add Comfort: Layer outdoor rugs or mats on top of your base. This provides a cushy spot for your pup to relax on once they’re done splashing about. Trust me, no one likes lounging on hot pavement.
- Create a Border: Use wooden beams or fencing to form a border around the play area. This not only looks great but keeps toys and pup activities contained in the designated zone.
- Seal for Durability: Apply a non-toxic sealant to any wood used, especially if it’s untreated. This step is essential to protect it from water, sun, and other outdoor elements—trust me, it’s worth the effort for longevity.
- Furnish and Decorate: Choose some fun decorative cushions or pet-friendly outdoor furniture to make the area cozy. A shaded space will help keep everyone cool on sunny days—so consider adding a canopy or outdoor umbrella for some extra protection.
- Organize Toys: Use an outdoor storage box to store all of your pup’s toys, balls, and treats. This keeps your area tidy and makes it easy to grab items for playtime.
Optional Add-ons/Variations
- Create a Shade Structure: If you want to get really crafty, consider hanging a light rope or chain from two trees to create a playful shade shelter. This adds character and keeps your dog cool and comfortable.
- Decorate with Colorful Plants: Consider adding some pet-friendly plants around the edges. Not only does this enhance the look, but it also provides a natural feel that both you and your dog will appreciate.
Pro Tip
If you’re feeling adventurous, opt for weather-resistant materials to make sure your poolside area withstands the elements. This can save you money in the long run because you won’t have to replace furniture or structures year after year.
Plus, always check for sharp edges—trust me, no one wants a splintered pup day.
4. Kiddie Pool With Sunshade
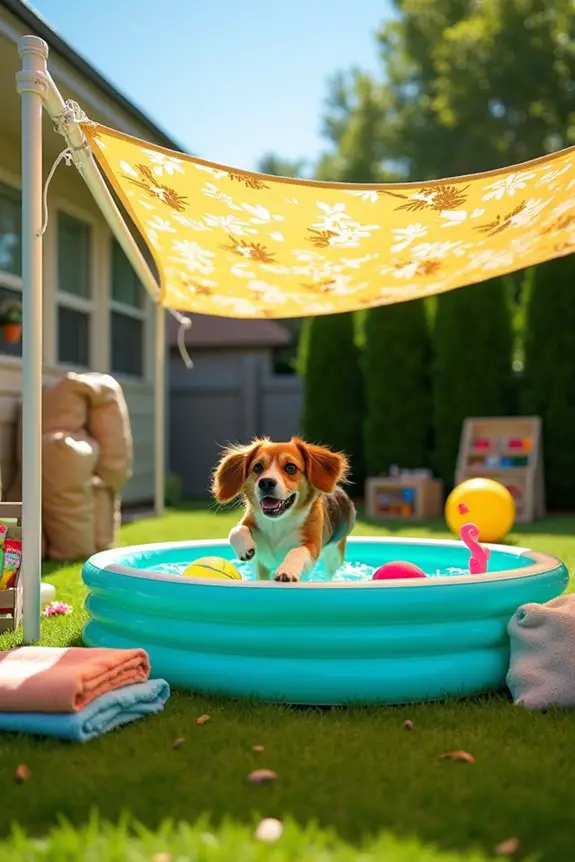
Are you ready to create a splash-tastic oasis for your furry friend? A kiddie pool with a sunshade isn’t just a practical solution for keeping your dog cool, but it also adds an appealing element to your backyard. With a little creativity and some basic DIY skills, you can create a fun space that both you and your pup will love.
Plus, it’s way more budget-friendly than a fancy dog pool, and it keeps your pooch comfy while they frolic in the water.
Materials Needed
- Inflatable kiddie pool or plastic kiddie pool
- PVC pipes (for the shade structure)
- UV-protective fabric or outdoor tarp
- Holesaw bit (for pipe assembly)
- Easily removable brackets or fittings (for assembling and securing the shade)
- Sand or pool cover (to weigh down the fabric)
- Duct tape (for extra reinforcement)
- Optional: Decorative pool floats or dog toys (for added fun)
Step-by-Step Instructions
- Choose Your Spot: Find a flat, sunny area in your yard that’s easily visible from your house. After all, you’ll want to keep an eye on your dog while they play. Make sure it’s free from sharp objects and potential hazards.
- Set Up the Pool: Inflate or fill your kiddie pool and place it in the chosen location. If you’re using a plastic pool, make sure it’s sturdy and has no cracks or leaks.
- Build the Shade Structure: Cut your PVC pipes to create a frame that will support your sunshade. Generally, a simple A-frame design works wonders. You should have two tall pieces (for the sides) and two shorter ones (for the top).
- Attach the Shade Fabric: Use your PVC pipes to create a structure that holds your UV-protective fabric or outdoor tarp above the pool. Secure the fabric tightly to prevent it from flapping in the wind. Duct tape can be handy here for additional strength where needed.
- Secure Everything: Weigh down the edges of the fabric with sandbags or pool covers, so it doesn’t blow away. You want your shade structure to hold firm even on breezy days, protecting your pup from the hot sun.
- Decorate for Fun: Add some playful elements like pool floats or dog toys into the kiddie pool. Trust me, seeing your dog bob around in a flamingo floaty will bring a huge smile to your face.
- Enjoy Splash Time: Encourage your dog to jump in and have fun! Don’t forget to join them by lounging nearby with a drink—it’s essential to supervise while they splash around, but you might be tempted to get wet too.
Optional Add-ons/Variations
- Color Your World: Choose colorful UV fabric or a fun tarp pattern to spice up the look of your sunshade. You could even match it to your dog’s personality—how about a bright blue for a playful pup or a leafy green for a nature lover?
- Add Toys and Treat Stations: Create mini stations at the side of the pool with toys or cool-down treats. Use small buckets or bins for easy access, making playtime even more exciting.
Pro Tip
Always check the fabric and PVC structure regularly for wear and tear, especially after windy or rainy days. A little upkeep goes a long way, ensuring your dog has a safe and enjoyable experience every time they splash into their pool.
And remember, sunscreen isn’t just for us humans—be sure to apply pet-safe sunscreen on any exposed areas of your pup, especially if they’re light-colored or have short fur.
Creating a kiddie pool with a sunshade can be a wonderfully fun and rewarding project that brings joy to both you and your four-legged companion. So roll up your sleeves, get a little creative, and plunge into this exciting DIY adventure!
5. Water-Resistant Dog Pool Toys
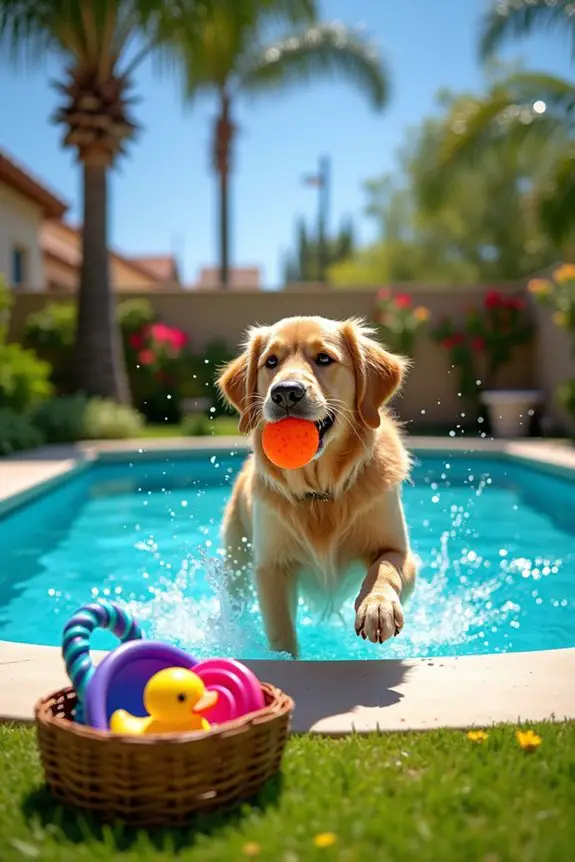
Is your dog’s pool playtime missing a splash of excitement? Well, the solution lies in the world of water-resistant dog pool toys. These fun and durable accessories are designed specifically for endless water play, providing entertainment, comfort, and even a bit of exercise for your furry friend. Not only do they keep your pup engaged, but they also elevate the whole pool experience — plus, they save your beloved tennis balls from a watery demise.
Let’s leap into creating some perfect pool-side pals for your pup.
Materials Needed
- Water-resistant dog toys (like floating fetch balls or rubber ducks)
- Wet dog-friendly toys (like tug ropes made from treated fabrics)
- Basic sewing kit (if you plan to customize)
- Markers or fabric paint (for personalization)
- Optional: Poolside storage bin (to keep toys tidy)
Step-by-Step Instructions
- Choose Your Toys: Start by selecting a variety of water-resistant toys. Look for options that are durable yet soft enough for your furry friend’s teeth. Think of floating fetch balls and tug toys that can hold up against some doggy excitement.
- Inspect and Test: Before introducing the toys to the pool, give each one a quick inspection. Confirm there are no sharp edges or small parts that could get lost in the water and become a choking hazard. You wouldn’t want your dog inhaling a rogue squeaker, would you?
- Personalize (Optional): Want to make those toys truly one-of-a-kind? Grab some fabric paint or markers and express your creativity! Whether it’s adding your dog’s name or a fun design, customizing their toys is a great way to bring your personality into playtime. Just let the paint dry completely before letting your dog have at it.
- Test the Waters: Now it’s time for the fun part! Toss the toys into the pool and encourage your puppy to jump in and start chasing. Watch as they splash and plunge after their new favorites. You might want to grab a towel afterward — things could get a bit wet.
- Storage Solution: After your dog is done playing, consider having a designated storage bin near the pool. This keeps your pool toys from becoming soggy, misplaced, or chewed on by critters. Plus, it makes clean-up a breeze.
- Supervision is Key: Always supervise your pup during pool playtime because, let’s be real, distractions can lead to unexpected jumps or splashes. Keeping an eye on them ensures safety while maximizing enjoyment.
Optional Add-ons/Variations
- Mix and Match Colors: Choose toys in coordinating colors that match your pool decor or your dog’s personality. A bright splash of color never goes out of style.
- DIY Tug Toys: If you’re feeling crafty, create your own tug toys by braiding long strips of water-resistant fabric. This way, you can customize the length and thickness to suit your dog’s needs. Who knew a little DIY could lead to endless fun?
Pro Tip
If your pup has a tendency to chew their toys, consider investing in reinforced products made from high-durability materials—this saves you money in the long run because you won’t be replacing those puppies every week.
Plus, it’s always good to opt for toys that are easy to clean, so you can just give them a rinse after a day in the pool, keeping your dog ready for their next aquasplash adventure.
There you have it — a handful of water-resistant dog pool toys to keep that tail wagging and your backyard parties full of joy. Because let’s face it, every splash counts when it comes to having fun!
6. Dog-Friendly Water Sprinkler
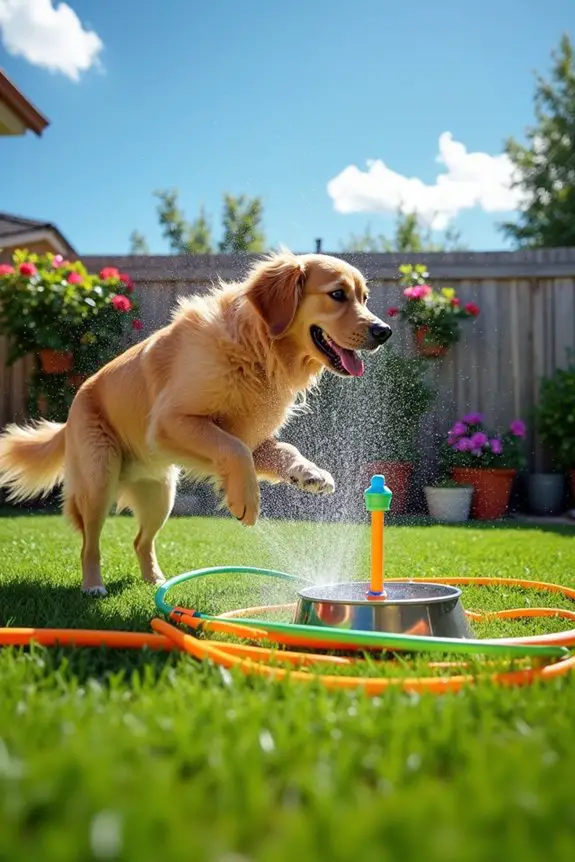
Have your dog jump and play with a revitalizing twist by creating a DIY dog-friendly water sprinkler! This fun and engaging project not only helps your pup cool off during hot days but also keeps them entertained and active. It’s an affordable alternative to store-bought options and can easily be adjusted to suit your dog’s size and energy level. Get ready for some splashing fun!
Materials Needed
- A garden hose (make sure it’s long enough for your yard)
- A sprinkler head (look for one that sprays wide enough for area coverage)
- Hose connectors (to attach the sprinkler head)
- Plastic or rubber tubing (if you want to create more spray patterns)
- Scissors (for cutting tubing)
- Duct tape or hose clamps (for securing connections)
- Adjustable wrenches (to tighten fittings)
Step-by-Step Instructions
- Choose a Location: Determine where your dog loves to play in the yard and set up your water sprinkler in that area. A sunny spot will keep things bright and cheery.
- Connect the Sprinkler Head: Attach the sprinkler head to one end of the garden hose using the hose connector. Make sure it’s tightly connected to prevent any leaks. You don’t want a surprise shower at the end of a hose!
- Add Tubing (Optional): If you want to create fun spray patterns, cut pieces of plastic or rubber tubing and attach them to the sprinkler head. You can even poke small holes in tubing for extra misty spray.
- Secure Everything: Use duct tape or hose clamps to firmly secure all connections. You don’t want anything coming undone when the water starts flowing and your pup is on the prowl.
- Set Up the Hose: Lay the hose out across the yard from your spigot to the sprinkler. Make sure it’s a clear path, free from tripping hazards, because no one wants their dog tumbling mid-splash.
- Turn on the Water: Finally, turn on the water and adjust the sprinkler to your desired spray pattern and range. Watch your pup go nuts, jumping and running through the revitalizing mist.
- Monitor the Fun: While it’s tempting to sit back and enjoy, keep an eye on your dog to make sure they’re safe and having a blast.
Optional Add-ons/Variations
- Spray Patterns: If you want to take it up a notch, consider adding multiple sprinkler heads on a single hose to create a fun water maze for your dog to run through.
- Colorful Decor: Use colored tape or paint to decorate the base of your sprinkler head. Get playful with it – who says it shouldn’t look good while bringing joy?
Pro Tip
Always be mindful of your dog’s personality. Some pups love a deluge, while others might prefer a gentle mist. Adjust your water pressure accordingly.
And don’t forget to replace the water in their bowl afterward; they’ll need to hydrate after all that excitement. With a bit of supervision and creativity, your DIY water sprinkler will be a hit all summer long!
7. Cooling Dog Pool Mats
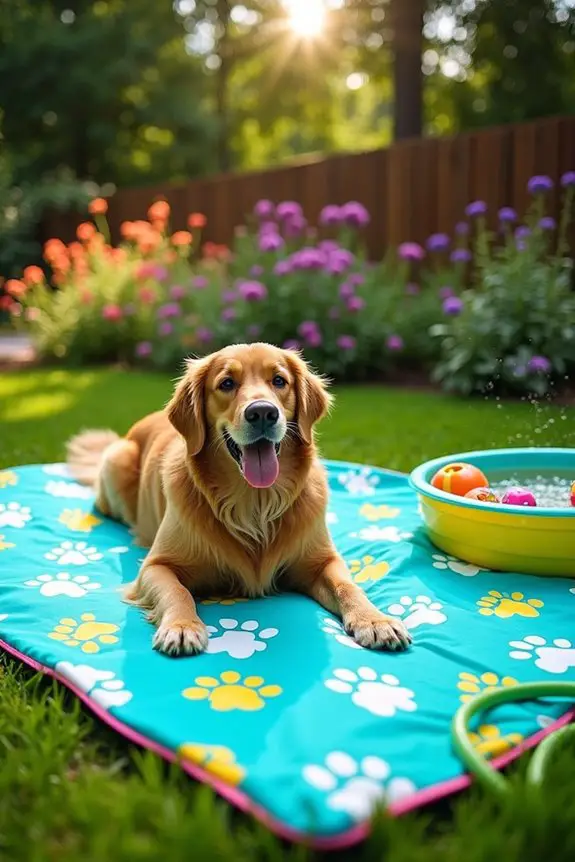
As the temperatures rise, there’s nothing quite like watching your furry friend romp around in some cool water. A DIY dog pool mat is a fantastic project that not only saves you money but also provides a rejuvenating spot for your pup to chill out.
Plus, it adds a colorful touch to your backyard. Trust me, your dog will thank you for this super simple and beneficial upgrade!
Materials Needed
- Heavy-duty waterproof fabric (like tarp or vinyl)
- Scissors
- Measuring tape
- Sewing machine or heavy-duty fabric glue
- Strong thread or adhesive
- Ruler or straight edge
- Plastic pool liner (optional for waterproofing)
Step-by-Step Instructions
- Measure the Area: Pick a spot in your yard where you’d like to set up the cooling mat. Use a measuring tape to determine how large you’d like the mat to be. A good size is about 3×5 feet, but feel free to go larger if your dog loves to sprawl.
- Cut the Fabric: Using scissors, cut the heavy-duty fabric according to your measurements. If you want a softer feel, consider layering two pieces together. Just remember that the more fabric, the more delightfully cushy it’ll be for your pup.
- Waterproof the Mat: If your fabric isn’t already waterproof, lay out a plastic pool liner underneath your cut fabric. This extra layer will help keep whatever surface you place it on (like grass or decking) dry.
- Sew or Glue the Edges: Now it’s the moment of truth. If you’re using a sewing machine, fold the edges of the fabric over about half an inch and sew them down to prevent fraying. If sewing isn’t your thing, fabric glue will do the trick, too. Just make sure everything’s secured nice and snug.
- Let It Dry: If you’ve used glue, give it some time to dry completely. Patience is a virtue, even if your dog doesn’t seem to share that sentiment.
- Place the Mat Down: Find the perfect spot in your yard and lay your lovely new dog pool mat down. Make sure it’s flat and free of debris, so your pup can lounge comfortably.
- Test It Out: Call in your dog for an afternoon of fun. If they give you that adorable head tilt, you’ve officially created a winning spot for them to relax and cool off.
Optional Add-ons/Variations
- Patterns and Colors: Get creative and use different colors or patterns of fabric. You could even let your kids help paint fun designs or paw prints on it. Who wouldn’t love a splash of personality in their backyard?
- Attach a Hose: Consider adding a hose attachment to the mat itself for an extra splash of water. Your pup will be delighted by the sudden spritz surprise!
Pro Tip
For extra safety, always check for any sharp edges or loose threads before letting your dog on the mat. It’s also a great idea to give it a quick rinse once in a while to keep things fresh and clean—especially if your pup likes to roll around in the grass first.
Keeping your DIY project clean makes for a happier and healthier pooch. Now, grab those supplies and watch your pup make the most out of summer days. You’ll be their hero, and honestly, there’s no better feeling than that.
Extra Tips & Ideas
When it comes to creating the ultimate dog pool experience, thinking outside the box can really pay off. Ever tried adding a splash pad? Your pup will love dashing through it.
Or how about incorporating a few floating toys? Keep ’em entertained longer. You could even set up some shade, say, with an umbrella or a DIY canopy. Trust me, your furry friend will appreciate a cool spot to relax in after a good splash!
Don’t underestimate the power of decorations. A few colorful beach balls or pool floats can brighten up the space.
And don’t worry if you get a bit wet while setting everything up—embrace the chaos. It’s all part of the fun, right? Just imagine all the tail wags you’ll get!
Frequently Asked Questions
What Materials Are Safest for Dog Pool Construction?
For your dog pool, use non-toxic, durable materials like high-density polyethylene (HDPE) or PVC. These plastics are safe for dogs, resistant to UV rays, and easy to clean, ensuring a fun and safe environment for your pet.
How Deep Should a DIY Dog Pool Be?
Think of your dog as a little fish, enthusiastic to splash. Aim for a depth of 12 to 18 inches; it keeps them cool while allowing them to paddle comfortably without overwhelming their playful spirit.
Can I Add Slides or Toys to My Dog Pool?
Absolutely, you can add slides or toys to your dog pool! Just make certain they’re safe and secure, and keep an eye on your pup to guarantee they’re having fun without any hazards.
How Do I Ensure Proper Drainage for My Dog Pool?
To guarantee your dog pool drains perfectly, dig a deep hole at one end, use a siphon or drain valve, and add a few clever slopes. Your pup’s gonna love splashing around in style and cleanliness!
What Maintenance Is Required for a DIY Dog Pool?
To maintain your DIY dog pool, you’ll need to regularly clean debris, change the water frequently, check for leaks, and guarantee proper filtration. Additionally, consider applying a non-toxic pool cleaner for hygiene purposes.
Conclusion
So, whether you’re dreaming up a puppy-friendly splash pad or a giant inflatable water slide, creating your DIY dog pool is a fantastic journey. It’s all about blending fun and safety, right? Picture your furry friend diving into their slice of paradise, while you sip lemonade nearby. With a splash of creativity and a sprinkle of love, you can craft a space where tails wag and joy reigns. Your backyard could be the ultimate canine getaway, just waiting for some puppy magic.

Amr Mohsen is a software engineer who traded his keyboard for a leash — at least on weekends. His love for dogs inspired him to share what he learns as a dog owner and enthusiast, bringing a detail-oriented, research-driven perspective to every article he writes. If it’s about dogs, he’s probably already looked it up twice.

