Did you know that the global market for pet products is projected to hit over $300 billion by 2025? That’s a whole lotta kibble and squeaky toys, but there’s still a huge demand for unique, DIY dog stuff. Imagine crafting your own stylish dog beds that not only look great but also keep our furry pals comfy. Curious about how you can tap into this trend and offer something special for dog lovers? Let’s explore some creative ideas together.
Unique Dog Bed Concepts
When it comes to cozy spots for your furry friend, think outside the box—or, in some cases, think like a dog.
Imagine crafting a hammock-style dog bed, perfect for those pups who live for lounging. All you need are sturdy canvas and some rope—easy peasy, right?
Or how about a repurposed suitcase? It’s an utterly unique dog bed that gives new meaning to “traveling in style.” Just cut a comfy foam piece to fit inside, and voila! You’re in business.
These unique dog bed concepts do wonders and are great pieces of diy dog stuff to sell. Your friends’ dogs will envy your creations, and honestly, who wouldn’t want to snuggle up in a suitcase?
I know I would, if only I were a dog.
Our Collection
When it comes to your furry friend, comfort is key, right?
Our collection features everything from Sustainable Wooden Dog Beds to a heated design that’ll keep your pup cozy on chilly nights—seriously, how cute would that be?
Whether you want a Luxury Memory Foam option or a versatile Convertible Sofa Dog Bed, there’s something here that’ll make your dog feel like the monarch they truly are.
1. Sustainable Wooden Dog Beds
If you want to give your furry friend a special place to snooze that adds style to your home and saves you some bucks, then building a wooden dog bed is just the project for you! Not only will it provide comfort for your pup, but it’s also a chance to show off your DIY skills. Plus, there’s nothing quite like the satisfaction of looking at your masterpiece and knowing you made it with your own hands. Additionally, consider incorporating premium dog fashion accessories to elevate your pup’s style even further. To enhance your outdoor space, you might also want to consider a premium pet waste management system for a clean environment. Furthermore, crafting a luxury dog bed can greatly improve your pet’s overall sleeping experience, while ensuring your pup enjoys a luxurious and comfortable space.
Materials Needed:
- 1 sheet of plywood (3/4 inch thick)
- 4 wooden legs (pre-made or 1×4 inch boards cut to your desired height)
- Wood screws (1.5 inches long)
- Wood glue
- Sandpaper (medium and fine grit)
- Non-toxic wood finish or paint (optional)
- Cushion or dog bed insert (to fit your frame)
- Measuring tape
- Circular saw or hand saw
- Screwdriver or power drill
Step-by-Step Instructions:
- Measure and Cut the Base: Start by deciding how big you want the bed to be. A good size for a small dog is about 30×24 inches. Use your measuring tape to mark those dimensions on your plywood, then carefully cut it out using your saw. If you’re feeling unsure, just remember: it’s better to measure twice and cut once.
- Sand the Edges: Once your base is cut, grab your sandpaper. Sand down those edges until they’re smooth. Nobody wants their dog snagging a paw on rough wood. Trust me, it’s not a fun experience.
- Attach the Legs: Flip the base over. Position the legs at each corner and attach them using wood screws. Make sure they’re flush with the edge of the plywood for a nice, clean look. Add some wood glue for extra sturdiness, because you want this bed to last longer than that “chew it up” phase.
- Finish It Up: If you want to add some flair or protect that lovely wood, now’s the time to apply your non-toxic finish or give it a nice coat of paint. Let it dry completely according to the product instructions.
- Add Comfort: Place the cushion or bed insert you picked out into the wooden frame. If it doesn’t fit perfectly, don’t worry – some extra blankets can make a comfy addition!
- Place It Perfectly: Find the coziest corner of your home for your furry friend’s new bed. Maybe it’s by the window for sunbathing or in the living room for maximum snuggle time with you. The choice is yours!
Optional Add-ons/Variations:
- Colorful Finish: Want to brighten things up? Try painting the bed a fun color or using stencils for some unique designs. Your dog can have a cooler bed than you, and who doesn’t love that?
- Bedding Styles: Instead of just one cushion, you could make a removable, washable cover for a bit of personal flair. Use a fun fabric that matches your home décor.
Pro Tip:
Always consider the size of your dog when cutting the wood. It’s way better to have a bit more space than to create a claustrophobic den for your pet.
And to keep things fresh and clean, think about layering the pad with a waterproof liner – it makes cleaning those occasional accidents a breeze.
There you have it! Your very own wooden dog bed that’s sure to be a hit with your pup and a fabulous touch for your home. Happy building!
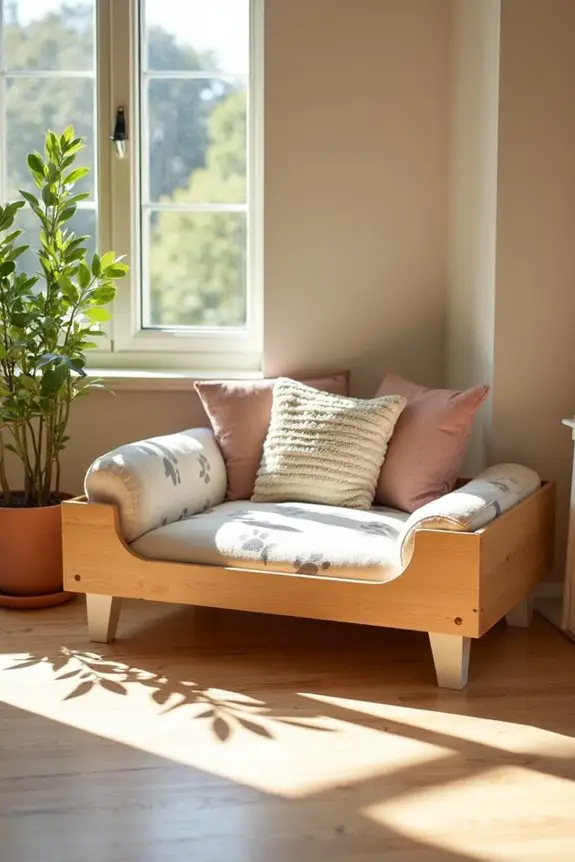
2. Convertible Sofa Dog Bed
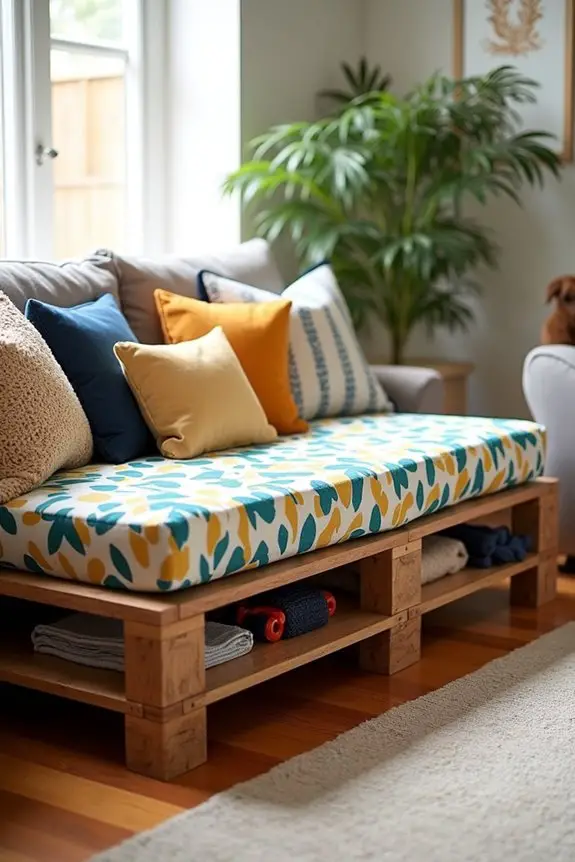
Have you ever thought about giving your pup a comfy place to lounge that doesn’t cramp your style? A convertible sofa dog bed might just be the perfect solution for you. This project not only provides a cozy resting spot for your furry friend, but it also seamlessly fits into your home decor. Plus, it’s a great way to save some cash compared to buying a fancy dog bed. Additionally, investing in high-quality dog luxury beds furniture can elevate your pet’s comfort.
Materials Needed:
- 1 sheet of plywood (preferably 3/4 inch thick)
- 3-4 wooden pallets or a pre-made sofa frame
- 2-3 heavy-duty hinges
- Wood screws (1.5 inches long)
- Foam mattress or thick dog bed cushion
- Non-toxic fabric (for covering, optional)
- Measuring tape
- Circular saw or hand saw
- Screwdriver or power drill
- Sandpaper (medium and fine grit)
Step-by-Step Instructions:
1. Create the Base: Start by deciding the size of your dog’s new bed. A typical sofa-style bed could be about 36×24 inches. Using your measuring tape, mark these dimensions on the plywood and cut it out carefully with your saw. Remember—the key here is measuring twice!
2. Prepare the Pallets: If you’re using wooden pallets, carefully disassemble them to get the slats you need. You want them to fit securely together, so make sure all pieces are even. Think of this as a puzzle—stay focused and don’t lose your pieces.
3. Assemble the Sofa Frame: Position the pallets into your desired sofa shape, using screws to connect them securely. Attach the plywood base on top of the frame. This will be the part your pup lounges on.
Once it’s all attached, give yourself a high-five because, wow, it’s looking good.
4. Add the Hinges: If you want your sofa to convert from a bed to a sofa, attach the hinges on one side of the frame. This makes it easy to lift and adjust the sleeping area as needed. Everyone loves versatility, right?
5. Sanding Time: Give the entire frame a good sanding with medium grit, followed by fine grit sandpaper. Smooth edges are essential—this is for your dog’s comfort, so no rough patches here.
6. Cover It Up: If you’re feeling fancy, wrap the foam mattress or dog bed cushion with your chosen non-toxic fabric and secure it tight. The bed will look stylish, and your pup will appreciate that extra comfort.
7. Find the Perfect Spot: Now, showcase your creation in a cozy corner of your living space where your dog can enjoy lounging. Whether it’s near a sunny window or in your favorite room, it’s now the coolest spot for your furry friend.
Optional Add-ons/Variations:
- Colorful Fabrics: Want to add a splash of personality? Choose fun colors or even patterned fabrics to cover the cushioned section. Your dog doesn’t have to be the only one with style!
- Extra Storage: Add a shelf or drawer under the bed frame to store toys or blankets. This way, you’re not just saving space—you’re also making it all look organized.
Pro Tip:
Before you get started, remember to double-check that everything is safely secured, especially the hinges. You wouldn’t want the sofa to fall apart mid-snooze, would you? Plus, it’s always a good idea to choose durable materials to guarantee this fun project lasts through your pup’s wildest adventures.
With just a little bit of creativity and effort, you can build a convertible sofa dog bed that’s not only practical but also enhances your home. So grab those tools and get started. Your pup deserves a cozy lair, and you deserve some DIY bragging rights. Happy crafting!
3. Heated Dog Bed Design
As the temperature drops and chilly drafts creep into our homes, your pup deserves a warm and snuggly place to curl up. A heated dog bed isn’t just a luxury—it’s a thoughtful upgrade that brings comfort to your furry friend during those cold winter months. Plus, making one yourself saves you money and adds a personal touch to your home decor.
Materials Needed:
- 1 large heating pad (preferably one with an auto shut-off function)
- 1 blanket or fleece fabric (to cover the heating pad)
- 1 old dog bed (just the cover if you don’t need the stuffing)
- Heavy-duty sewing needle and thread or fabric glue (for non-sewers)
- Measuring tape
- Scissors
- Optional: Fabric scraps for decoration or personalization
Step-by-Step Instructions:
- Get the Heating Pad Ready: Start by unpacking your heating pad and making certain it works. Set it to the low setting for a gentle warmth, perfect for your dog. Safety first—always check that it has an auto shut-off feature.
- Prepare the Dog Bed Cover: If you’re using an old dog bed, remove the stuffing and just keep the cover. If you want to make a completely new cover, measure and cut the fleece fabric big enough to wrap around the heating pad and leave some extra to tuck over and secure.
- Insert the Heating Pad: Place the heating pad inside the dog bed cover or under the fleece fabric if you’re making a custom one. Confirm that the cord hangs out, so it can be plugged in conveniently.
- Secure Everything: If you’re using a dog bed cover, zip it up or fold it neatly over and secure it with safety pins if needed. Just be sure the heating pad is well covered to prevent your pup from chewing or getting to the heating element.
- Add a Soft Layer: If you have extra cushions, blankets, or fabric scraps, place them on top or around the heating pad for that added cozy factor—like making a doggy burrito. Dogs love layers, right?
- Find the Right Spot: Choose a comfortable, draft-free location for the heated bed. Make sure it’s near an outlet so you can easily plug in the heating pad. Bonus points if it’s a warm spot in your house with good natural light.
- Test It Out: Plug it in and let it warm up. Check the temperature before letting your dog jump in. Your pup will probably take one sniff and think they’ve died and gone to heaven. Watch them enjoy their new heated haven!
Optional Add-ons/Variations:
- Personalized Touch: Use different fabric patterns to align with your home decor. Think about classic patterns like plaid or whimsical prints for a pop of color. You could even stitch your dog’s name on the blanket if you’re feeling crafty.
- Extra Storage: Sew a pocket to the side to hold their favorite toys or treats. That way, it’s all in one cozy corner—efficient and adorable.
Pro Tip:
When using heating pads, always check to verify they aren’t too hot for your pup, especially if they’re a younger or older dog. A little experiment with temperature settings can help you find that perfect warmth that keeps them cozy without overheating.
Keeping an eye on the cord placement is also intelligent to avoid any accidental chewing.
And just like that, you’ve transformed an ordinary dog bed into a plush retreat fit for a canine king or queen—all while keeping your wallet happy. Can’t wait to see your dogs blissfully snoozing in their new nest!
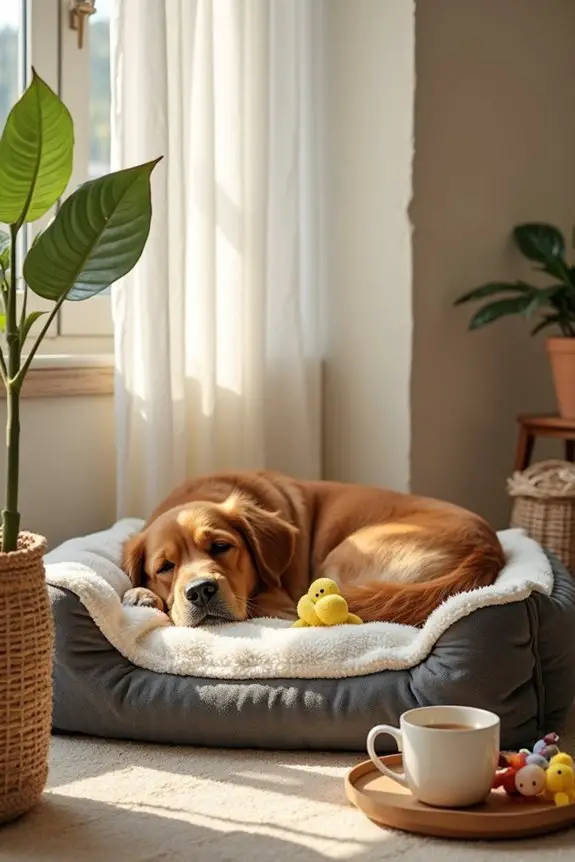
4. Luxury Memory Foam Dog Bed
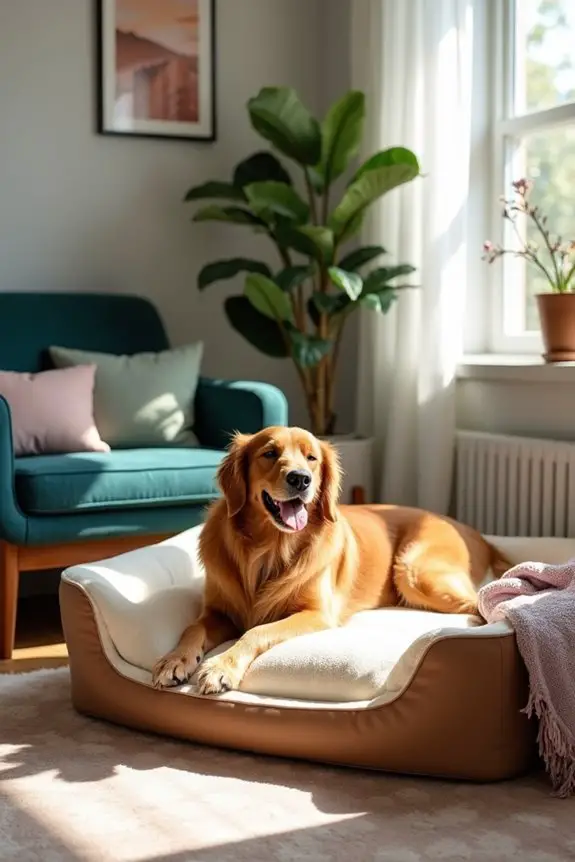
Want to give your furry friend the ultimate comfort they deserve? A luxury memory foam dog bed is a fantastic DIY project that not only improves your pup’s quality of sleep but also saves you some serious cash compared to store-bought options. Plus, you can tailor it to match your home decor perfectly. Let’s make an oasis for your dog together!
Materials Needed:
- 1 large piece of memory foam (choose the thickness based on your dog’s needs)
- 1 soft fabric for the cover (like fleece or cotton in your favorite color)
- Heavy-duty sewing needle and thread or a sewing machine
- Measuring tape
- Scissors
- Optional: Zipper (for easy cover removal and washing)
- Optional: Fabric scraps for decorative accents
Step-by-Step Instructions:
- Measure and Cut the Memory Foam: Start by measuring the space you’d like the bed to occupy. Use the measuring tape to mark your desired dimensions on the memory foam. Cut it with scissors – don’t worry, it’s not as messy as my last hair-cutting adventure.
- Create the Fabric Cover: Take your soft fabric and cut it into two pieces that are slightly larger than your memory foam. This will allow for seams and tucking. You can choose a color that matches your living room or something that screams, “Look at me, I’m fabulous!”
- Sew the Pieces Together: With the soft sides of the fabric facing each other, sew around the edges, leaving one side open for the memory foam. If you’re not into sewing, fabric glue can work here. Just try not to glue your fingers together like I did once (pro tip: it’s not as fun as it sounds).
- Insert the Memory Foam: Turn your cover inside out (so the seams are hidden) and carefully slide your memory foam into the cover. This can be a little tricky, so wiggle it in gently. A bit of a shake can help it settle in nicely.
- Close It Up: If you used a zipper, sew it in now. Otherwise, fold the open edge in neatly and stitch it closed, making sure it’s secure. Your dog is going to wiggle around like a seal, so we want it to be durable.
- Fluff It Up: Give your newly created dog bed a good shake to fluff up the foam and fabric. You might find that your dog has magically appeared beside you, curiously sniffing their new spot. Fido knows what’s good.
- Snug it In: Find a cozy spot in your home for their new sleeping paradise. Maybe a quiet corner or near your cozy reading chair. Just keep it away from any drafts (they don’t need your floor’s cold wind blowing at them).
Optional Add-ons/Variations:
- Decorative Fabrics: Use patterned fabric to make it truly unique. Think polka dots, florals, or even a cool superhero design that showcases your pup’s personality.
- Customizable Accents: Add some fabric scraps to create patches or maybe even their name on the bed. A personal touch can turn a basic design into a masterpiece.
Pro Tip:
Always check the fabric for durability. A tough fabric like canvas can withstand more wear and tear, especially if your pup is a chewer or likes to dig. And don’t forget to wash the cover regularly. It’s best for your dog and helps keep your house looking fresh, too. After all, who wants a smelly dog bed lounging around?
Now, time to kick back and watch your pup luxuriate in their new doggy dreamland. You’ll both be happy you took the time to create this little slice of heaven together.
5. Outdoor Elevated Dog Bed
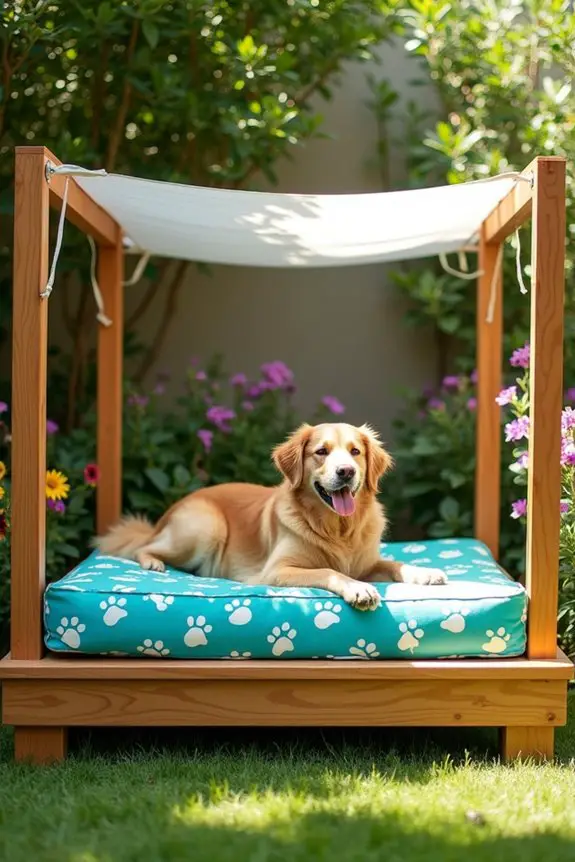
Is your dog tired of lounging on cold, hard surfaces outside? An outdoor elevated dog bed is the perfect DIY solution to keep them comfy and off the ground while enjoying some fresh air. This project is budget-friendly and stylish, providing a cozy retreat for your furry friend without breaking the bank.
Materials Needed:
- 4 wooden posts (for legs, about 3-4 feet tall)
- 2 wooden planks (for the bed’s sides, dimensions depending on desired size)
- 1 large piece of weather-resistant fabric (like outdoor canvas or marine grade)
- Heavy-duty staples and staple gun
- Measuring tape
- Saw (if cutting wood yourself)
- Sandpaper (to smooth sharp edges)
- Waterproof sealant or paint (optional for wood protection)
Step-by-Step Instructions:
- Cut the Wood to Size: Start by measuring and cutting your wooden posts and planks to your desired dimensions. Aim for a height that keeps the bed elevated—about 10 to 12 inches off the ground should do the trick. If you’re using pre-cut wood, even better; just check the dimensions to verify it works for your pup’s size.
- Sand the Edges: Before assembling, sand down any sharp edges on the wood to avoid potential scratches or splinters. I once won a “Best Purse Bruiser” award from my dog because I didn’t sand properly—don’t repeat my mistakes.
- Build the Frame: Using the wooden planks, create a rectangular frame that will serve as the base of the bed. Attach the planks to the posts using your staple gun or wood screws. Make sure everything is lined up nicely, so it won’t wobble whenever your pup jumps on.
- Prepare the Fabric: Cut your weather-resistant fabric to size, ensuring it overlaps the edges of your wooden frame by a couple of inches. This will give it a secured fit. You don’t want your dog pulling the fabric through the gaps like it’s some kind of game—trust me, it won’t end well.
- Attach the Fabric: Lay your fabric over the wooden frame and stretch it tightly. Use the staple gun to secure the fabric to the underside of the wooden frame. This step is essential for keeping the bed snug and preventing your dog from yanking it loose during their jaunty joy hops.
- Seal and Finish: If desired, apply waterproof sealant or paint to the wooden frame for extra protection against the elements. Let it dry completely before taking it outdoors. Picture me once trying to rush that step; let’s just say my DIY project ended up with a lovely drip trail on my shoe.
- Find the Perfect Spot: Place your elevated bed in a shaded outdoor area where your dog can relax and enjoy the breeze. Watch as they quickly discover their new hangout, possibly giving you that “thank you” look we all live for.
Optional Add-ons/Variations:
- Fabric Patterns: Choose fabric with fun patterns like paw prints or stripes, or even go with a solid color that complements your patio furniture. Your dog deserves to lounge in style, right?
- Add a Canopy: Attach a lightweight, removable canopy to provide some sun protection and create an even more inviting space.
Pro Tip:
If you’re concerned about stability or your dog being a bit of a wild one, you can add cross braces between the legs for extra support. Not only will this enhance durability, but it could also save you from doing impromptu repairs while your pup’s in mid-snooze.
With just a little time and effort, your dog will have a fabulous elevated bed that keeps them cool, comfy, and cute while they soak up the outdoor vibes. Happy crafting!
6. Wall-Mounted Dog Bed
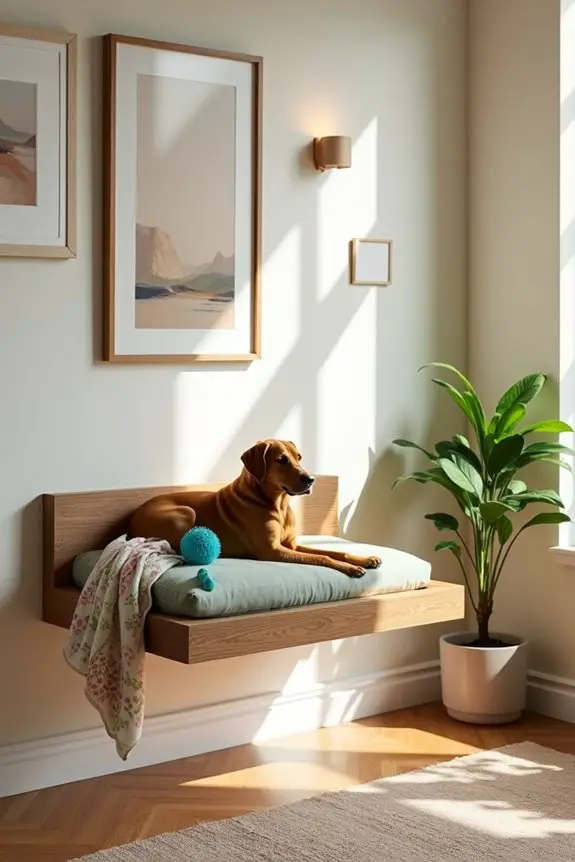
Are you tired of tripping over your pup’s bed cluttering your living space? A wall-mounted dog bed is a stylish, space-saving solution that not only keeps your home looking tidy but also provides your furry friend with a cozy place to perch. With this DIY project, you’re giving your dog a snuggly nook while optimizing your home’s layout.
Materials Needed:
- 2 wooden boards (for the bed platform, about 2 inches thick)
- 2 sturdy brackets (to mount to the wall)
- Heavy-duty screws and wall anchors (for added support)
- Measuring tape
- Drill with drill bits
- Sandpaper (for smoothing edges)
- Paint or wood stain (optional for aesthetics)
- Soft bedding or cushion (to line the platform)
Step-by-Step Instructions:
- Measure the Space: Find the perfect wall spot for your dog bed, ideally near the family hangout area. Measure and mark where you want the bed to be mounted—consider how high your dog can jump. Just keep in mind, even the cutest pup shouldn’t feel like they’re participating in the Olympics every time they want a nap.
- Cut the Wood (if necessary): If your wooden boards need to be cut down to size, do that now. Aim for a platform that comfortably accommodates your dog. A larger bed might need dimensions of about 30 inches long by 20 inches wide. Just be sure to measure twice so you’re not left with a “creative solution” like I’d once (don’t ask).
- Sand the Edges: Sand down any rough edges on your wooden platform to avoid splinters and discomfort for your pooch. I once skipped this step and the aftermath involved a frantic vet visit. You do NOT want that to happen.
- Attach the Brackets: Using your drill, securely attach the brackets to the wall at the marks you made earlier. Make sure they’re anchored properly to support your dog’s weight. You might want to shout out to a friend for help holding the platform when you’re setting it up.
- Mount the Platform: Fit the platform onto the attached brackets. Confirm it’s sturdy, and give it a little shake—like a ‘test paw’—to make sure it’s secure.
- Add Comfort: Finally, place the soft bedding or cushion onto the platform. You can even throw in a favorite blanket or toy for extra coziness, because who doesn’t love a familiar scent to snuggle up with?
Optional Add-ons/Variations:
Want to add a touch of flair? Paint or stain the wooden platform in a vibrant color that matches your home decor to make it a seamless part of the room. You could also add a side railing with some extra wood to give your pup that cozy nook feel. Customizing your dog’s space makes it feel like it’s truly theirs.
Pro Tip:
If you have a particularly frisky pup, consider installing a safety netting or low railing around the edges to prevent accidental falls—this way, your dog can jump on and off without a worry. Plus, a washable cover on the bedding makes it easy to keep clean, saving you the headache of unexpected snack accidents.
With a little effort and creativity, this wall-mounted dog bed can turn into the space your dog dreams of, all while keeping your home neat and stylish. So, roll up those sleeves and get ready to pamper your pup like the royalty they are. Happy crafting!
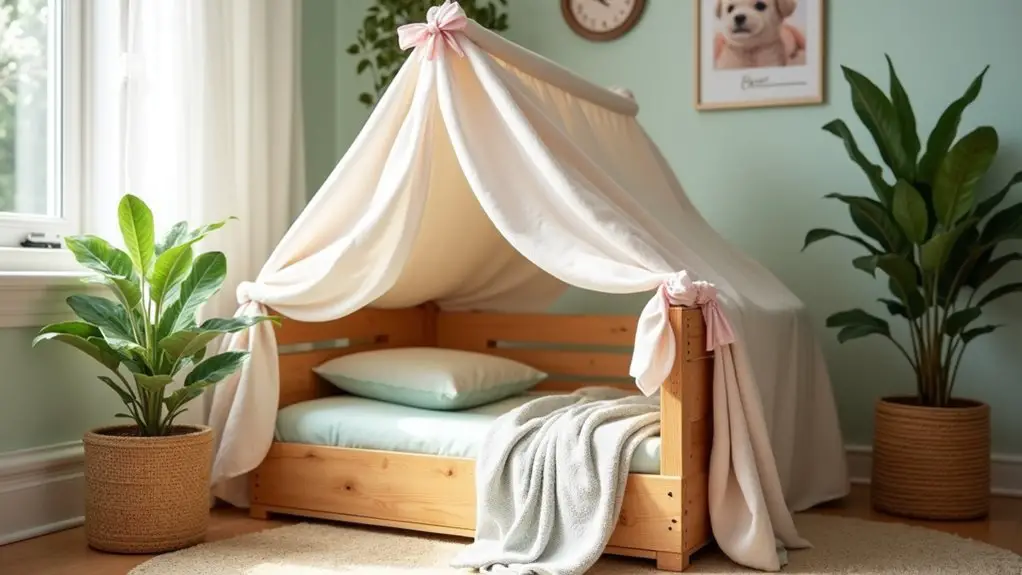
7. Dog Bed With Canopy
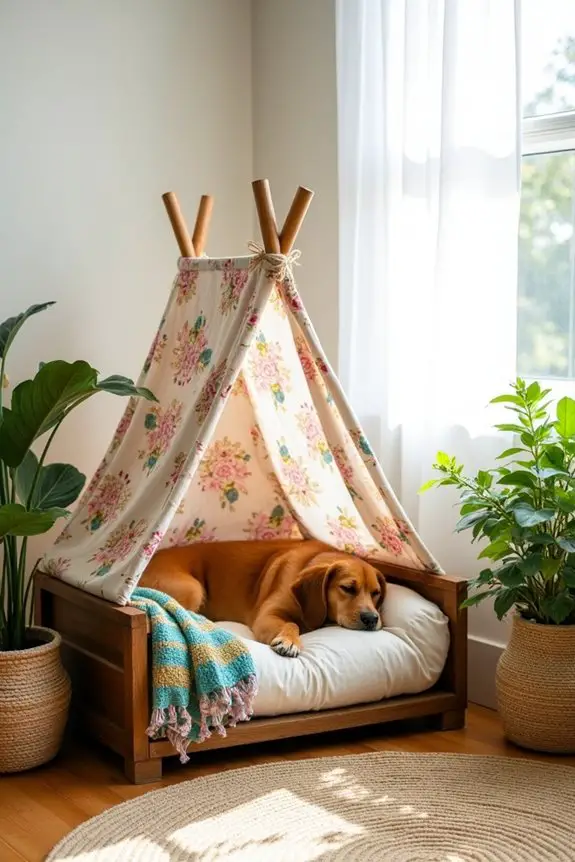
If you’re looking to transform your pup’s sleeping area into a stylish and cozy retreat, a DIY dog bed with a canopy is just the project for you. Not only does it add an adorable touch to your home decor, but it also gives your fur baby a sense of security from the sun or any pesky drafts. And let’s be honest, your pooch deserves the royal treatment.
Materials Needed:
- Wooden crate or box (as the base for the bed)
- Four wooden dowel rods (for the canopy)
- A light fabric (like muslin or cotton) for the canopy cover
- Fabric scissors
- Measuring tape
- Hot glue gun and glue sticks
- Sandpaper (for smoothing any rough edges)
- Soft bedding or cushion for the crate
- Optional: wood paint or stain for finishing
Step-by-Step Instructions:
- Choose the Base: Start with a sturdy wooden crate or box that’s appropriately sized for your dog. Measure and adjust the height so that your pup can jump comfortably in and out. Remember, we’re not trying to launch them into the stratosphere here.
- Prep the Base: Sand down any rough edges on the crate to keep your dog’s paws safe and smooth. No one wants to end up at the vet because they skimped on this important step—trust me.
- Cut the Canopy Fabric: Measure the width and length of the top of the box. Cut your fabric slightly larger than these dimensions so that it drapes nicely as a canopy. You can let it flow or tie it back, whatever your style.
- Create the Canopy Frame: Take the four wooden dowel rods and cut them to the desired height of your canopy. Insert the rods into each corner of the crate, pushing them into the corners until they’re secure. You might want to have a friend hold them while you glue the ends for extra stability.
- Attach the Fabric: Now, drape your fabric over the dowel rods, adjusting it to create a lovely canopy over the crate. Use your hot glue gun to secure the fabric to the ends of the rods. If you’re feeling fancy, you can even add little ties or clips to keep the fabric in place—everyone loves a good DIY flourish.
- Add the Cushion: Place a soft bedding or cushion inside the crate to give your pooch ultimate comfort. This is also where you can throw in a favorite blanket or toy, because a touch of familiarity can do wonders.
- Final Touches: Stand back and admire your handiwork. Maybe adjust the canopy fabric a little more for that perfect look. Snap a picture for Instagram; your friends will be so impressed.
Optional Add-ons/Variations:
Feeling creative? Try using colorful fabrics or patterns that match your home’s decor. You could also paint the crate to give it a fun, personalized flair. It’s all about turning your pup’s spot into a stylish nest.
Pro Tip:
Use heavy-duty glue to guarantee the dowels stay firmly in place. And hey, if you’re worried about the canopy fabric being too sheer, double it up or use a heavier fabric—just think of it as giving your pup a cozy fort to nap in. After all, who doesn’t want the comfort of a hidden nook?
Extra Tips & Ideas
While you might think that DIY dog stuff is all about practical designs, there’s a whole world of extra tips and ideas that can turn your projects from simple to spectacular.
Consider adding custom embroidery to dog beds or colorful patterns to leashes. It’s those little details that catch the eye.
Ever thought about using eco-friendly materials? Not only do they appeal to eco-conscious pet owners, but they’re also a fun challenge to work with. You can even personalize items with your dog’s name, making it extra special.
And hey, if you mess up, just call it “rustic charm.” Don’t shy away from experimenting; if a dog bed turns into a pillow fort, maybe that’ll be the next big thing.
Frequently Asked Questions
What Materials Are Best for Making Dog-Related DIY Projects?
You’ll want to use durable fabrics like canvas or fleece, non-toxic paints, and sturdy wood or metal for construction. Also, consider recycled materials for eco-friendly projects that are safe and comfortable for your dog.
How Can I Determine the Right Size for Dog Products?
You’ll want to measure your dog’s weight and breed, then consult size charts for collars, beds, or clothing. Picture your pup comfortably lounging or strutting around, ensuring they’re happy and well-fitted in their new gear.
What Tools Do I Need for DIY Dog Projects?
You’ll need basic tools like scissors, measuring tape, a sewing machine, glue, and various fabrics. Don’t forget to have a hammer, nails, and wood for projects requiring sturdiness. Get creative with colors and designs!
Are There Specific Safety Considerations for DIY Dog Items?
Absolutely, you should keep safety in mind. Avoid choking hazards, guarantee materials are non-toxic, and double-check for sharp edges. Your furry friends deserve the best, so make their comfort and well-being your priority.
How Do I Price My DIY Dog Creations for Sale?
To price your DIY dog creations, consider material costs, your time, and market research. Check similar products for their pricing, then set your price based on the quality and uniqueness of your items.
Conclusion
So, there you have it—ten unique DIY dog designs that are not just practical but downright fun. Can you imagine your pup lounging on a stylish elevated bed, or nestling into a cozy suitcase? Each project lets you release your creativity while giving our furry friends the comfort they deserve. Why not jump in and create something special for your dog? Because, after all, they give us unconditional love—don’t they deserve something just as unique in return?

Hi, I’m Ali Tarek, the founder of Animalsman. I’ve always been passionate about pets, especially dogs and cats, and I created this website to share practical tips, easy recipes, and helpful care advice for fellow pet lovers. My goal is to make pet care simple, enjoyable, and accessible for everyone. When I’m not writing or curating content, you’ll usually find me spending time with my furry friends or learning new ways to keep them happy and healthy.

