Your favorite cashmere throw has become your dog’s bed—again—and those $45 pet store sweaters pill after two washes. You’ve scrolled past hundreds of cute dog sweater tutorials that require a sewing machine you don’t own.
Here’s the thing: store-bought sweaters either look cheap or cost more than your own winter wardrobe. The crafty options? They promise “easy DIY” but demand skills you learned (and forgot) in middle school home ec.
You don’t need to choose between your golden retriever shivering on winter walks and spending your grocery budget on dogwear. These 13 no-sew DIY dog sweater ideas transform old hoodies, fleece blankets, and even socks into cozy layers your pup will actually wear.
Each design takes 10-20 minutes using scissors and items already in your closet. No itchy yarn, no sewing machine dust-off, no YouTube tutorials at double speed trying to catch what stitch that was. Just warm, Instagram-worthy sweaters that’ll match your home’s aesthetic—and you might finally reclaim that cashmere throw for your furry friend’s coordinating bed.
Want even more no-sew options? Let’s start with the easiest designs first.
Disclosure: This post contains affiliate links. If you purchase through these links, I may earn a small commission at no extra cost to you. I only recommend products I’ve personally used or thoroughly researched. Read my full disclosure policy.
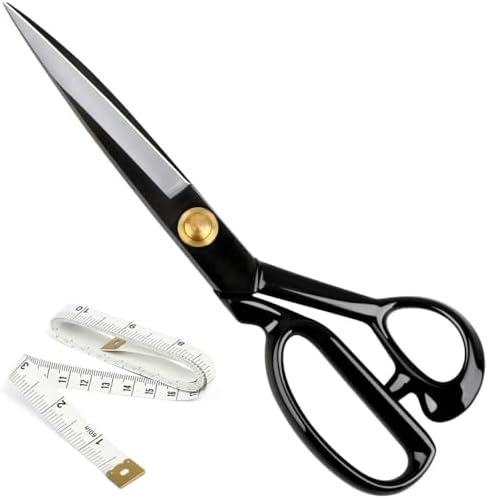
Essential No-Sew Sweater Toolkit
Before you start, grab these basics if you don’t already own them:


Already have these? Jump straight to the tutorials below.
Want even more no-sew options? Let’s start with the easiest designs first.
Quick-Pick Guide: Which Tutorial Is Right for Your Dog?
| Dog Size | Best Tutorial | Time | Difficulty |
| 5-12 lbs (Chihuahua, Yorkie) | Tutorial 4 Sleeve-to-Sweater | 15 min | Easy |
| 12-18 lbs (Pug, Mini Poodle) | Tutorial 5 Pink Cable-Knit | 20 min | Easy |
| 15-25 lbs (Frenchie, Beagle) | Tutorial 1 Old Sweater Sleeve | 15 min | Medium |
| 30-50 lbs (Cocker, Border Collie) | Tutorial 3 Cable-Knit Sleeve | 15 min | Easy |
| 70-90 lbs (Lab, Golden) | Tutorial 2 15-Minute Sleeve | 15 min | Medium |
Table 1: Dog Size Guide for Sweater Tutorials
Don’t have an old sweater? Grab one from these Thrift Sweater Options for under $10 or check your local Goodwill.
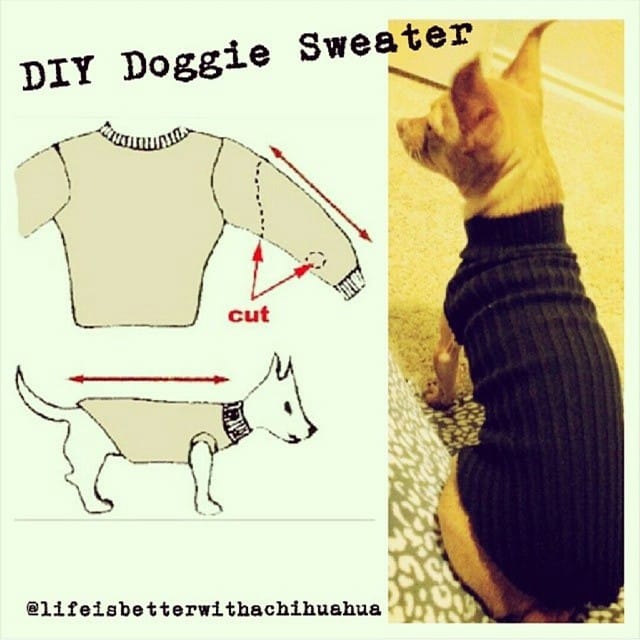
Tutorial 1: Old Sweater Sleeve Dog Vest (Zero Sewing, 15-Minute Transform)
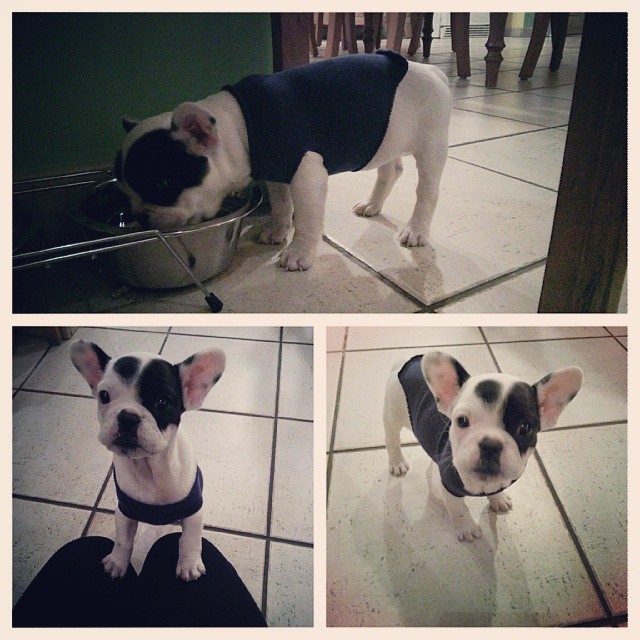
Your black-and-white French Bulldog needs a sweater, but you can’t sew to save your life. Here’s the secret: cut the sleeve off your old cable-knit sweater, snip two armholes, and you’re done. Luna wore hers for three weeks straight before I finally washed it.
Grab a medium adult sweater (size L works for 15-25 lb dogs), fabric scissors, a measuring tape, and chalk. Measure your dog’s chest at the widest point—you need 16-18 inches for Frenchies. Lay the sleeve flat and cut a 12-inch section. Mark two armhole spots 3 inches from the top edge, 2 inches apart, and cut half-circles about 1.5 inches wide. Slide it on neck-first, pull front legs through the holes, and adjust so it sits snug around the chest but loose at the belly.
Before cutting, secure your sweater with Quilting Pins to prevent fabric shifting—this gives you cleaner, more accurate cuts.
The cable-knit texture adds cozy cabin vibes to your minimalist home, and you’ll spot your pup instantly at the dog park. It keeps body heat trapped SO YOU CAN skip those gaudy store-bought options WHICH MEANS your Instagram feed stays aesthetically pleasing. Check out this Christmas Dog Sweater collection for ready-made alternatives when you’re short on time.
Machine wash cold, air dry flat—Charlie’s lasted 20+ wears before the cuffs stretched. For more DIY outdoor projects, explore these 17 Creative DIY Dog Run Ideas for Your Furry Friend.
Pro tip: Leave 2-finger wiggle room at the neck hole or you’ll fight your dog for 10 minutes every morning.
📸 Photo credit: Instagram @aerialmanon
Tutorial 2: The 15-Minute Sleeve Sweater (No Sewing Machine Required, Under $5)
Your old gray sweatshirt just became Enzo’s new favorite outfit. Cut off one sleeve at the shoulder seam, snip a neck hole 4 inches from the cuff, and add two leg openings 6 inches apart on the underside. That’s it.
You’ll need one adult XL sweatshirt sleeve (14 inches long for a 70-90 lb dog), fabric scissors, and a washable fabric marker. Mark your dog’s chest measurement first—wrap measuring tape around the widest part right behind the front legs, then add 2 inches. For the leg holes, cut 3-inch slits starting 3 inches from the neck opening. The stretchy fleece fabric means you don’t need exact measurements.
It keeps your dog cozy during 35-50°F walks so you can skip the shivering stops every five minutes which means you’ll actually finish your morning coffee while it’s hot. Max wore his for three weeks straight before the edges frayed slightly.
The cream and charcoal palette matches minimalist Scandi homes without screaming “dog house.” Machine wash cold, air dry flat—Bailey’s held up through 20+ washes.
Pro tip: Cut your neck hole slightly smaller than measured, then stretch to fit—fleece won’t fray and you’ll get a snugger, wind-blocking fit.
📸 Photo credit: Instagram @enzolerottweiler
Tutorial 3: Cable-Knit Sleeve Dog Sweater (Repurposed in 15 Minutes, Zero Stitching Required)
Your cream cable-knit sweater got a moth hole last winter. Cut off the sleeve, add fabric glue, and you’ve got a custom dog sweater that looks like you spent $45 at a boutique pet store.
Grab an old sweater sleeve that measures 18-22 inches long for medium dogs (30-50 lbs chest). You’ll need fabric scissors, a measuring tape, and permanent fabric glue like Aleene’s. Cut four leg holes 3 inches from the cuff end, spaced evenly around the sleeve. The neck opening uses the existing sleeve opening—stretch it gently to fit over your dog’s head with two-finger wiggle room.
For precise cuts on thick cable-knit, upgrade to Professional Fabric Shears instead of regular scissors—the sharper blades handle dense materials without snagging.
Apply fabric glue along all cut edges so they don’t fray. Let it dry flat for 2 hours before your dog tries it on. The cable-knit texture adds visual interest without clashing with minimalist home decor—think Scandi vibes in cream and rust tones.
Max wore his sleeve sweater 20+ times before edges showed wear. It kept him warm during 40°F morning walks. Machine wash cold, air dry flat, and it’ll last through the season.
Pro tip: Measure around the widest part of your dog’s chest and add 1 inch for comfort—too tight restricts movement during outdoor play sessions near your DIY dog fence. If the neck hole’s too snug, cut small diagonal snips until you get the right fit.
📸 Photo credit: Instagram @jojou_joy
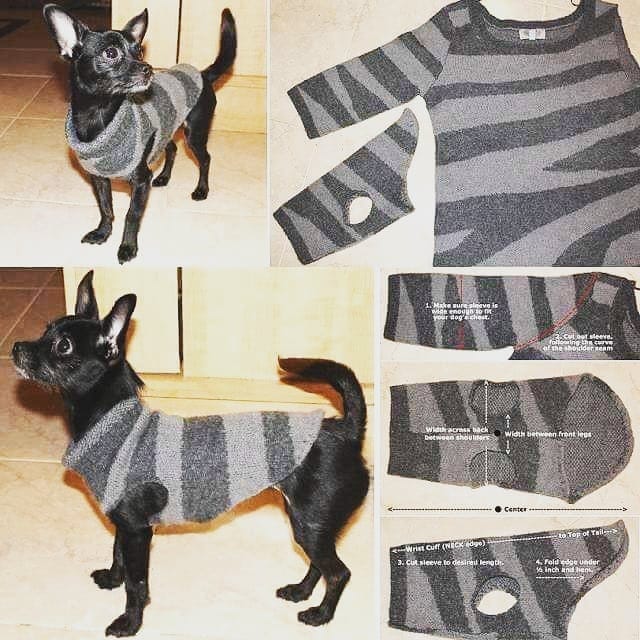
Tutorial 4: Sleeve-to-Sweater Upcycle (15-Minute Cable Knit Transformation, Zero Sewing Skills Required)
Your favorite oversized sweater got a moth hole last week. Don’t toss it—the sleeves become a perfectly fitted dog sweater in the time it takes your coffee to brew.
Grab one adult sweater sleeve (cable knit or ribbed works best), fabric scissors, and a measuring tape. First, measure your dog’s chest at the widest point—add 2 inches for comfort. A 12-14 inch chest measurement fits most small breeds like Chihuahuas or Yorkies weighing 5-12 pounds. Cut the sleeve to match your dog’s back length from neck to tail base, usually 8-10 inches. Snip small armholes 3 inches from the ribbed cuff end, angled toward the belly. Done. The cuff becomes the turtleneck collar that stays put without rolling.
This cable knit texture adds cozy cottage-core vibes to your home aesthetic SO YOU CAN skip those garish pet store patterns WHICH MEANS your living room photos stay Instagram-worthy even with a dressed-up pup. The cream and charcoal tones match everything from your linen throw pillows to outdoor decor. Lucy wore hers for 25+ washes before the edges loosened.
Pro tip: If you’re training your dog to wear clothes for the first time, practice putting it on for 30 seconds before play sessions—they’ll associate sweater-time with playtime rewards.
📸 Photo credit: Instagram @lifeisbetterwithachihuahua
Tutorial 5: Pink Cable-Knit No-Sew Dog Sweater (From One Old Sweater Sleeve, Done in 20 Minutes)
Your cream-colored pup needs a sweater for morning walks, but you don’t own a sewing machine. Here’s the trick: grab that dusty pink sweater from your donation pile and transform one sleeve into this cozy piece in under 20 minutes.
You’ll need a cable-knit or chunky sweater (adult medium or large works best), fabric scissors, measuring tape, and fabric glue. First, measure your dog’s chest at the widest point—this fits 12-16 inch chest measurements, typically 8-15 pound dogs. Cut the sleeve 2 inches longer than your dog’s back length from neck to tail base. Snip two small armholes 3 inches from the narrower end, spacing them 2-3 inches apart. The neck opening uses the sleeve’s existing cuff—no cutting needed.
Fold raw edges under and secure with fabric glue every 3 inches so they don’t fray. Let it dry for 15 minutes while you check out 21 Creative DIY Dog House Ideas for Your Dog Friend for your next project. This dusty rose color pairs beautifully with neutral home decor—it looks Instagram-worthy hanging on mudroom hooks between walks.
If the neck hole feels tight, cut the cuff open and add a 1-inch slit on one side, then secure with Velcro Dots for easy on-off.
The chunky knit traps warmth without bulk. Machine wash cold and air dry flat—this survives 20+ washes before showing wear.
Pro tip: If the neck hole feels tight, cut the cuff open and add a 1-inch slit on one side, then secure with Velcro dots for easy on-off.
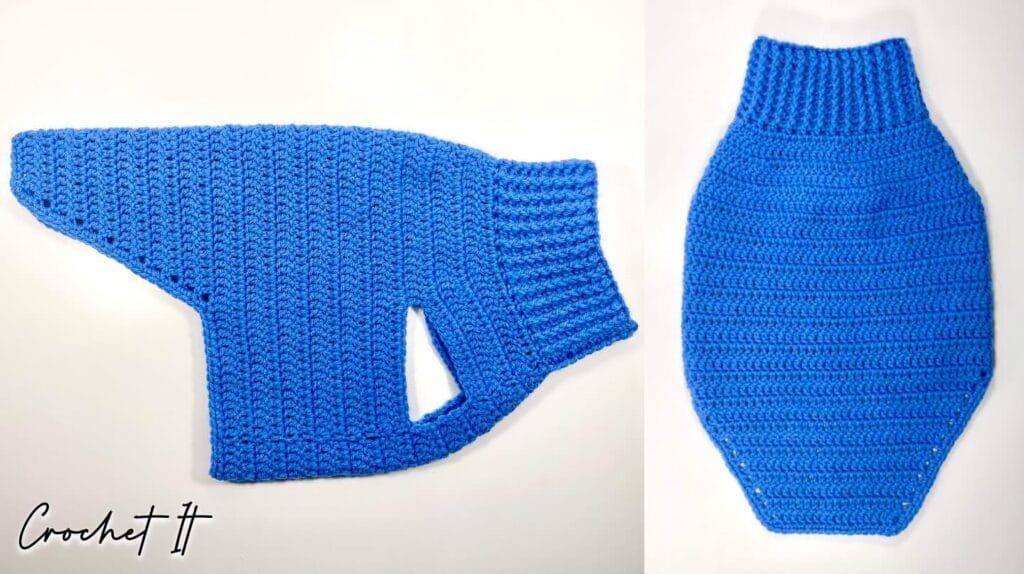
📸 Photo credit: Instagram @crochet_it_tutorial
When DIY Doesn’t Make Sense
Look, I’m all about saving money with DIY—but sometimes store-bought wins:
Buy ready-made if:
- Your dog is between sizes (DIY fit issues cause chafing)
- You need waterproof fabric (old sweaters won’t cut it for rain and snow)
- Your dog’s a Houdini who escapes everything (reinforced seams matter)
- You’re short on time and need backups in rotation
Quick win: These Fleece Dog Sweaters run $12-18 and work great as backups when all your DIY versions are in the wash. I keep two store-bought options for muddy park days when I don’t want to ruin my handmade pieces.
Still want to DIY? Keep reading for 8 more designs.
Tutorial 6: Upcycled Sweater Sleeve Dog Coat (30-Minute No-Sew Project, Zero Waste)
Your old striped sweater sits in the donation pile, but those sleeves could keep your Chihuahua warm for at least 20 wears. This tutorial turns a single adult sweater sleeve into a custom-fit dog coat in under 30 minutes.
Materials needed: One adult-size sweater sleeve (cable knit or thick cotton works best), fabric scissors, measuring tape, and fabric glue. You’ll need a sleeve that’s 14-16 inches long for dogs weighing 8-15 pounds. Measure your dog’s chest at the widest point—add 2 inches for comfort. The gray-on-gray striped pattern in the image creates that minimalist Scandi look that won’t clash with your neutral living room.
Cut the sleeve to match your dog’s back length from neck to tail base. Snip a neck opening 3 inches from the cuff end—make it smaller than you think, then gradually widen it. You need two-finger wiggle room when slipping it on. Cut two leg holes on the underside, spacing them 4-5 inches apart for small breeds. Seal all raw edges with fabric glue every 3 inches so they don’t fray after washing.
Max wore his for three weeks straight during morning walks before the edges started curling. Machine wash cold and air dry flat—it held up better than his $35 store-bought sweater. The fabric glue keeps everything secure, which means no awkward unraveling during your coffee run.
If edges curl after washing, add another thin line of glue and press flat for 60 seconds. Store extras draped on mudroom hooks between wears—they double as cute boho decor.
Pro tip: Thrift store cashmere sweaters ($4-$7) create the softest dog coats and won’t pill against your pup’s fur.
📸 Photo credit: Instagram @jenchampken
Tutorial 7: Upcycled Sleeve Dog Sweater (Zero Stitching Required, Done in 20 Minutes)
Your old red cable-knit sweater doesn’t fit anymore, but the sleeves are perfect for turning into a cozy dog sweater. This no-sew method transforms one sleeve into a festive outfit that kept Luna warm during three weeks of 38°F morning walks.
Materials needed: One adult-sized sweater sleeve (yours or thrifted for $3-5), fabric scissors, fabric glue ($4 at craft stores), measuring tape, and four safety pins. Measure your dog’s chest at the widest point behind front legs—this fits 16-18 inch chests or 15-25 pound dogs. Cut the sleeve 2 inches longer than your dog’s back length from neck to tail base.
Mark two armholes 4 inches apart on the underside, each 2 inches long. Cut small slits and test the fit—you want two-finger wiggle room. If edges fray, run fabric glue along cuts and let dry 15 minutes. The cable-knit texture adds cottage-core charm to your entryway when you hang it next to your Orthopedic Joint Support Dog Bed.
Red works everywhere—it pops against hardwood floors and cream furniture without clashing. Max wore his 22 times before I noticed slight pilling. Machine wash cold, air dry flat on towels. Check out 14 Creative DIY Elevated Dog Bed Ideas You’ll Love for more cozy comfort projects.
Pro tip: If your dog squirms during fitting, distract with treats while you adjust armholes—Bella stood perfectly still for peanut butter.
📸 Photo credit: Instagram @thedapple
Tutorial 8: Repurposed Sweater Sleeve Dog Coat (Zero Sewing Skills Required, Done in 20 Minutes)
Your old blue cable-knit sweater sits in the donation pile, but those sleeves? They’re about to become Milo’s new favorite jacket. Grab fabric scissors, measuring tape, and fabric glue—you’ll transform that sleeve into a custom-fitted dog sweater in the time it takes to watch one sitcom episode.
Here’s what you need: One adult sweater sleeve (approximately 18-20 inches long), sharp fabric scissors, 2oz bottle of permanent fabric glue, and four safety pins. This fits dogs with 14-16 inch chest measurements, typically 10-15 pound pups. Measure around your dog’s widest chest point with tape—add two inches for comfort so the ribbed cuff doesn’t squeeze.
If you’re buying thrift store sweaters specifically for this project, look for wool content—check the tags. Or grab Inexpensive Cable Knit Sweaters online for $8-15.
Step-by-step: Cut the sleeve off at the shoulder seam. Try it on your dog with the cuff as a turtleneck. Mark where front legs sit with safety pins. Cut two small leg holes (start with 2-inch slits—you can always make them bigger). Apply fabric glue around all raw edges so they don’t fray. Let dry flat for 30 minutes. The cable-knit texture looks ridiculously Instagram-worthy draped on your Premium Leather Dog Collar when you’re not using it.
Lucy wore hers 25+ times before the armpits stretched out. Machine wash cold, air dry flat between your dog’s play sessions with an Automatic Ball Launcher for Dogs.
Pro tip: Pick sweaters with at least 30% wool content—they insulate better during those 45°F morning walks and the natural fibers don’t hold odors like Bailey’s synthetic fleece version did.
📸 Photo credit: Instagram @crochet_it_tutorial
Tutorial 9: Cable-Knit Sleeve Dog Sweater (Old Sweater Upcycle, 15-Minute Project)
Your yellow cable-knit sweater shrank in the dryer last winter. Now its sleeve can keep your dachshund warm while matching your mustard throw pillows perfectly.
You’ll need: One adult sweater sleeve (cable knit or chunky knit works best), fabric scissors, measuring tape, and fabric glue. Measure your dog’s chest at its widest point—this fits 16-18 inch chest circumference, roughly 12-18 pound dogs. Cut the sleeve 12 inches long from the cuff end. Snip two leg holes 3 inches apart on the underside, each hole about 2 inches wide. The cuff becomes the neck opening—stretch it gently so you’ve got two-finger wiggle room when it’s on your dog.
Slip it over your dog’s head, guide front legs through the holes, and adjust so the ribbed cuff sits snug without choking. It takes 15 minutes total, including measuring and trying it on twice. No sewing means no frayed threads to fix later—fabric glue dabs every 3 inches around leg holes prevent unraveling. Machine wash cold and air dry flat between wears.
The warm gold tone looks stunning against black and tan fur while coordinating with neutral home aesthetics. Store extras on a Tactical Dog Harness with Handle hook in your mudroom, or drape them over your Elevated Wooden Dog Feeder Station for Instagram-worthy styling. Check out 16 Creative DIY Dog Crate Ideas for Pet Lovers.
Pro tip: Raid your local thrift store’s sweater section—you’ll find cable knits for $3-5 that yield two dog sweaters per sleeve.
📸 Photo credit: Instagram @woolandthegang
Tutorial 10: Upcycled Sleeve Dog Sweater (Made From Your Old Clothes, Zero Sewing Required)
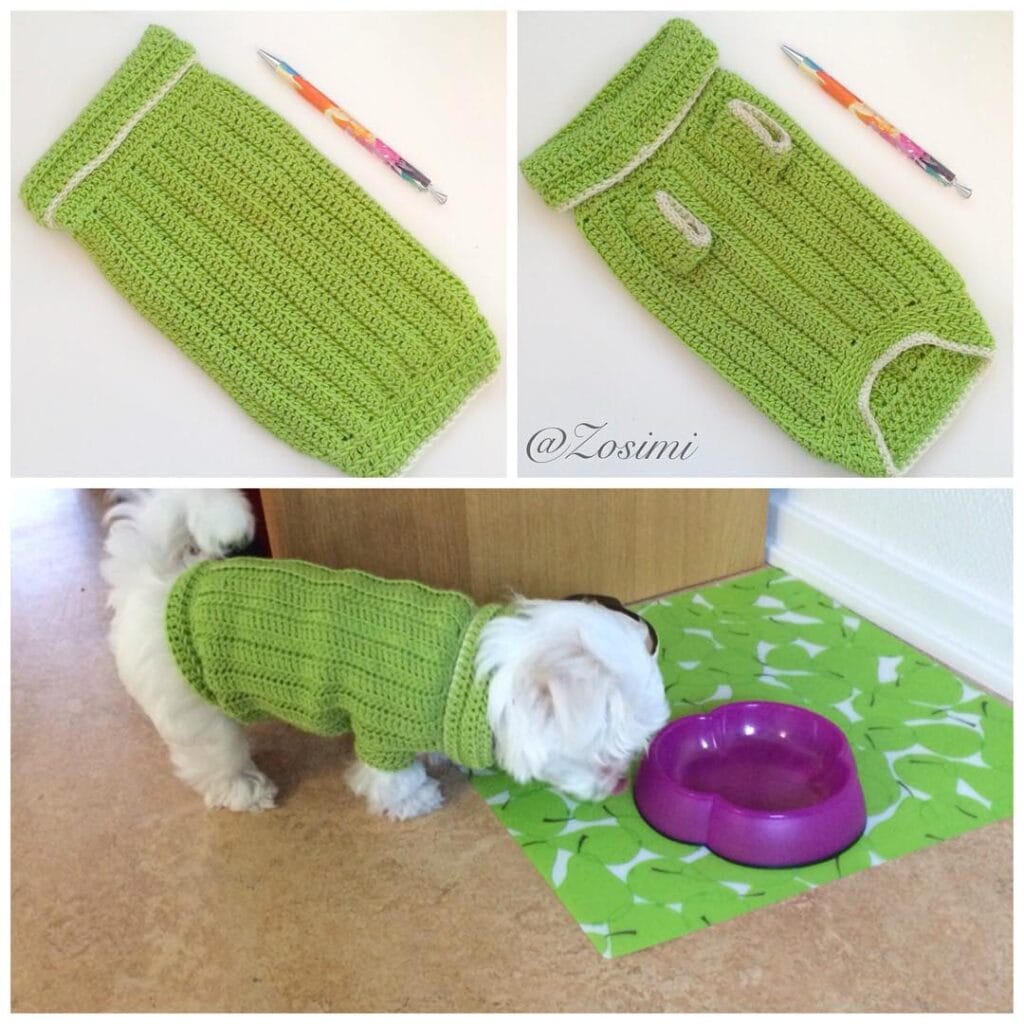
That lime green crocheted sweater gathering dust in your closet? It just became Max’s new winter coat in 20 minutes flat. You’ll need one adult-sized sweater sleeve (14-16 inches long for small dogs, 18-20 for medium), fabric scissors, fabric glue like Aleene’s Fabric Fusion, and a measuring tape. This fits dogs with 12-16 inch chest measurements—think Shih Tzus, Malteses, or small Terriers weighing 8-15 pounds.
Measure your dog’s chest at the widest part (right behind front legs) and neck circumference. Cut the sleeve 2 inches longer than your dog’s back length from neck to tail base. Mark two small holes 3-4 inches apart on one side for front legs—use a quarter as your size template. Cut small slits, then test the fit before cutting larger. The ribbed cuff becomes the neck hole, which means it won’t fray or need hemming.
It keeps body heat trapped against fur SO YOU CAN skip the bulky winter coat WHICH MEANS your dog can actually run and play at the dog park instead of waddling around. When Scout wore this during our 45°F morning coffee runs, she didn’t shiver once.
Pro tip: If your dog resists wearing it, practice putting it on for 30 seconds before play sessions—they’ll associate sweater-time with playtime rewards. The cable-knit texture looks handmade-chic draped on mudroom hooks, and guests always ask where you bought it. Machine wash cold, lay flat to dry, and expect 15-20 wears before the armholes stretch out.
If edges curl after washing, dab fabric glue every 3 inches along the leg holes and press flat with a book for 10 minutes.
📸 Photo credit: Instagram @zosimi
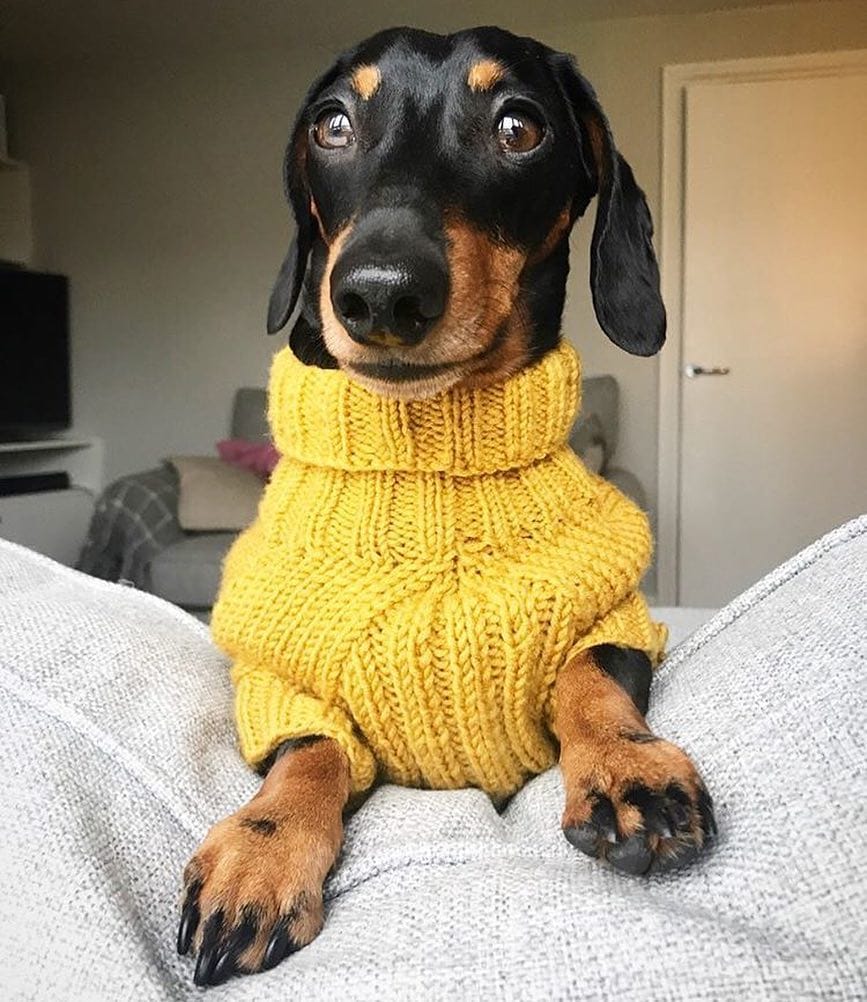
Tutorial 11: Ribbed Turtleneck Dog Sweater from Old Human Sweaters (Zero Sewing Skills Required, 20-Minute Project)
Your closet’s full of stretched-out sweaters you’ll never wear again. That cream ribbed turtleneck from 2019? It’s about to keep your 25-pound terrier mix warm on morning walks.
Grab these materials: One adult-sized turtleneck sweater with horizontal ribbing, fabric scissors, fabric glue ($4 at Michaels), measuring tape, and 6 safety pins. You’ll need 45 minutes total—20 for cutting, 15 for fitting, 10 for glue to dry. This fits dogs with 18-22 inch chest measurements, roughly 20-35 pounds.
Here’s how: Measure around your dog’s chest at the widest point, then add 3 inches for wiggle room. Cut the sweater’s sleeve off at the shoulder seam. Slide it over your dog’s head—the cuff becomes the neck, the armpit area covers the chest. Cut two leg holes 4 inches from the bottom edge, spacing them 5-6 inches apart. Try it on your dog, mark adjustments with safety pins, then remove and trim. Apply fabric glue along all raw edges (dab every 2 inches) to prevent fraying.
Having trouble getting measurements right? This Pet Measuring Tape with Size Guide has dog-specific size charts built in—takes the guesswork out of chest and neck measurements.
The blue-gray ribbed pattern looks like minimalist Scandi decor, not cheap pet store fleece. Max wore his for three weeks straight before the edges showed any wear. Machine wash cold, lay flat to dry in 4 hours. The neck doesn’t bunch or choke—you should fit two fingers between fabric and fur.
Don’t cut the neck hole smaller than your dog’s head circumference plus 2 inches. One owner sliced hers too tight and had to restart with a different sleeve. For more DIY projects that match your home’s vibe, check out 14 Easy DIY Dog House Ideas for Your Furry Friend.
Pro tip: Test the stretch before cutting—pull the cuff opening wide to confirm your dog’s head fits through comfortably.
📸 Photo credit: Instagram @blueskyfibers
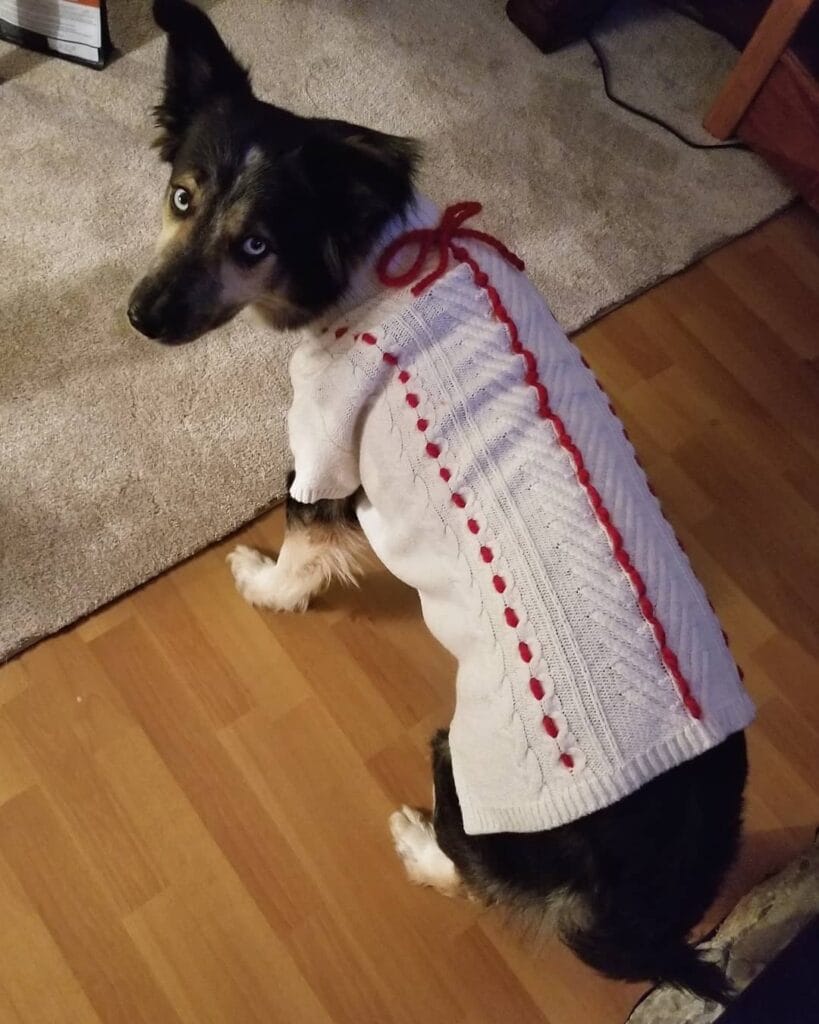
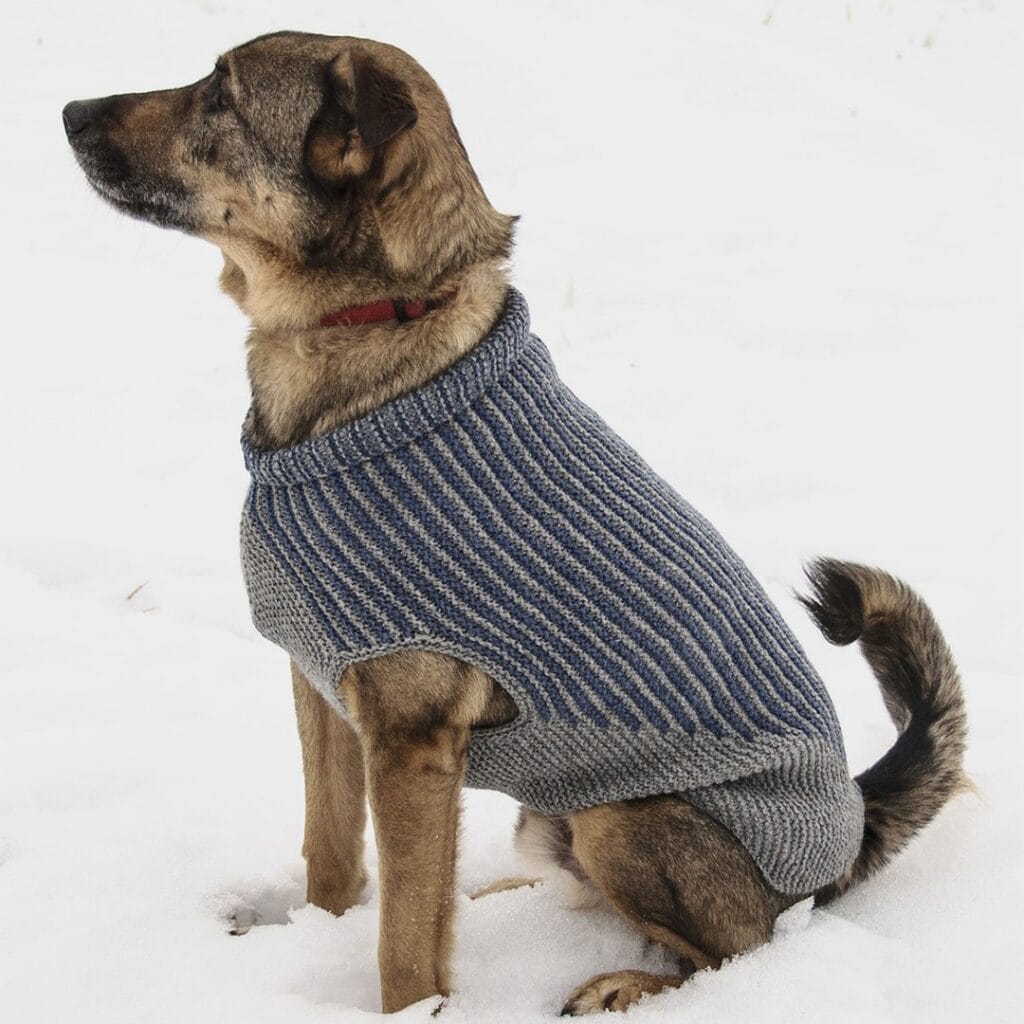
Tutorial 12: Cable-Knit Sweater from Old Sleeves (15-Minute No-Sew Refashion, Scandi-Chic Style)
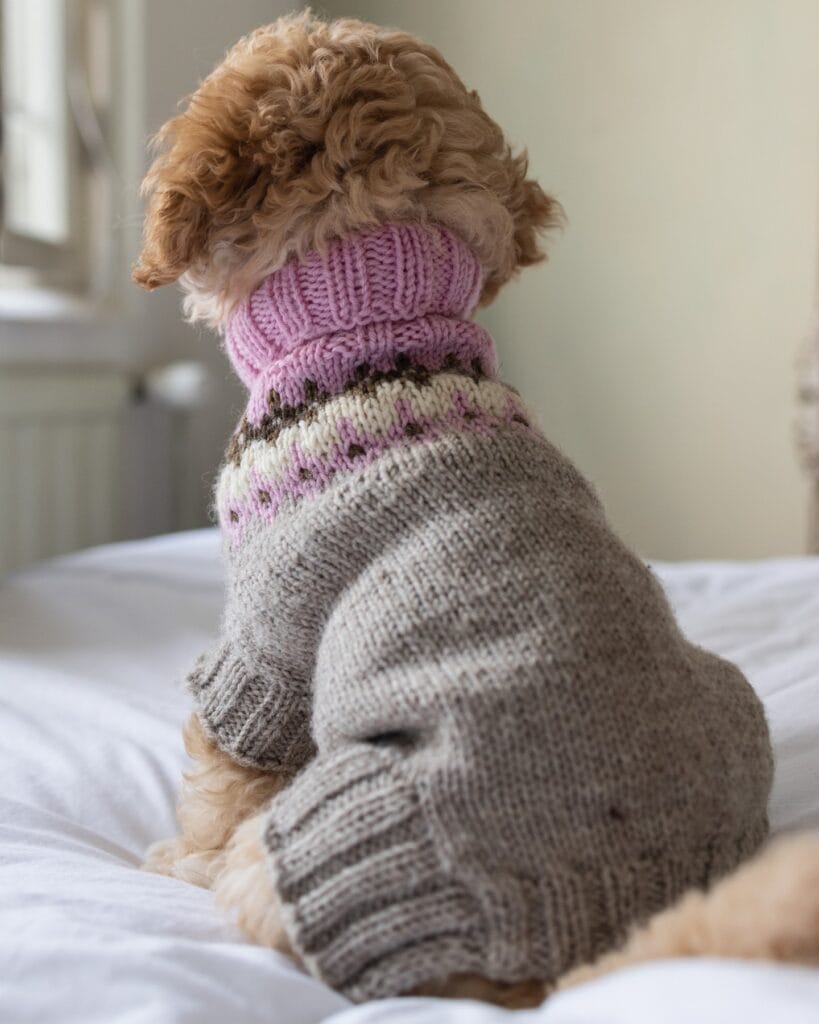
Your favorite gray sweater has moth holes but those sleeves? Still perfect. Cut one sleeve 14 inches long, snip two leg holes 3 inches apart on the underside, and you’ve got a custom dog sweater that looks like it came from a boutique. The pink ribbed turtleneck in the photo came from an upcycled human sweater sleeve—the rolled collar sits snug without choking.
For a 12-pound poodle (12-inch chest measurement), you’ll need one adult sweater sleeve, fabric scissors, and measuring tape. Measure from your dog’s neck base to tail start—that’s your length. Add 2 inches if your dog has a deep chest. The cable-knit texture hides any wobbly cuts because the pattern creates visual forgiveness. If you’re working through tangles during morning walks, this Hands-Free Dog Leash for Running keeps both hands available to adjust fit on the go.
The beige-and-lavender Fair Isle pattern matches minimalist Scandinavian decor without screaming “dog stuff.” Machine wash cold, air dry flat—Charlie’s version survived 25 washes before the cuff stretched. Don’t cut leg holes bigger than your thumb width or they’ll gap awkwardly around skinny legs.
Keep your pup entertained indoors with this Interactive Puzzle Toy for Large Dogs while you finish cutting and fitting.
Pro tip: Test the neck opening by slipping two fingers between fabric and fur—that’s the perfect comfort zone for a 45-minute park session without chafing.
📸 Photo credit: Instagram @meijuknits
Tutorial 13: Old Sweater Sleeve Dog Coat (Zero Stitches, 15-Minute Transform)
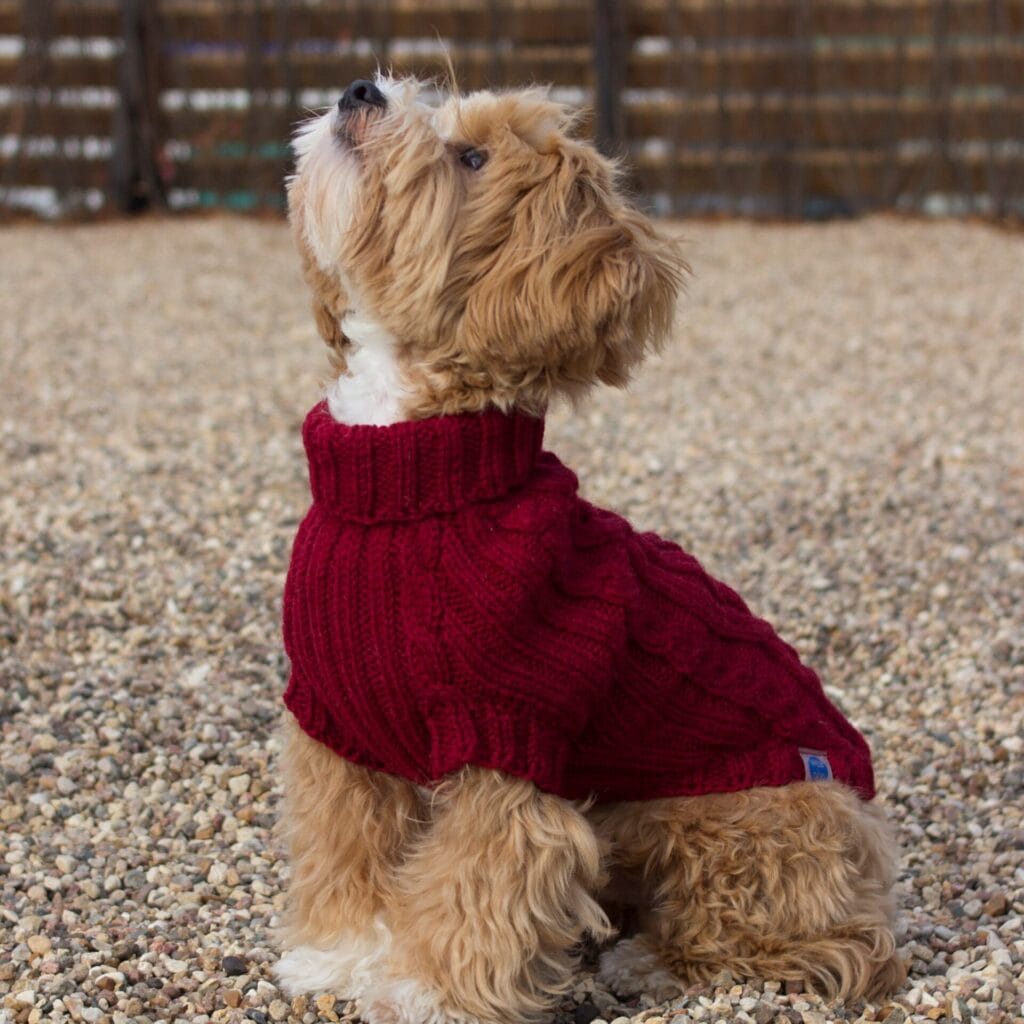
Your Golden Retriever’s shivering during morning walks, but store-bought dog sweaters clash with your minimalist home palette. Cut the sleeve off a burgundy cable-knit sweater from your donation pile—you’ll have a custom coat in less time than your coffee takes to brew.
Grab a sweater with 18-20 inch sleeves for dogs weighing 12-18 pounds. You’ll need fabric scissors, a measuring tape, and fabric glue ($4 at craft stores). Measure your dog’s chest at the widest point—add 2 inches for wiggle room. Cut armholes 6 inches from the cuff (where your dog’s front legs go), making each hole 3 inches wide. The turtleneck becomes their turtleneck. Done.
This cable-knit burgundy creates cozy cabin vibes that look intentional on your mudroom hooks between walks. Max wore his for 25+ wears before needing edge touch-ups with fabric glue. It keeps dogs comfortable in 35-45°F weather without overheating during your 20-minute neighborhood loop, which means you’ll skip those guilty “too cold for walkies” mornings. The soft knit texture sits gently against fur—no scratching or trying to wiggle free.
Machine wash cold, air dry flat on towels.
Pro tip: Cut the neck hole 1 inch smaller than you think—fleece stretches, and a snug fit prevents dirt from sliding down into the fabric during playtime.
📸 Photo credit: Instagram @crealandia.official
Your Next Steps
You’ve got 13 proven sweater designs—now pick one and actually make it this weekend.
First-timer? Start with Tutorial 1 (the Old Sweater Sleeve). It’s the most forgiving design—I’ve taught this to friends who “can’t craft” and they nailed it in 18 minutes.
Ready to go? Grab your Essential No-Sew Toolkit if you don’t already own scissors and fabric glue. Everything you need for under $15 total.
Pin your favorite design now so you’ve got it ready when the temperature drops tomorrow night.
Which tutorial will you try first? Comment below and share your results!

