Have you ever looked at your dog’s cage and thought, “I wish this could be more than just a plain box”? Well, you’re in luck. Turning a dog cage into stylish furniture isn’t just possible, it can be a blast. Just think about a rustic wooden kennel or a chic leatherette dog bed. Sounds appealing, right? Let’s explore some creative ideas that’ll make your pup’s space look fabulous and maybe even trick your guests into thinking it’s just a nice piece of decor. What’s the first idea that comes to mind?
Stylish Pet Furniture Examples
When you think of pet furniture, do you picture something bland and boring? You’re not alone.
But dog cage furniture DIY can totally flip that idea on its head. Imagine transforming a plain old dog cage into a stylish accent piece. Try adding a cute wooden top, so it doubles as a side table—now that’s functional, right?
You could even paint it in your living room colors, or cover it with fabric that matches your decor. Or how about adding some cute storage baskets inside for toys?
Your furry friend will love it, and you won’t have to hide it from guests. Why settle for ordinary when you can create something special? Your dog deserves it, and your home will thank you.
Our Collection
Let’s check out our collection of amazing dog cage furniture ideas that blend style and function beautifully.
You’ve got the rustic wooden kennel design for a warm touch, the sleek glass-top dog crate for a modern vibe, and even a vintage suitcase dog bed that’ll make your pup feel like they’re traveling in style.
Each piece serves a purpose, but they also add a dash of charm to your home—who wouldn’t want that?
1. Rustic Wooden Kennel Design
If you’re tired of your dog’s ugly metal cage ruining your decor, a rustic wooden kennel is the perfect DIY project for you. Not only does it provide a cozy and safe space for your furry friend, but it also blends seamlessly into your home’s aesthetic, making it look more inviting. Additionally, these kennels can be adorned with luxury dog grooming supplies to pamper your pup in style!
Plus, building it yourself can save you a chunk of change! Let’s get you started on this rewarding journey to style and function.
Materials Needed:
- Tools:
- Drill
- Saw (circular or miter saw works best)
- Screwdriver
- Measuring tape
- Sandpaper (medium and fine grit)
- Supplies:
- Plywood sheets (for walls and top)
- Wooden planks (for the base and slats)
- Wood screws
- Wood glue
- Stain or paint (your choice for a rustic finish)
- Safety goggles
- Dog bed or blanket (for comfort)
Step-by-Step Instructions:
- Measure and Cut: Decide how big you want the kennel to be. Measure out the dimensions on the plywood and wooden planks. A good starting size is about 3 feet long, 2 feet wide, and 2.5 feet tall for medium-sized dogs. Use your saw to cut the pieces carefully.
- Assemble the Base: Lay out the wooden planks to create the base. Use wood glue to secure them together, and reinforce with screws for added strength. Make sure it’s sturdy; after all, you wouldn’t want it to wobble like that IKEA shelf you tried to put together last summer.
- Build the Walls: Attach the plywood sheets to the respective sides of the base using screws. Make sure to leave an opening for a door on one side. You can make this a simple rectangular door or add a cute arch for stylistic flair.
- Create the Top: Place another piece of plywood over the top. This will protect your pup from any falling objects. You can make it removable, just in case you need to visit the inside — given how much dogs love to stow away their treasures.
- Finishing Touches: Sand down all rough edges for safety (no one wants splinters). Stain or paint your kennel in a rustic hue that matches your home decor. This step can be as creative as you like; you could use a barn-red stain or a weathered grey paint.
- Add Comfort: Place a cozy dog bed or a soft blanket inside. Spoil your pup a little; after all, they deserve a nice throne!
- Optional Door: If you want an extra touch, you can add a hinged door to the opening. Simply attach hinges on the side, and it’ll swing open easily.
Optional Add-ons/Variations:
- Different Colors: Switch up the stain or paint color to suit your home. Try distressed white for a beachy look or deep brown for a cabin vibe.
- Decorative Accents: Attach some cute decals, leave a little room for your pup’s name, or hang a chalkboard for writing sweet messages (or reminders, like NOT to steal your socks).
Pro Tip:
Before you start the assembly, take a moment to visualize your dog’s space.
Consider adding a few ventilation holes on the sides—this will keep your furry friend breezy and comfortable. Plus, it’s always better for their fur-nadoes that tend to happen in closed spaces!
With this rustic wooden kennel, you’re not just creating a space for your pup;
2. Modern Glass-Top Dog Crate
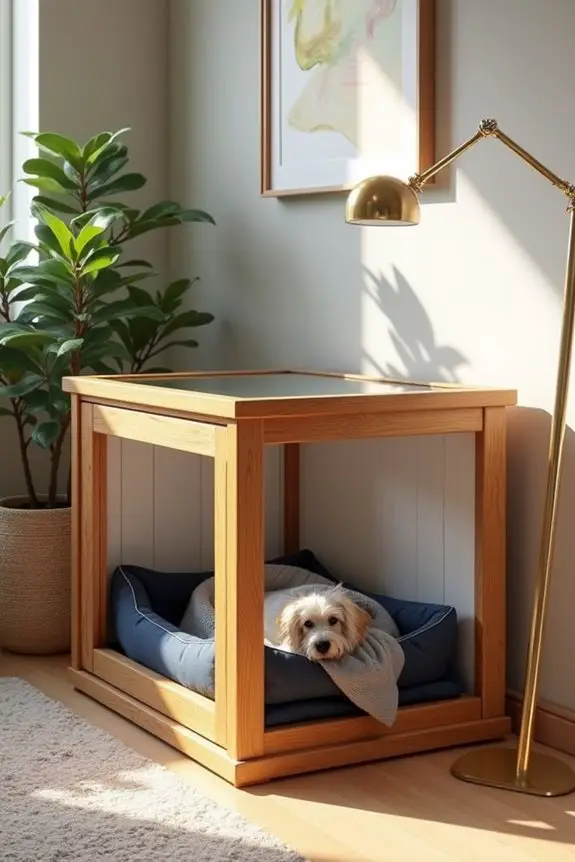
Are you tired of the stark look of traditional dog crates clashing with your home’s interior? If so, this DIY project could be your newest endeavor. A modern glass-top dog crate not only enhances your dog’s comfort but also elevates your home decor, making it a stylish addition rather than an eyesore. Plus, it’s a great way to save on expensive furniture designed for pets while providing your furry friend with a chic space of their own. Additionally, incorporating luxury dog furniture can complement this stylish upgrade and provide even more options for your pet’s comfort.
Materials Needed:
- Tools:
- Drill
- Screwdriver
- Measuring tape
- Circular saw or miter saw
- Sandpaper (medium and fine grit)
- Supplies:
- Wooden boards (for the frame)
- Glass top (cut to size, ideally tempered for safety)
- Metal or wooden dog crate (for the interior)
- Wood screws
- Wood glue
- Felt pads (to protect your floor)
- Paint or stain (to match your decor)
- Dog bed or soft blanket (for comfort)
Step-by-Step Instructions:
- Measure and Cut: Start by determining the size you want for your crate. Measure the metal crate along with the outer frame dimensions. Cut your wooden boards accordingly—consider a size around 4 feet long, 3 feet wide, and 3 feet tall for a larger dog.
- Build the Frame: Lay out the wooden boards to form the rectangular frame. Use wood glue and screws to assemble it. Verify your frame is sturdy—nobody wants a wobbling masterpiece when your dog jumps in.
- Attach the Walls: Cut additional wooden boards to create the walls of your crate. Attach these securely to the frame using screws. You could also choose to design one wall with a slatted pattern for added air flow and style.
- Add the Glass Top: Carefully place the glass panel on top of the frame. If you’re feeling adventurous, you might want to secure it with brackets for extra stability.
- Finishing Touches: Sand down any rough edges to make sure everything is safe and lookin’ sleek. Then, paint or stain your wooden frame to match your existing furniture. Seriously, choose a shade that complements that no-drama vibe of your home.
- Make it Comfortable: Add a plush dog bed or a favorite blanket inside. Your pup will love curling up in their new stylish nook.
- Optional Door: If you want to give them some privacy but keep it chic, consider adding a sliding wooden door on one of the shorter sides. Attach it with sliding rail hardware for a perfect mix of functionality and style.
Optional Add-ons/Variations:
- Material Swaps: Instead of wood, consider using durable, recycled materials for the frame to give it an eco-friendly twist or experiment with different colors of paint to match your own personal vibe.
- Personalized Touches: You could add a nameplate with your dog’s name, or stain the wood in a fun color that pops against the glass.
Pro Tip:
When finishing up your crate, consider using felt pads on the bottom of the legs to avoid scratching your floors.
Also, remember that safety is key—if you’re using glass, verify it’s tempered and avoid sharp edges for your pup. They may be a playful bundle of joy, but they’re also accidental interior designers in the making!
3. Chic Leatherette Dog Bed
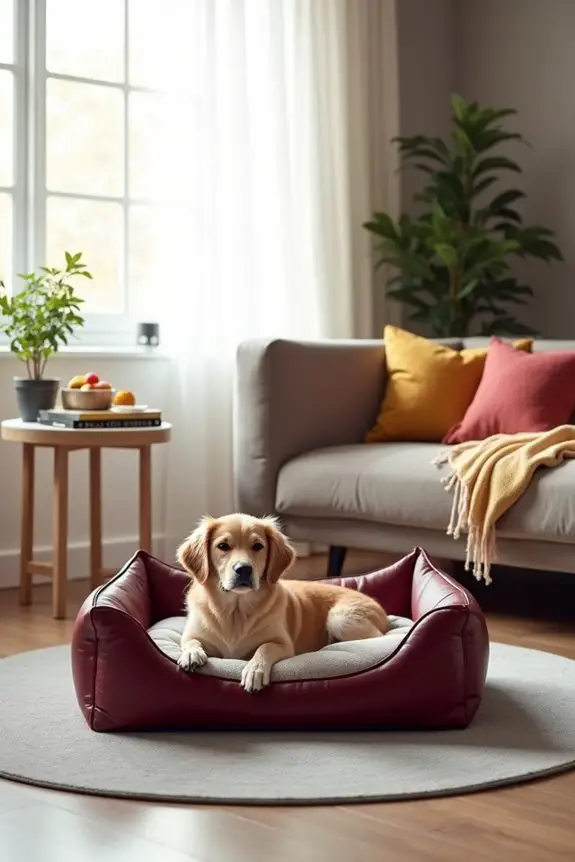
Looking to elevate your dog’s nap game? Consider this chic leatherette dog bed project, designed for the stylish pet owner who wants a sleek, comfortable spot for their furry friend. Not only does this DIY bed add a touch of elegance to your home decor, but it’s also an affordable and practical solution that can withstand the wear and tear of daily dog life. Plus, your pup will love snuggling into something that feels fancy and cuddly. Moreover, pairing this bed with luxury dog beds large can create a cozy corner that caters to your dog’s comfort and style preferences.
Materials Needed:
- Tools:
- Scissors
- Measuring tape
- Sewing machine or needle and thread
- Iron (optional, for smoothing fabric)
- Supplies:
- Leatherette fabric (enough to cover the bed size you choose)
- Soft foam or cushion filling (for the base)
- Pillow stuffing (optional, for extra comfort)
- Zipper (to make the cover removable)
- Fabric glue (for added security)
- Felt pads (to protect your floors from scratches)
Step-by-Step Instructions:
- Measure and Cut: Start by measuring your dog’s length and width when they’re curled up—this will give you the ideal dimensions for the bed. Cut your leatherette fabric into two rectangles, ensuring they’re about 2-3 inches larger than your foam on all sides for sewing allowance.
- Create the Base: Layer your foam or cushion filling to create the base of the bed. Make it thick enough for comfort but not so thick it becomes a climbing challenge for your dog. Depending on your dog’s size, aim for a thickness of 4-6 inches.
- Sew the Cover: Place one piece of leatherette fabric right-side up on a flat surface. Take your second piece and place it right-side down on top. Pin the edges together, leaving an opening for a zipper on one side. If you’re feeling adventurous, a stylish striped pattern could be interesting too.
- Insert the Zipper: Sew in the zipper at the designated opening to make the cover removable. This way, cleaning becomes a breeze, and you don’t have to deal with any unexpected doggie smells clinging to the fabric.
- Finish the Bed: Turn the cover right-side out and stuff it with your foam base. If you opted for pillow stuffing, add some in for that cloud-like comfort.
- Secure it in Place: Use fabric glue to secure any loose edges if necessary. Smooth out any wrinkles or folds, and make it cozy for your pup.
- Present it to Your Dog: Find the perfect spot in your home, place the new bed down, and be ready for the explosion of joy as your dog instantly recognizes the luxury they’ve been presented with.
Optional Add-ons/Variations:
- Feel free to experiment with fabric patterns—how about a funky polka dot or a classic houndstooth? You could also try adding a fun pop of color to the piping for a modern touch.
- If your dog loves to chew or dig, consider reinforcing the seams with double stitching for added durability and peace of mind.
Pro Tip:
Before you start cutting, always check your dog’s reactions to new materials. If they’re into snuggly fabrics, you might want to test with smaller swatches first. It’s like a fashion parade for pets, and let’s be honest, you want them to strut their stuff in something that’s both stylish and comfortable.
4. Compact Multi-Function Dog Space
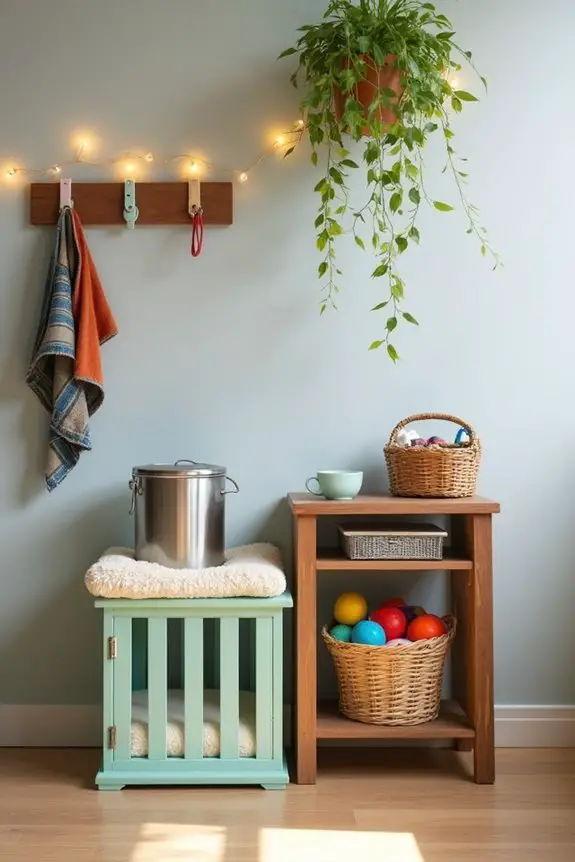
If you have a small home or just want to maximize your space, creating a compact, multi-function dog space can be a game changer. This DIY project combines practicality and style, allowing you to have a cozy nook for your furry friend while keeping your living area neat and tidy. Best of all, it saves money compared to store-bought options, giving you more room in your budget for those adorable doggy toys. In addition, an essential dog food storage cabinet can help keep your pet’s food neatly organized and easily accessible.
Materials Needed:
- Tools:
- Measuring tape
- Drill/Screwdriver
- Saw (if cutting wood)
- Sandpaper
- Paintbrush and/or roller (if painting)
- Supplies:
- Wooden shelves or crates (size dependent on your space)
- Cushion or dog bed (for comfort)
- Dog food container (to keep supplies tidy)
- Hooks or pegs (for leashing storage)
- Stain or paint (to match your decor)
- Screw-in casters (optional, for mobility)
Step-by-Step Instructions:
- Measure Your Space: Start by measuring the area where you want to create your dog space. Make sure it’s large enough for the shelves or crates you plan to use, but compact enough to keep things organized.
- Select Shelves/Crates: Choose wooden shelves or crates that fit into your space. You can stack crates for a cool, rustic look or opt for sleek shelves for a modern vibe. Be creative with how they’ll fit together; maybe one crate acts as a base for another.
- Sand and Paint/Stain: Smooth any rough edges on the wood with sandpaper. If you want to add a splash of color to your space, now’s the time to paint or stain the wood. Let your imagination run wild—after all, your home should reflect your personality.
- Assemble Your Space: Securely attach the shelves or crates together if you decide to stack them. If you’re feeling fancy, you can use some L-brackets for added stability. Just make sure everything is tight, because nobody wants a wobbly dog house.
- Add Cushioning: Place a comfy cushion or dog bed on one of the shelves or inside a crate. This will give your pup a cozy resting area to relax and keep them off the cold floor.
- Organize Dog Supplies: Next, designate a shelf for your dog’s supplies. Use the dog food container on one side for easy access to food. You can even add a small basket for toys—think of it as your pup’s organized play zone.
- Install Hooks for Leashes: Don’t forget to attach hooks or pegs on the side for leashes, collars, or even fashionable bandanas. It keeps everything in one place, making your daily walks smooth and stress-free.
Optional Add-ons/Variations:
- Color Customization: Use bright colors or patterns to paint your crates or shelves, making them a fun addition to your home decor. You could even decoupage fun images onto them for a personal touch.
- Lighting Features: Consider adding fairy lights or a small lamp above the dog space. It not only looks inviting but also creates a beautiful ambiance for you and your pet.
Pro Tip:
Always verify your DIY dog space is stable and safe. If you’re using wood, avoid any chemicals that can be harmful to pets when painting or staining. A polyurethane finish can seal the wood and protect it from scratches but make sure it’s pet-safe and fully dried before letting your furry friend explore.
With this compact multi-function dog space, you’re not just creating a lovely spot for your pet; you’re also getting a stylish solution that blends seamlessly with your home. Plus, your dog will appreciate the effort—trust me, they can totally tell when you put thought into their special space.
5. Vintage Suitcase Dog Bed
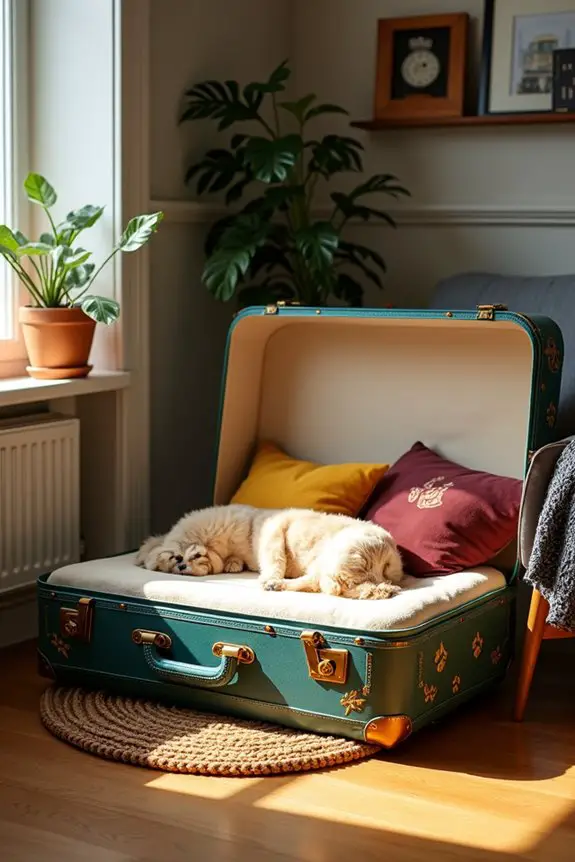
If you’re looking to add a touch of nostalgia to your home while also creating a cozy space for your pup, a vintage suitcase dog bed is just the ticket. Not only will it save you money (those fancy dog beds can really add up), but it will also make your home look charming and unique. Plus, your dog will love having their own stylish little nest to curl up in! Additionally, consider incorporating wellness products into your pet’s routine for a comprehensive approach to their health.
Materials Needed:
- Tools:
- Screwdriver
- Drill (optional for adding legs)
- Sandpaper (for smoothing edges)
- Supplies:
- Vintage suitcase (the funkier, the better)
- Comfy dog bed or cushion (that fits inside the suitcase)
- Felt pads or small furniture legs (to keep the suitcase off the ground)
- Decorative fabric (optional, if you want to line the interior)
- Hot glue gun and glue sticks (for securing fabric)
Step-by-Step Instructions:
- Find the Perfect Suitcase: Scout out thrift stores, garage sales, or your attic for a vintage suitcase. Look for one that’s in relatively good shape, and be sure it can snugly fit your dog’s bed.
- Clean It Up: Give your suitcase a good cleaning. Wipe down the outside and vacuum the inside to verify it’s a clean, comfortable space for your furry friend. If there’s any lingering odor (you know what I mean), try leaving it out in the sun for a few hours.
- Optional Lining: If you want to add a pop of color or a soft touch, consider lining the inside with decorative fabric. Cut pieces to fit and use a hot glue gun to secure them down. You might want your pup to feel fancy.
- Secure the Bed: Place the dog bed or cushion inside the suitcase. If your pup is a bit wobbly when jumping in, you can use some felt pads or small furniture legs to raise the suitcase slightly off the ground, making it easier for them to enter.
- Make It Cozy: Confirm that the bed is comfy and stable. Adjust the bed placement if needed and consider adding some soft toys or a blanket for added coziness, because who doesn’t love a snuggle buddy?
- Show Off Your Creation: Decide where to place your suitcase dog bed. It could look charming in the living room, near a sunny window, or in your bedroom. Snap a pic, and don’t forget to show off your new creation online—friends will be barking with jealousy.
Optional Add-ons/Variations:
- Personalized Touch: Want something extra unique? Try painting the outside of the suitcase with your dog’s name or a fun design. Or, add some decals that reflect your pup’s personality—after all, they’re not just any dog.
- Pillow Options: Experiment with different types of cushioning—maybe try a plush, orthopedic dog bed or even a handmade pillow for a more rustic look. Your pup deserves the best, right?
Pro Tip:
Before you launch into this project, make sure to check for any broken clasps or latches on the suitcase. You want your vintage treasure to be safe and sound for your snuggly friend.
Safety first—after all, we don’t want a suitcase-to-the-face situation now, do we?
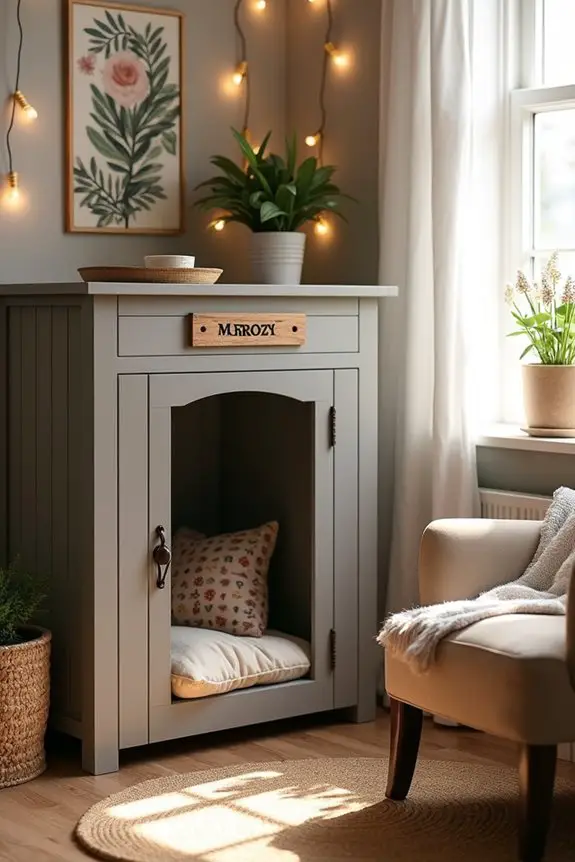
6. Cottage-Style Dog Crate
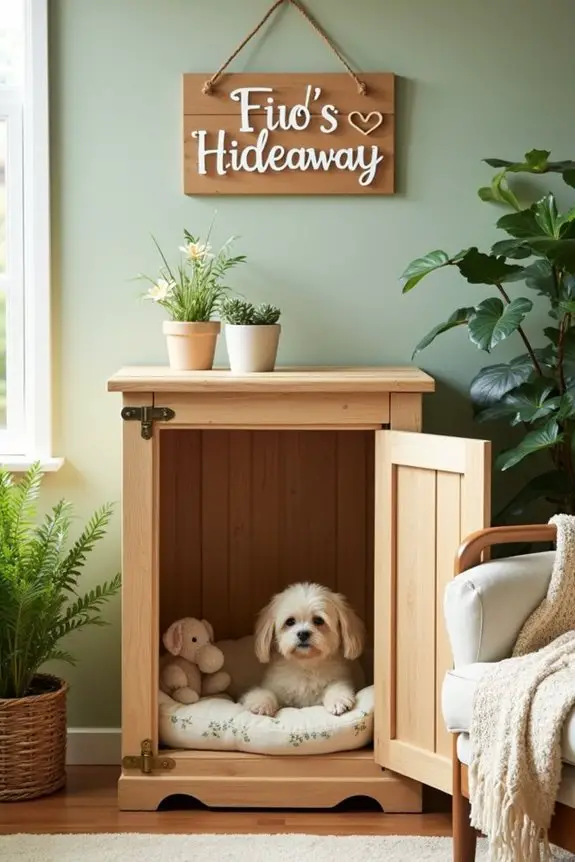
Creating a cottage-style dog crate is the perfect solution for dog owners who want to combine functionality with style. Not only does it serve as a cozy retreat for your pup, but it also blends beautifully with your home decor, guaranteeing that your furry friend’s space doesn’t clash with your design aesthetic.
Plus, building it yourself can save you some cash, and let’s face it, who doesn’t love a good DIY project?
Materials Needed:
- Tools:
- Screwdriver
- Drill
- Measuring tape
- Saw (if cutting wood)
- Sandpaper
- Supplies:
- Wooden crates or pallets (you can often find these for free or cheap)
- Wood glue or screws
- Hinges (for doors, if desired)
- Non-toxic wood finish or paint (optional)
- Soft bedding or cushion for the crate interior
Step-by-Step Instructions:
- Choose Your Crate Style: Decide whether you want to use wooden crates or repurpose pallets. Look for ones that are sturdy and clean, as your pup deserves a safe spot.
- Measure and Cut: If using pallets, measure and cut them to create a box frame that will serve as the base of your crate. You might want to create a structure that allows your dog to sit up comfortably while keeping the overall dimensions snug enough to feel secure.
- Assemble the Frame: Use wood glue or screws to put the pieces together. Confirm everything is tight and stable, because we wouldn’t want your pup’s new hideaway to fall apart during playtime.
- Add a Door: If you want to make the crate more functional, attach hinges to one side to create a door. This makes it easier for your dog to enter and exit, and it gives you access for cleaning (a win-win).
- Smooth It Out: Use sandpaper to smooth all rough edges. Remember, safety first—no one wants splinters in a delicate dog paw.
- Finish It Up: If you’re feeling adventurous, add a non-toxic finish or paint to complement your home decor. Make sure it fully dries before introducing your dog to their new space.
- Cozy Comfort: Place some soft bedding or a cushion inside the crate to make it inviting. Add a plush toy for those snuggly moments, and watch your pup enjoy their new den.
Optional Add-ons/Variations:
– Personalized Staining: Instead of a plain finish, you can customize your crate with stains that match your furniture or fabrics around your house.
Feeling crafty? Try stenciling your pup’s name on the front for a personal touch.
– Decorative Touch: Consider adding a small sign above the crate that reads “Fido’s Hideaway” or something playful. It’s a little extra charm that showcases your love!
Pro Tip:
Make sure to measure your dog before building the crate so
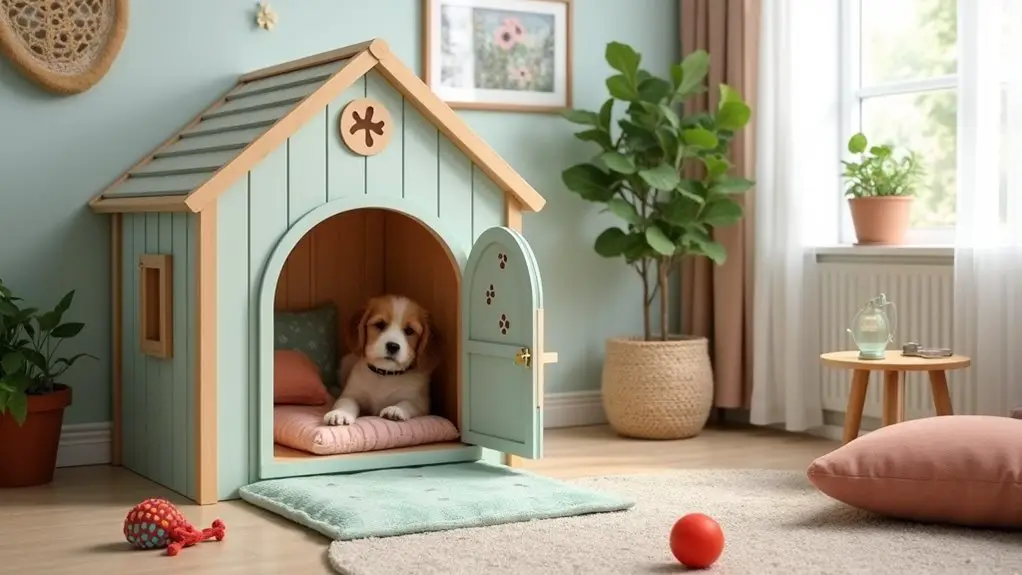
7. Indoor Dog Playhouse Design
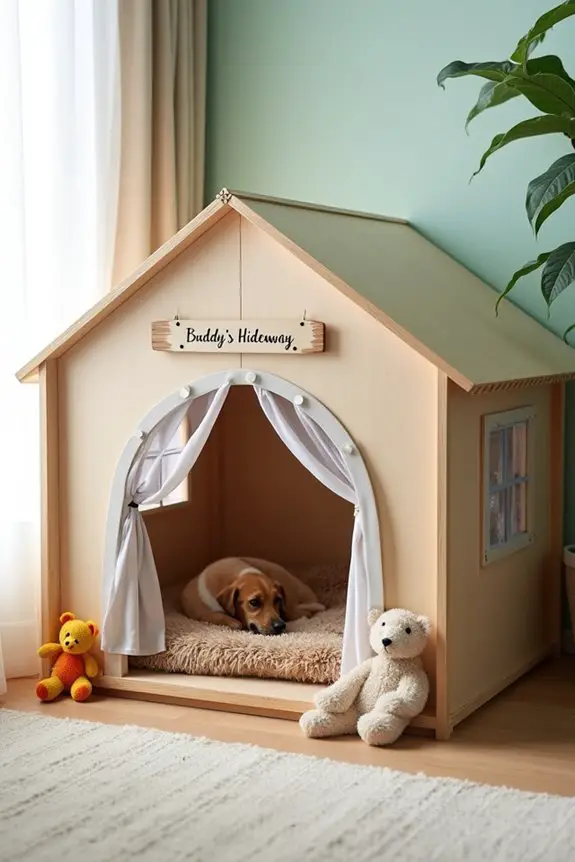
Looking to give your dog a cozy spot that feels like home? How about crafting an indoor dog playhouse? This DIY project isn’t just a fun activity; it provides your pup with a personal space for play, rest, or a little bit of hide-and-seek. Plus, it adds a touch of charm to your living space, making it look like you’ve got a stylish pet rather than just a fur tornado. It’s the perfect blend of comfort and creativity.
Materials Needed:
- Tools:
- Screwdriver
- Drill
- Measuring tape
- Saw (if you need to cut wood)
- Sandpaper
- Supplies:
- Plywood sheets (for walls and floor)
- Wood screws
- Hinges (optional for doors)
- Non-toxic paint or wood finish (optional for that stylish touch)
- Soft bedding or pet mat
- Decorative fabric (for curtains or add-ons)
- Dog-friendly toys (to fill the space)
Step-by-Step Instructions:
- Plan Your Design: Sketch out a plan for the playhouse. Think about your dog’s size—everyone wants a house that feels just right. You don’t need blueprints worthy of a mansion; just a simple outline will do.
- Cut the Wood: Measure and cut the plywood into the desired dimensions for the walls and floor. A good size for small to medium dogs might be around 3ft by 2ft. That’ll give them enough room to lounge without feeling lost.
- Assemble the Walls: Start by attaching the walls to the floor using wood screws. Think of this as building a fort, but, you know, for your pup. Confirm everything is sturdy so it can withstand the occasional canine shenanigans.
- Add a Roof: Attach a second layer of plywood or some wooden beams to create a roof. This will also keep your dog feeling safe and snug inside, almost like a cozy little hideaway.
- Create an Entrance: If you’d like a door, simply cut out an opening on one of the walls and attach a hinge with a small flap. This adds functionality. Plus, how cute would that be? Your dog can “knock” before entering—just kidding, they probably won’t.
- Smooth It Out: Don’t forget to sand down all the rough edges. Nobody wants a little paw getting caught on a jagged edge. Safety first, right?
- Make It Homey: Add some soft bedding or a plush pet mat inside to create a comfy nook. You can even drape decorative fabric over the entrance for a playful touch. Your dog may think they’ve just been upgraded to a five-star hotel.
Optional Add-ons/Variations:
- Personalized Decor: Add a touch of personality by painting your dog’s name on the side or stenciling cute paw prints around the house. Consider using fabric that matches your home’s decor, so it seamlessly blends in rather than sticking out like a sore thumb.
- Window with a View: If you’re feeling a bit spunky, cut out small windows and cover them with a sheer, dog-friendly fabric. This adds ventilation and a view for when your pup wants to keep an eye on the world outside.
Pro Tip:
Always use non-toxic materials, especially if your dog loves to chew. Safety is paramount, and you can have peace of mind knowing that your dog’s little paradise is also safe and sound.
If you’re on a budget, look for reclaimed wood or second-hand supplies. It gives character, is eco-friendly, and saves pennies for treats!
Crafting an indoor dog playhouse is a fluffy-filled adventure just waiting for you. So grab your tools, let your creativity flow, and make your dog’s indoor haven a reality. Who knows? You might even want to sneak in there for a nap yourself. Just watch out for those furry snuggles.
Extra Tips & Ideas
While transforming a plain dog cage into stylish furniture may sound intimidating, it’s actually a fun way to showcase your creativity and make your home feel more inviting.
Start small—maybe add a coat of paint or some cute fabric. You could also repurpose an old table to serve as a cover.
Just be careful if you’re not handy; I once tried to build a shelf and ended up with a modern art piece instead.
Consider personalizing it with photos or your dog’s favorite toys peeking out—your guests will love it.
And don’t forget to think about comfort. Adding cozy blankets or cushions will guarantee your pup loves their new space.
It’s about blending function and flair, right?
Frequently Asked Questions
What Materials Are Best for DIY Dog Cage Furniture?
For DIY dog cage furniture, wood, wire mesh, and non-toxic paint are best. You’ll also want sturdy hinges and locks for safety. Consider using soft, washable fabrics for added comfort and ease of cleaning.
How Much Does It Typically Cost to Create DIY Pet Furniture?
Creating DIY pet furniture typically costs between $50 to $200, depending on materials and design complexity. You’ll need to account for tools and supplies, but the outcome might just surprise you with its charm and functionality.
Are There Specific Tools Needed for Assembling Dog Cage Furniture?
Yes, you’ll need some specific tools for assembling dog cage furniture. A drill, screwdriver, measuring tape, saw, and sandpaper are essential. These tools will help you accurately cut and assemble the pieces securely.
Can I Customize the Design to Fit My Home Decor?
You can certainly customize the design to fit your home decor. After all, “home is where the heart is.” Choose colors, materials, and styles that reflect your taste while ensuring your dog’s comfort and safety.
How Can I Ensure My Dog Is Comfortable in Its New Cage Furniture?
To guarantee your dog’s comfortable in its new cage furniture, add soft bedding, provide familiar toys, and maintain proper ventilation. Regularly check for any signs of stress and adjust the space to suit your dog’s needs.
Conclusion
So, whether you’re turning a dog cage into an elegant piece of furniture or crafting an eye-catching dog bed from a vintage suitcase, your furry friend will feel like royalty. Who knew that with a sprinkle of creativity, a dash of elbow grease, and maybe a few glue mishaps, you could create a cozy palace for your pup? Now, let’s get those DIY spirits soaring—your dog’s new throne awaits, and it’s begging for a little flair.

Amr Mohsen is a software engineer who traded his keyboard for a leash — at least on weekends. His love for dogs inspired him to share what he learns as a dog owner and enthusiast, bringing a detail-oriented, research-driven perspective to every article he writes. If it’s about dogs, he’s probably already looked it up twice.

