Your golden retriever is basically a 70-pound chaos machine, and you love him — but girl, that plastic crate sitting in your living room? It’s killing your whole vibe.
I had the same problem with my cousin’s dog when she stayed with us for a month. That ugly black wire crate just sat there, clashing with everything. Every time someone came over, I wanted to throw a blanket over it and pretend it didn’t exist.
And I know you’ve got those Pinterest boards full of cozy, coordinated rooms. So having an eyesore crate parked next to your carefully chosen throw pillows? That stings a little.
Here’s the thing — dog cage furniture DIY is genuinely a thing, and it’s easier than you’d think. These 7 ideas turn that dreaded crate into a piece your guests will compliment instead of quietly judge.
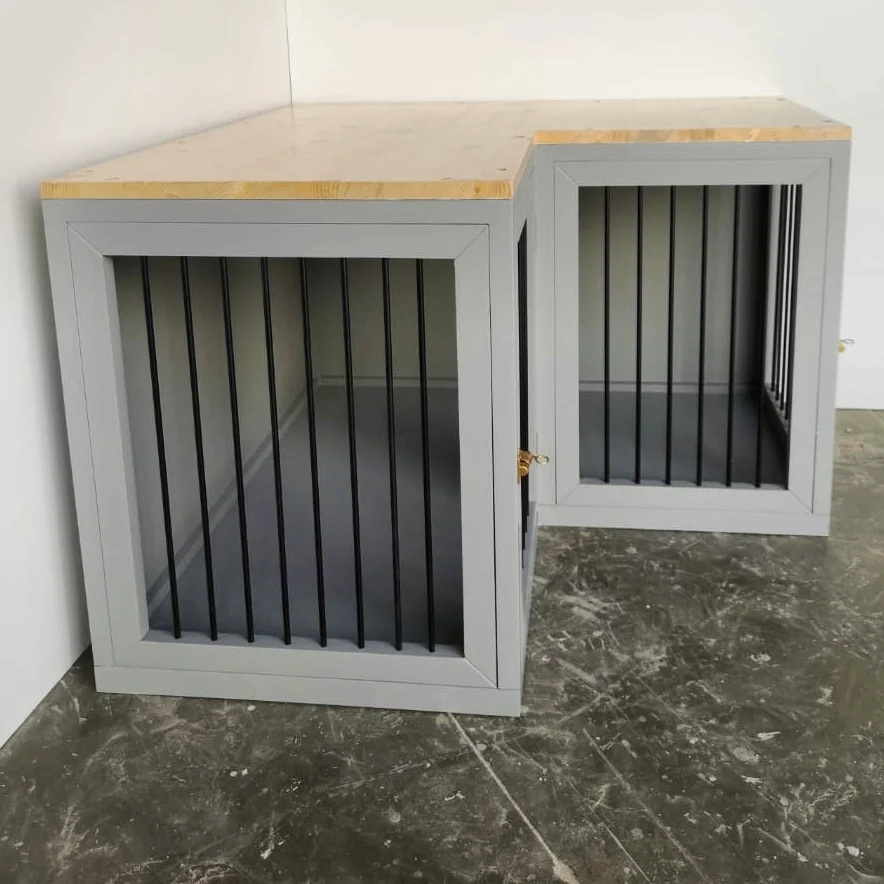
#1: DIY Double Dog Crate Furniture With a Wood Top (The One That Actually Looks Good in Your Living Room)
You know that moment when your golden retriever is sprawled across the floor, and the wire crate is just… sitting there, clashing with everything you’ve carefully put together? Yeah. My cousin had the same problem — her crate looked like it belonged in a storage unit, not a Pinterest-worthy living room.
This build is different.
Prep Time: 1 hour | Active Project Time: 6–8 hours | Difficulty Level: Intermediate
Materials & Tools:
– 3/4″ plywood or pine boards (for the frame and base)
– 3/4″ solid pine for the top surface (natural finish)
– Gray chalk paint or milk paint (this build uses a warm light gray)
– Black steel rods (3/8″ diameter, cut to your desired height)
– Gold brass latch hardware for the smaller door
– Wood glue + pocket screws
– Drill, jigsaw, miter saw
– Sandpaper (120 and 220 grit)
– Paintbrush + foam roller
Instructions
Start by cutting your pine boards to frame two separate crate openings — one large (roughly 36″W x 24″D x 30″H) and one smaller (24″W x 18″D x 24″H). These two units sit side by side, with the larger one slightly taller, and the solid pine top spans across both to create one connected surface.
Build each box frame individually using pocket screws and wood glue at every joint. This is where most people rush — don’t. Let the glue cure at least 30 minutes before moving to the next step, because a wobbly frame is impossible to fix once the rods are in.
Drill evenly spaced holes along the top and bottom rails of each frame front — space the black steel rod holes about 2.5″ apart for that clean bar look. Slide each 3/8″ rod through, secure with a dab of epoxy inside the hole, and wipe off the excess before it sets.
Sand the entire frame starting with 120 grit, then finishing with 220 grit for a smooth paint surface. Apply two coats of light gray chalk paint, letting each coat dry fully. The matte finish hides small imperfections and gives it that furniture-store feel your golden retriever doesn’t deserve but totally gets.
Attach the gold brass latch to the smaller door panel — it’s a small detail, but it pulls the whole look together against the gray.
Finally, cut your pine top to overhang slightly on the front and side edges (about 1″). Leave it natural or apply a light coat of danish oil for warmth. Screw it down from inside the frame so zero hardware shows on top.
The roomy interior means your dog can stand, turn, and settle in actually comfortably — the steel rod spacing keeps visibility open so she doesn’t feel closed off, which reduces anxiety for dogs who struggle with traditional solid-wall crates.
Seal any exposed wood edges inside with pet-safe paint to make cleanup easier when muddy paws happen (and they will).
📸 Photo credit: Instagram @furnature.ae
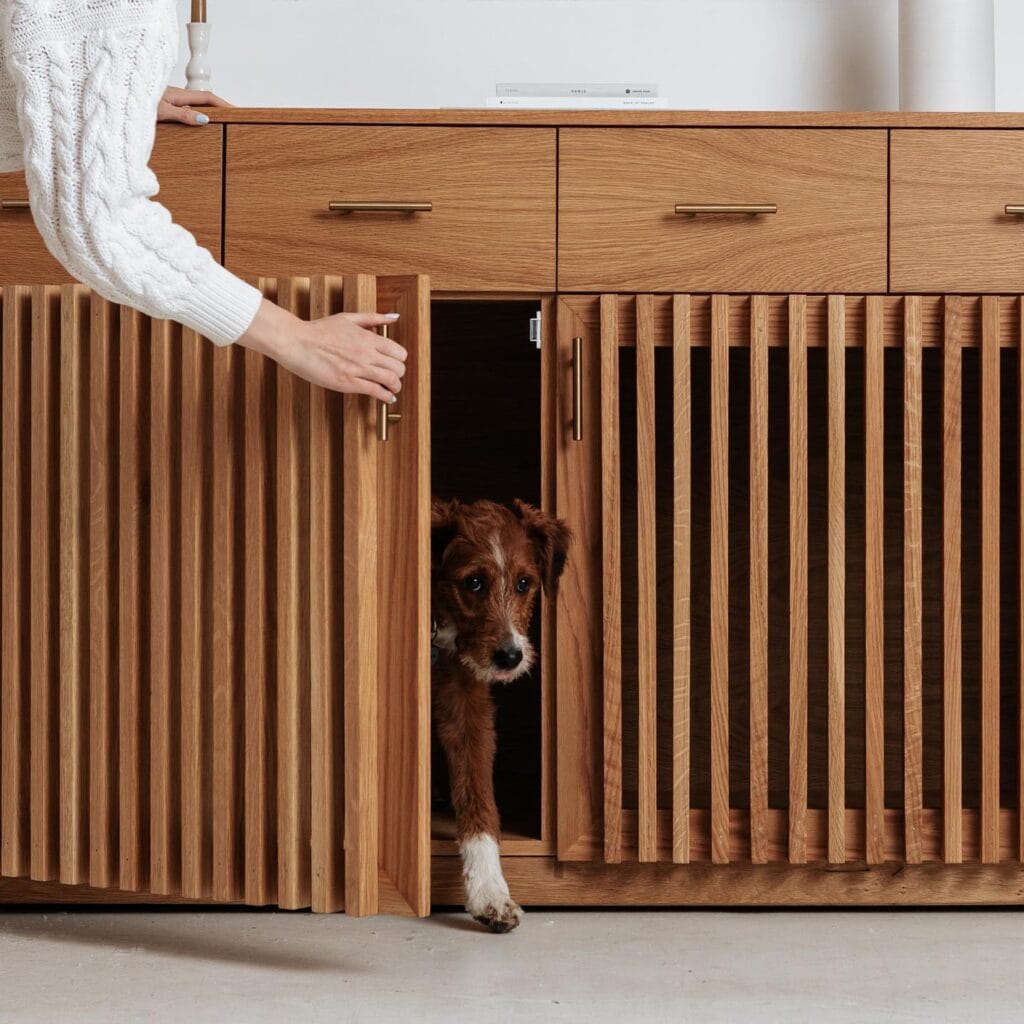
#2: DIY Built-In Sideboard Dog Crate (The One That’ll Make Your Guests Ask “Wait, Is That a Dog House?!”)
Your golden probably does that thing where she drags her muddy paws across the living room floor and then immediately wants to curl up somewhere cozy. Mine too. And the last thing either of us wants is a wire crate sitting in the middle of our Pinterest-perfect living room looking like a jail cell.
This build is different.
Materials & Tools You’ll Need:
– 3/4-inch oak plywood (for the cabinet body)
– 1×2-inch oak slat strips (for the slatted door panels)
– Brass bar pulls (approx. 5 inches, like the ones visible in the photo)
– Piano hinge or 35mm concealed cabinet hinges
– Wood glue + 1.5-inch brad nails
– Sandpaper (120-grit then 220-grit)
– Water-based wood stain in warm walnut
– Miter saw, jigsaw, nail gun, drill
Prep Time: 1 hour | Active Project Time: 2 full weekends | Difficulty Level: Intermediate
### Instructions
Start by cutting your plywood into the cabinet shell — two side panels, a top, a back panel, and a middle divider if you want the sideboard drawers above like in the photo. The crate section sits on the left, and the drawer unit lives on the right. That separation is what makes this look like actual furniture instead of a pet product.
Sand every panel with 120-grit first, then finish with 220-grit for that smooth, touchable surface your dog will brush against a hundred times a day.
For the slatted doors — and this is the part that makes the whole build — rip your 1×2 oak strips into consistent widths on a table saw, then space them roughly 1/2 inch apart when attaching them to a door frame made of 3/4-inch oak. The slats give your dog airflow and visibility, so she never feels trapped. Built-in ventilation means a calmer dog, which means fewer anxiety scratches on your floors.
Attach the door frame to the cabinet using concealed 35mm hinges so there’s no hardware showing on the outside. Install the brass bar pulls centered on each door panel. That brass-against-oak combination is what gives this the high-end sideboard look.
Stain the whole piece before final assembly. Getting into those slat gaps after everything is nailed together is a nightmare — ask me how I know.
Line the interior floor with a washable cushion cut to fit. Your golden gets a den that feels like hers, and you get a piece of furniture that actually belongs in your home.
The slatted doors let her see the room without being in it — dogs feel secure in enclosed spaces, so this setup genuinely reduces restlessness. That’s the feature-benefit-payoff right there: oak slats create visual openness, which keeps her calm, which means you stop coming home to chewed furniture.
If you love projects that pull double duty around the house, 13 Genius DIY Dog Stuff Every Pet Parent Needs to Try Today! has more ideas that’ll make your space work harder for both of you.
Use a router on the outer cabinet edges to add a subtle roundover — it softens the whole look and protects your dog from sharp corners when she nudges her way in and out.
📸 Photo credit: Instagram @dune.customworks
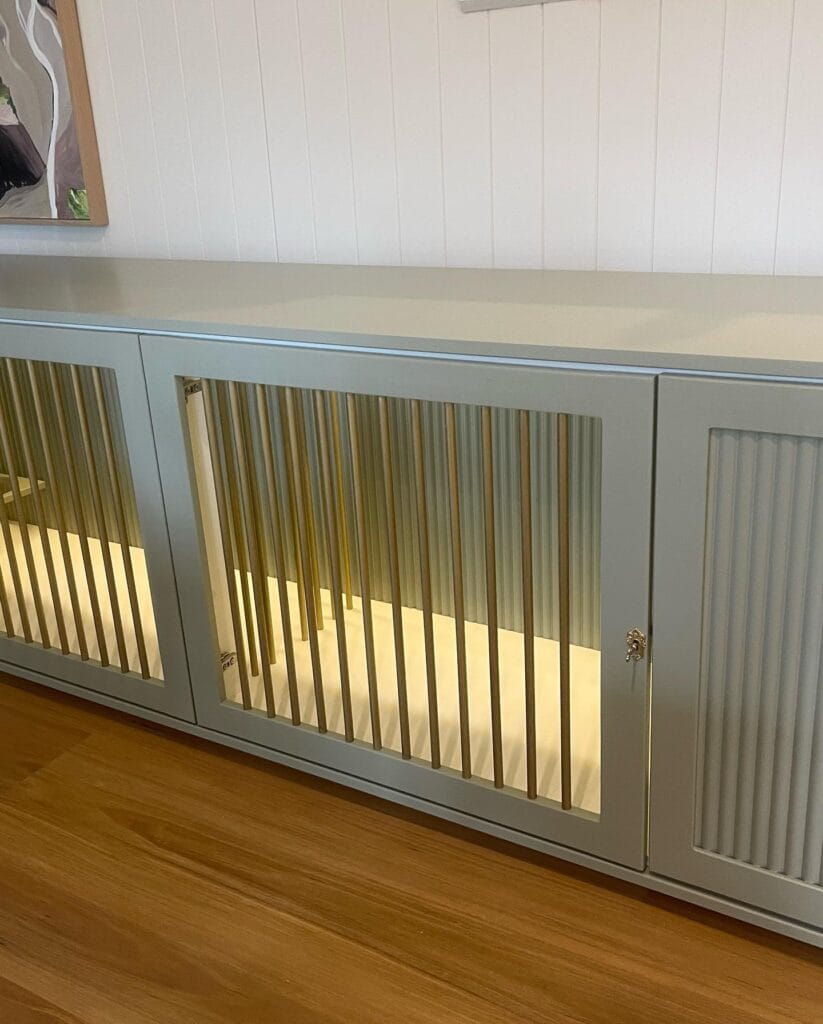
#3: Slatted Sage Green Dog Crate Cabinet With Built-In Lighting
Your golden retriever has claimed the living room corner again — and the plastic crate you shoved there is not the vibe you had on your Pinterest board.
Yeah. I’ve been there.
This sage green slatted cabinet crate is the one that made me stop scrolling. It looks like a custom sideboard, but it’s actually a dog den. The vertical brass-toned wooden dowels sit inside a painted MDF frame, backlit with warm LED strip lighting that makes the whole thing glow. And that soft gold light? It keeps the space calm for anxious dogs — no harsh overhead glare, no dark cave energy.
Materials & Tools
– MDF boards (for the frame — ¾ inch thickness)
– Hardwood dowels (⅝ inch diameter, cut to uniform height)
– Warm white LED strip lights (adhesive-backed)
– Satin latex paint in sage green or duck egg blue
– Decorative brass hardware (lock + pull)
– Reeded glass panel (for the solid side door)
– Wood glue, drill, miter saw, sandpaper (120 and 220 grit)
Instructions
Cut your MDF into a rectangular frame — two side panels, a top, a base, and a back shelf strip. Sand every edge with 120 grit first, then finish with 220 grit before painting. This matters because paint grabs smoother surfaces differently, and you want that furniture-grade finish.
Build the dowel grid next. Drill evenly spaced holes along both the top inner frame and the base board — space each hole 2 inches apart to keep the slatted look open but secure. Apply wood glue to each dowel end before pressing them in. Let it cure 24 hours flat.
Run your LED strip along the inside base before attaching the bottom panel permanently. This is the step most people skip, and then they’re crawling inside a cabinet with a staple gun. Don’t do that.
Paint the entire exterior two coats of sage green satin latex, letting each coat dry 4 hours. The satin finish wipes clean — dried kibble, muddy paw prints, mystery drool — all come off with a damp cloth. That wipe-clean surface keeps the piece looking fresh without a full scrub every weekend, which means you actually enjoy having it in your living room.
Attach your brass lock hardware to the door frame and hang the door on concealed hinges so the front stays sleek. The lock gives you control during guests or mealtimes without stressing your dog out with a heavy latch sound.
If you love making things for your dog that actually look good in your home, 12 Heartfelt Designs for DIY Dog Accessories has more ideas worth bookmarking.
The warm lighting inside isn’t just pretty — dogs settle faster in softly lit spaces, so your golden will actually use this instead of pushing the door open and sleeping on your feet at 2am.
Choose dowels in a natural wood tone rather than painting them. The contrast between the raw wood slats and the painted frame is what gives it that high-end furniture look — painted dowels flatten the whole effect.
⏱ Prep Time: 1 hour | 🔨 Active Project Time: 6–8 hours | ⭐ Difficulty Level: Intermediate
📸 Photo credit: Instagram @mandaleighfurniture
#4: Build a Dog Crate End Table That Looks Like It Belongs in a Pottery Barn Catalog
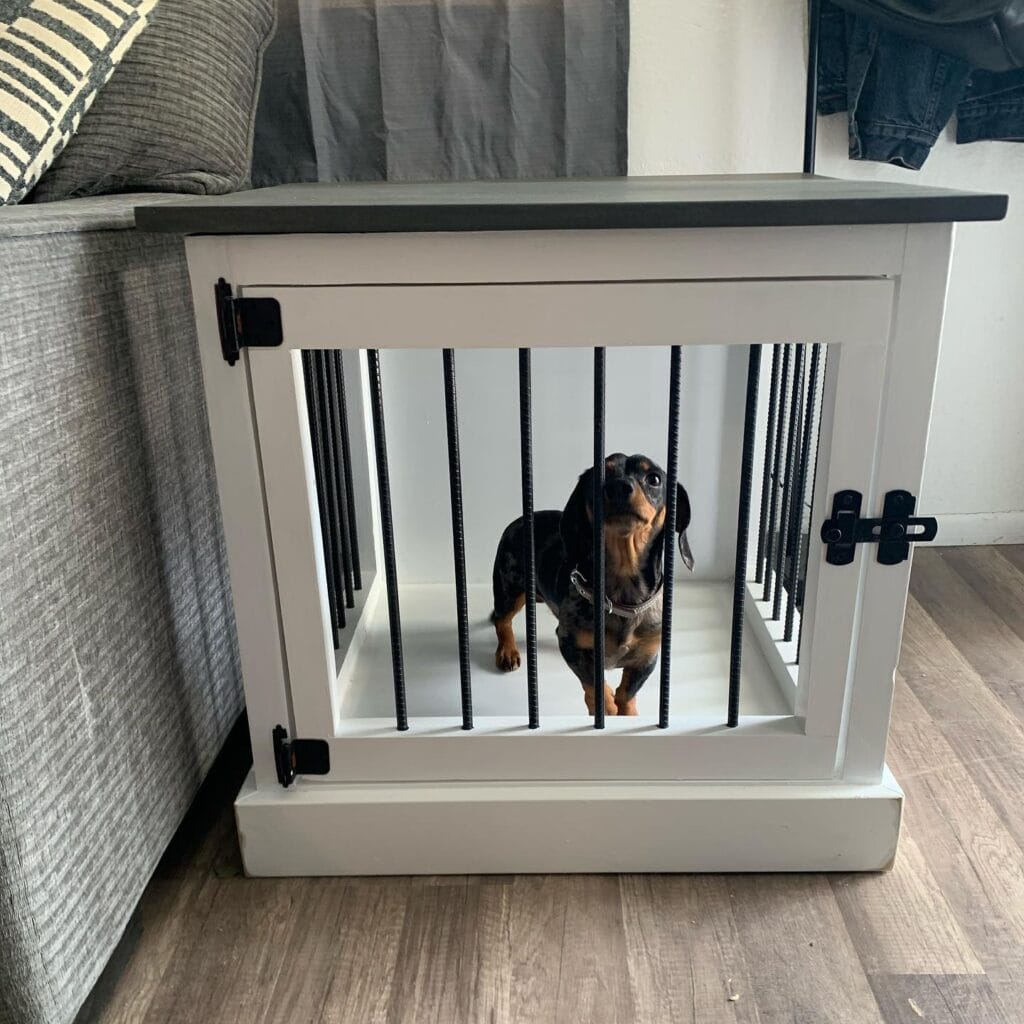
You know that moment when your golden is just staring at you from across the room, and her metal wire crate is literally the first thing guests see when they walk in? Yeah. I’ve been there. My cousin’s dachshund had this sad, prison-looking wire cage shoved next to the couch for two years before she finally said enough.
This build fixes that completely. What you’re looking at here is a white-painted solid wood dog crate that doubles as an end table, finished with a dark charcoal gray top panel. The front door uses vertical black rebar rods as bars, held inside a clean white wood frame with matte black hinges and a sliding bolt latch. It sits flush against the sofa like it was always meant to be there.
Materials & Tools
– 2×4 lumber (framing)
– 1×6 pine boards (side and top panels)
– ⅜-inch rebar rods (cut to matching lengths for bars)
– White chalk paint or exterior-grade white paint
– Dark gray paint or stain (for the top)
– Matte black hinges (x2) and a sliding bolt latch
– Wood screws, drill, circular saw, sandpaper (120-grit and 220-grit)
– Wood glue, tape measure, level
Instructions
Start by cutting your 1×6 pine boards into four panels — two side walls, one back panel, and one top. My cousin made the mistake of skipping the dry-fit step, and her frame came out crooked. Don’t skip it. Lay every piece out on the floor before a single screw goes in.
Build the base box first by attaching the side panels to a ⅜-inch thick plywood floor piece using wood glue and screws. Let it cure for at least an hour. The box structure being solid before you add the door frame means zero wobbling once your dog is inside — which matters especially for heavier breeds.
For the door frame, cut two vertical side pieces and two horizontal rails from your 1×4 pine. Drill evenly spaced holes across the top and bottom rails — about 1.5 inches apart — to seat each rebar rod. Tap the rods in with a rubber mallet and secure with a drop of strong construction adhesive. This rebar-rod system keeps the front visually open so your dog doesn’t feel closed off, while the solid wood frame keeps everything structurally tight.
Attach the door to the main crate box using your matte black hinges, positioning one near the top and one near the bottom for even weight distribution. Add the sliding bolt latch at mid-height on the right side — it’s the same placement you see in the photo, and it makes one-handed opening a breeze.
Sand the entire piece starting with 120-grit, then finish with 220-grit for a smooth paint surface. Apply two coats of white chalk paint to all wood surfaces except the top. Paint the top panel in your dark charcoal gray. The two-tone finish is what makes this look intentional instead of DIY.
The best part: because the crate doubles as an actual end table, you reclaim floor space and your dog gets a cozy den she’ll actually want to hang out in.
If you want to go even further with managing your dog’s space around the house, 12 Creative DIY Dog Gate Ideas for Your Home has some seriously clever builds worth looking at.
Cut your rebar rods slightly longer than needed, then grind or file the ends smooth before inserting them. Sharp rebar tips inside a dog crate is not the vibe. And if your crate feels even slightly uneven on the floor, add small felt furniture pads to the base corners — it protects your hardwood and levels everything out.
Prep Time: 30 minutes | Active Project Time: 4–6 hours | Difficulty Level: Intermediate
📸 Photo credit: Instagram @standstrongsawworks
#5: Built-In Dog Crate Console Table With Drawers (The Pinterest Dream That Actually Works)
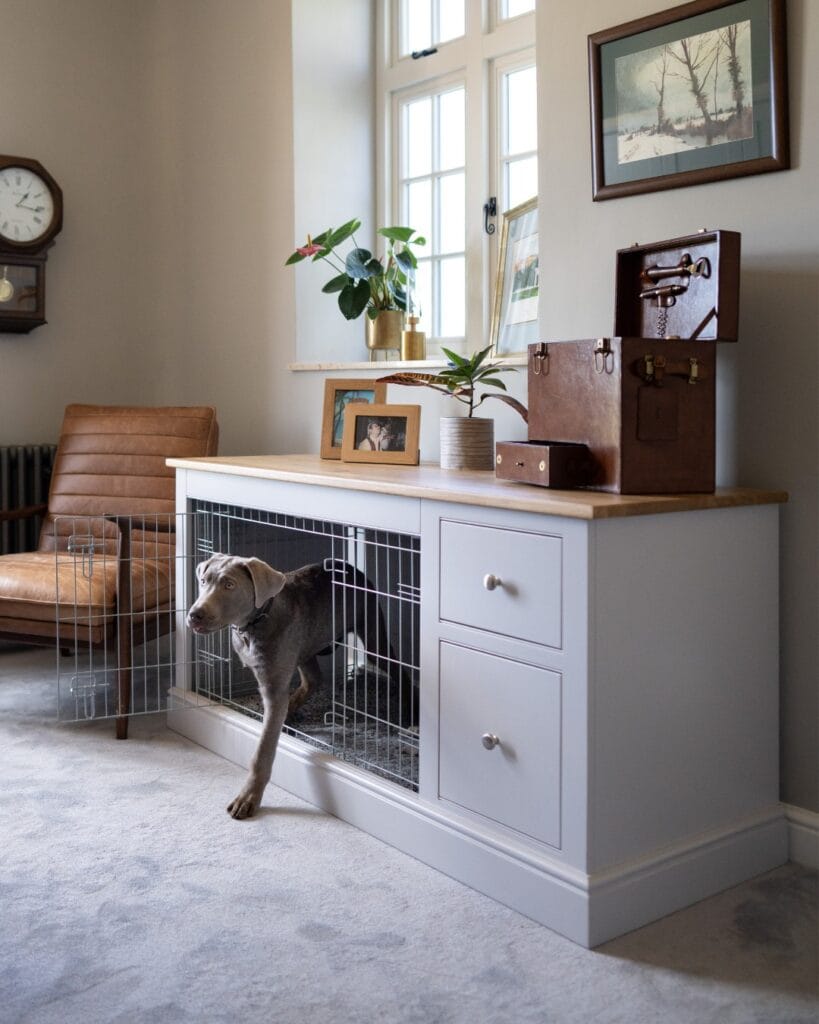
Your golden retriever has that look — the one where she’s half in, half out of her wire crate, giving you the sad eyes while you’re trying to host people in your living room. The crate is fine. It’s just… there. Clashing with everything you’ve carefully curated.
This build fixes that.
Prep Time: 2 hours | Active Project Time: 2 full weekends | Difficulty Level: Intermediate
Materials & Tools
– 3/4-inch MDF or birch plywood for the cabinet body
– Solid oak board (at least 1.5 inches thick) for the top surface
– Farrow & Ball Purbeck Stone or similar warm gray paint for the exterior
– Two drawer box kits with soft-close slides
– Round ceramic knobs in matte white
– One 42-inch folding wire dog crate (the internal frame)
– Wood glue, pocket screws, 2-inch finishing nails
– Orbital sander, miter saw, brad nailer, paint roller
Instructions
Cut your plywood panels to create a cabinet box roughly 48 inches wide by 20 inches deep by 34 inches tall. The left side houses the wire crate — build that cavity first, sizing it so the crate slides in with about half an inch of clearance on each side.
Assemble the box using pocket screws through the interior corners, then add a center divider panel to separate the crate space from the drawer column on the right. This divider is structural, so don’t skip the glue. Sand every panel to 120 grit before assembly — paint reveals every imperfection on flat MDF.
Build two drawer boxes from 1/2-inch birch plywood and mount them on full-extension slides. The drawer column being separate from the crate zone means your golden’s space stays hers — no rattling hardware near her head when she’s resting.
Apply two coats of gray paint with a foam roller for a smooth, brush-stroke-free finish. The oak top sits loose on top (secured with figure-8 desktop fasteners underneath), and that warm wood grain against the cool gray is exactly the contrast your room needs.
And here’s what this really gives you: a functional console table — feature — that doubles as a dog den — benefit — so your space looks pulled-together even on the messiest Monday morning — payoff.
Real talk: the wire crate stays fully removable for cleaning. Slide it out, hose it down, slide it back. Your golden gets a den that feels enclosed and cozy (dogs genuinely prefer it). You get a surface for framed photos, plants, and whatever else you’ve been pinning.
If you want to go further with the top, 7 Creative Dog Crate Topper DIY Ideas has some really clever ways to style that oak surface beyond just décor.
Paint the inside of the crate cavity a dark charcoal — it makes the wire crate disappear visually and gives the whole piece that expensive, built-in look.
📸 Photo credit: Instagram @thepaintedfurnitureco
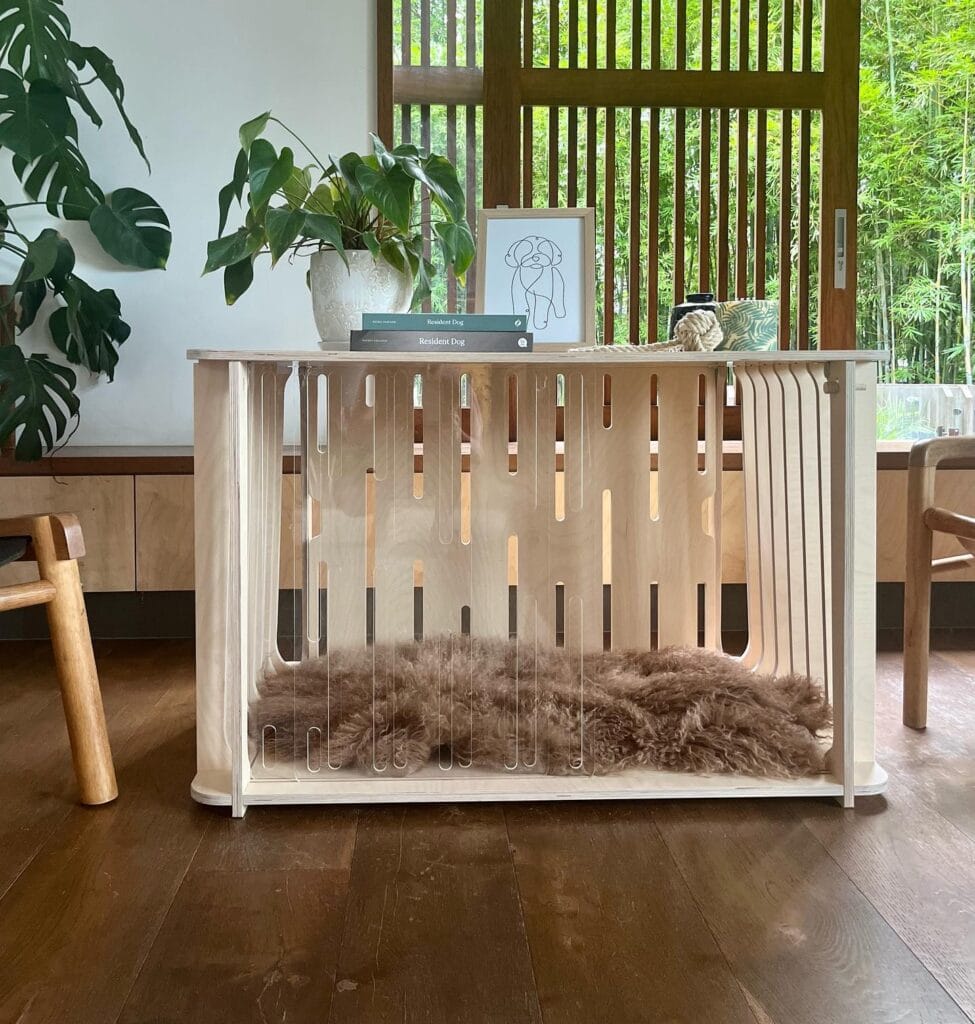
#6: DIY Acrylic & Birch Plywood Dog Crate That Looks Like Actual Furniture
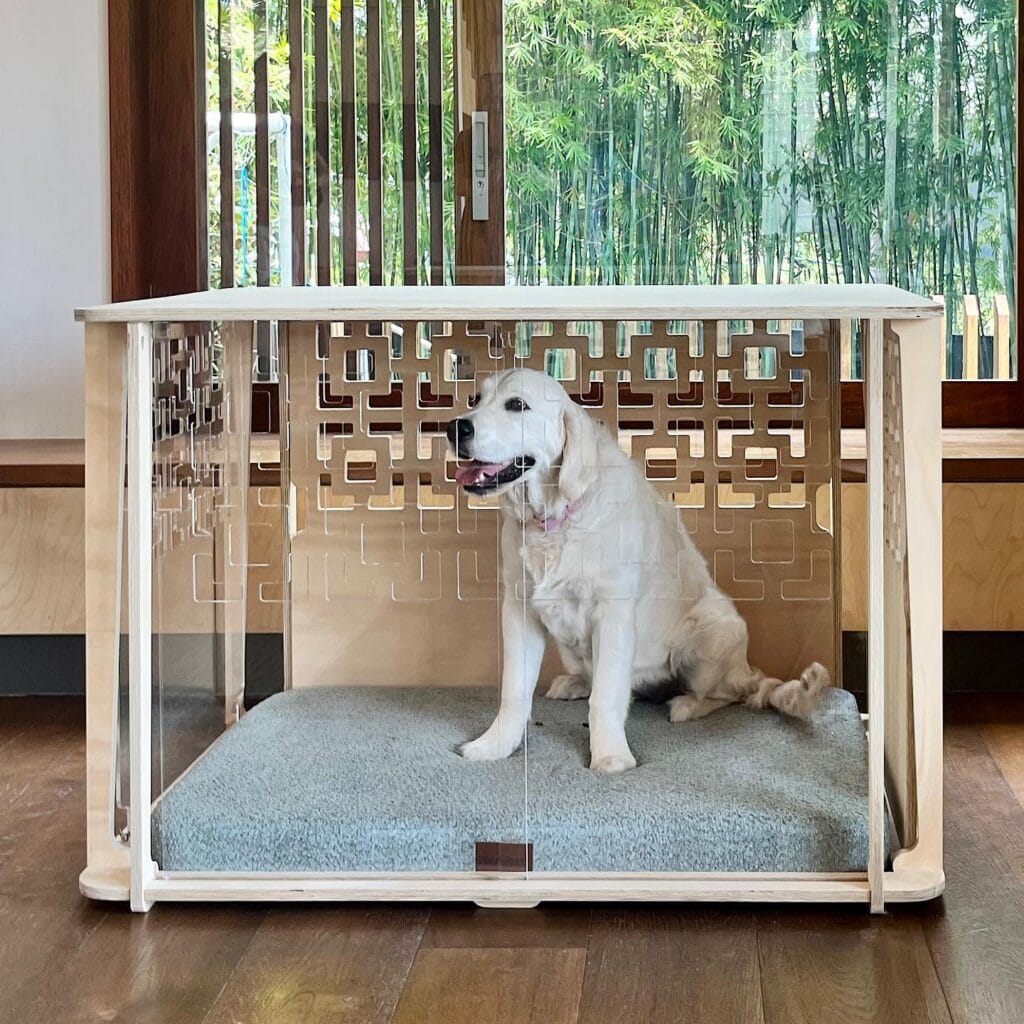
You know that moment when someone comes over and their eyes go straight to the giant black wire crate in your living room corner? Yeah. That moment.
This build is what happens when you refuse to let a dog crate ruin your aesthetic.
Materials & Tools You’ll Need:
– ¾-inch birch plywood (for top panel and base frame)
– Clear acrylic sheets — ¼-inch thick, cut to door panel size
– Laser-cut decorative panel in a geometric lattice pattern (can be ordered from Etsy or cut at a local makerspace)
– Wood dowels or corner leg pieces — 1.5-inch diameter
– Piano hinge for the acrylic door panel
– Small barrel bolt latch
– Memory foam dog mat — 3-inch thick, covered in gray boucle fabric
– Wood glue + pocket screws
– Sandpaper — 120 and 220 grit
– Matte white wood stain or primer paint
– Acrylic adhesive
– Drill, jigsaw, measuring tape, clamps
Prep Time: 1 hour | Active Project Time: 6–8 hours | Difficulty Level: Intermediate
### Instructions
Start by cutting your birch plywood into one top panel and one base panel — both sized to your dog’s length plus 6 inches on each side for breathing room. My golden is a big girl, so I went with 42 x 28 inches for both panels.
Sand both pieces through 120 grit first, then finish with 220 grit until the surface feels like paper. This step matters more than people think — the smoother the wood, the cleaner your stain sits.
Cut four corner leg pieces from your dowels or square lumber to your desired height. For a large dog like a golden retriever, 24 inches tall gives them space to sit upright comfortably — which means less anxiety in the crate, and fewer scratching sounds at 2am.
Attach the legs to the base panel using pocket screws and wood glue. Clamp everything and let it cure for at least one hour before moving on.
Now take your laser-cut lattice panel and attach it to the back and side walls using acrylic adhesive and thin wood framing strips. This panel is the whole vibe — it reads as decor, not containment.
For the front door, hinge your clear acrylic sheet to one of the front corner legs using a piano hinge. Acrylic doors — hinged on one side and latched on the other — let your dog see out without feeling trapped, which cuts down on whining fast.
Attach the top panel last, securing it to the leg tops with wood glue and corner brackets underneath. Apply your matte white stain in long, even strokes and let it dry fully between coats.
Slide in the gray boucle memory foam mat and you’re done. The mat’s cushioned support means your dog actually wants to go in — which makes crate training about a hundred times easier.
If your golden also needs a dedicated sleep spot outside the crate, 7 Cozy DIY Dog Beds for Large Dogs has some builds that match this same clean aesthetic.
Use furniture feet pads on the bottom of each leg — your hardwood floors will thank you, and the crate won’t slide when your dog shuffles around inside.
📸 Photo credit: Instagram @thepawsroom_dogcratefurniture
#7: Double Dog Crate Furniture — The Built-In Console Table Your Living Room Deserves
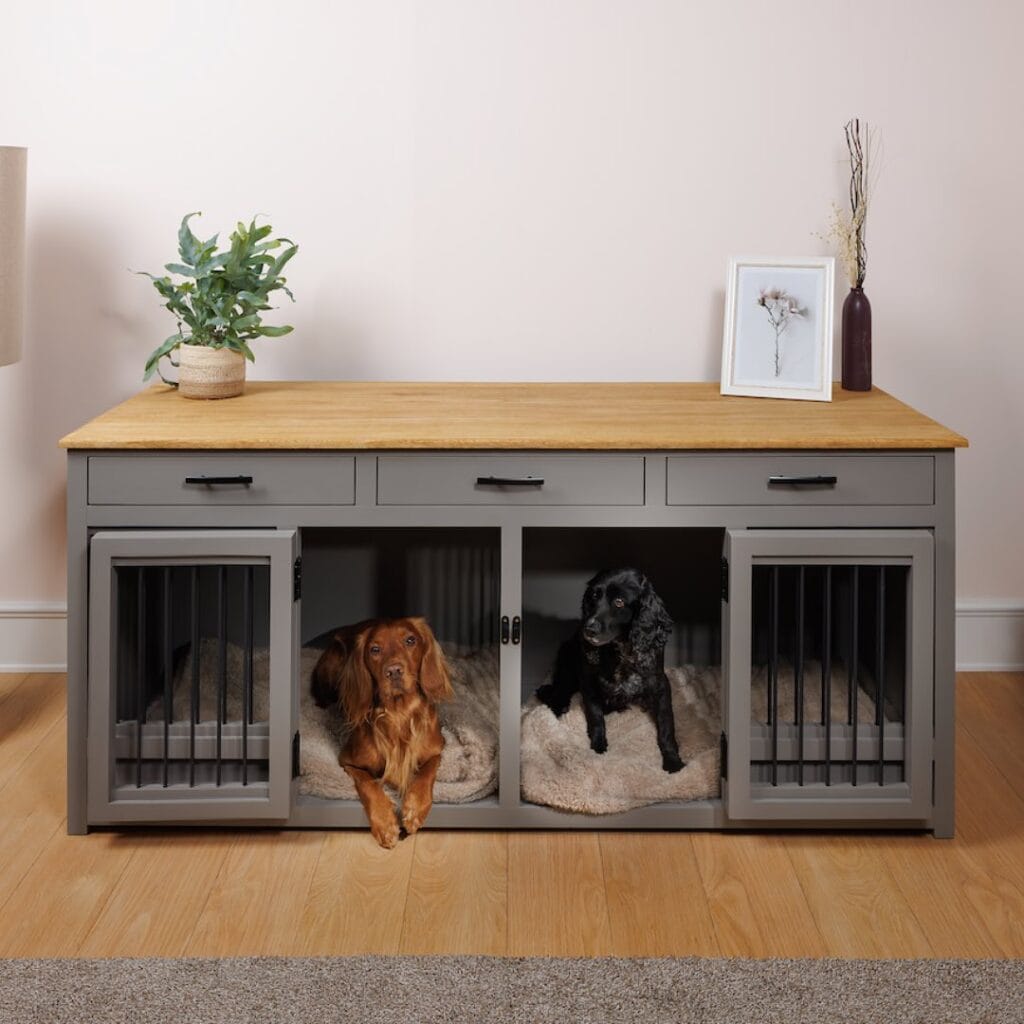
You know that moment when your golden flops right in the middle of the living room and you’re stepping around her just to get to the couch? Yeah. And then the wire crate in the corner is just… there. Staring at you. Ruining everything you worked so hard to Pinterest-board into existence.
This double dog crate console table is the one that changed everything for me.
Materials & Tools You’ll Need:
– 3/4-inch plywood (birch or oak) for the carcass and top
– Solid oak butcher block (approx. 72″ x 20″) for the tabletop
– Gray chalk paint (I used Frenchic Al Fresco in Silt)
– Black iron bar handles (3 drawer pulls + 4 door handles)
– Black metal crate bars/inserts — pre-cut panels or DIY welded bar grids
– Piano hinges for the 4 crate doors
– Drawer slides (soft-close, 18-inch)
– Wood glue + pocket screws
– Sandpaper (80, 120, and 220 grit)
– Clear matte sealant for the tabletop
– Drill, circular saw, jigsaw, tape measure, clamps
Prep Time: 2 hours | Active Project Time: 2–3 weekends | Difficulty Level: Intermediate
—
### Instructions
Start by cutting your plywood into the main carcass panels — two tall side walls, a full-length top panel (which will sit under the butcher block), a shared center divider, and floor panels for each crate bay. The finished cabinet in this build sits at roughly 36 inches tall x 72 inches wide x 20 inches deep, giving each dog a bay that’s about 28 inches wide — plenty of room for a cocker spaniel-sized pup, though you might want to bump it to 32 inches for a golden retriever.
Assemble the outer carcass first using pocket screws and wood glue at every joint. Once the box is solid, install the center divider, then add the three drawer compartments across the top section. The drawer faces sit flush with the cabinet front, so measure twice before cutting those openings.
For the crate bar inserts, you have two options. Weld your own steel bar grids using 1/2-inch round bar stock spaced 2 inches apart, or source pre-cut panels online and cut them to fit your opening. The bars in this build are painted matte black, which ties into the hardware and keeps the whole look cohesive. Secure the bar panels inside the door frames before attaching the piano hinges — it’s so much easier than trying to retrofit them after.
Sand the entire cabinet starting with 80-grit, working up to 220-grit for a smooth chalk paint finish. Two coats of gray chalk paint give you that muted, furniture-store look. Don’t skip the sealant on the oak top — dogs jump, paws land, drinks spill. A matte polyurethane coat protects the grain without making it look plasticky.
Drop in a plush crate pad for each bay. That is the moment your dogs walk in, circle twice, and never look at the old wire crate again.
Built-in crate bars mean your dogs get a den that feels safe and enclosed — that security actually reduces anxiety, which means less whining at night and a calmer dog during the day.
And honestly? The three drawers up top are perfect for leashes, treat bags, and all that random dog stuff that used to live on your kitchen counter.
If your pup needs more ways to burn energy outside their cozy new space, 7 DIY Dog Agility Course Ideas for Fun is worth a look for your backyard setup.
Chalk paint can feel streaky on plywood edges — thin your second coat slightly with water and use a flat brush (not a foam roller) on those edges for a cleaner finish. And if you’re cutting the bar insert openings with a jigsaw, tape the cut line first. It prevents tear-out and keeps everything looking sharp.
📸 Photo credit: Instagram @thepetcarpenter
The One Measurement Mistake That’ll Ruin Your Dog Cage Furniture Build
Okay, real talk — most DIY tutorials tell you to measure your crate, then build around it. Don’t do that.
Here’s what they skip: crates flex. Wire crates especially bow outward when your dog shifts their weight, and if your furniture frame is built too snug, that pressure cracks your joints within weeks. I learned this the hard way with my first build — gorgeous farmhouse console, split right down the corner seam by month two.
Add a full inch of clearance on every side. That gap disappears once you add interior trim, and your build actually lasts.
The other thing nobody talks about? Wood choice matters more than finish choice. Pine looks pretty but dents the moment your golden retriever decides the furniture is a scratching post. Go with poplar or oak for the frame, even if you paint over it — the density holds up against real dog life.
And if you’re building a whole dedicated dog zone, pairing this with a 7 Creative Ideas for Your DIY Dog Washing Station makes the whole space actually functional.
Build smarter, not prettier first.
Your Home Can Look Good and Survive a Golden Retriever
Okay, so here’s the thing — you don’t have to choose between a house you love and a dog you love. Both can coexist. I promise.
Pick one product from this list and just try it. That’s it. Start small. You’ll notice the difference fast — no more crunching through the kitchen in muddy-paw panic, no more hiding your sofa cushions before guests arrive.
Your home should feel like yours again. Stylish, calm, and golden-retriever-approved.
So tell me — which problem are you tackling first? The mud situation, the fur situation, or the “my dog owns this couch now” situation? 😄

Amr Mohsen is a software engineer who traded his keyboard for a leash — at least on weekends. His love for dogs inspired him to share what he learns as a dog owner and enthusiast, bringing a detail-oriented, research-driven perspective to every article he writes. If it’s about dogs, he’s probably already looked it up twice.


