Your golden girl tracked mud through the living room again — and honestly, your gorgeous Pinterest rug did not deserve that.
Here’s the thing: your dog needs her own space outside. A real one. Not some sad plastic box that looks like it belongs in a parking lot.
I went through this exact spiral last summer. My pup, Koda, kept treating my porch cushions like his personal napping throne. I kept thinking — there has to be a cuter solution that doesn’t cost a fortune.
That’s when I fell down the diy outside dog house rabbit hole, and girl, I never came back up.
These 7 ideas? They’re the ones I actually saved and bookmarked. We’re talking structures that look good in your yard and give your dog a cozy spot she’ll run to on her own.
Let’s get into it.
#1: Build This Sleek Modern Dog House Your Pup Will Actually Use
You know that moment when your golden retriever gives you those eyes from the back porch — soaked from a rain shower, shivering just enough to make you feel guilty? Yeah. I’ve been there with my dog Koda, watching him press his wet nose against the sliding door like he’s auditioning for a sad movie.
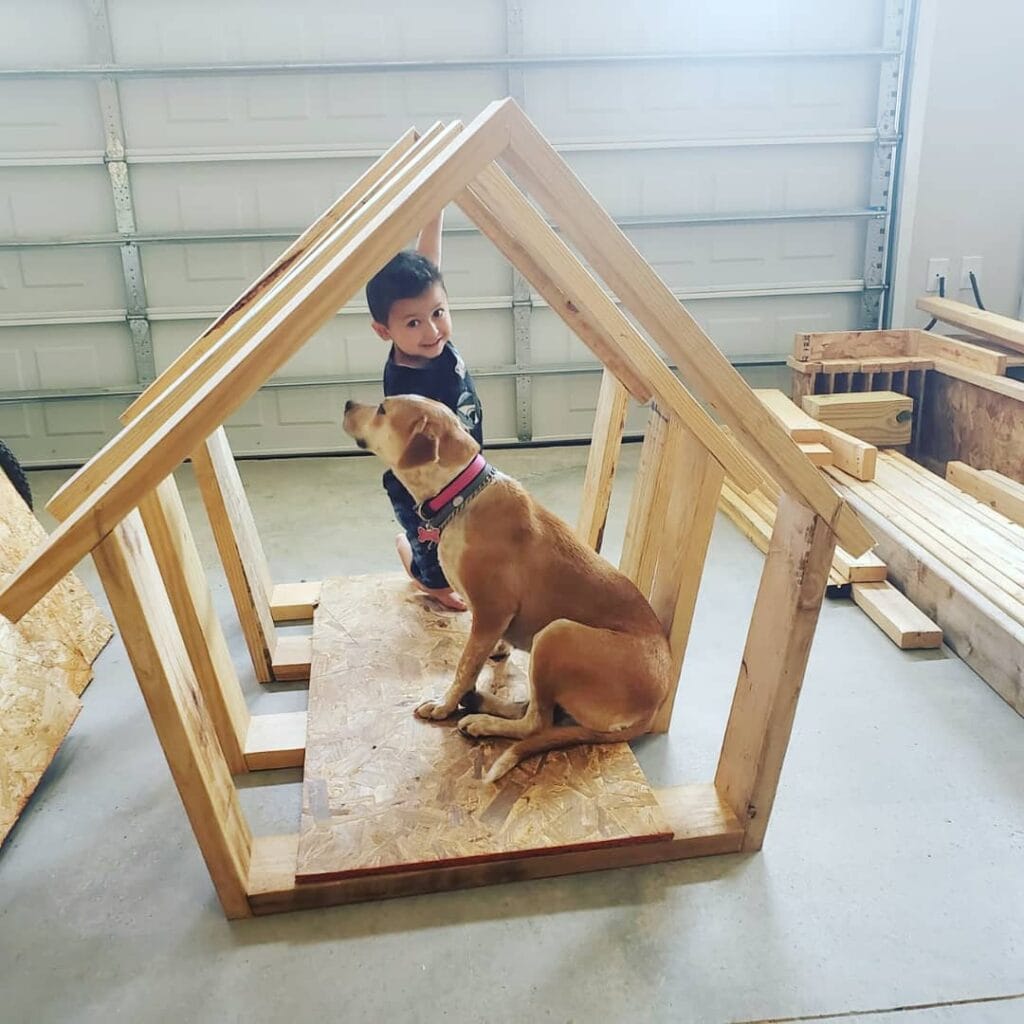
That’s exactly why this cedar plank modern dog house stopped me mid-scroll.
Materials & Tools You’ll Need:
– ¾-inch cedar tongue-and-groove planks (natural finish, light honey tone)
– ¾-inch plywood sheets for interior walls and floor
– Black-painted exterior trim boards (2×2 pine)
– Asphalt shingles or black corrugated roofing panel
– Waterproof wood stain (warm amber tone)
– Interior latex paint (burnt orange/sienna for inside walls)
– Exterior wood screws (2-inch and 3-inch)
– Circular saw, drill, sander, paintbrush
– Weatherproof foam sleeping mat (24×36 inches, striped cotton cover)
– Measuring tape, carpenter’s square, clamps
### Instructions
Start by cutting your plywood base to your dog’s size — for a golden retriever, aim for 48 inches wide by 36 inches deep. Sand every edge smooth before assembly because splinters are not the vibe.
Build your four wall frames first using 2×2 black pine trim as the skeleton. Attach your cedar tongue-and-groove planks vertically across the front-facing wall — this creates that Pinterest-worthy wood grain texture you’re seeing in the photo. The natural honey color against black trim hits different.
For the angled roofline, cut two side panels at a 30-degree pitch. This pitch sheds rain and gives the house that clean, architectural look instead of a boxy sad doghouse shape. Secure your black roofing panel on top with exterior screws and add a bead of weatherproof caulk along every seam.
Paint your interior walls that warm burnt sienna orange before closing the structure. Here’s the trick: painting the inside before assembly saves you from cramming a brush into tight corners later. Once dry, screw your walls together and attach the base.
The open-front design — no door flap — means your pup can watch the yard, feel the breeze, and still stay sheltered. That visibility feature keeps anxious dogs calm, which means less barking and a happier dog overall.
Slide in a waterproof foam mat topped with a washable striped cotton cover. When your golden drags mud inside (and she will), you just pull the cover off and toss it in the wash.
Mounting the house against a dark fence panel like this gives it a built-in, intentional look — like it belongs there instead of just sitting in the yard.
Keep the cedar unfinished on the outer planks if you want it to weather to a silver-gray over time, or seal it with an exterior clear coat to hold that warm honey tone for years.
Prep Time: 30 minutes | Active Project Time: 6-8 hours | Difficulty Level: Intermediate
📸 Photo credit: Instagram @bankertobuilder
#2: How to Build a Modern Farmhouse Dog House Your Golden Will Actually Use
You know that moment when your golden comes barreling in from the backyard, soaking wet, and makes a beeline for your white sofa? Yeah. Mine did that last summer and I still think about it. What she actually needed was a cozy outside spot to decompress — somewhere that felt like hers.
This build gave me that. And honestly? It’s one of the prettiest things in my backyard now.
Prep Time: 1 hour | Active Project Time: 4–6 hours | Difficulty Level: Intermediate
Materials & Tools:
– 3/4-inch plywood sheets (walls + floor)
– Cedar 1×6 boards (siding panels, stained warm honey-brown)
– 2×4 pine lumber (frame + corner posts)
– 1×3 pine boards (white-painted roof trim)
– White exterior paint + honey-brown wood stain
– Wood screws (1-5/8 inch + 3-inch)
– Drill, circular saw, measuring tape, sandpaper
Instructions
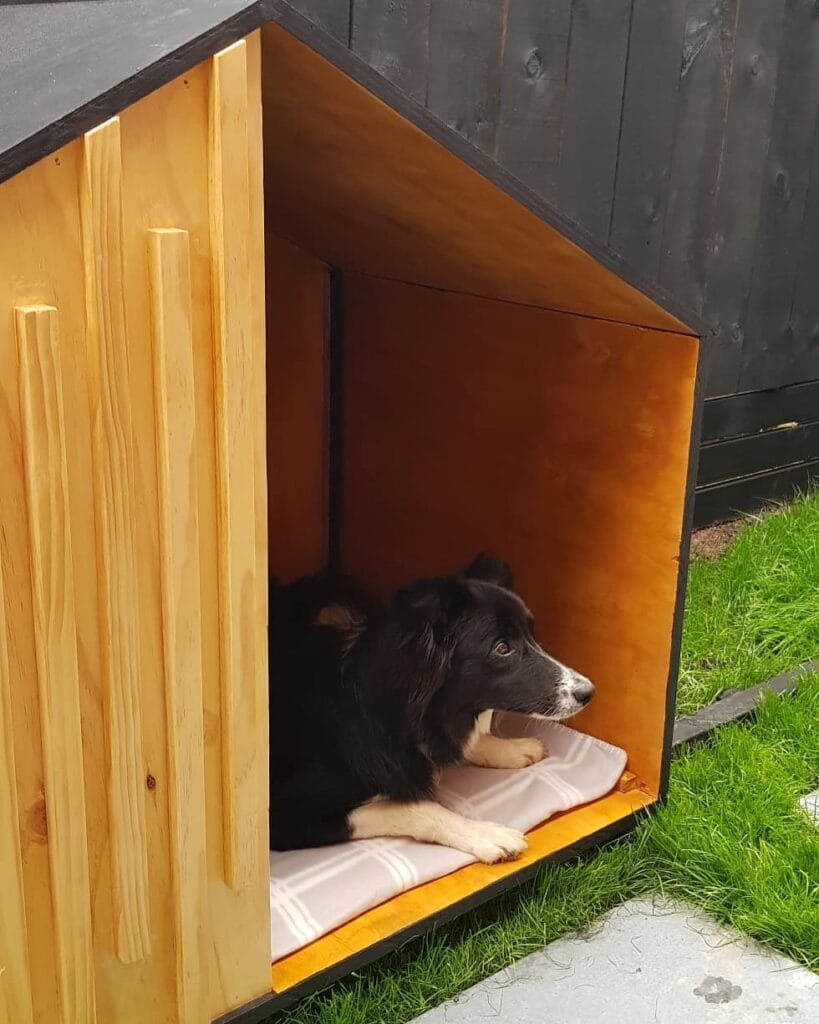
Start by cutting your 2×4 pine into a base frame — a 36×36-inch rectangle works well for a golden retriever. Attach four corner posts at 24 inches tall. This open-porch design means your dog gets airflow without exposure, which keeps her cool in summer and dry during light rain.
Next, cut your 3/4-inch plywood for the back and side walls. Attach them to the frame with 3-inch screws, flush at the top. Leave the front open — that wide, welcoming entrance lets a large dog move in and out without crouching.
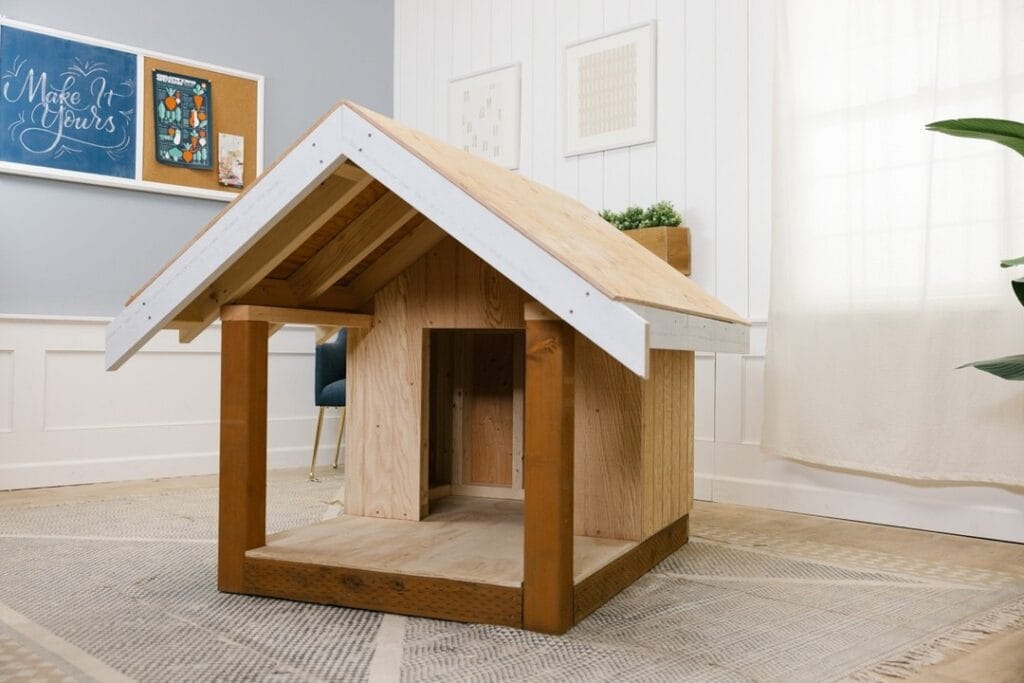
Now build the roof frame. Cut two 2×4 ridge pieces to form your peak, then lay 1×6 cedar planks across at an angle. The A-frame pitch sheds rainwater fast, so the interior stays dry even in a storm. Sand everything smooth before your dog claims her space.
Stain the cedar panels in that warm honey-brown, then paint the 1×3 roof trim boards white. The contrast is what makes this look like it belongs in a design magazine — and right in your backyard.
And here’s the thing nobody tells you: sealing the floor with an exterior waterproof coat protects the wood from moisture, which means the whole structure lasts years longer. Your golden gets a dry, splinter-free floor. You get a dog house that doesn’t rot by spring.
Predrill every screw hole to prevent the cedar from splitting. And if you want to give her even more outdoor space, 17 creative DIY dog run ideas for your furry friend pair perfectly with this build.
Sanding the entry edges takes five extra minutes but protects your dog’s shoulders every single time she walks in. Don’t skip it.
📸 Photo credit: Instagram @dunndiy
#3: Build a Flat-Top OSB Dog House Your Pup Will Actually Use
You know that moment when your golden retriever plants herself on the patio and refuses to come inside, even when it’s getting dark? Yeah. Mine does the exact same thing. And I get it — she wants to be outside, but she also needs somewhere that’s hers.
That’s exactly what this build gives her.
Materials & Tools You’ll Need:
– ¾-inch OSB (Oriented Strand Board) sheets — you’ll need approximately 4–5 sheets
– 2×2 pine lumber for the base feet (cut into 4-inch blocks)
– Wood screws (1.5-inch and 2.5-inch)
– Circular saw or jigsaw
– Drill + driver bits
– Measuring tape + pencil
– Sandpaper (80-grit)
– Wood glue (optional but helps)
Instructions
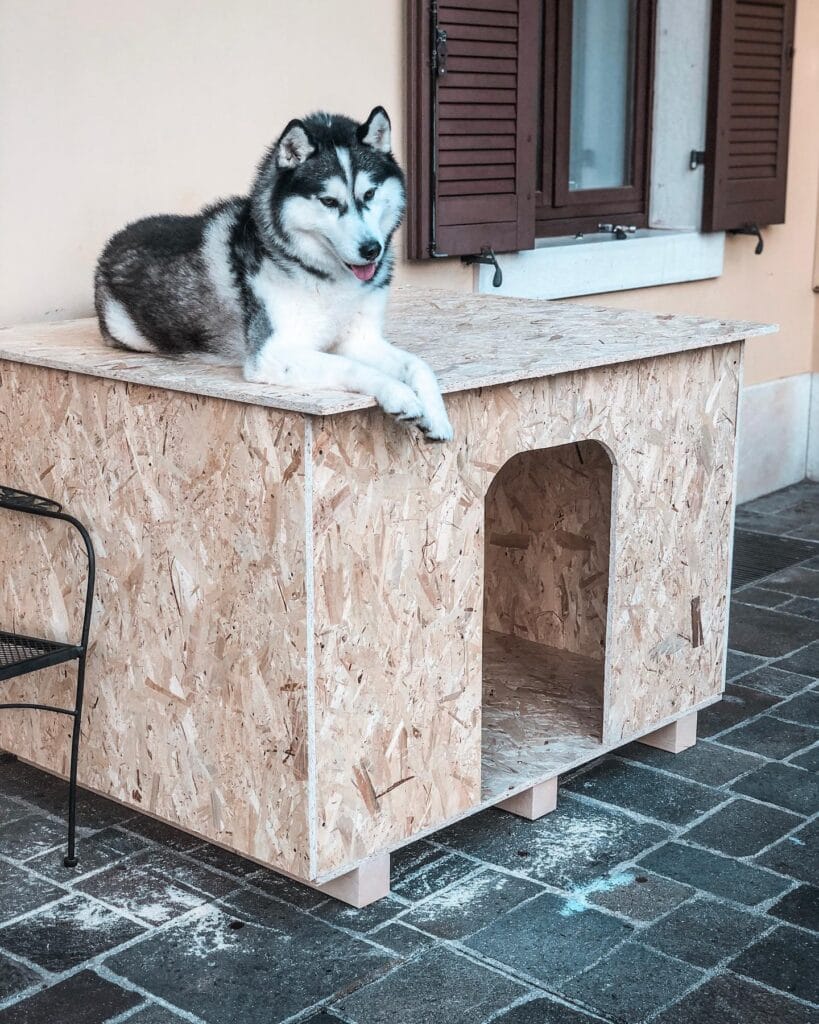
Start by cutting your OSB sheets into panels: two side panels (24″x24″), one back panel, one front panel with an arched entry cut, and one flat top panel slightly larger than the box so it overhangs a couple inches on each side.
Cut the arched doorway on your front panel using a jigsaw. The arch shape makes entry easier on your dog’s back — no crouching through tight square corners.
Assemble the four walls using 2.5-inch screws, driving them through the side panels into the front and back edges. Add the 2×2 pine foot blocks underneath each corner before closing the bottom — this lifts the whole structure off cold ground, keeping moisture out and your dog warmer in cooler weather. OSB is dense enough to hold heat, so that elevation matters more than people think.
Attach the top panel last. Let it overhang slightly on all sides — this feature sheds rainwater away from the entry, which means your dog stays dry and the interior wood stays intact for years longer.
Sand all edges with 80-grit sandpaper, especially around the arch opening. A rough edge on OSB will catch your dog’s fur every single time she walks through.
The flat top isn’t just a design choice — it becomes a natural perch. Huskies and big dogs love elevated surfaces, and your golden will too. OSB is sturdy enough to hold a large dog without any flex.
If you love projects like this, 12 Dog Spaces in House Design Ideas You’ll Want to Steal! has some incredible inspo for making outdoor spaces feel intentional.
OSB weathers better when you seal it — one coat of exterior wood sealant after assembly will double its lifespan outdoors. Don’t skip this step if your patio gets afternoon rain.
Prep Time: 30 minutes | Active Project Time: 3–4 hours | Difficulty Level: Beginner-Intermediate
📸 Photo credit: Instagram @ariannacau
#4: Build a Double-Door Cedar Dog House Your Pup Will Actually Use
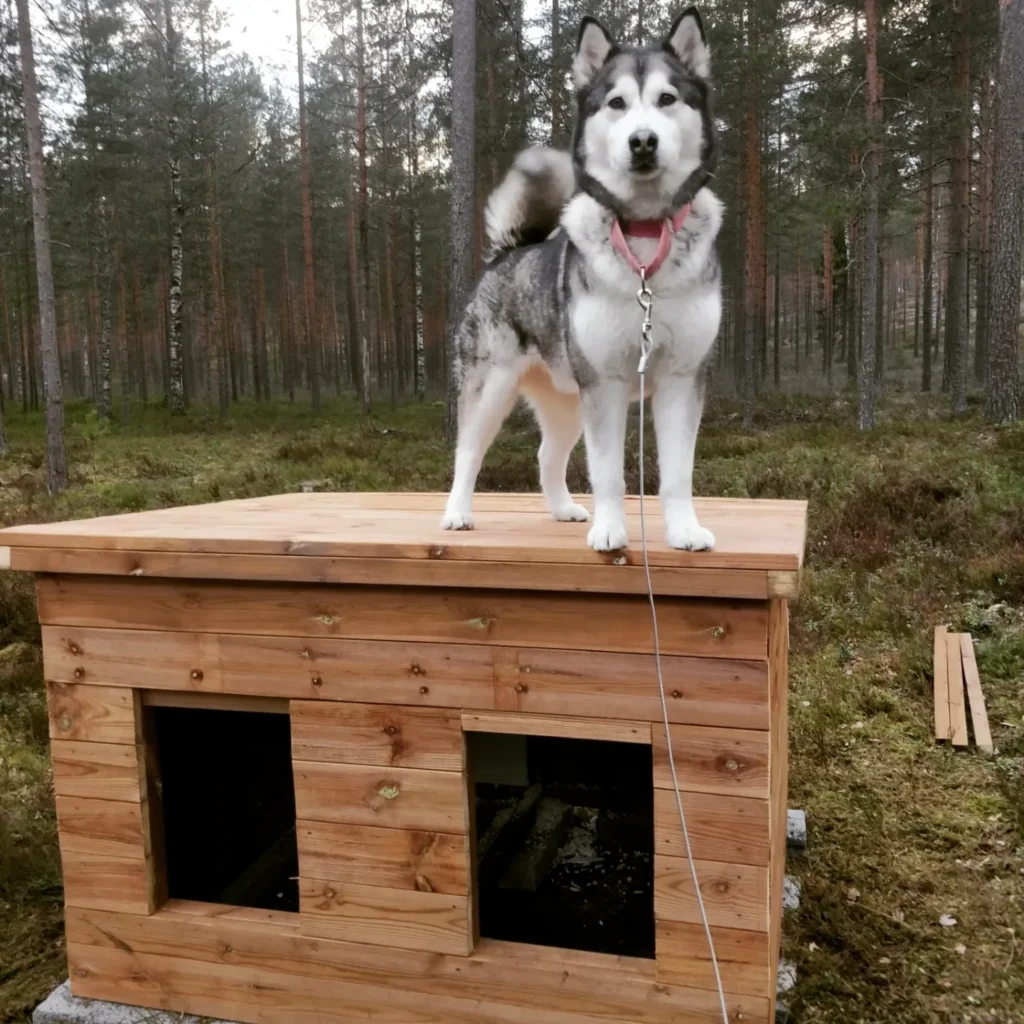
You know that look your golden gives you when it’s raining and she’s just… standing there, soaking wet, refusing to go in her flimsy plastic kennel? Yeah. That’s the moment that made me want to build something real.
This double-entry cedar dog house from @kuunlaulunkennel is exactly what I’ve been obsessing over. Two openings mean better airflow in summer and an easy escape route if your dog gets spooked. The flat roof doubles as a lookout platform — and clearly, dogs approve.
Materials & Tools
– Pressure-treated cedar planks (1×6 boards, approximately 8–10 feet long)
– Plywood sheet (¾ inch thick) for the roof base
– Concrete paver blocks (for elevated foundation)
– Exterior wood screws (2.5 inch)
– Circular saw, drill, measuring tape, sandpaper (120-grit)
– Weather-resistant wood sealant
Prep Time: 1 hour | Active Project Time: 6–8 hours | Difficulty Level: Intermediate
Instructions
Start by laying four concrete paver blocks flat on the ground in a rectangle — this keeps the floor dry and off damp soil, which protects your dog from cold seeping up through winter nights.
Cut your cedar planks to frame a base roughly 48 x 36 inches. Cedar naturally resists moisture and rot, so your dog gets a dry, splinter-free space that lasts years without repainting.
Build the side walls first, screwing horizontal planks directly into corner posts. Keep the boards tight — zero gaps means zero drafts.
Frame two rectangular openings on the front face, each roughly 12 x 14 inches. And here’s what makes this design brilliant: dual entries reduce anxiety for dogs who feel cornered by a single door. Feature-wise, the double opening creates cross-ventilation, which keeps the interior cooler on hot days and gives your dog actual comfort instead of a stuffy box.
Top the structure with your ¾-inch plywood base, then layer cedar planks horizontally across it. Flush edges matter here — sand everything smooth before your dog ever steps up.
Seal all exterior surfaces with two coats of weather-resistant sealant. Let each coat dry fully before the next.
A better way: if your yard slopes, shim the paver blocks level before building. An unlevel base causes the whole frame to rack and gaps appear over time.
If you love planning outdoor pet spaces, 14 Creative DIY Elevated Dog Bed Ideas You’ll Love has some seriously smart companion pieces for this build.
Leave the roof unsealed for one week before letting your dog climb it — fresh sealant fumes are no joke for sensitive noses.
📸 Photo credit: Instagram @kuunlaulunkennel
#5: The Flat-Roof Modern Dog House That Looks Like It Belongs in an Architecture Magazine
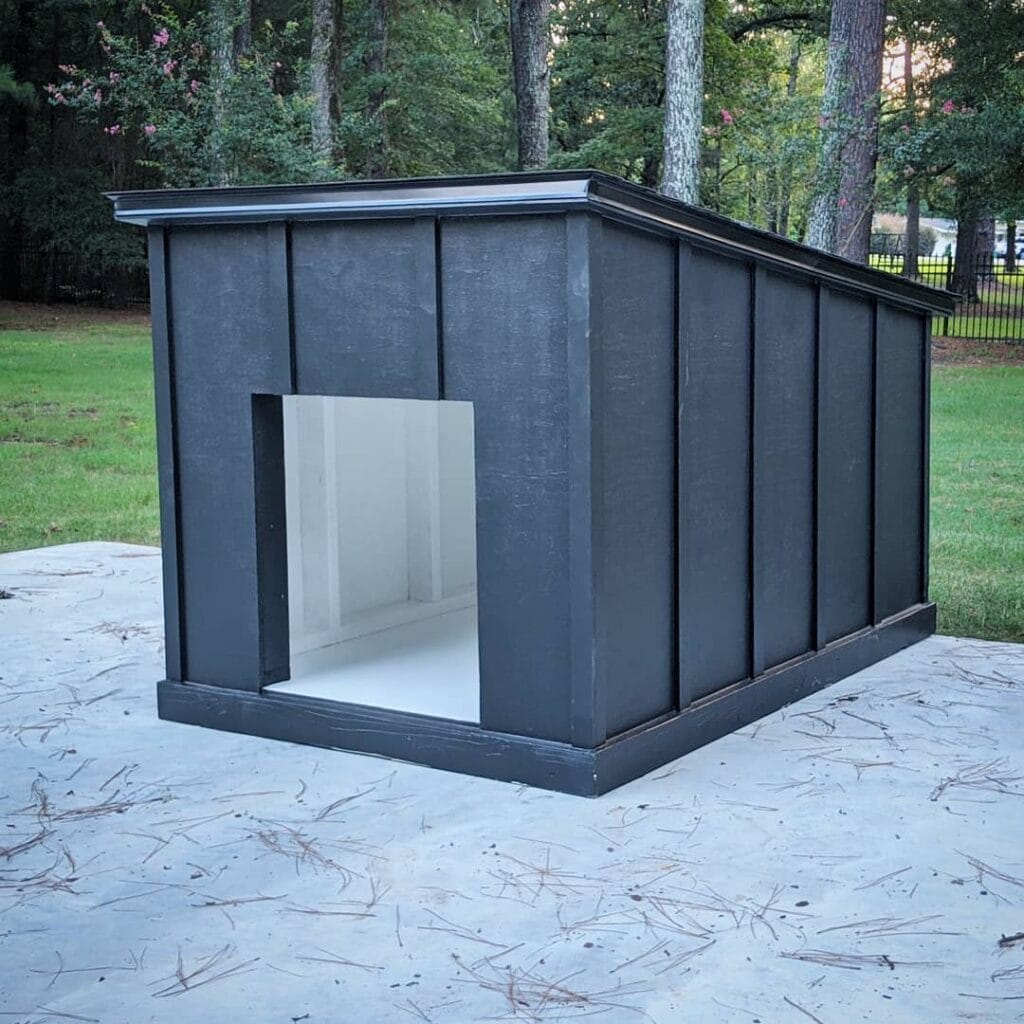
You know that moment when your golden girl trots back inside after playing in the yard, and you just cleaned the floors? Yeah. She doesn’t care. And honestly, neither do I — but what I do care about is giving her a space outside that she’ll actually want to stay in.
This build is giving modern farmhouse meets actual dog shelter energy. And it looks so good on the patio that your neighbors will think you hired someone.
Materials & Tools:
– 3/4-inch plywood sheets (for walls, floor, and roof)
– 1×4 pine boards (for vertical batten strips)
– 1×6 pine boards (for base trim and crown molding detail)
– Thin metal roofing sheet (for the flat roof cap — visible in silver)
– Exterior wood primer
– Dark charcoal exterior paint (Benjamin Moore “Wrought Iron” matches this vibe)
– Bright white interior paint
– Wood screws, measuring tape, circular saw, nail gun, sandpaper
Prep Time: 1 hour | Active Project Time: 6–8 hours | Difficulty Level: Intermediate
### Instructions
Start by cutting your plywood into four wall panels and one floor panel. The interior white finish isn’t just pretty — sealed interior walls mean moisture can’t seep into the wood, so your dog stays dry and warm through every season.
Once your panels are cut, assemble the box frame with screws at each corner. Before you close it up, paint the inside completely white. Two coats. This step is so much easier before assembly, trust me — learned that the hard way on my cousin’s chicken coop build last summer.
Attach your 1×4 batten strips to the exterior walls, spacing them about 8–10 inches apart. These give the house that board-and-batten texture you see in the photo, and they reinforce the walls at the same time. That’s the kind of detail that makes the whole thing look custom-built, not cobbled together.
Add your 1×6 base trim around the bottom perimeter and crown molding trim at the roofline. These finishing touches add structure — which means the house sits level and stable on your concrete pad without shifting.
Lay your metal roofing sheet flat across the top and secure it with screws. It sheds rain better than wood alone, which means the interior stays drier for your pup during those random afternoon storms.
Paint the full exterior in your charcoal color — two solid coats for weather protection. Cut your door opening off-center on the left side like you see here. That placement naturally blocks wind from blowing straight inside, so your dog gets a draft-free retreat she’ll actually use.
The slight slope on the roof — even though it reads as flat — helps rainwater run toward the back rather than pooling on top. Use a level when mounting your metal sheet to get that gentle angle right.
📸 Photo credit: Instagram @woodshopmike
#6: How to Build a Craftsman-Style Dog House Your Pup Will Actually Use

Your golden is out there giving you those eyes through the back door again. She wants to be outside with you, but the sun is brutal and there’s nowhere for her to rest. Girl, I felt that so hard last summer with my dog Koda — he’d just flop in the dirt because he had zero shade.
This charcoal gray, craftsman-style dog house is the answer. And it looks so good in a yard it honestly belongs on a Pinterest board.
Materials & Tools:
– 2×4 and 2×6 pine lumber (frame and base)
– 1/2-inch exterior plywood (walls and roof deck)
– Cedar wood (decorative gable trim and bone nameplate)
– Architectural shingles (dark gray)
– Exterior gray paint — charcoal shade
– Wood stain (warm honey tone for cedar accents)
– Wood router (for engraving the name)
– Jigsaw, circular saw, nail gun, sandpaper
– Waterproof dog bed insert
– Small evergreen tree (optional but so cute for styling)
Instructions
Start by cutting your 2x4s into a rectangular base frame — size it so your golden can stretch out fully, something around 4×4 feet works well for larger breeds. Attach your plywood floor directly onto that base, then build four wall panels from 2×4 framing and 1/2-inch plywood sheathing.
The peaked roofline is what gives this house that craftsman character. Cut your roof panels at a 45-degree angle and nail them together at the ridge. Layer your dark gray shingles starting from the bottom edge and working upward so water sheds correctly — this keeps your pup dry even in a heavy rain, which means she’ll actually want to sleep in there instead of scratching at your back door.
For the gable, cut your cedar boards into a starburst fan pattern and nail them under the peak. Sand everything smooth, then apply two coats of exterior charcoal gray paint to all wood surfaces. The cedar trim gets a warm honey stain — that contrast is what makes the whole thing look custom.
Route your dog’s name into a cedar bone cutout and mount it centered above the entrance. It’s a small detail, but the feature protects the nameplate from fading, which means it stays looking sharp season after season, and your neighbors will ask you who built it.
Tuck a waterproof cushion insert inside and you’re done.
Sand all entry edges extra smooth before painting — splinters on doorframe edges are easy to miss but rough on paws going in and out daily.
Prep Time: 2 hours | Active Project Time: 6–8 hours | Difficulty Level: Intermediate
📸 Photo credit: Instagram @thehappyglamperco
#7: The Pinterest-Perfect White Dog House with a Flower Box Window
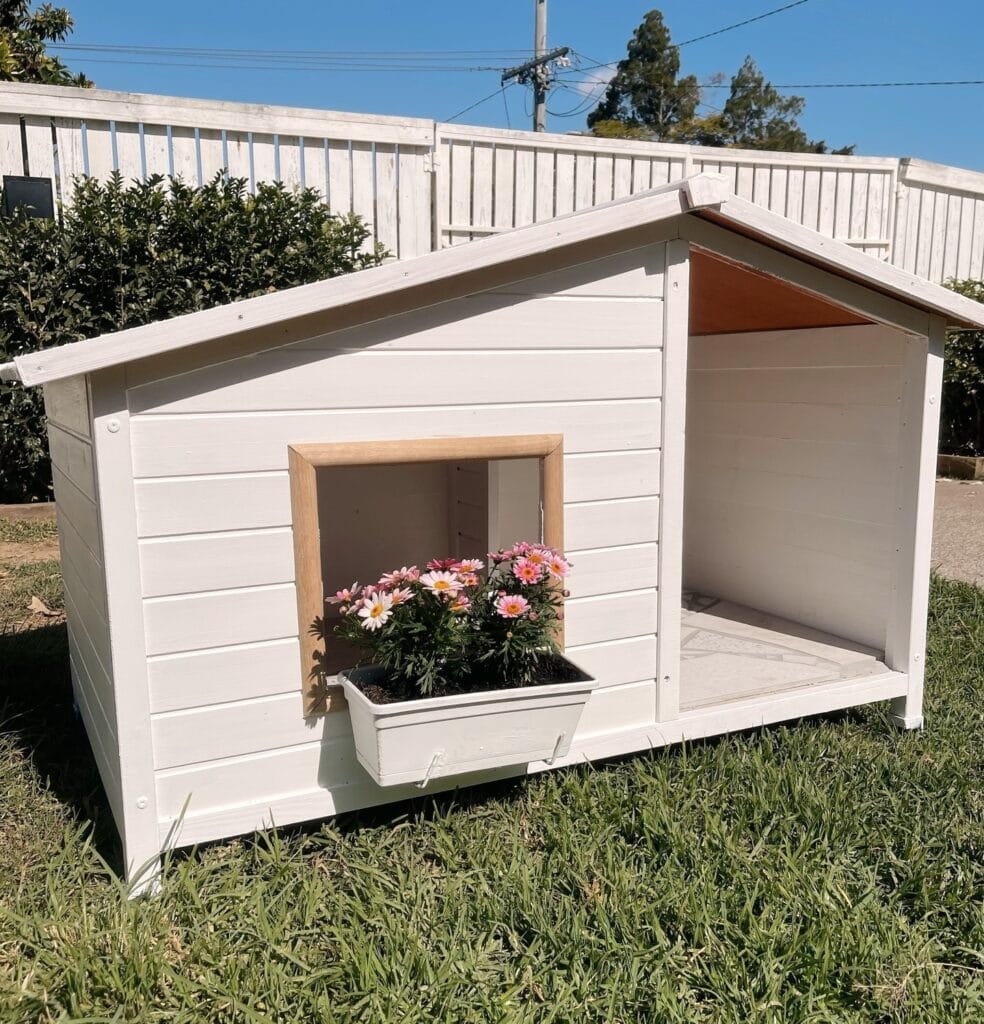
Okay, you know that moment when your golden retriever finally has a spot outside that’s actually hers? Like, not just a corner of the yard — but a real little house that looks cute enough to be on your mood board?
That’s exactly what this build gives you.
Materials & Tools You’ll Need:
– Pine or cedar planks (horizontal lap siding style)
– White exterior paint (semi-gloss holds up best)
– Natural wood trim for the window frame (unfinished oak looks perfect)
– Corrugated copper or terracotta roofing sheet for the interior ceiling detail
– White rectangular window box planter (approx. 12–14 inches wide)
– Pink daisy flowers (gazanias work beautifully here)
– Wood screws, drill, sandpaper, exterior wood glue
– Measuring tape, saw, paint brushes
Prep Time: 1–2 hours | Active Project Time: 6–8 hours | Difficulty Level: Intermediate
### Instructions
Start by cutting your pine planks to frame a rectangular base — aim for roughly 4 feet wide by 3 feet deep so your golden has real room to stretch out. Sand every edge before assembly because splinters on your girl’s paws? Not happening.
Build the side walls first using horizontal lap siding — each plank overlaps the one below it by about half an inch. This overlap sheds rain naturally, keeping the interior dry without needing extra weatherproofing.
Cut the window opening on the left side wall — roughly 14 inches square feels proportional here. Frame it with your unfinished oak trim pieces, letting that warm natural wood pop against the white. And don’t skip sanding the frame corners smooth — dogs brush past window edges constantly.
The roofline uses a classic A-frame pitch, meeting at a center ridge. Attach your terracotta roofing sheet to the interior ceiling side — it reflects light in the warmest way and honestly looks so good in photos.
Apply two coats of white semi-gloss exterior paint to every surface. Let the first coat cure for a full 4 hours before the second — rushing this step causes peeling within weeks.
Mount your window box planter directly below the window frame using two metal bracket hooks. Fill it with gazanias or pink daisies. The right side opens completely as a covered porch — your dog gets shade, airflow, and her own little lounging deck. Covered porch means airflow without full sun exposure, so your retriever actually uses the house on hot afternoons instead of avoiding it.
Paint the window box the same white as the walls so it reads as one cohesive piece.
If you’re also thinking about a cozy indoor option for rainy days, 7 Cozy DIY Indoor Dog Kennel Ideas has some really good builds that match this same aesthetic.
Seal everything with an exterior clear coat once paint is fully cured — this single step doubles the lifespan of the whole structure. Do the underside of the base too, since ground moisture is what destroys wood dog houses from the bottom up first.
📸 Photo credit: Instagram @ivytalentco
The One Ventilation Mistake That Ruins Most DIY Dog Houses
Okay, I have to tell you this because nobody talks about it — and it cost my cousin a whole rebuild last summer.
Most people build the roof, add a cute little door, call it done. But they skip airflow completely. And that doghouse turns into a literal oven in July or a damp, moldy box in winter.
Here’s the pro move: add two small vents near the roofline on opposite sides of the house. Not the walls, the roofline. Hot air rises, so placing vents up high pulls the heat out instead of trapping it around your dog.
Real talk: the floor matters just as much. Raise it 3-4 inches off the ground on small wooden blocks. That gap blocks ground moisture from soaking into the wood and keeps your pup’s bedding from going musty by week two.
One more thing — size your door opening to your golden’s shoulder height, not their full height. It holds warmth inside way better during cold nights.
Your dog will actually use this house. That’s the whole point.
Your Sofa Will Thank You (And So Will Your Sanity)
Okay, so here’s the deal — pick one cover and just try it. Seriously, that’s it. You don’t need to overthink this.
Your golden is already plotting his next muddy adventure, and your sofa deserves better than another panic-clean before guests arrive. I’ve been there. It’s exhausting.
The best part: once you’ve got the right cover down, you stop dreading cuddle time and actually enjoy it. That’s the whole point, right?
So tell me — which style fits your living room vibe, and is your pup more of a “sneaks up slowly” or a “full-body launch onto the couch” kind of dog? 🐾

Amr Mohsen is a software engineer who traded his keyboard for a leash — at least on weekends. His love for dogs inspired him to share what he learns as a dog owner and enthusiast, bringing a detail-oriented, research-driven perspective to every article he writes. If it’s about dogs, he’s probably already looked it up twice.


