
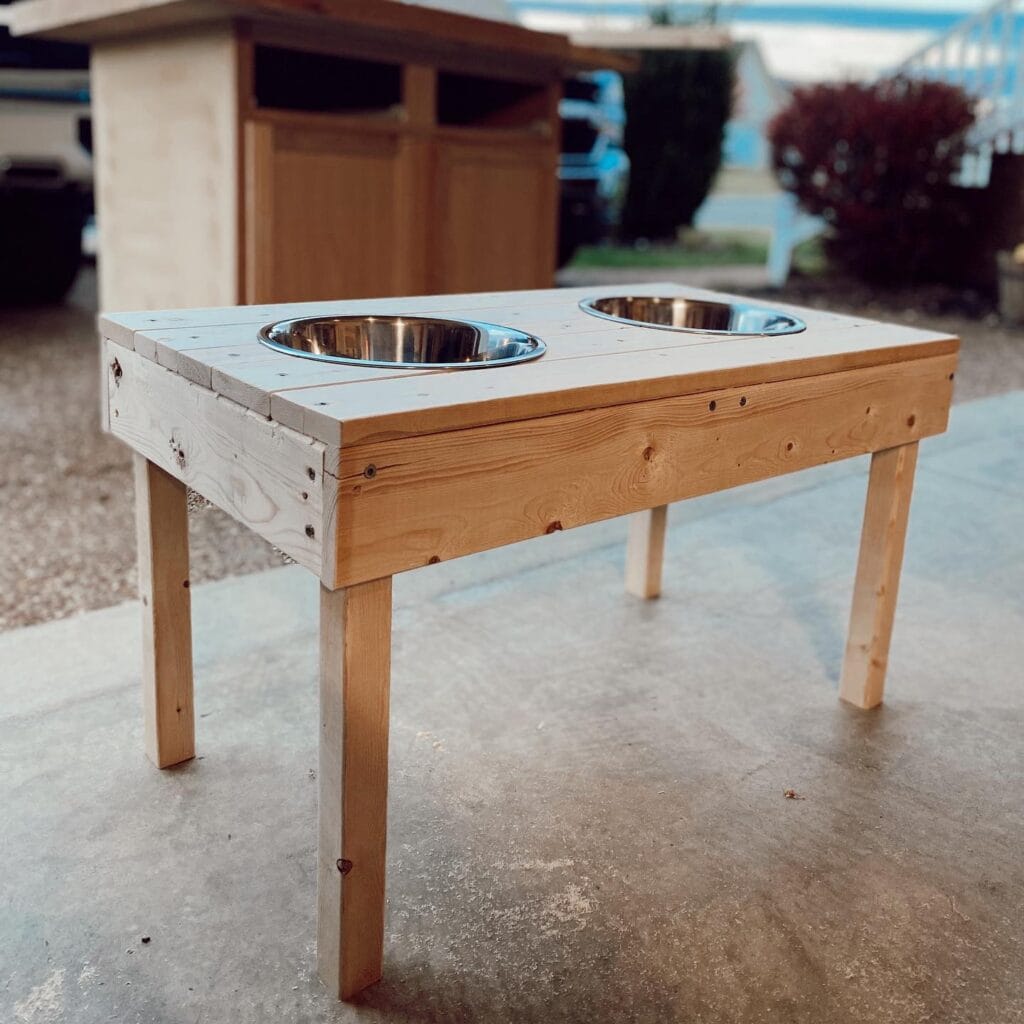
Your golden retriever is so adorable… that is, until you’re stepping over his water bowl for the 100th time, or you trip on the kibble bag that’s just lying there on the floor looking like a huge mess.
A friend of mine went away and left her dog home. When she came back her dog had made the corner of the kitchen into a soggy disaster area. Wet paw prints, food scattered everywhere, the dog bowl is never in the same place. It stressed her out every morning.
And you’ve worked way too hard on your home decor to let the dog bowl situation come and ruin it all.
Good news: If you’re looking for a dog feeding station DIY, this is the place. 7 cute, DIY dog feeding stations are on the menu today that are not only affordable, but also adorable and totally DIY-able for all my dog mom friends out there who want a clean and put together space, but still want to be able to have everything you need for your pup, without sacrificing the way your space looks.
#1: Built-In Bench Dog Feeding Station (Hidden Drawer Style)
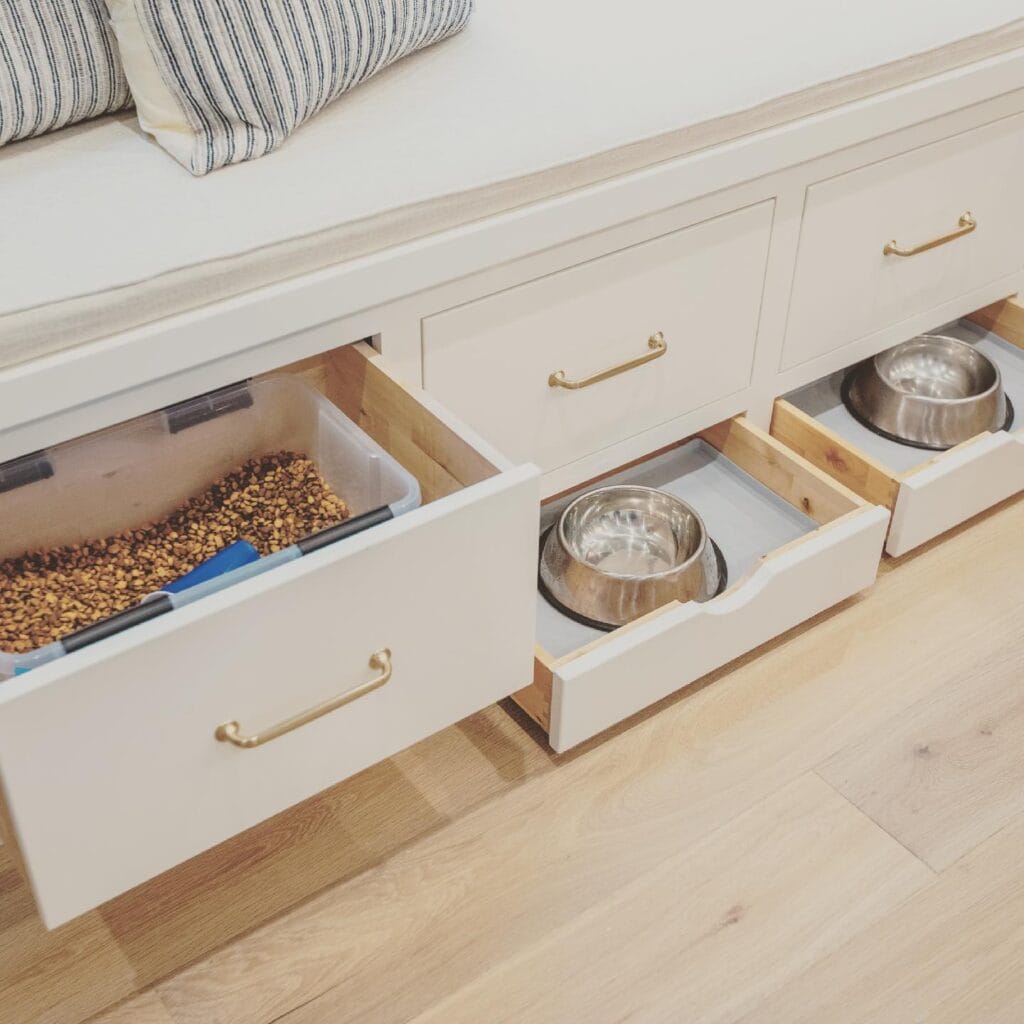
Have you ever been preparing for company and suddenly realized that your dog’s food bowl and the huge bag of kibble that it came in were just… sitting there… in the middle of your kitchen floor? I’ve been there.
This set up from the photo is doing the most (in the best way).
Shaker-style cabinet panels, white painted MDF or solid wood, Brass bar drawer pulls, Clear plastic storage bin for kibble, Stainless steel dog bowls, 2, Natural pine wood drawer dividers, Light gray drawer liner, Wood glue, screws, circular saw, drill.
Instructions
I built three pull-out drawers under the cushion of a bench seat. The left drawer is the widest, and fits my plastic kibble bin along with a blue scoop inside. The two drawers on the right each hold one stainless steel bowl, which are inside of pine wood dividers so they don’t slide around.
Sand it down and then paint with two coats of white eggshell paint so that it looks clean and wipe-able, as we all know golden retriever drool is real.
Prep Time: 30 min | Active Project Time: 6–8 hrs | Difficulty Level: Intermediate
Screw soft-close drawer slides onto the inside of each sliding drawer so the bowls won’t rattle when people walk by.
📸 Photo credit: Instagram @cindymccarleydesigns
#2: Raised Dog Feeding Station With Storage Drawer (The Pinterest-Worthy One Your Kitchen Actually Needs)
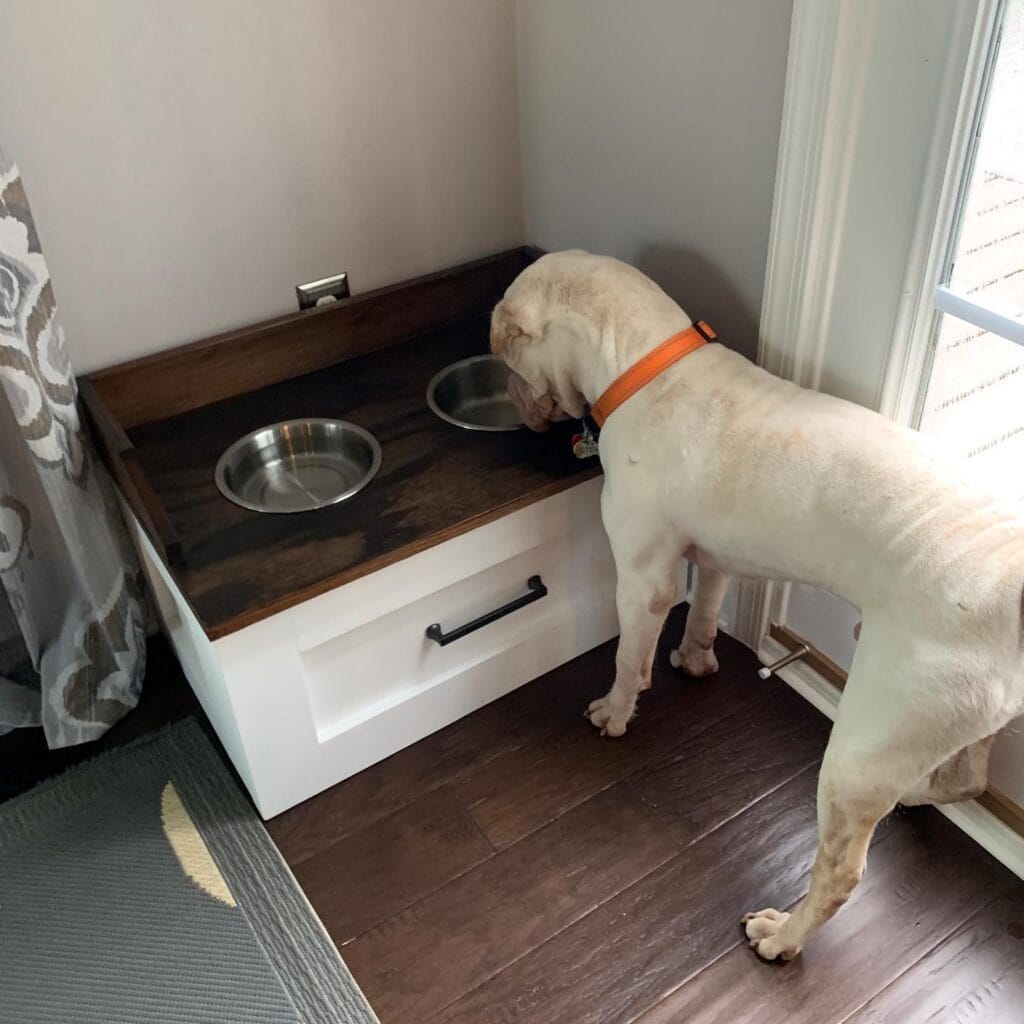
Prep Time: 30 min | Active Project Time: 3–4 hours | Difficulty Level: Intermediate
—
You’ve probably been there before, your golden slides across the hardwood floors on his big paws with his nose down in the bowl, my cousins lab does the same thing bowls flying everywhere and the water is splashing.
This build fixes that completely.
Materials & Tools:
– 3/4″ plywood (white-painted base)
– Walnut stain wood (24″ x 16″ top panel)
– Two stainless steel bowls (6″ diameter)
– Black matte drawer pull handles
– Wood glue + pocket screws
– Jigsaw, drill, sandpaper (120-grit)
Instructions
Cut the plywood into a box frame with the following dimensions: 24″W x 16″D x 12″H. Sand all of the edges to remove rough spots. Cut two 6″ circular holes in the top using a jigsaw (This keeps the bowls from sliding around). Attach the top using wood glue and pocket screws. Cut a drawer box out of the remaining plywood to create a simple drawer box. Attach a black matte pull. Paint the bottom of the box bright white. Stain the top of the box dark walnut.
Less strain on your dog’s neck: Your dog will eat more comfortably, and you won’t have to mope up the water trails.
For the smaller bowls, I cut the holes slightly smaller than the bowl lip so the bottom hole wouldn’t fall through.
📸 Photo credit: Instagram @mlkwoodworking
#3: Built-In Cabinet Dog Feeding Station (The One That Makes Your Kitchen Look Like a Pinterest Board)
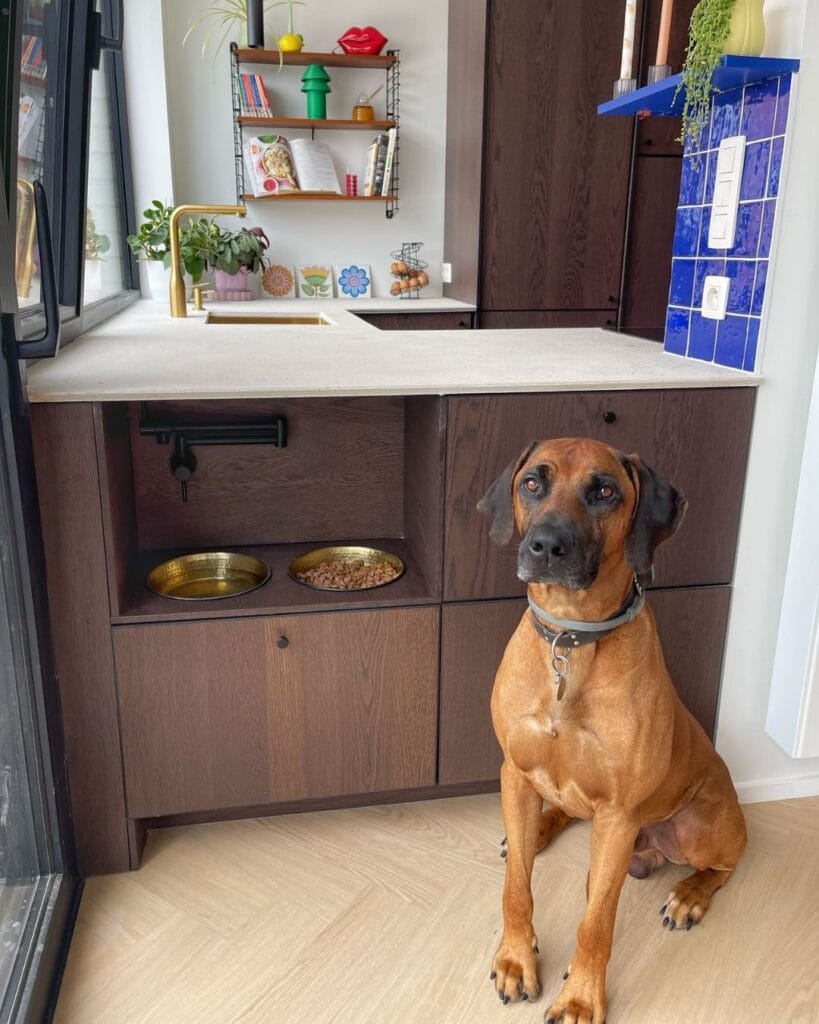
You know,POSITE: when your dog’s food bowl goes sliding across the floor and kibble goes everywhere. My friend literally had canned food splattered on her white cabinets for a week.
This build fixes that permanently.
Materials & Tools: – Dark oak veneer IKEA base cabinets (60cm width) – Concrete-look quartz countertop – Two hammered brass bowls (28cm diameter) – Black matte towel rail (for leash storage) – Wood stain in espresso brown Drill, screws, sandpaper
Instructions
Cut an open cubby into one section of the cabinets. Make sure you sand all edges so that your dog will not catch a paw. Mount the black matte rail to the inside of the cubby to hook the leashes on. Slide both the brass bowls on to the low wooden platform. They should be at chest height for the dogs, as elevated bowls can help prevent neck strain, and can also help prevent stomach problems in the dogs after eating.
Built-in storage means zero bowl migration across your kitchen floor.
Seal your countertop with a food-safe matte sealant. It wipes clean easily when water splashes onto it.
Prep Time: 1 hour | Active Project Time: 4-5 hours | Difficulty Level: Intermediate
📸 Photo credit: Instagram @ikeahackersofficial
#4: Personalized Raised Dog Feeding Station with Engraved Name Plate
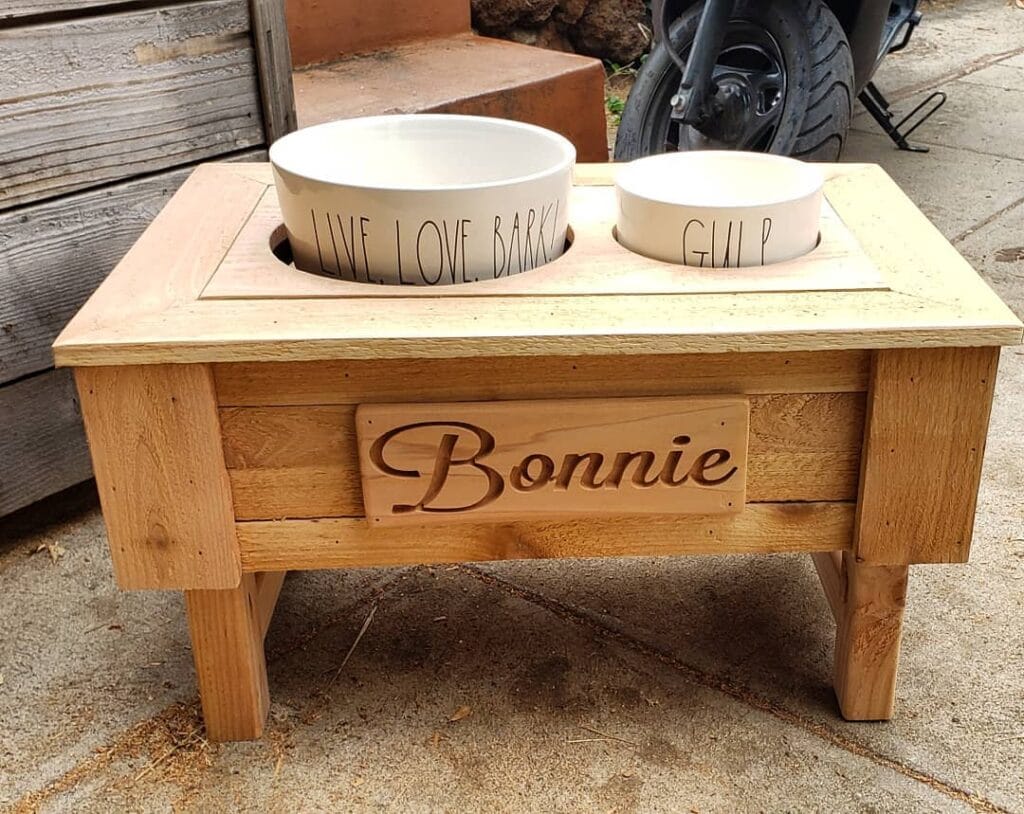
If your Golden Retriever has a habit of sliding her water bowl across the kitchen floor when she takes a drink, then this elevated station may be for you. Hopefully this will stop the mess from happening again.
The Material & Tools: – Cedar or pine lumber (I used 1×6 boards, and 1×4 boards) – Wood screws (1.5″ and 2.5″) – Laser-engraved name plaque (cedar, 4″×8″) – Two ceramic bowls (Live Love Bark and Gulp) – Wood stain (honey oak) – Jigsaw, drill, sandpaper (120-grit)
Instructions
Cut 1×6 boards into four legs 10” tall. This will keep our medium-large dog comfortable while eating and reduce long-term neck strain. Attach side panels using 2.5″ screws. Build the table top frame with 1×4 boards laid flush with the 1×6 legs. Cut two 6” diameter holes to drop in the bowls. Sand everything smooth. Stain with honey oak. Screw the engraved name plaque on the front panel. Drop in the bowls.
And the best part is that it gives your dog a healthier posture and prevents bloating while enjoying a bowl of dog food. You will have a happier dog every day.
Prep Time: 30 min | Active Project Time: 2-3 hrs | Difficulty Level: Beginner-Intermediate
It’s the engraved plaque that makes this feel a little boutique and not a homemade gift.
📸 Photo credit: Instagram @molsen808
#5: Raised Oak Dog Feeding Station (The One Benji Deserves)
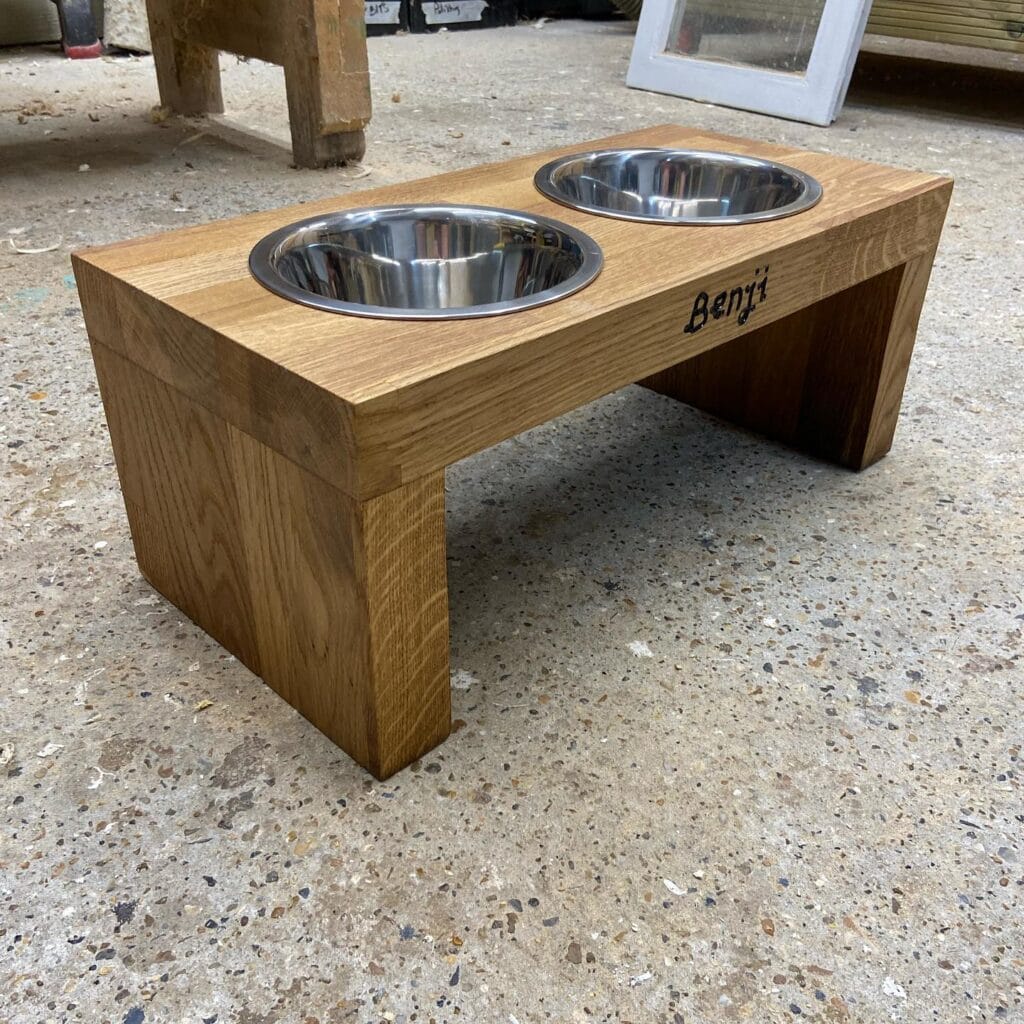
Has your dog ever run so fast to her bowl that she slides across the floor and somehow launches water halfway across your kitchen? My cousin’s dog does this every meal.
Prep Time: 30 min | Active Project Time: 3 hours | Difficulty Level: Intermediate
Materials & Tools:
– Solid oak wood (warm honey color, like the picture above)
– Two 6-inch stainless steel bowls
– Wood stain (medium oak)
– Wood glue + clamps
– Jigsaw + sandpaper (120-grit) I used a wood burning pen to burn the name on the wood.
Instructions
Cut the planks into one 24 x 8-inch piece and two 8 x 6-inch pieces for the sides. Sand the pieces smooth and stain the pieces before gluing. Getting into the corners after staining is a nightmare.
Serga et co. Glue the legs under each end of the top piece. Clamp for 2 hours.
Trace your bowl openings with a pencil, then cut with your jigsaw. The raised height actually reduces neck strain for bigger dogs, which can make eating easier and less likely to cause bloating in the long run.
You burn a name into the front panel of the casket while it is still unfinished. This is cleaner looking and the burn goes deeper.
Seal with food-safe polyurethane (two coats).
Cut the holes in the bowl a little smaller than the rim of the bowl. This prevents the bowl from sliding when I’m in the middle of a meal.
📸 Photo credit: Instagram @paul_loveday_woodwork
#6: Built-In Dog Feeding Station with Tiled Backsplash and Storage Drawers
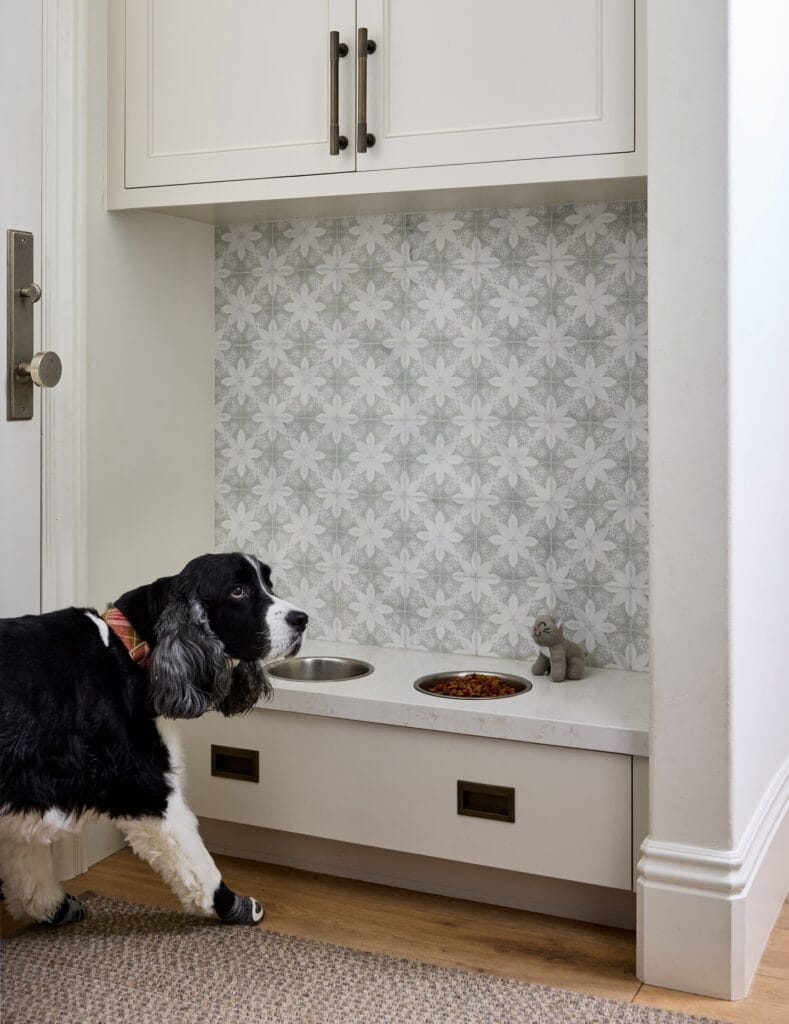
You know how when you are filling your golden’s bowl in the kitchen and water spills all over the place, food kibble rolls under the fridge and you are stepping on it with bare feet at 7am? Well this built-in fixes all of that.
Prep Time: 2 hours | Active Project Time: 1 weekend | Difficulty Level: Intermediate
-Materials & Tools: ¾-inch MDF or plywood for cabinet frame – White shaker cabinet doors with aged brass pulls – Quartz countertop remnant (white/grey veining) – Cement encaustic tiles (grey floral pattern, 4×4 inch) – Two stainless steel inset dog bowls – Flat-front drawer with brass recessed pulls – Tile adhesive, grout, brad nailer, wood screws
Instructions
Build a 24 inch wide x 18 inch deep recessed niche in the mudroom wall between the two cabinet columns. Frame it with ¾ inch plywood and then attach your shaker upper cabinet to the top.
Cut the quartz remnant to fit the niche surface and drill two holes the size of the bowls – the bowls sit flush, meaning they don’t tip, and you don’t have to struggle to clean them.
Cement tile the back wall with floral cement tiles before the countertop is put in. Grout with a light grey grout to keep the pattern crisp.
I added one pull out drawer underneath, which is great for storing food. The food remains hidden and stays fresh. My mudroom now looks like a design magazine!
If you have a silicone mat, put it under the bowl area, to catch the drips before they hit the floor.
📸 Photo credit: Instagram @julierootesinteriors
#7: Raised Wooden Dog Feeding Station with Double Steel Bowls
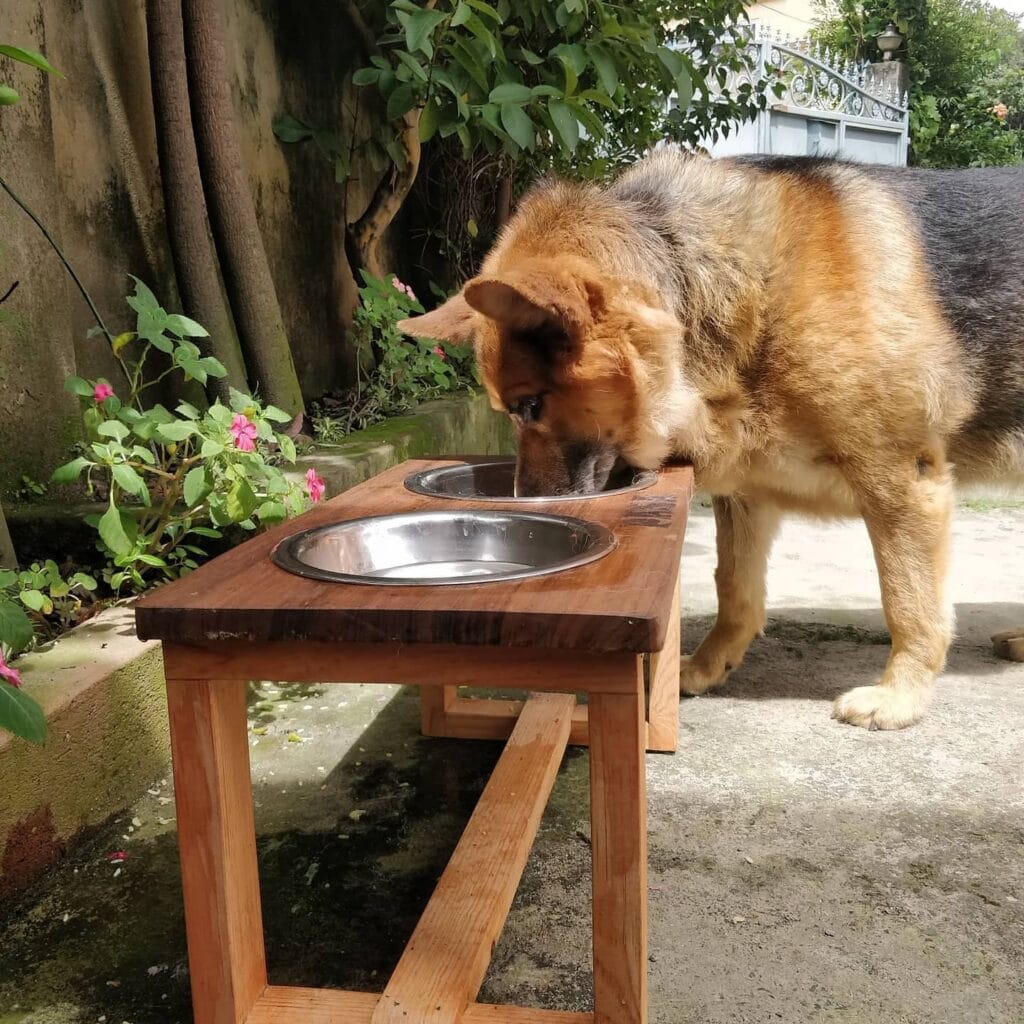
Your golden retriever bends her whole neck down to eat, and you cringe every time. My dog Koda used to do the same thing with the strain on her neck and splashing water everywhere. I was tired of having a mess on my floors.
This solid wood elevated feeder with two stainless steel bowls fixes that problem.
– 2×4 pine lumber (frame legs and crossbars) – 1x hardwood plank (dark walnut stained top) – Two 6-inch stainless steel inset bowls – Wood screws, sandpaper, wood stain, drill
Instructions
Cut the legs of the table so they are 12″ each. Attach two horizontal cross bars between each leg pair with wood screws – one in the front, one in the back and one in the middle, for stability. Sand everything, then stain with dark walnut stain. Let it cure. Cut two holes the same size as the bowls in the top plank. Place the bowls into their holes.
The raised height reduces neck strain — meaning your dog eats comfortably and you get zero floor puddles.
Keep the leg spacing wider than shoulder width so that the station doesn’t tip over during energetic eating sessions.
Prep Time: 20 min | Active Project Time: 2 hours | Difficulty Level: Beginner-Intermediate
📸 Photo credit: Instagram @yellowhatti
The One Measurement Mistake That Ruins Most DIY Feeding Stations
Sometimes you have to see the mistake that someone else made to understand how you too can avoid it. Well, I made this same mistake and it cost me a whole weekend redo.
The majority of people measure the diameter of their dog’s bowl and then build the station around this measurement. Wrong. You need to measure the bowl’s outer rim plus one inch on each side for the cut out hole. Skip the extra inch and your bowls will either fall through or fit so tight that you won’t be able to get them out for washing.
Here’s the thing nobody tells you — bowl height matters more than aesthetics.
For a Golden of your size, the feeding surface should be at about elbow height (from the floor to the top of your dog’s bent front leg joint). If it’s lower than this, your dog will have to strain her neck every time she eats, which over time could cause joint problems.
The best part: a slightly elevated station also catches splashed water before it hits your kitchen floors. Your Pinterest-worthy kitchen stays dry.
Another pro-tip: Make sure to seal any wood edges you’re using with a food-safe polyurethane. The wood soaks up moisture and can warp in less than a month… which happened to me after my first build sat in a box of tools until spring.
Your Dog Deserves a Clean, Happy Home — And So Do You
You don’t have to pick and choose. You can love your golden retriever and have a home that you are proud of. Promise.
Choose one of these ideas and just do it. Try it, it can be the simplest thing. My point is pick one item from this list and just try it out. This small win in my space this week has made it feel like a new space.
And, if you’re in the mood to spoil your dog and these backyard DIY dog playground ideas are for you.
Which one of these are you grabbing first?

Amr Mohsen is a software engineer who traded his keyboard for a leash — at least on weekends. His love for dogs inspired him to share what he learns as a dog owner and enthusiast, bringing a detail-oriented, research-driven perspective to every article he writes. If it’s about dogs, he’s probably already looked it up twice.



