When you think about dog leash holders, you might envision a plain hook or a boring bar. But why settle for dull when you can have style and function? From whimsical bone-shaped hooks to rustic wooden racks, there are so many creative designs that can make your home feel dog-friendly and stylish. Curious about which designs can add both flair and practicality to your space? Let’s explore some of these charming options.
Stylish Hooks and Organizers
When you think about it, a stylish hook or organizer for your dog’s leash can make life just a bit easier, don’t you think?
Imagine this: You’ve got your dog, treats, and a leash, but where’s the leash? A dog leash holder DIY project can save you the hassle. You can grab a wooden board or an old picture frame, paint it your favorite color, and add some hooks.
Hang it by the door for quick access. You’ll wonder how you lived without it. Plus, it adds a personal touch to your home.
Need a quick dog walking solution? Search no further. You’ll wonder, why didn’t I think of this sooner? Trust me, it’ll be a stylish game changer.
Our Collection
You’re going to love exploring our collection of dog leash holders, designed to bring both charm and functionality to your space.
Whether it’s the playful wall-mounted bone-shaped hooks or the rustic wooden leash rack with hooks, there’s something to melt every pet lover’s heart.
And don’t forget about the adorable ceramic dog leash holder that could almost be a piece of art on your wall—who knew organizing could look this good?
1. Wall-Mounted Bone-Shaped Hooks
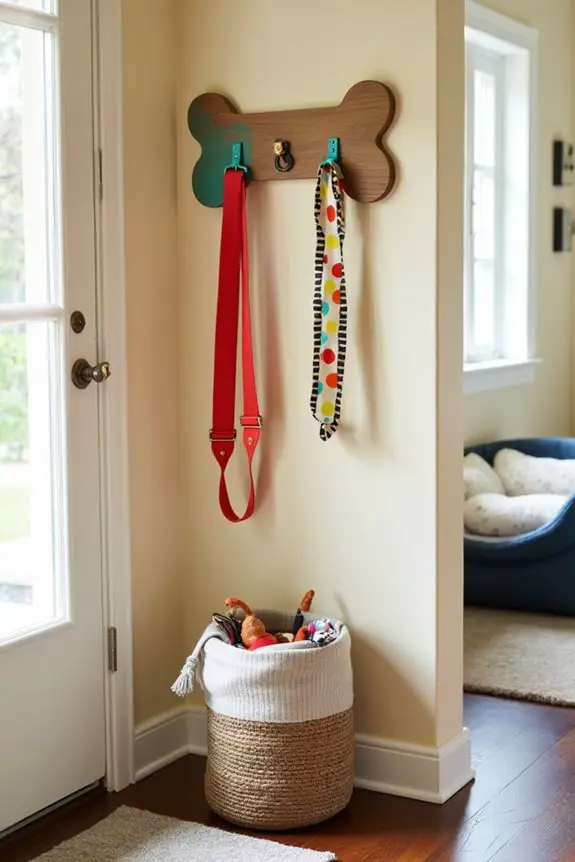
If you’re a dog owner, you know the struggle of tangled leashes and scattered toys. Enter the wall-mounted bone-shaped hooks, your new best friend. Not only do they bring a playful touch to your space, but they also keep your canine’s essentials organized and at the ready. Plus, it’s a budget-friendly project that brings a bit of your pup’s personality to your home. You can also elevate your design with luxury dog house accessories to enhance the aesthetic of your pet space. Additionally, incorporating stylish dog crate furniture can further blend functionality with style. Investing in luxury dog training equipment can improve your overall training experience and bond with your pet. In fact, choosing a comfortable luxury dog bed can greatly improve your pet’s relaxation experience. Let’s get started!
Materials Needed:
- 1 wooden board (about 1″ x 6″ x 24″)
- 2 bone-shaped hooks (you can find these online or in home improvement stores)
- Sandpaper (medium and fine grit)
- Wood stain or paint (color of your choice)
- Paintbrush or cloth (for staining)
- Screws (included with hooks)
- Drill (with drill bits)
- Level
- Measuring tape
- Pencil
- Wall anchors (if mounting on drywall)
Step-by-Step Instructions:
- Get Your Board Ready: Take your wooden board and give it a good sanding. Make sure to smooth the edges; nobody wants splinters while reaching for a leash—yikes.
- Measure and Mark: Decide where you want your hooks to go. Use the measuring tape to verify they’re evenly spaced. Mark the spots with your pencil. I like to think of it as creating a little masterpiece, one paw at a time.
- Drill Holes for the Hooks: If you’re using wooden boards and wish to avoid splits, drill pilot holes at the marks you made. Carefully attach the bone-shaped hooks using the screws they came with. Use the level to verify they’re straight—no one wants a lopsided leash holder, trust me.
- Stain or Paint: Now, it’s time for some color. Whether you prefer a chic natural wood finish or a pop of bright color, apply your wood stain or paint. If you’re using paint, two coats might do the trick. Allow it to dry completely. I once impatiently skipped this and ended up with rainbow fingers—lesson learned.
- Mount the Hook Board: After everything’s dried, it’s time for installation. Hold the board against the wall in your desired location. Use a level to verify it’s straight, then mark the holes where you’ll attach it. Drill holes for the screws (don’t forget the wall anchors if needed), and secure the board to the wall.
- Hang Your Leashes: Now the fun part. Hang up your dog leashes, harnesses, and even some of those adorably ridiculous dog sweaters. If you’re like me, your pup might’ve more clothes than you do.
Optional Add-ons/Variations:
Want to make it extra special? You could personalize your hooks with your dog’s name using stencils or paint.
Or try distressing the wood for a rustic look by lightly sanding the edges after painting. Maybe even add a few paw prints (finger paint for humans can work too!).
Pro Tip:
Before you commit to a wall location, consider how you want to access your leashes. An easy grab when rushing out the door is a must.
And if your dog is a “creative escape artist,” maybe install the hooks out of reach or on a higher wall.
With this simple DIY project, not only do you add some charm to your home, but you also develop a special hangout spot for your furry friend’s essentials. Enjoy your new space, and remember: a tidy home leads to a happy pup.
2. Wooden Leash Rack With Hooks
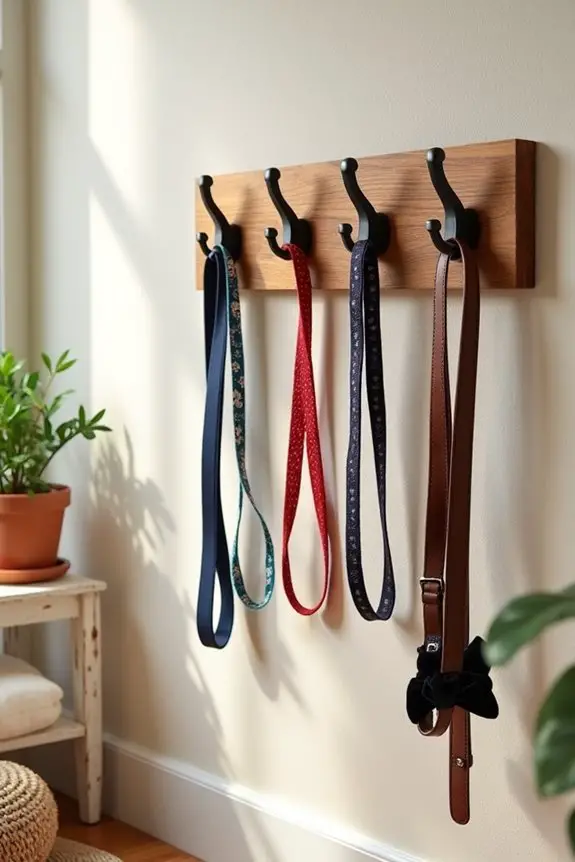
If you’re tired of leashes draped over furniture or tangled in a messy heap, this DIY wooden leash rack is for you. Not only does it keep everything organized and accessible, but it’s also a fantastic way to add a touch of rustic charm to your home. Plus, making your own can save you a good chunk of change compared to those fancy, store-bought versions. Luxury dog products can also enhance your dog’s style while keeping your space tidy.
Materials Needed:
- 1 wooden board (about 1″ x 6″ x 24″)
- 4-6 sturdy hooks (your choice of design)
- Sandpaper (medium and fine grit)
- Wood stain or paint (your favorite color)
- Paintbrush or cloth (for applying), or a spray can for a modern touch
- Screws (most hooks will include these)
- Drill (with drill bits)
- Level
- Measuring tape
- Pencil
- Wall anchors (if needed for drywall)
Step-by-Step Instructions:
- Prepare Your Board: Start by sanding your wooden board until it’s smooth enough to touch without getting splinters. This is an important step—trust me, you don’t want to be reaching for the leash and get a surprise splinter.
- Plan Your Hook Placement: Think about how many leashes you need to hang and decide how far apart you want the hooks. Use your measuring tape to guarantee they’re evenly spaced and mark where you’ll drill the holes with a pencil. You can think of this as arranging a little family portrait for your dog’s favorites.
- Drill Holes for Hooks: If you’re using hardwood, drill pilot holes where you made your marks to prevent splitting. Attach your hooks securely with the screws provided. Check to make sure they’re level because who wants a crooked hook, right? Not me.
- Stain or Paint Your Board: This is where you can get creative. Apply your chosen wood stain or paint. Two coats might be a great idea for that professional look. Patience is key here; let everything dry thoroughly. I once misjudged drying time and almost painted myself into a colorful corner—don’t be like me.
- Mount Your Leash Rack: Hold your board up at your desired height on the wall and use a level to guarantee it’s straight. Mark the screw holes, drill where needed, and install your leash rack. Remember those wall anchors if you’re hanging on drywall. You don’t want that beautiful piece crashing down because it’s not anchored properly.
- Hang Up the Leashes: The final step is to hang your dog’s leashes, collars, and maybe even a fancy bowtie or two. You might want to give your pup a little pep talk about this new system—“Look how organized we’re now!”
Optional Add-ons/Variations:
Feeling adventurous? You could change up the hooks with colorful, themed ones to match your home décor or your dog’s personality—like fun animal shapes or vintage styles.
You could also use reclaimed wood for a rustic look or paint the board in playful colors that pop in your entranceway.
Pro Tip:
If you want your leash rack to stand the test of time, consider applying a clear sealant after staining or painting. This will protect your creation from wear and tear, especially if your pup tends to get a bit excited and snags a leash or two off the rack (I speak from experience).
3. Paw Print Decorative Hanger
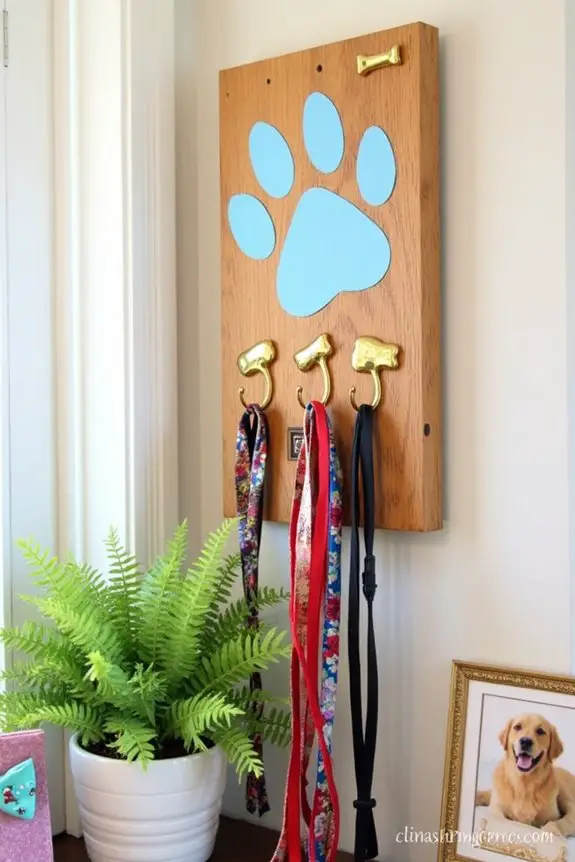
Want to add a little personality to your dog’s leash organization while also keeping things tidy? Search no more than this super cute paw print decorative hanger! Not only does it keep your leashes from becoming an unsightly mess, but it also brings character to your home. Who doesn’t want a cheerful reminder of their furry best friend every time they grab the leash for a walk? Plus, making one yourself can be easier on the wallet than those fancy décor shop versions.
Materials Needed:
- Wooden board (about 1″ x 6″ x 24″)
- Paw print stencil (you can make your own or print one out)
- Paint (your preferred color, maybe a fun pop against your wall)
- Paintbrush or sponge brush
- 4-6 strong hooks (in fun shapes if you’d like)
- Sandpaper (medium and fine grit)
- Screws (comes with the hooks)
- Drill (and drill bits)
- Level
- Measuring tape
- Pencil
- Wall anchors (if needed for drywall)
Step-by-Step Instructions:
- Sand Your Board: Begin with the important part—sanding down your wooden board. You want to confirm there are no rough edges that could snag on you (or your pup) when they’re enthusiastic for a walk. Trust me, one splinter is one too many.
- Apply the Paw Print Stencil: Place your stencil in the center (or where you think it looks best) of the board. Use a pencil to lightly trace the outline. This will be your canvas—a little doggie art, if you will.
- Paint It Up: Grab your paintbrush and fill in the stencil with your chosen color. Feel free to channel your inner artist here. Choose a contrasting color to make that paw print pop! Just remember: a little goes a long way, so go easy on the paint.
- Seal the Deal: Once the paint is dry—don’t be like me and try to rush this step—seal it with a clear topcoat to keep your masterpiece safe from wear and tear.
- Attach the Hooks: Use the measuring tape to mark where you want the hooks along the bottom edge of the board. Drill pilot holes in the marked locations. Then, attach each hook securely, doing a little happy dance once they’re settled in. Just think of how functional yet cute your rack will be!
- Mount Your Piece: Carefully hold your decorated board where you’d like it on the wall. Use a level to confirm it’s straight (we all know how awkward a crooked hanger looks). Drill your holes, insert wall anchors if necessary, and attach the board.
- Start Hanging: Now for the best part—hang the dog’s leashes! Add collars, or even a small decorative piece like a doggy bowtie or a photo of your fur baby. Voilà, you’ve got a leash holder that doubles as home decor!
Optional Add-ons/Variations:
Looking to make it truly yours? Try using different paint colors based on your home’s palette. You could even switch out the wood for something like reclaimed barn wood for that rustic feel. Or go wild with glitter! Who said functional can’t be fun?
Play around with the hook designs—stars, hearts, or even dog bones—just let your imagination run free.
Pro Tip:
When securing the hooks, check their weight limit to confirm they can hold not only the leashes but also any additional items you might add. You don’t want your decorative hanger to give way during your next big leash wrangling adventure.
And take your time with the paint and sanding—it may seem tedious, but cute projects are worth a little extra effort.
Now pat yourself on the back! You’ve created a lovely piece that reflects your love for your pup and keeps your home looking neat. Happy crafting!
4. Ceramic Dog Leash Holder
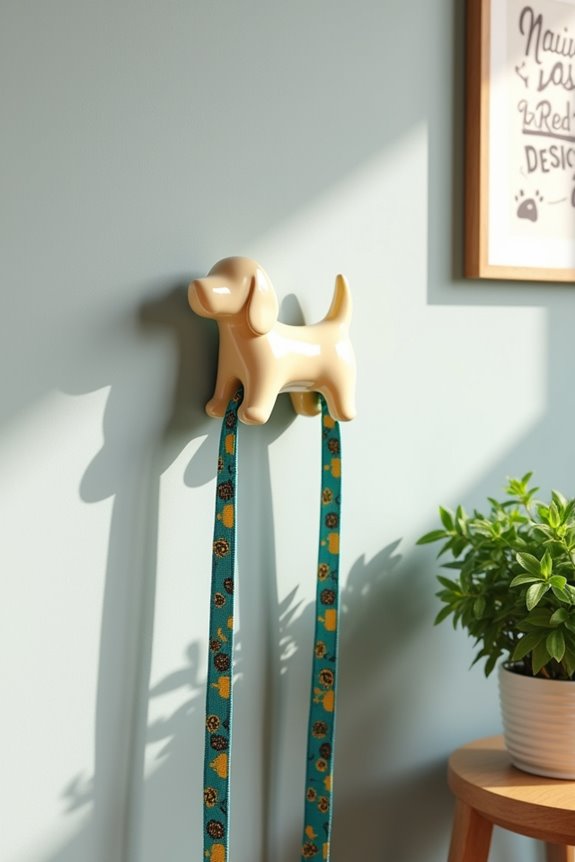
If you’re on a mission for a stylish and functional way to keep your dog’s leash organized, seek no further than a ceramic dog leash holder. Not only does it add a dash of charm to your home décor, but it also guarantees that your leash is always in the right place for those spontaneous walk moments.
And let me tell you, nothing feels better than being prepared to snatch that leash and trot out the door without some epic game of hide-and-seek in your own home.
Materials Needed:
- Ceramic dog leash holder (available at most pet stores or online)
- Strong adhesive (epoxy or hot glue)
- Optional: Decorative paint (for personal touches)
- Optional: Small wall screws (if mounting is preferred)
Step-by-Step Instructions:
- Choose Your Spot: Decide where you want your ceramic leash holder to live. Find a place that’s both convenient and visible—for those quick grab-and-go moments.
- Prep the Surface: If you’re mounting it, make sure your wall surface is clean and dry. Wipe away any dust or residue, and if you’re going all-in with adhesive, make sure that area is ready to hold your masterpiece.
- Apply Adhesive: If you’re going for glue, follow the product instructions for application. Dot a good amount on the back of the ceramic holder. If you’re using screws, skip this step and move to drilling pilot holes.
- Press It On: Firmly press the ceramic holder against your chosen surface. If you’re using glue, hold it for a minute or two for a strong bond—think of it as an embrace that says, “We can do this together.”
- Let It Cure: Allow time for the adhesive to set properly according to the instructions. Patience is key here, so go ahead and take your pup for a walk without that leash—just this once.
- Personalize It: If you’re feeling crafty, use decorative paint to add a unique design or a little flair to your ceramic holder. Maybe your dog’s name or a fun quote that makes you smile every time you use it.
- Hang the Leash: Now for the moment of truth—hang your leash and enjoy your newly organized space.
Optional Add-ons/Variations:
Feeling creative? You can paint the ceramic holder in your dog’s favorite color, or even match it to your home décor. Alternatively, use stickers or decals for a cute touch that shows off your style.
Personalization is where the magic happens, so let your imagination run wild.
Pro Tip:
When applying adhesive, make sure you use a strong one to prevent any accidental drops. There’s nothing worse than having your leash holder crash down with a heavy clank when you’re in a rush to head out.
Always give it time to set, because no one wants a leash that ends up on the floor instead of hanging beautifully.
Plus, keeping your muk-tale organized gives you one less thing to trip over during those exciting puppy playdates.
5. Collapsible Leash Storage Basket
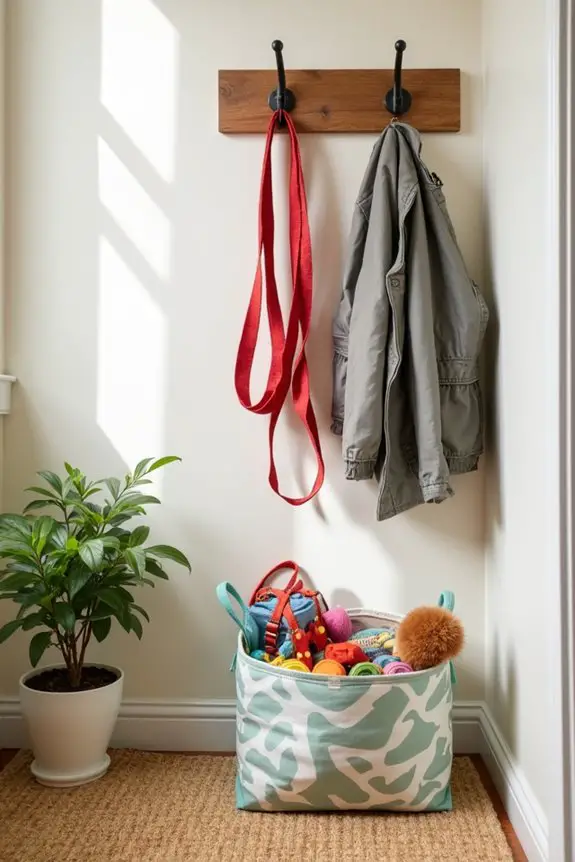
If you’ve ever tripped over your dog’s leash while rushing out the door or searched high and low for it before a walk, a collapsible leash storage basket might just be the game changer you didn’t know you needed.
Not only does it keep everything tidy, but it also adds a touch of personality to your home—making sure you’re always ready for adventure.
Materials Needed:
- A collapsible fabric basket (available at home goods stores or online)
- A pair of scissors (optional)
- Decorative fabric or paint (if customizing)
- Measuring tape
- Stencils or stickers (for personal touch)
Step-by-Step Instructions:
- Pick Your Basket: Choose a collapsible basket that suits your style. Whether it’s a minimalist look or a fun print, selecting a basket you love makes this project worthwhile.
- Personalize It (Optional): If you want to add some flair, consider using fabric paint or stencils to decorate the outside of the basket. Have fun with it! You could even write your dog’s name or a cute phrase like “Let’s Go!”
- Decide Where to Place It: Find a convenient location for your basket—near the door, in your mudroom, or even beside your dog’s bed. The key is to pick a spot where you can easily grab the leash.
- Fill It Up: Now, this is the fun part. Place your dog’s leash, harness, and any extra supplies like poop bags or treats inside. The best part about a collapsible basket? When you’re not using it, simply fold it down for easy storage. It’s like magic.
- Utilize Hooks (Optional): If you want to take it to the next level, consider adding a couple of hooks on the wall above the basket. You can hang the leash on the hooks while keeping treats and toys safely inside the basket.
- Admire Your Work: Sit back and enjoy the view of your organized area. Does it look better? Absolutely. Is it making your life easier? You bet.
Optional Add-ons/Variations:
Feeling a bit crafty? You can swap out the fabric with a different texture or color to match your home decor.
You might also consider using removable stickers to update designs as your dog’s personality shines through its various stages of life.
Pro Tip:
For safety’s sake, make sure the basket is lightweight yet stable enough to hold all your pet essentials without toppling over.
A heavier basket can also help prevent adventurous paws from tipping it over during curious digs.
With this collapsible leash storage basket, your dog’s gear will have a dedicated home, saving you from the morning madness and turning it into a smooth changeover from indoors to outdoors.
And yes, your home will thank you too.
6. Decorative Wall-Mounted Leash Shelf
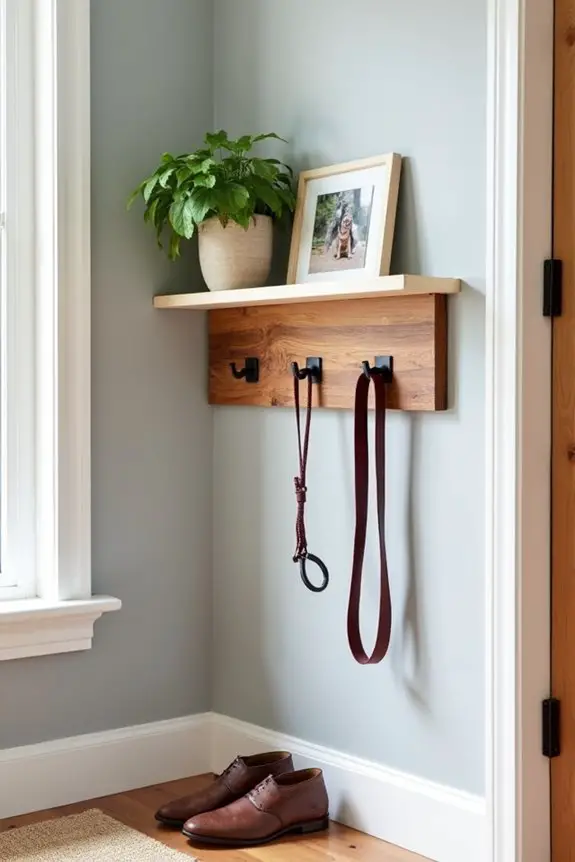
If you want to merge style with functionality in your dog-loving home, a decorative wall-mounted leash shelf is the perfect DIY project for you. Imagine a charming yet practical solution that keeps your pet’s essentials organized while enhancing your décor. You’ll be freeing up floor space, saving yourself headaches from searching for that leash again, and let’s be honest, you’ll show off your adorable pooch’s accessories in a delightful way.
Materials Needed:
- A small wooden shelf (available at craft stores or online)
- Two sturdy hooks (for hanging the leash)
- Wall brackets (if not included with the shelf)
- Sandpaper (optional)
- Paint or wood stain (to match your decor)
- Paintbrush (if using paint/stain)
- Screws and a drill (associated hardware for mounting)
- Measuring tape
- Level (for proper alignment)
Step-by-Step Instructions:
- Choose Your Shelf: Start by selecting a small wooden shelf that fits your wall space. Consider one with a design that complements your home’s décor. It can be rustic, modern, or whimsical—whatever matches your personality.
- Prep the Surface: If you’re up for it, sand the shelf lightly to remove any rough spots. This step isn’t strictly necessary but gives a more polished finish, especially if you’re painting or staining it.
- Personalize: Here’s where your creativity shines. Paint the shelf or apply wood stain in the color of your choice. If you want to jazz it up even more, consider adding stencils or vinyl lettering with your dog’s name or a cute phrase like “Adventures Await.”
- Install Hooks: Before mounting, screw in the hooks on the underside of the shelf. You can position them according to your preference, but make sure they’re spaced out enough for the leash to hang without getting tangled.
- Find the Right Spot: Use the measuring tape to determine the perfect height on the wall for your shelf. Generally, it should be within reach, ideally near the door where you grab your dog’s leash for walks.
- Mount the Shelf: Using the drill, secure the wall brackets to the wall, making sure they’re level and straight. Then, attach the shelf to the brackets according to the manufacturer’s instructions. It’s like a mini workout—bonus!
- Admire and Organize: Hang your dog’s leash on the hooks and feel that sweet sense of accomplishment. Take a step back and admire your handiwork—doesn’t it look nice? Now you have a functional piece that looks as good as it’s practical.
Optional Add-ons/Variations:
Feeling a little extra creative? You could swap the plain wood for a reclaimed wood shelf for a rustic vibe or go bold with a funky color that pops against your wall. Adding a small potted plant on the shelf can boost the aesthetic, too, as long as it’s out of reach from your playful pup.
Pro Tip:
Make sure to mount the shelf securely; you don’t want it to come crashing down when your energetic dog decides the leash is a chew toy. Use a stud finder for the most secure installation, and you’ll give yourself peace of mind while flaunting your trendy DIY leash shelf.
With this fun project, you’ll not only solve the chaotic leash dilemma but also add a splash of style to your space. Happy crafting, and cheers to more organized doggy adventures!
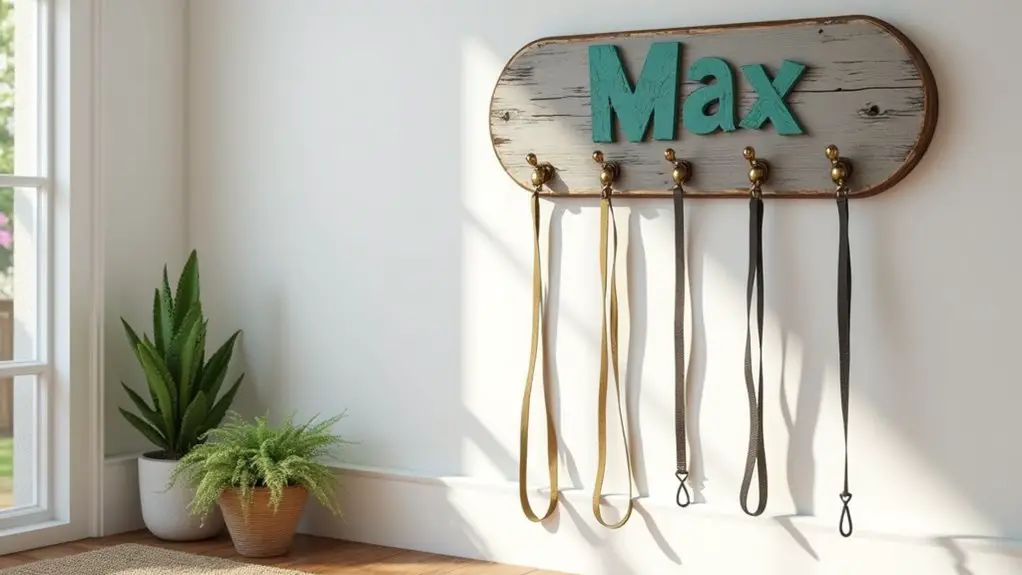
7. Personalized Nameplate Leash Holder
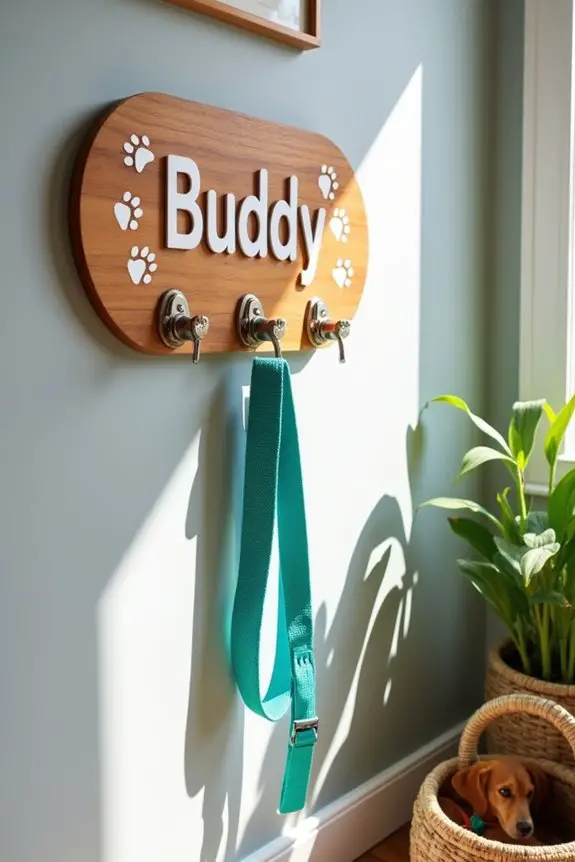
If you want to add a unique touch to your home while keeping your dog’s leash handy, this DIY Personalized Nameplate Leash Holder is just what you need. Not only does it help organize your dog’s gear, but it also showcases your furry friend’s personality. Plus, it’s an inexpensive way to elevate your entryway decor—goodbye, boring hooks!
Materials Needed:
- A wooden plaque or sturdy piece of wood (choose your shape and size)
- Sandpaper
- Acrylic paint or wood stain
- Paintbrushes (two sizes: one for base coating, one for detailing)
- Stencils or vinyl letters (for the name)
- Two or more hooks (depending on how many leashes you have)
- Screws and wall anchors (for mounting)
- Drill
- Level
Step-by-Step Instructions:
- Choose Your Wood: Pick a wooden plaque that suits your style. Think about whether you want something rectangular, oval, or maybe a fun shape like a bone.
- Smooth It Out: Grab the sandpaper and smooth any rough edges on your wood piece. This will make your holder feel nice and refined. It’s like a spa day for your wood—just much less relaxing.
- Get Creative: Paint the wood in your favorite color or apply wood stain for a rustic feel. Don’t be shy! Add pops of vibrant colors or designs that reflect your pup’s spirit.
- Add the Name: Once the paint is dry, place the stencils or vinyl letters on the wood to spell out your dog’s name. This is where you can really personalize it. Use a fine brush for detailing around the letters if you want to add flair.
- Attach the Hooks: Measure where you want to place the hooks on the lower part of the plaque. Mark the spots, then screw them in securely. You can space them out based on how many leashes or collars you have—just don’t get carried away with too many hooks unless your dog is planning a pet parade.
- Mount to the Wall: Use a level to verify your leash holder hangs straight, then carefully drill the screws into wall anchors. It’s important to be precise here; we want your decor to look appealing, not like it’s had a few too many treats and drunkenly stumbled on the wall.
- Hang Your Leashes and Enjoy: Once it’s mounted, drape your dog’s leash on the hooks. Stand back and admire your creation. Not only is it functional, but it’s also a conversation starter. Just wait until guests see your pup’s name on display.
Optional Add-ons/Variations:
- Consider using a different type of wood, like reclaimed barn wood for a rustic vibe, or go sleek with a painted canvas. You could even add paw prints or fun designs around the name for extra character.
- Use a metallic finish for a more modern look, or even add little embellishments like faux gems or stickers to customize it further.
Pro Tip:
To make certain your hooks hold up over time, use screws that are designed for wall mounting. This prevents any unfortunate moments where you’re disappointed to find your leash holder has decided to come crashing down. Trust me, no one wants to witness that tragedy during a walk.
Now, all you need to do is train your dog to walk themselves…just kidding—enjoy organizing all your leashes in style!
Extra Tips & Ideas
While you’re sifting through ideas for that perfect dog leash holder, think about personal touches you can add to make it uniquely yours. Maybe you want to paint it in your favorite colors or add fun stickers that reflect your dog’s personality.
Consider incorporating a small shelf for treats or a cute plant that won’t get knocked over. You could even hang a photo of your pup to brighten the space.
Feeling crafty? Try using reclaimed wood for a rustic vibe—it’s easier than it looks. Trust me, if I can stain wood without turning my fingers into a tie-dye mess, you can too.
Just remember: the goal is to create a space that brings a smile every time you grab the leash.
Frequently Asked Questions
What Materials Are Commonly Used for Dog Leash Holders?
You’ll find dog leash holders commonly made from materials like wood, metal, plastic, and fabric. Each offers different aesthetics and durability, so choose according to your style and the strength you need for your leash.
How Can I Mount a Dog Leash Holder Securely?
To mount your dog leash holder securely, use wall anchors for added strength, ensuring you drill into studs. Picture those sleek hooks ready to embrace your pup’s leash, keeping everything tidy and accessible.
Are Customizable Leash Holders Available?
Yes, customizable leash holders are available. You can choose colors, materials, and designs that match your style. Many online retailers and local artisans offer options to create a unique leash holder just for you.
What Are Some Eco-Friendly Options for Dog Leash Holders?
Eco-friendly options for dog leash holders are like discovering hidden treasures. You can choose bamboo, reclaimed wood, or recycled materials to create stylish, sustainable solutions that keep your space organized while being kind to the environment.
Can I Use a Leash Holder for Multiple Dogs?
Yes, you can use a leash holder for multiple dogs, but make certain it’s sturdy enough to handle the weight and movement. It’s a great way to keep everything organized while you’re out walking.
Conclusion
So, why settle for a boring old leash holder when you can showcase your pup’s personality? With options like whimsical hooks or personalized racks, you can easily combine style with function. Think about how these little touches make your entryway feel more welcoming. Plus, organizing your dog’s gear will save you from those frantic moments of searching under the couch for that elusive leash. After all, who doesn’t love a little charm in their daily routine?

