Okay, so you know that moment when your golden comes bounding in from the backyard and you just know before you even look down?
Mud. Everywhere. On the rug you just styled for your entryway.
Girl, I’ve been there. My dog Koda went through this phase where he’d pick the muddiest corner of the yard every single time, and I was losing my mind trying to keep my floors clean.
That’s the thing nobody tells you — without a dedicated spot, your dog just… picks one. And it’s never the spot you’d choose.
A diy dog potty area actually fixes this. It gives your pup a clear zone and saves your sanity (and your floors).
Real talk: these 10 designs are doable on a weekend, and some of them are actually cute enough to keep your backyard looking Pinterest-ready.
#1: Build a Sand-Based Dog Potty Area (Like This Genius Park Setup)
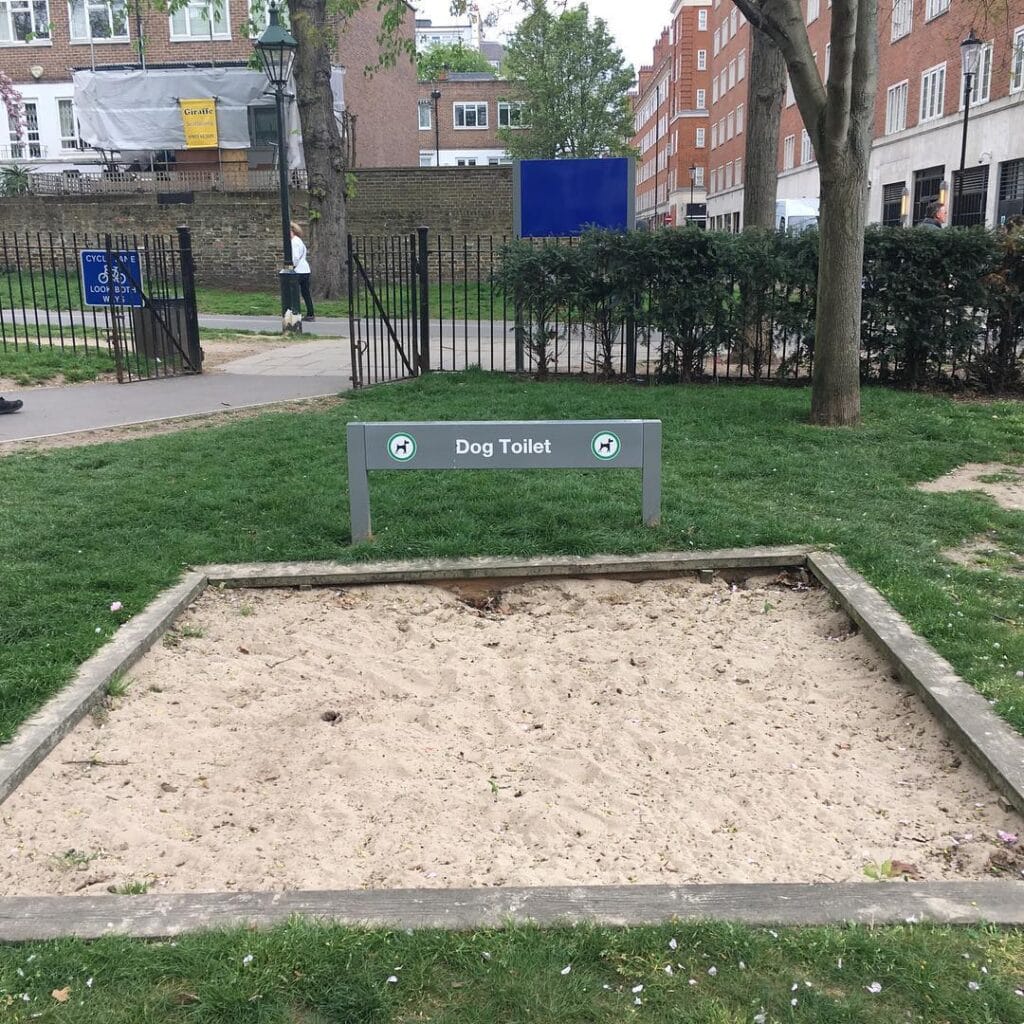
You know that moment when your golden has already gone in three different spots in the backyard, and you’re just standing there in your slides holding a bag, wondering why you even have grass anymore?
Yeah. Same.
Prep Time: 30 min | Active Project Time: 2–3 hours | Difficulty Level: Beginner
Materials & Tools:
– 4 wooden landscape timbers (3.5″ x 3.5″, pressure-treated)
– 2–3 bags of play sand (fine-grain, 50 lbs each)
– Galvanized corner brackets + screws
– Weed barrier fabric
– A drill, mallet, and measuring tape
– One metal sign post + custom engraved sign (optional but adorable)
Instructions
Pick a low-traffic corner of your yard — somewhere your dog already gravitates toward, honestly. Clear the grass from a 4×4 foot patch, dig down about 3 inches, and lay your weed barrier flat across the bottom. This keeps the sand from mixing into the soil and makes future cleanouts so much easier.
Frame the perimeter with your timber pieces, securing each corner with galvanized brackets. A mallet helps knock them flush against the ground.
Fill the box with fine-grain play sand — this texture encourages dogs to dig and sniff, which mimics their natural instinct to find a spot. The sand absorbs moisture fast, drains without pooling, and stays odor-controlled way longer than grass. My neighbor did this last summer for her lab mix and told me she stopped smelling anything within a week.
And that payoff? You get zero muddy paw prints tracking across your kitchen floor.
Want an easy win? Train your dog to use it by placing a piece of their used waste in the sand on day one. It signals to them — this is the spot.
Scoop waste daily and refresh the full sand layer every 3–4 months. If you love this idea, 12 best dog play areas for your furry friend has more setups that blend into a real backyard.
📸 Photo credit: Instagram @carterkusteraphoto
#2: Indoor Airport-Style Canine Relief Station (With Fake Grass + Fire Hydrant)
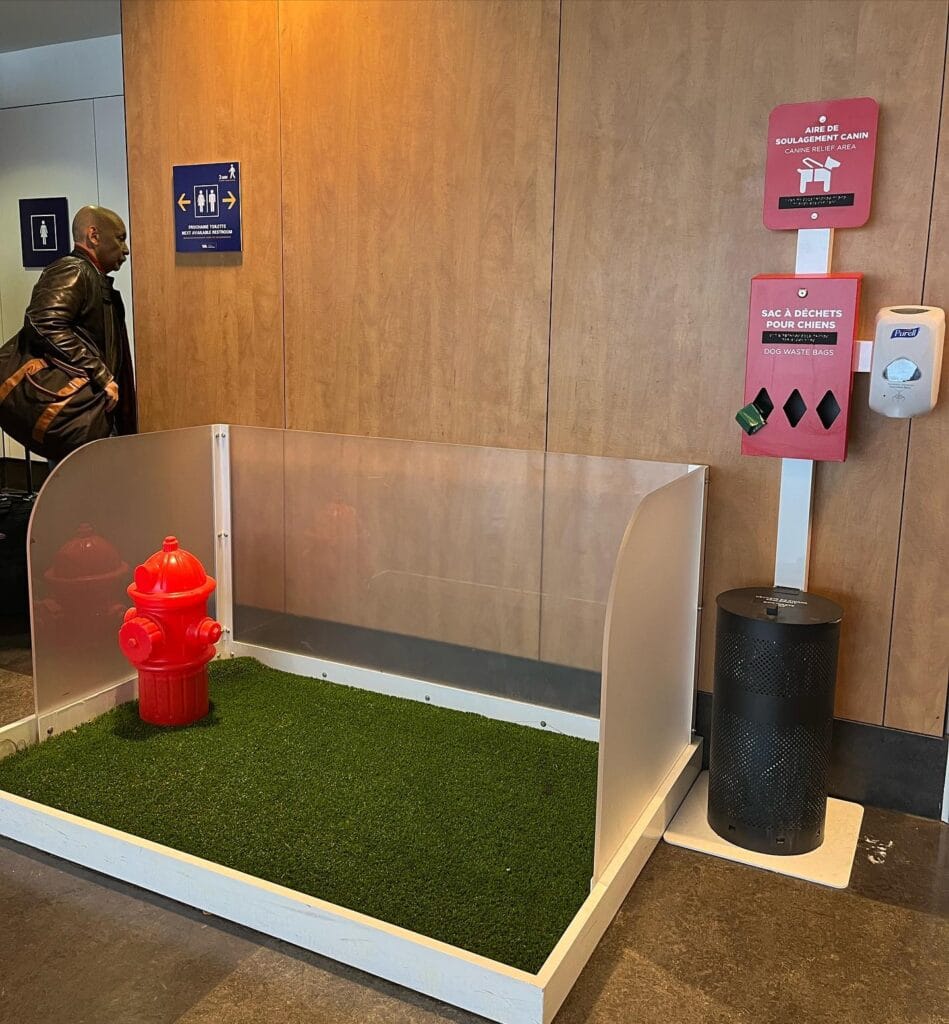
You know that panic when your golden starts sniffing every corner of your entryway and you know what’s coming next? Yeah. That moment right before the accident — that’s exactly what this setup prevents.
I saw this at an airport and lost it. An actual dog potty station, indoors, with fake grass and a little red fire hydrant. It looked so clean and intentional, not like a sad pee pad shoved in a corner.
Materials & Tools:
– 1 wooden frame box (approx. 24″ x 36″ x 4″ depth) — pine boards work great
– Artificial grass mat cut to fit (24″ x 36″)
– Clear acrylic panels (3 sides, roughly 18″ tall) for splash protection
– Small red plastic fire hydrant (decorative + functional cue for your dog)
– Dog waste bag dispenser (wall-mounted, red)
– Purell hand sanitizer dispenser (wall-mounted)
– Small cylindrical waste bin with lid
– Drill, screws, silicone sealant, sandpaper
Instructions
Build your pine wood frame first — four boards forming a shallow 4-inch deep rectangle. Sand every edge so there are no splinters. Seal the inside bottom with silicone sealant and let it cure fully so urine doesn’t seep into the wood.
Lay your artificial grass mat directly inside the frame. Cut it snug so it sits flat with zero gaps at the corners. This tight fit keeps it from shifting when your golden steps on it.
Now attach your clear acrylic panels — one across the back, one on each side — using corner brackets drilled into the frame. The acrylic contains splatter while keeping the whole setup visible and open, so your dog never feels trapped. And that matters more than people think.
Place the red fire hydrant in one corner of the grass. Dogs naturally target upright objects, so this actually trains them faster — the feature guides behavior, the benefit is fewer accidents outside the station, the payoff is a clean floor every single time.
Mount your bag dispenser and hand sanitizer on the wall directly beside the station at arm height. Add the waste bin right underneath for a one-step cleanup.
Prep Time: 30 min | Active Project Time: 2–3 hours | Difficulty Level: Beginner–Intermediate
For the grass mat, rinse it weekly with a white vinegar and water mix — it neutralizes odor without harsh chemicals that might bother your dog’s nose. If your golden is hesitant at first, place one of his used pee pads under the grass mat for a day. He’ll figure it out fast.
This whole setup pairs beautifully with some of the other creative builds in 13 Genius DIY Dog Stuff Every Pet Parent Needs to Try Today! if you want to keep going on a dog-friendly home overhaul.
📸 Photo credit: Instagram @colour_me_bel
#3: Real Grass Indoor Potty Tray (The “My Dog Refuses to Go Outside” Fix)
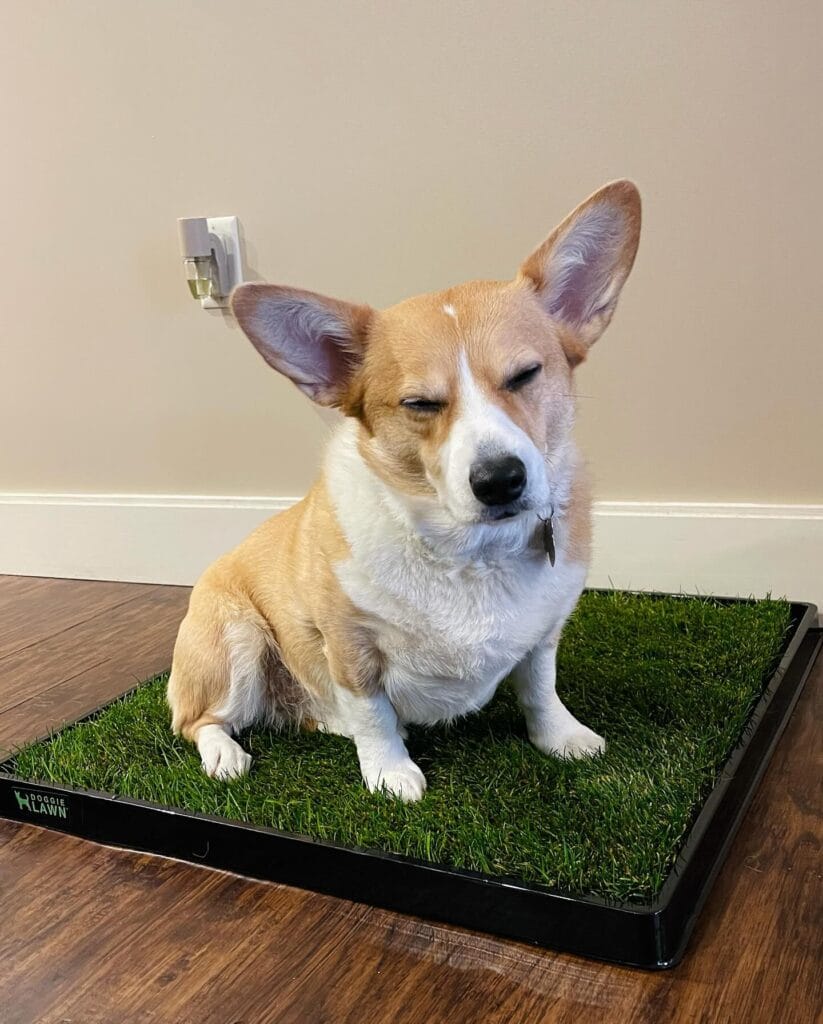
You know that moment when your golden has been staring at you for 20 minutes and it’s pouring outside and you’re both just… standing there? Yeah. This setup is the answer.
I spotted this on a friend’s Instagram and immediately texted her for details. Her corgi uses it without any retraining — just put it down and he knew exactly what it was.
Prep Time: 15 min | Active Project Time: 20 min | Difficulty Level: Easy
Materials & Tools:
– DoggieLawn real grass replacement tray (shown: 18″ x 24″ black plastic tray)
– Fresh sod cut to tray size (or a pre-grown DoggieLawn insert)
– Wall-mounted odor plug-in (the white nightlight-style unit shown keeps the corner fresh)
– Hardwood or tile flooring underneath for easy cleanup
– Optional: waterproof tray liner
Instructions
Set your tray flat against a baseboard wall — that back corner placement gives your dog a sense of privacy, which actually encourages them to use it faster. Slide the real grass insert directly into the black rimmed tray, pressing edges flush so there’s zero gap for accidents to escape underneath.
Plug your odor neutralizer into the nearest outlet right above the tray. Real grass — not fake — naturally absorbs liquid and controls smell, so your living room stays clean without daily scrubbing.
That’s the payoff: real grass triggers your dog’s natural instinct to go, the tray catches everything, and you skip the 6am rain walk entirely.
Swap the grass insert every 1-2 weeks. If you notice your dog hesitating, rub a tiny bit of their scent onto the grass — it clicks for them immediately.
If you love keeping your dog’s space stylish and functional, these 11 creative dog areas to create in your home spaces are worth a look.
📸 Photo credit: Instagram @croutonpotato
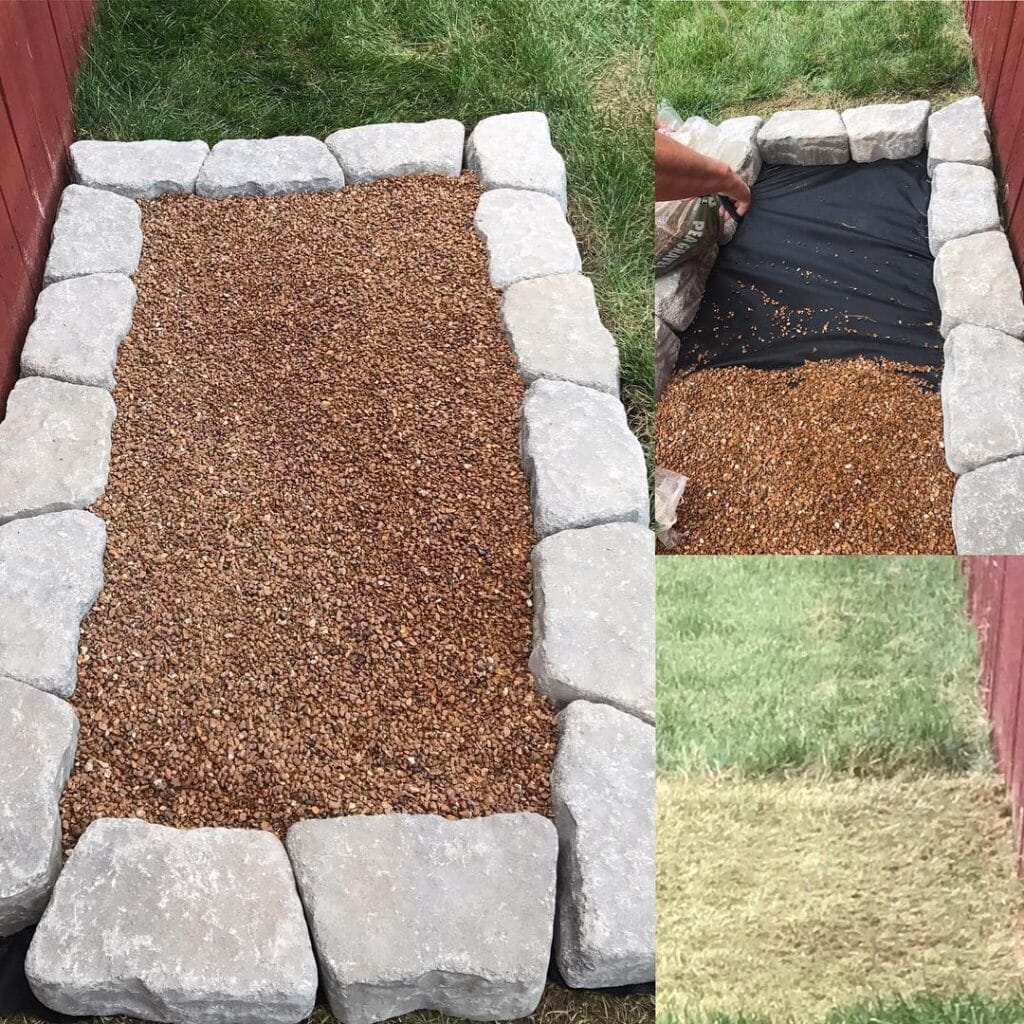
#4: Pea Gravel Dog Potty Station With Stone Border (The One That Actually Stays Clean)
You know that moment when your golden girl trots back inside after doing her business in the mud and drags her paws across your entryway rug? Yeah. That moment. I lived it every single morning last summer and I was done.
Prep Time: 30 minutes | Active Project Time: 2–3 hours | Difficulty Level: Beginner
Materials & Tools:
– Gray tumbled stone border blocks (roughly 4–6 inches each)
– Pea gravel in a warm cedar-brown tone (approximately 2–3 bags for a 3×5 ft space)
– Black landscape weed barrier fabric
– Garden scissors or utility knife
– Measuring tape
– Hand tamper or flat shovel
Instructions
Start by clearing the patch of dead or sparse grass — that bottom-right photo shows you exactly what a sad, muddy mess looks like before this fix, so use it as your “before” motivation.
Lay your weed barrier fabric flat across the entire area first. This step is the reason this whole setup works — fabric blocks weeds from pushing through, gravel stays put, and your dog gets a clean dry surface every single time she squats.
Border the perimeter with your tumbled stone blocks, stacking them two rows high on each side. Press them firm into the soil so they don’t shift when your pup paws around.
Pour your pea gravel over the fabric and spread it 2–3 inches deep. The gravel drains fast, which means no soggy paws, no muddy tracks, and honestly zero smell buildup when you rinse it weekly.
And the stone border does double duty — it keeps gravel contained and gives the whole spot that Pinterest-board look you’d actually want in your backyard.
Rinse the gravel with a garden hose once a week and spray a pet-safe enzyme cleaner monthly to keep odors from settling in.
📸 Photo credit: Instagram @jeremy___perryman
#5: The Fenced Flagstone + Gravel Dog Potty Yard (With a Lamp Post Your Neighbors Will Actually Compliment)

You know that moment when you open the back door and your golden just bolts into the grass — and comes back in with muddy paws, wet belly, the whole situation? Yeah. This setup is the answer to that chaos.
This DIY dog potty area uses irregular bluestone flagstone laid over a river rock gravel base, enclosed by a white vinyl privacy fence. There’s a mini red fire hydrant marker in the corner (adorable AND functional — it gives your pup a target), plus a black iron lamp post so nighttime bathroom runs don’t require a flashlight.
Materials & Tools:
– Bluestone flagstone slabs (irregular cut, 1.5–2 inches thick)
– River rock gravel (1–2 inch mixed stones)
– Landscape fabric (weed barrier underneath)
– White vinyl privacy fence panels (6 ft tall)
– Decorative red fire hydrant post marker
– Black powder-coated lamp post with solar or wired lantern top
– Rubber mallet, level, garden edging
Instructions
Start by mapping out your space and laying landscape fabric flat across the entire area — this blocks weeds and keeps the gravel from sinking into the soil over time.
Pour your river rock gravel 3–4 inches deep over the fabric. Rake it level before touching the flagstone. And this step matters more than people think — uneven gravel means wobbly stones, and wobbly stones mean your dog skips the whole area.
Place your bluestone slabs one by one, pressing each piece firm into the gravel. Leave 1–2 inch gaps between slabs and fill those gaps back in with loose gravel. The irregular shapes create a natural puzzle — no two yards look the same.
Set your lamp post in a concrete footer near the center-back zone, away from the main stone path. Install the fire hydrant marker in a corner near the fence — dogs respond to visual targets, and this trains them to use one consistent spot.
Here’s the trick: spray the hydrant with a tiny bit of your dog’s urine scent on day one. It sounds weird but it works immediately.
The gravel drainage — combined with the stone path — means rainwater flows through instead of pooling, so you’re not dealing with a muddy swamp two days after a storm. That’s the real payoff here.
Rinse the stones weekly with a garden hose and swap out gravel patches every season to keep odors down.
Prep Time: 1–2 hours | Active Project Time: 4–6 hours | Difficulty Level: Intermediate
📸 Photo credit: Instagram @love.lab.lewis
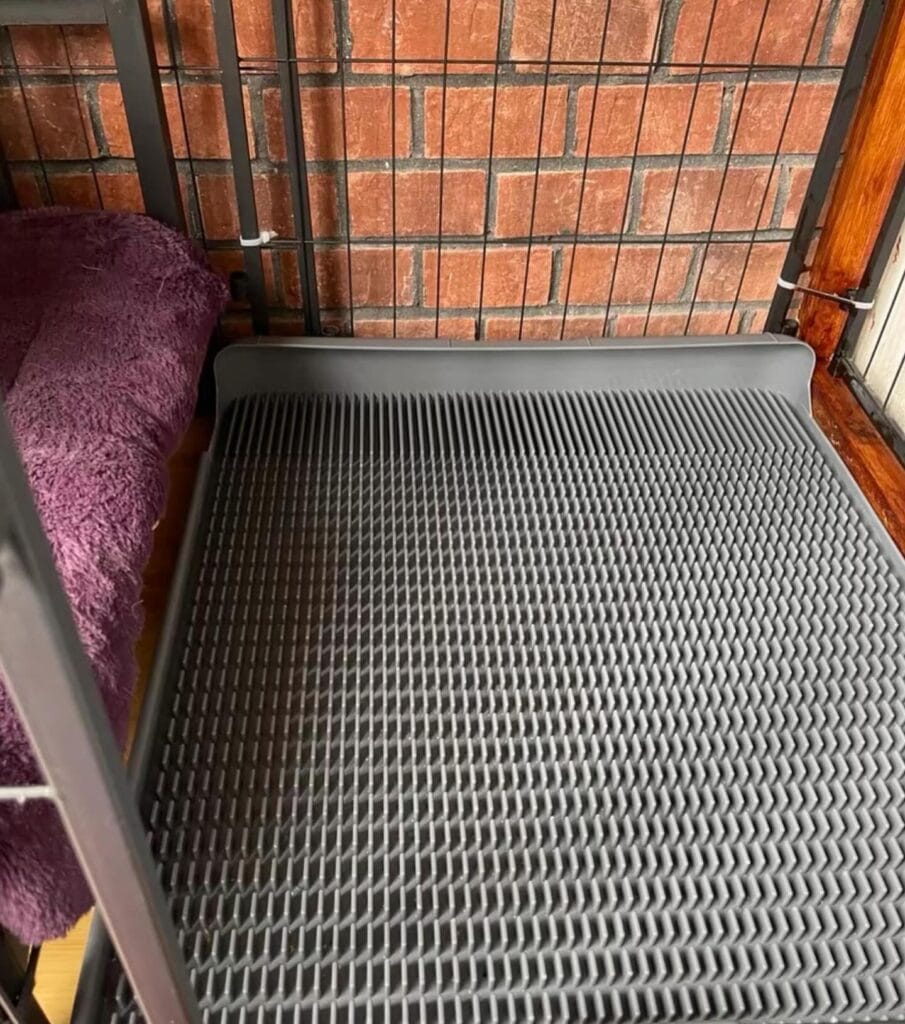
#6: DIY Wire Mesh Potty Tray Station (The One That Actually Stays Clean)
You know that moment when your golden trots back inside after doing her business and her paws are covered in whatever was outside? Yeah. My friend Mia had the same chaos — muddy prints straight across her cream-colored rug, every single morning.
This setup fixes that.
Prep Time: 20 minutes | Active Project Time: 1–2 hours | Difficulty Level: Beginner
Materials & Tools:
– Dark gray powder-coated wire mesh panel (floor grate)
– Black metal kennel frame with grid walls
– Plastic drip tray (fits flush under the mesh)
– Purple sherpa dog bed or cushion
– Zip ties or panel clips
– Measuring tape
– Wire cutters
Instructions
Start by measuring the inside floor of your kennel frame so your wire mesh grate fits with zero gaps on the edges. The raised mesh design lets liquid drop straight through into the drip tray below — that tray catches everything, so your floors stay dry and your sanity stays intact.
Clip the gray plastic mesh panel into the base of the metal frame using zip ties at each corner. Snap the black drip tray underneath. It slides out for cleaning in under two minutes.
Tuck the purple sherpa cushion into one corner so your girl has a soft spot that sits away from the potty zone.
The mesh keeps paws lifted off wet surfaces, which means cleaner floors and drier paws on those rainy Texas mornings.
If you’re building this inside a larger setup, pairing it with one of these 7 cozy DIY indoor dog kennel ideas gives you a full dedicated space your dog will actually use consistently.
Rinse the tray every other day with a white vinegar and water mix — it cuts odor without harsh chemicals near your pup.
📸 Photo credit: Instagram @petlover.thailand
#7: White Picket Fence Garden Gate Potty Station

You know that moment when your golden has already gone in the flower bed — again — and you’re standing there in your slippers holding a little bag, just… sighing?
Yeah. Me too. My neighbor actually built something like this and I could not stop thinking about it on my drive home.
This setup uses a white vinyl picket fence with a gate frame to section off a dedicated potty corner. The ground is lined with pea gravel and river rock — about 2–3 inches deep — so urine drains through instead of pooling. Tucked against a stone wall with red salvia bushes framing both sides, it looks like a Pinterest garden nook. Not a dog bathroom. That’s the whole point.
Materials & Tools:
– White vinyl picket fence panels (pre-cut gate kit works great)
– Galvanized gate hinges and latch hardware
– Pea gravel — approximately 1–2 cubic feet depending on space
– River rock border stones
– Landscape fabric (weed barrier layer)
– Level, drill, post anchors
– Flagstone pavers for the approach path
Instructions
Lay your landscape fabric first — this is your secret weapon against weeds sneaking up through the gravel. Cut it to fit your corner space and overlap edges by 4 inches.
Set your vinyl post anchors into the ground at 4-foot intervals. Use a level on every single post before you tighten. One crooked post throws off the whole gate swing and you’ll notice it every single day.
Attach your fence panels between the posts, then hang the gate using galvanized hinges — these resist rust after rain or hose-down days. The gate swings inward so your dog steps onto the gravel naturally without you nudging her.
Pour your pea gravel over the landscape fabric in an even 2-inch layer, then add a top layer of river rock for a cleaner look. The gravel drains urine down and away — no smell sitting on top, no muddy paws tracking across your flagstone path. Your dog gets a clear, defined “this is the spot” zone, which actually speeds up potty training because the texture cue is consistent.
Prep Time | 30 minutes | Active Project Time | Half a day | Difficulty Level | Beginner–Intermediate
Add red salvia or similar low-maintenance flowering shrubs along the fence line. They hide the fence base, look gorgeous, and the whole corner stops looking like a utility area. And if you want more ideas for the full yard, 7 Creative Ideas for Your Outdoor Dog Area has some really good setups worth seeing.
Rinse the gravel with a garden hose once a week — it stays fresh way longer than you’d expect.
📸 Photo credit: Instagram @patrycja_sandiego
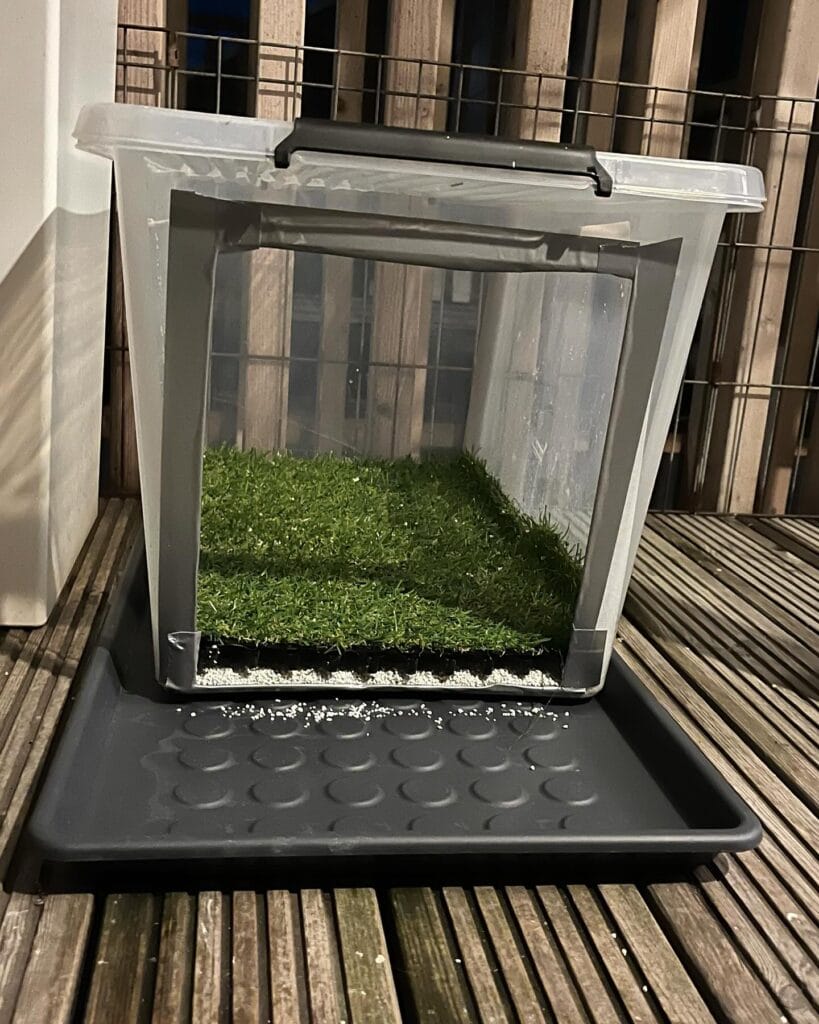
#8: DIY Indoor Potty Station Using a Clear Storage Bin (Balcony-Friendly!)
Okay, you know that moment when your golden has been staring at you for 20 minutes and it’s pouring outside and you just… can’t? Yeah. This setup is exactly what saved my sanity.
Prep Time: 20 minutes | Active Project Time: 45 minutes | Difficulty Level: Easy
Materials & Tools:
– Large clear plastic storage bin (with a snap-lock lid)
– Black plastic drip tray (sized larger than the bin base)
– Artificial grass mat (cut to fit the bin interior)
– Small white pebble drainage layer (about 1 inch deep)
– Box cutter or utility knife
– Measuring tape
Instructions
Start by cutting a large square window into the front face of the storage bin using your box cutter. Leave at least a 2-inch border on all sides so the structure stays rigid. This opening lets your dog step in without jumping.
Lay your white pebble layer flat on the bin floor first. The pebbles catch liquid and keep the grass elevated, which prevents that gross soggy-bottom smell building up over time.
Place your cut artificial grass mat directly on top of the pebbles. The grass sits perfectly without shifting.
Slide the whole bin onto your black drip tray. Any overflow lands there, not on your deck.
The snap-lock lid doubles as a splatter guard when flipped back during use.
Rinse the grass weekly and replace pebbles monthly to keep everything fresh.
📸 Photo credit: Instagram @tabithaslifejourney
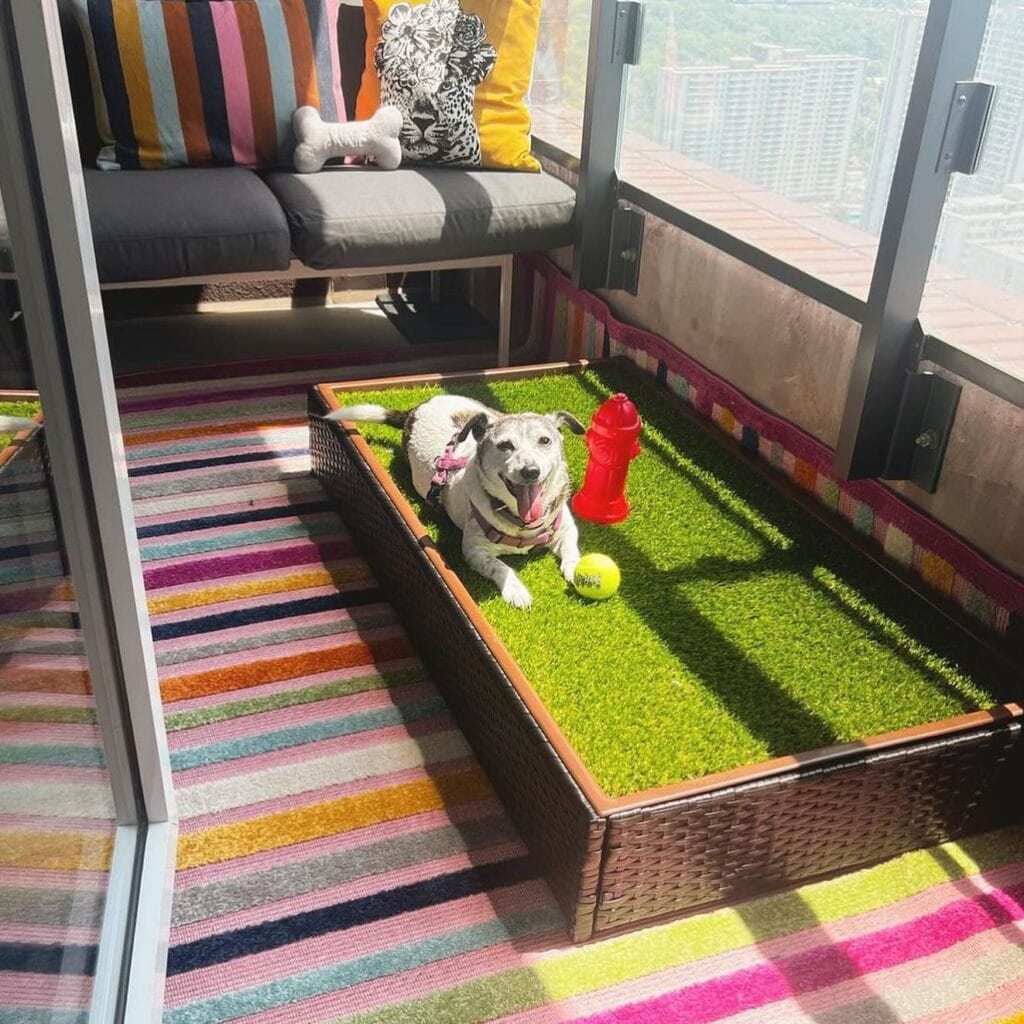
#9: The Raised Grass Potty Box With a Mini Fire Hydrant Marker

Your golden is standing at the door again. It’s raining, you’re in socks, and you’re already calculating how long it takes to towel off muddy paws. Yeah, I’ve been there — except multiply that by a high-rise apartment with no yard. That’s what pushed me to finally build this setup.
This one caught my eye on Instagram and I genuinely gasped. It’s a raised wicker-panel potty box filled with artificial turf, with a red plastic fire hydrant marker right in the center as a scent anchor for training. The whole thing sits against a glass wall — clean, contained, and honestly Pinterest-worthy.
Materials & Tools:
– Dark brown resin wicker planter box (roughly 24″ x 48″ x 6″ deep)
– Artificial grass mat cut to fit the interior
– Red plastic fire hydrant (decorative marker)
– 1-gallon jug for rinsing the turf weekly
– Box cutter or scissors
– Measuring tape
Instructions
Measure your planter box interior first — getting the grass mat exactly flush matters more than you’d think, because gaps collect debris fast. Cut the artificial turf mat using a box cutter along a straight edge. Press it flat inside the box so it sits snug with no curling corners.
Place the red fire hydrant marker slightly off-center toward the front. Dogs instinctively target vertical objects, so this placement naturally draws them to use the spot consistently — that’s the training benefit that actually sticks.
Position the whole box near a glass door or wall. The reflection helps some dogs recognize the space as “their spot” during early training days. And keep your 1-gallon rinse jug nearby because a quick weekly pour-through keeps odor from building up in the turf fibers.
Rotate the turf mat every two weeks so it wears evenly and lasts longer.
Prep Time: 10 min | Active Project Time: 20 min | Difficulty Level: Beginner
📸 Photo credit: Instagram @porchpotty
#10: Fenced Gravel Dog Potty Station With a Fire Hydrant Focal Point

Okay so you know that moment when your golden comes barreling inside after doing her business in the muddy grass — paws absolutely caked — and you’re just standing there holding a towel like… why did I think grass was a good idea?
Yeah. This setup fixes that.
Materials & Tools You’ll Need:
– Pea gravel or mixed river rock (plan for 2-3 inches deep)
– White vinyl privacy fence panels (this one uses 6-foot panels in an L-shape corner)
– Flat sandstone stepping stones (roughly 18×24 inches each)
– Decorative cast iron fire hydrant (purely for the aesthetic — and honestly for your dog’s excitement)
– Black metal landscape edging to border the gravel area
– Green mesh waste bin with lid
– “Please Clean Up” sign (12×8 inch green printed sign)
– Rubber mallet, measuring tape, level, shovel
Instructions
Start by choosing a corner of your yard that already has a fence line — or build one. This design uses a white vinyl L-shaped fence corner as the back boundary, which keeps the whole thing feeling intentional rather than thrown together.
Dig out the grass inside your designated square. Go down about 4 inches so the gravel sits flush with the lawn edge. Lay your black metal edging around the perimeter and press it in with a rubber mallet so it locks the gravel in.
Pour your river rock mix in. Rake it level at about 2-3 inches deep. And here’s the part people skip — press your flat sandstone steppers down slightly into the gravel so they sit stable and your dog (and you) aren’t slipping.
Position the cast iron fire hydrant in the corner. It gives your golden a clear “spot” she’ll return to every single time — that familiarity actually speeds up potty training consistency.
Drop your green waste bin right at the entrance edge. Mount your “Please Clean Up” sign against the fence if neighbors share the space.
Gravel drains on its own, so rain just passes straight through — no mud, no mess, no ruined rugs.
If you love building spaces for your dog outside, 15 DIY Dog Playground Ideas for Your Backyard has some seriously good companion projects for this kind of setup.
Hose down the gravel every couple weeks and rake it back into place. That’s genuinely the whole maintenance plan.
Prep Time: 1 hour | Active Project Time: 3-4 hours | Difficulty Level: Moderate
📸 Photo credit: Instagram @debbiewilliamsonaloha
The Drainage Secret That Saves Your DIY Dog Potty Area From Total Disaster
Okay, real talk — most people skip this step and then wonder why their dog’s potty area smells like a gas station bathroom after two weeks.
Here’s what nobody tells you: slope matters more than the material you pick.
Your base needs a 2% grade minimum — that’s about a quarter inch drop per foot — so urine actually runs away from the surface instead of pooling underneath it. I learned this the hard way after my cousin built a gorgeous pea gravel setup for her lab, and by summer it was basically a swamp.
Don’t just dump gravel straight onto soil either. Lay a weed barrier first, then add a two-inch layer of crushed granite under your top material. Crushed granite compacts and locks in, so you get real drainage instead of a muddy sinkhole.
What this means for you: your golden retriever has a clean, odor-free spot, and you’re not re-doing this whole project in six months.
Also — and this is huge — rinse the area with an enzyme cleaner weekly, not monthly. Smell attracts repeat use, but bacteria build-up attracts flies.
Your Golden Deserves a Clean Home Too
Okay, so here’s the thing — you don’t have to choose between loving your dog and loving your home. Both can coexist. I promise.
Pick one product from this list and just try it. That’s it. Start small. Your sofa, your rugs, your sanity — they’ll all thank you.
And honestly? Watching your golden flop around on a clean couch without you low-key panicking about the fur situation? That’s the good stuff. That’s what we’re here for.
So tell me — which room in your house does your golden retriever basically own at this point? 🐾

Amr Mohsen is a software engineer who traded his keyboard for a leash — at least on weekends. His love for dogs inspired him to share what he learns as a dog owner and enthusiast, bringing a detail-oriented, research-driven perspective to every article he writes. If it’s about dogs, he’s probably already looked it up twice.


