You know that moment when you’re running late, and your golden is doing his happy zoomies by the door, and somehow his leash has vanished into thin air? Yeah. I lived that chaos every single morning for months.
The leash always ended up buried under my tote bag, tangled around my keys, or just… gone. And my entryway? A total mess that did not match the cozy aesthetic I’d spent way too long curating on Pinterest.
Here’s what actually fixed it — a dedicated dog leash holder DIY that pulls double duty: it keeps everything in reach AND looks good doing it.
The best part: you don’t need to be crafty or spend a lot of money. These 10 designs range from rustic wood hooks to minimalist wall mounts, and honestly, some of them are so cute they became a focal point in my entryway.
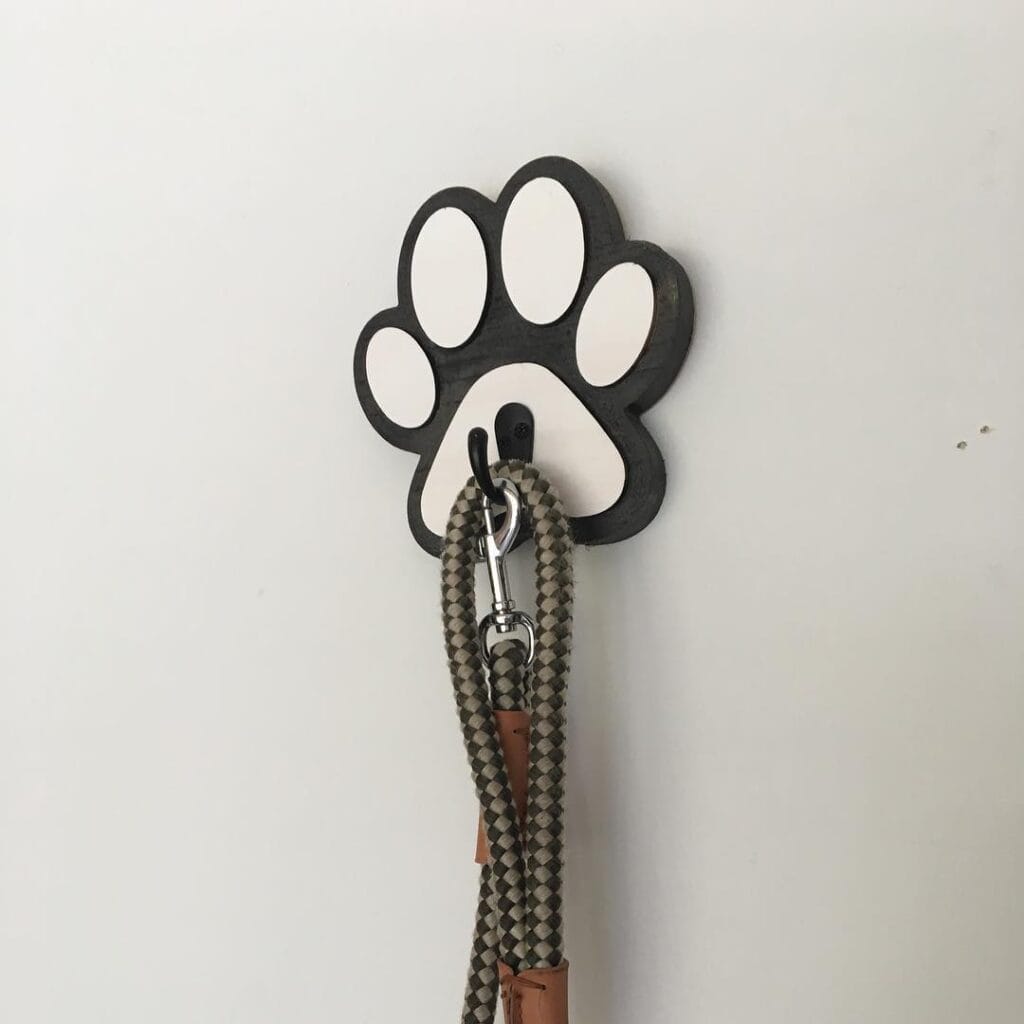
#1: Paw Print Leash Holder — The Cutest Wall Hook You’ll Ever DIY
You know that moment when you walk through your front door and trip over the leash again? It’s coiled on the floor, muddy clasp and all, right where anyone can step on it. Yeah. That chaos ends today.
This paw print wall hook is exactly what your entryway needs — and honestly, it looks like something straight off a Pinterest board.
Materials & Tools You’ll Need:
– ¼-inch thick MDF or plywood sheet (approx. 6×6 inches)
– Black acrylic craft paint
– White acrylic craft paint
– Small single metal wall hook (black finish)
– Jigsaw or scroll saw
– Sandpaper (120-grit)
– Pencil and paw print template (printed from free online stencils)
– Drill with small bit
– Wood screws (½-inch)
– Strong wall anchors
Instructions
Trace your paw print template onto the MDF and cut it out with the jigsaw — slow curves win here, so don’t rush. Sand every edge smooth with your 120-grit sandpaper until it feels almost silky under your thumb.
Paint the entire shape black first and let it dry completely. Then hand-paint the toe beans and main pad area white, leaving that bold black border framing everything. Two coats gives you that clean, graphic contrast you see in the photo.
And here’s where it comes together — drill a small centered hole near the bottom of the main pad, then screw your black metal hook directly into the wood. The hook grips the leash clasp, which means zero tangles on your floor and a front door that finally looks intentional.
Mount the whole piece using wall anchors so it holds firm even when your golden retriever is dragging the leash off in excitement.
Prep Time: 15 min | Active Project Time: 1.5 hours | Difficulty Level: Beginner
The beauty of MDF here is that paint grips it without primer — skip the primer step and save yourself 20 minutes of waiting.
📸 Photo credit: Instagram @hardeedesign
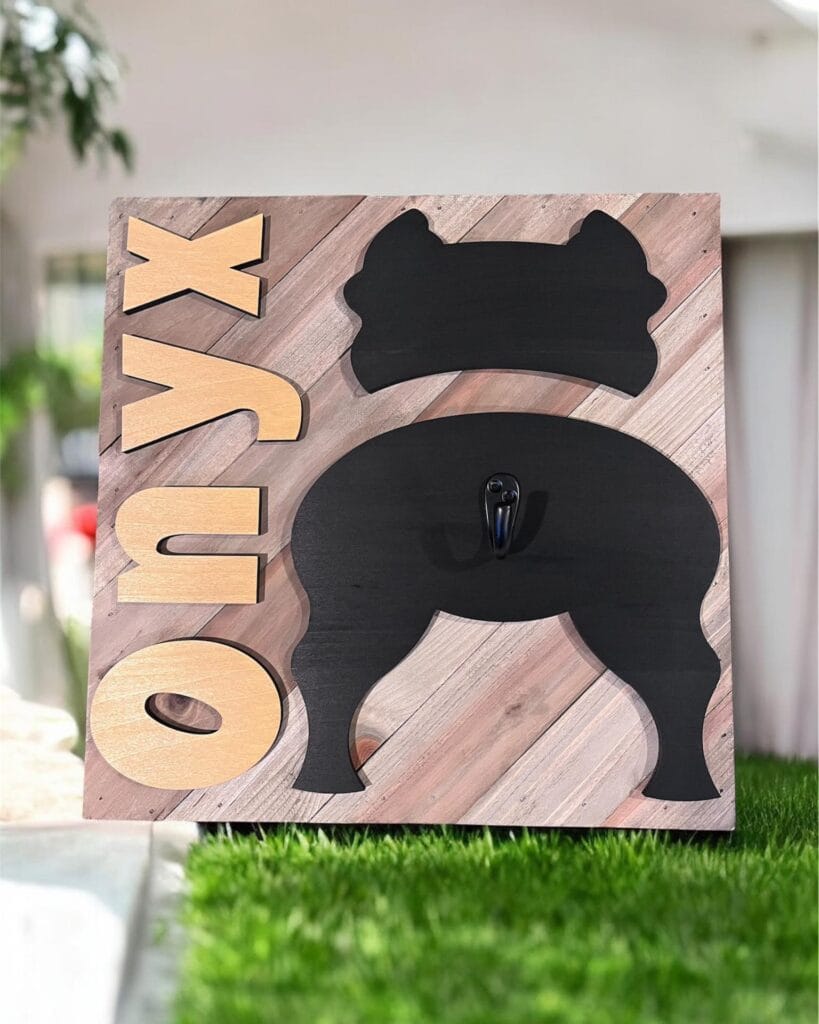
#2: Personalized French Bulldog Leash Holder Sign (The “Onyx” Style)
You know that moment when you’re rushing out the door and your golden’s leash is just… gone? Like, you know you left it somewhere, but now it’s under a couch cushion or tangled with the grocery bags. Yeah. This fixes that.
Prep Time: 30 min | Active Project Time: 2–3 hours | Difficulty Level: Intermediate
Materials & Tools:
– 12″x12″ or 18″x18″ wood plank board (cedar or pine works great)
– Diagonal wood plank strips in light/dark contrast stain
– Black acrylic craft paint
– Gold/natural wood-tone craft paint
– Jigsaw or scroll saw
– 1 black metal wall hook
– Wood glue + finishing nails
– Sandpaper (medium + fine grit)
– Stencil or printed dog breed silhouette template
– Paintbrushes + painter’s tape
– Matte sealant spray
### Instructions
Start by cutting your cedar planks into diagonal strips — alternating light and dark stain gives you that rustic Pinterest-board texture you’re probably already pinning right now.
Arrange and glue the strips onto your base board, then let it dry completely before moving on. While it’s drying, trace your dog’s breed silhouette (French Bulldog here, but swap it for a Golden outline and honestly it hits different) onto a separate ¼” plywood sheet and cut it out with your jigsaw.
Sand every edge smooth. Paint the silhouette cutout in flat black acrylic — two coats minimum. Cut a second, slightly smaller version of the top half (the head/shoulder piece) as a separate layer to add that layered 3D depth you see in the photo.
Mount the head piece above the body piece with wood glue and finishing nails, leaving just enough gap between them to look intentional. Attach your black metal hook centered on the body section — this is where the leash actually lives now, which means zero frantic searches before morning walks.
For the name, cut individual letters from ¼” plywood, paint them in that warm natural golden wood tone, then arrange them vertically along the left side. The raised lettering — because it sits off the board — catches light and makes the whole thing feel custom and expensive.
Finish with two coats of matte sealant spray over everything. The sealant protects the paint from muddy paws and damp leashes, so it stays sharp-looking even in a busy entryway.
Hang it right by your front door at eye level. Every time you come home, the hook is right there — leash goes on it before you even kick off your shoes. And honestly, seeing your dog’s name on the wall just makes the whole entryway feel like it belongs to your family, not just your house.
If you love making things for your pup, 13 Genius DIY Dog Stuff Every Pet Parent Needs to Try Today! has some seriously good projects in the same vibe.
Sand your letters lightly before painting — rough wood soaks up paint unevenly and the gold tone won’t look as clean. One thin coat, let it dry, then a second coat. Way better finish that way.
📸 Photo credit: Instagram @bige_4428
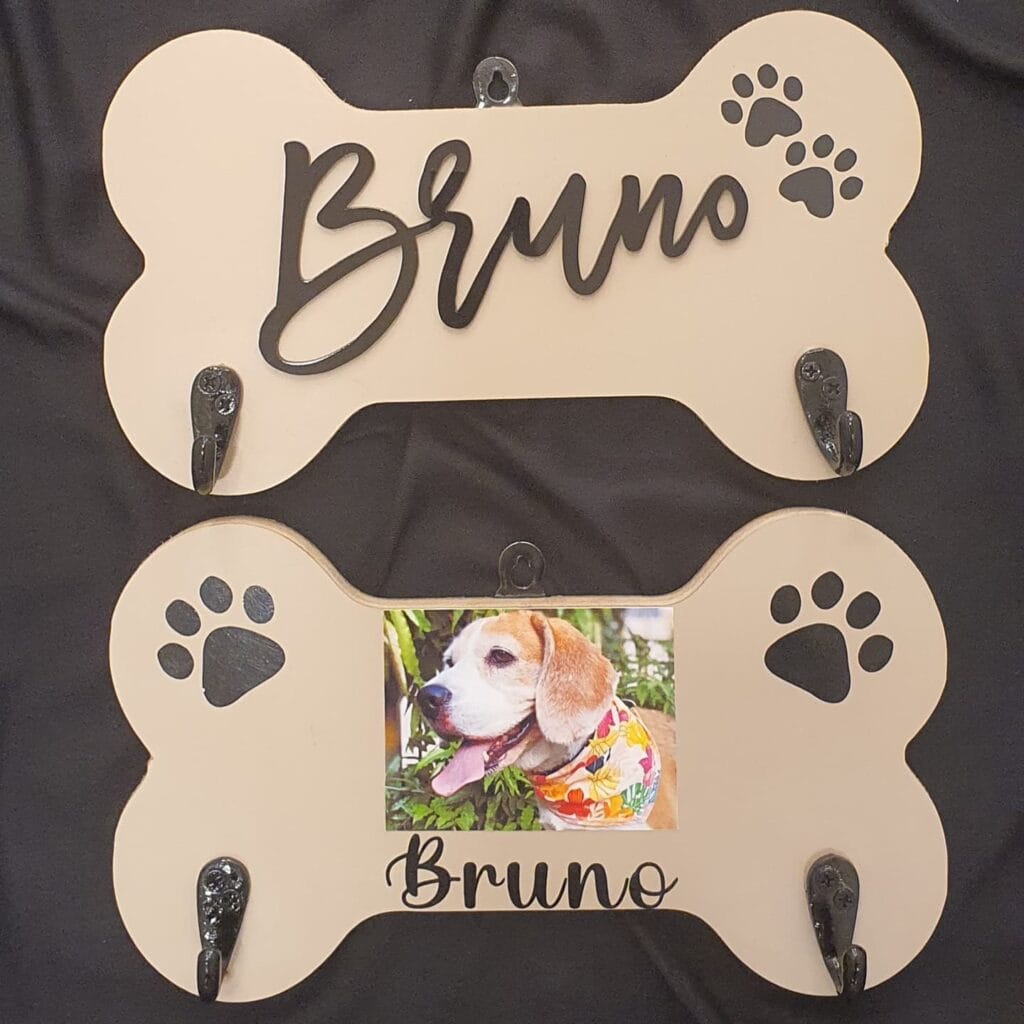
#3: Bone-Shaped Leash Holder With Photo Frame and Name Sign
You know that moment when you’re rushing out the door, your golden is spinning in circles, and the leash is nowhere? Yeah. It’s tangled in the junk drawer, buried under a scarf, or hanging off a random doorknob again.
This bone-shaped wall organizer is the fix.
Materials & Tools You’ll Need:
– ¼-inch MDF or birch plywood (two 12″ x 8″ bone-shaped panels)
– Black acrylic craft paint
– Sandpaper (120-grit)
– Laser cutter or scroll saw
– Wood glue
– 4 black metal double-prong hooks
– Small D-ring hanging hardware (2 pieces)
– Chalk paint in cream or warm beige
– Vinyl lettering or wood-burned name letters
– One 4″x6″ photo of your pup
Instructions
Cut two bone shapes from your ¼-inch plywood — one acts as your name sign panel, one holds the photo frame opening. Sand every edge until it feels smooth against your palm, because rough edges catch on leashes and scratch walls.
Paint both panels in cream chalk paint and let them cure for two full hours. Trace paw prints using a stencil and fill them with black acrylic. This paint-then-layer method keeps lines sharp without bleeding.
Attach your name letters to the top panel — wood-burned letters grip better than vinyl on textured chalk paint, so they won’t peel after humidity changes. Cut a 4″x6″ rectangle from the center of your bottom panel, slide your photo behind it, and secure it with a thin strip of wood glue along the back edges.
Mount your four metal hooks — two per panel, evenly spaced — using a power drill with a ¼-inch bit. Screw your D-ring hardware to the top of each panel. These hooks hold leashes, collars, and your pup’s harness without bending, which means no more fumbling.
Hang both panels with 3 inches of gap between them. That gap is intentional — it creates visual breathing room and makes the whole piece feel like intentional wall decor, not an afterthought.
The two-panel setup means your golden’s leash, collar, and harness each get their own hook — feature-benefit-payoff: four dedicated hooks means zero tangled gear means you actually leave on time for that morning walk.
If you love this style of personalized pet project, 12 Heartfelt Designs for DIY Dog Accessories has more ideas that feel this intentional.
Seal everything with a matte Mod Podge coat to protect the photo and paw prints from humidity. And swap the photo seasonally — I started doing this with my dog Koda’s pictures and it honestly makes the whole entryway feel fresh without redecorating.
Prep Time: 30 minutes | Active Project Time: 3–4 hours | Difficulty Level: Intermediate
📸 Photo credit: Instagram @paws.n.pups
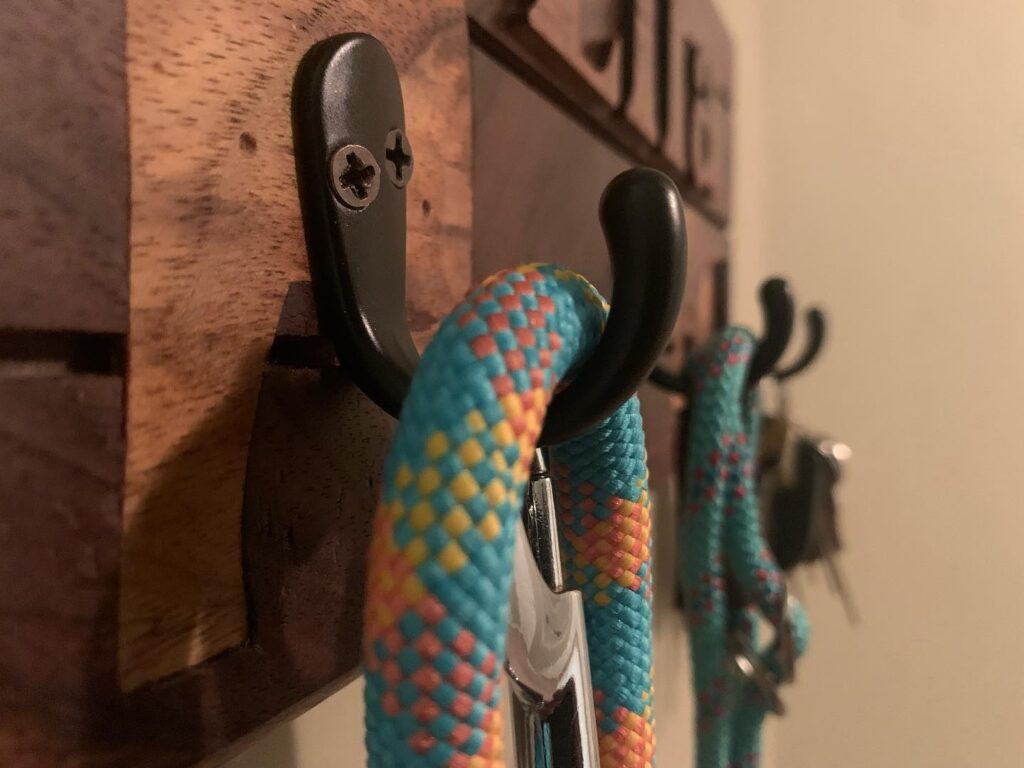
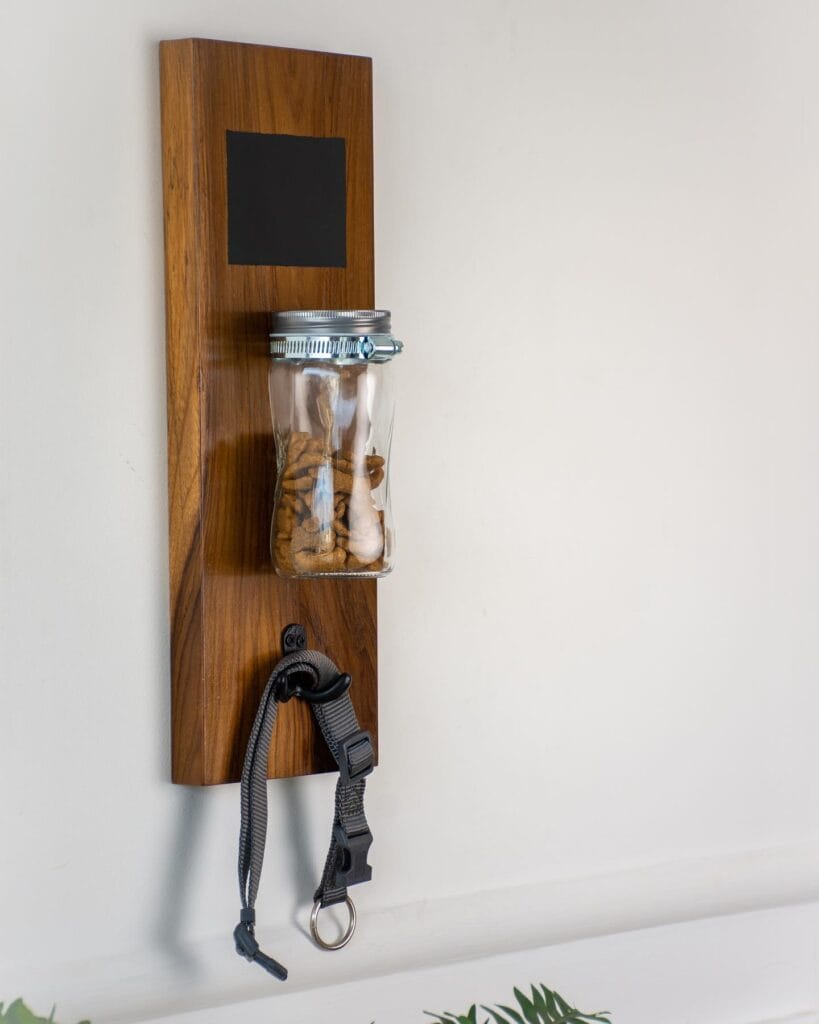
#4: Walnut Wall Station with Mason Jar Treat Holder and Leash Hook
You grab the leash off the floor again — it’s tangled around your Golden’s water bowl, the treats bag is somewhere under the couch, and your dog is spinning in circles at the door. Every. Single. Morning.
This wall station fixes all of that in one spot.
Materials & Tools You’ll Need:
– 1 piece of walnut wood board (approximately 6″ x 24″)
– 1 wide-mouth Ball mason jar (16 oz)
– 1 stainless steel hose clamp (sized to fit the jar)
– 1 small chalkboard paint square or adhesive chalkboard label
– 1 black metal hook or carabiner-style wall hook
– Wood stain (medium walnut tone) + polyurethane sealant
– Drill, screws, sandpaper (120-grit then 220-grit)
Prep Time: 30 minutes | Active Project Time: 2–3 hours | Difficulty Level: Beginner-Friendly
### Instructions
Sand your walnut board starting with 120-grit sandpaper, then finish with 220-grit until it feels silky under your fingers. Apply two coats of walnut stain, letting each coat dry fully before the next — rushing this step dulls the grain and it shows.
Once dry, seal the board with polyurethane. This protects the wood from those inevitable muddy-paw moments near the door.
Attach the stainless steel hose clamp about halfway up the board using two screws. Slide your mason jar through the clamp upside down — yes, upside down — so your dog’s kibble treats sit accessible at the bottom when you flip the jar. Tighten the clamp until the jar feels firm but you can still remove it for refilling.
Mount your black metal hook below the jar with two sturdy screws. This hook holds the leash and collar together, so nothing gets separated.
Apply your chalkboard square near the top of the board. And this is where it gets genuinely useful — write your pup’s vet schedule, walking reminders, even your Golden’s monthly flea med date.
Mount the whole station beside your front door using two wall anchors for a secure hold.
The chalkboard label keeps scheduling visible, the jar keeps treats within reach, and your leash stops living on the floor — that’s the feature-benefit-payoff that makes this worth building on a Sunday afternoon.
I built mine last spring after my dog knocked over the treat bag and ate half of it before I even noticed. Never again.
If you love organizing your space around your dog’s routine, the ideas in 14 Stylish DIY Dog Crate Furniture Ideas You’ll Love hit that same Pinterest-worthy-but-actually-functional sweet spot.
Mounting at eye level for you means your Golden can’t nudge the jar loose with their nose — learned that one the hard way.
📸 Photo credit: Instagram @talkingdogclub
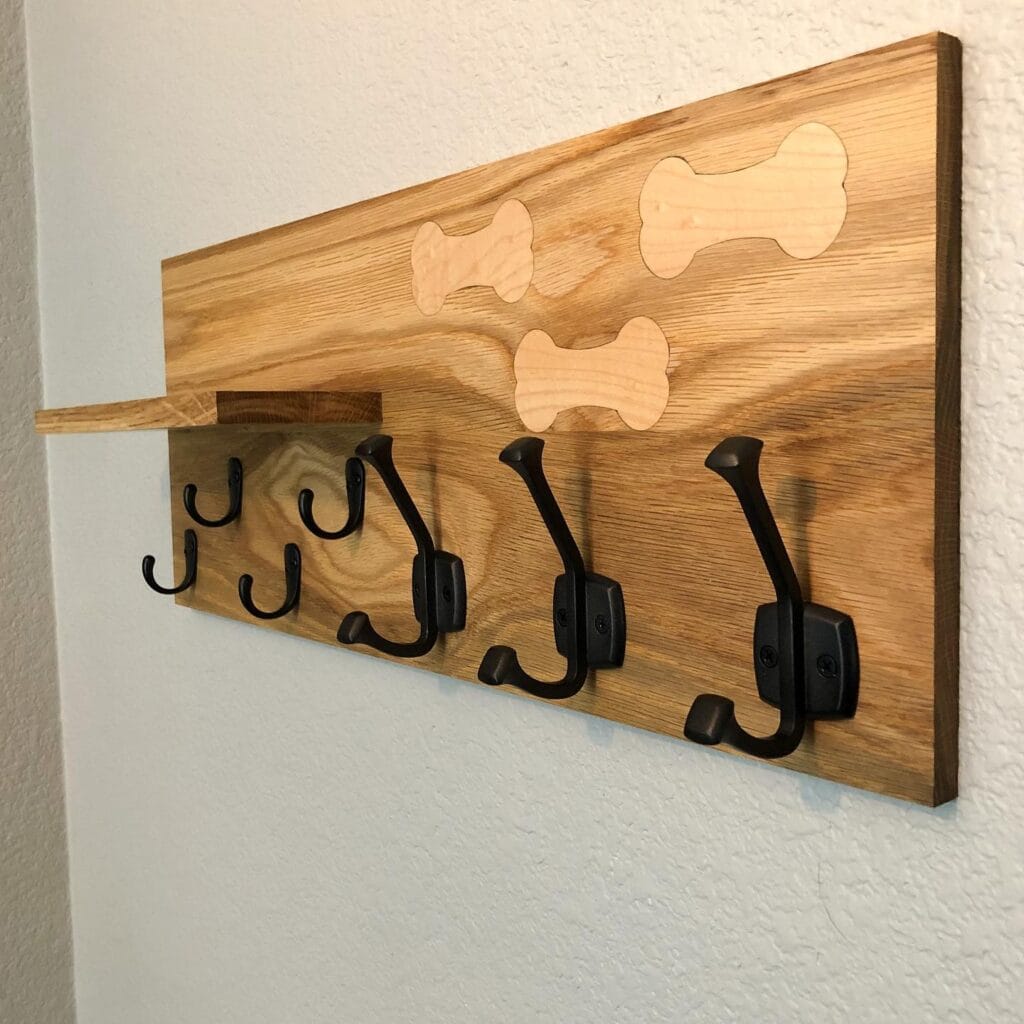
#5: Dog Bone Inlay Leash Rack With a Mini Shelf (The Entryway Upgrade Your Golden Deserves)
You know that moment you walk in the door and your golden absolutely loses it — leash flying, paws everywhere, and somehow the leash ends up on the floor, the couch, or just… gone? Yeah. Mine too.
This rack from @bottswoodworks fixes all of that and looks Pinterest-worthy doing it.
Prep Time: 30 min | Active Project Time: 3–4 hours | Difficulty Level: Intermediate
Materials & Tools:
– 3/4-inch red oak board (main backing panel)
– 1/4-inch maple wood (for the bone inlay cutouts)
– Wood stain (golden oak tone)
– 4 double black cast-iron hooks
– Small oak shelf (3-inch depth) for keys or treats
– Router or scroll saw
– Wood glue + clamps
– Sandpaper (120-grit and 220-grit)
– Drill + screws for wall mounting
### Instructions
Start by cutting your red oak board to roughly 36 x 12 inches. Sand both sides with 120-grit first, then finish with 220-grit — you want that surface smooth before anything touches it.
Trace three dog bone shapes onto your maple sheet and cut them out with a scroll saw. Then use your router to carve matching recesses into the oak board at the same depth as your maple thickness. Dry-fit before gluing — gaps will show after staining and you’ll be annoyed.
Apply wood glue into each recess, press the maple bones in, and clamp overnight. The lighter maple against the stained oak creates that two-tone contrast you’re seeing in the photo — that’s the whole look.
Once dry, apply your golden oak stain evenly across the board. The maple absorbs differently than the oak, which is exactly why the bones pop without any paint.
Attach your small oak shelf about one-third from the left edge using wood glue and pocket screws from behind. Mount your four double cast-iron hooks evenly spaced below it. The double-hook design holds both a leash and a harness on the same hook — feature that saves counter space, benefit that ends the morning scramble, payoff that means you’re actually out the door on time.
Wall mount with 2.5-inch screws into studs. Done.
Seal with a matte polyurethane coat — it protects the wood from wet leashes and muddy-paw chaos near the door.
📸 Photo credit: Instagram @bottswoodworks
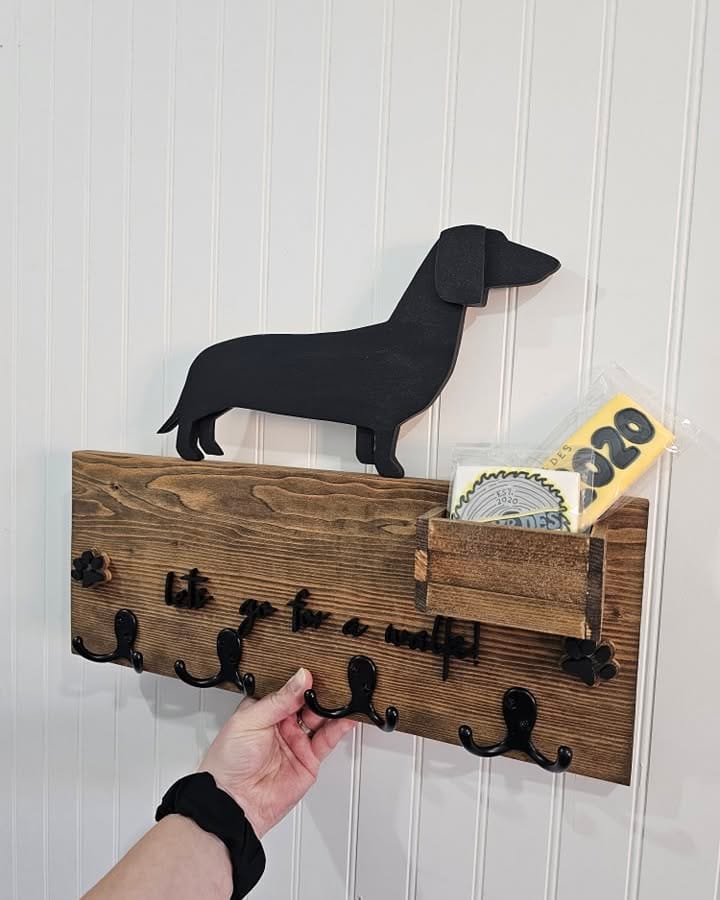
#6: Dachshund Wall Organizer With Leash Hooks — The Cutest Entryway Fix You’ll Ever Build
You know that moment when you grab Maya’s leash and it’s somehow tangled around three pairs of shoes, a grocery bag, and whatever that mystery jacket is that’s been on the floor since Tuesday? Yeah. That chaos.
This dark-stained pine wood wall organizer with a black metal dachshund silhouette on top is the one thing your entryway has been screaming for. It holds leashes, keys, and even has a small wooden slot box on the right side for mail or poop bag rolls. And it’s got four double-coat black iron hooks lined up across the front.
Materials & Tools:
– 1×6 pine board (cut to approx. 24 inches)
– Small pine box (approx. 5×4 inches) for the slot organizer
– Dark walnut wood stain
– Black metal dachshund cutout (laser-cut or hand-cut from 1/8-inch steel)
– 4 double-sided black iron hooks
– Wood glue + brad nailer
– Sandpaper (120-grit then 220-grit)
– Mounting hardware (keyhole brackets)
– Black letter stencils or vinyl lettering
Instructions
Sand your pine board smooth, starting with 120-grit then finishing with 220-grit — this keeps the stain from blotching. Apply one coat of dark walnut stain with a lint-free cloth and wipe off the excess after two minutes. Let it cure for a full 24 hours before touching it again. Rushing this step is where most people mess up.
Build your slot box separately from 1×4 pine scraps, gluing and nailing the sides into a small open-top rectangle. Stain it to match, then attach it to the right end of your main board with wood glue and two brad nails from the back.
Real talk: the letter placement makes or breaks this whole project. Use vinyl lettering (easier than stencils) to add your phrase — the board in the image reads “lets go for a woof” in a handwritten script style. Center it across the board face before committing.
Mount your four double hooks evenly spaced along the bottom edge, pre-drilling pilot holes so the wood doesn’t split. Then attach your black metal dachshund cutout centered on top of the board — two small screws from behind hold it flush.
Install keyhole brackets on the back so the whole piece hangs flush and level against your wall. The hooks keep leashes off the floor, the slot box catches mail before it disappears, and your entryway finally looks like a Pinterest board instead of a lost-and-found bin.
Prep Time: 30 min | Active Project Time: 3–4 hours | Difficulty Level: Beginner-Friendly
If you’re already loving the idea of a dedicated dog space, 7 Cozy DIY Indoor Dog Kennel Ideas might be your next weekend project.
Give your metal cutout two coats of flat black spray paint before mounting — it stops rust and gives it that sharp matte finish you see in the photo.
📸 Photo credit: Instagram @zoeyanddes
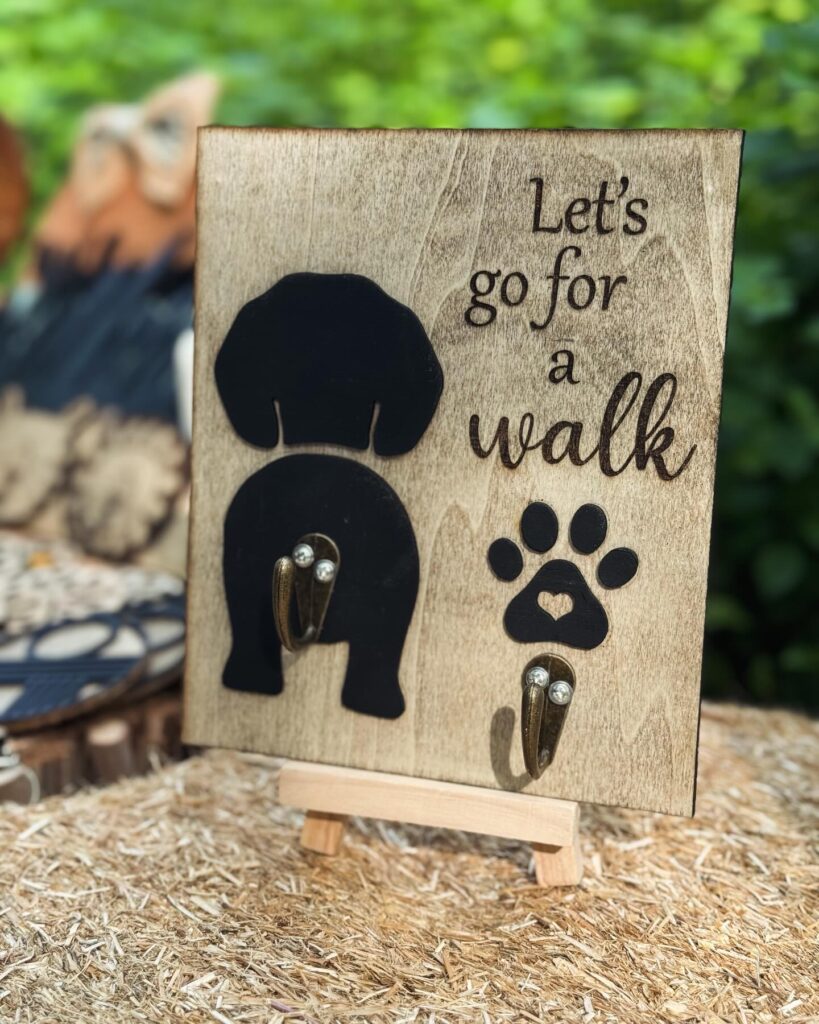
#7: Laser-Engraved “Let’s Go for a Walk” Dog Leash Holder Board
You know that moment when you’re rushing out the door, Scout’s spinning in circles, and the leash is nowhere? Yeah. That chaos ends here.
This wood-burned leash board is genuinely one of my favorite builds — and honestly, it looks like something you’d pay $60 for on Etsy.
Materials & Tools:
– 1 piece of Baltic birch plywood (8″x10″, ¼” thick)
– Black acrylic craft paint
– 2 antique brass double-coat hooks
– Wood stain (I used “weathered gray”)
– Laser engraver OR wood-burning pen
– Silhouette cut stencils (dog rear + paw print shapes)
– Fine-grit sandpaper (220-grit)
– Mod Podge (matte finish)
– Small flat brush
Prep Time: 30 min | Active Project Time: 2–3 hours | Difficulty Level: Intermediate
### Instructions
Sand your plywood until it’s completely smooth — any rough patches will ruin the stain absorption. Apply your weathered gray stain in long strokes and let it dry for a full hour.
Once dry, position your stencils: the dog rear silhouette goes left-center, and the paw print sits right, slightly lower. Paint both shapes with black acrylic using a flat brush. Two coats minimum. The crisp black-on-gray contrast is what makes this board look expensive.
And here’s where the magic happens — use your wood-burning pen to engrave “Let’s go for a walk” in the upper right corner. Cursive lettering for “walk” hits different visually. Take your time on this part.
Once everything’s dry, seal the entire board with Mod Podge. That protective coat means the paint doesn’t chip when leashes are grabbed daily — which is the whole payoff when you’ve put this much love into it.
Screw in your antique brass hooks directly through the silhouette shapes: one under the dog body, one under the paw print. Mount the board near your front door.
Staining a second coat before painting the silhouettes gives you richer depth — that two-tone effect you see in the photo isn’t an accident, it’s layered intentionally.
📸 Photo credit: Instagram @collage.designstudio
#8: DIY “WOOF” Paw Print Leash Holder With Black Metal Hooks
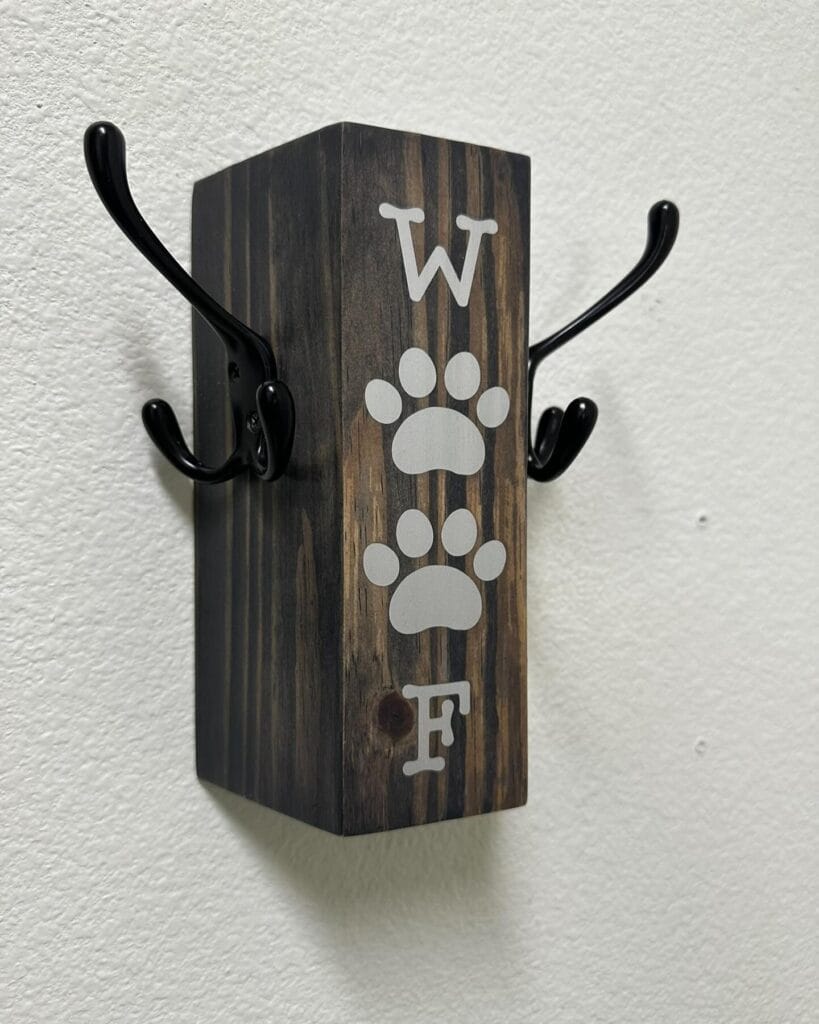
You know that moment when your golden comes bounding in from the backyard, paws still damp, and her leash ends up on the floor again — right where you’ll trip over it at 7am? Yeah. That’s what this is for.
I made one of these for my cousin last Christmas and honestly, I was lowkey jealous of how good it looked on her wall.
Materials & Tools:
– 4×4 pine wood block (cut to approximately 12 inches tall)
– Dark walnut wood stain
– White craft paint or vinyl stencil
– Paw print stencil + letter stencils (W, O, O, F)
– 2 black double-hook coat hooks with screws
– Sandpaper (medium grit)
– Paintbrush + foam roller
– Wall anchors + drill
Instructions
Sand your wood block until it’s smooth, then apply two coats of dark walnut stain, letting it dry fully between coats. That deep, almost-ebony finish is what makes the white design pop so hard.
Once dry, center your stencils vertically — W at the top, two paw prints in the middle acting as the double-O, and F at the bottom. Paint them white and let dry.
Mount your black double hooks on each side of the block, spaced about 4 inches apart. The hooks hold weight well, which means leashes, harnesses, and even your pup’s bandana stay off the floor — finally.
Drill into a stud or use wall anchors for a secure hold.
Staining before mounting gives you cleaner edges and zero paint mess on your wall.
Prep Time: 20 min | Active Project Time: 2–3 hours | Difficulty Level: Beginner-Friendly
📸 Photo credit: Instagram @swansonwoodshop2020
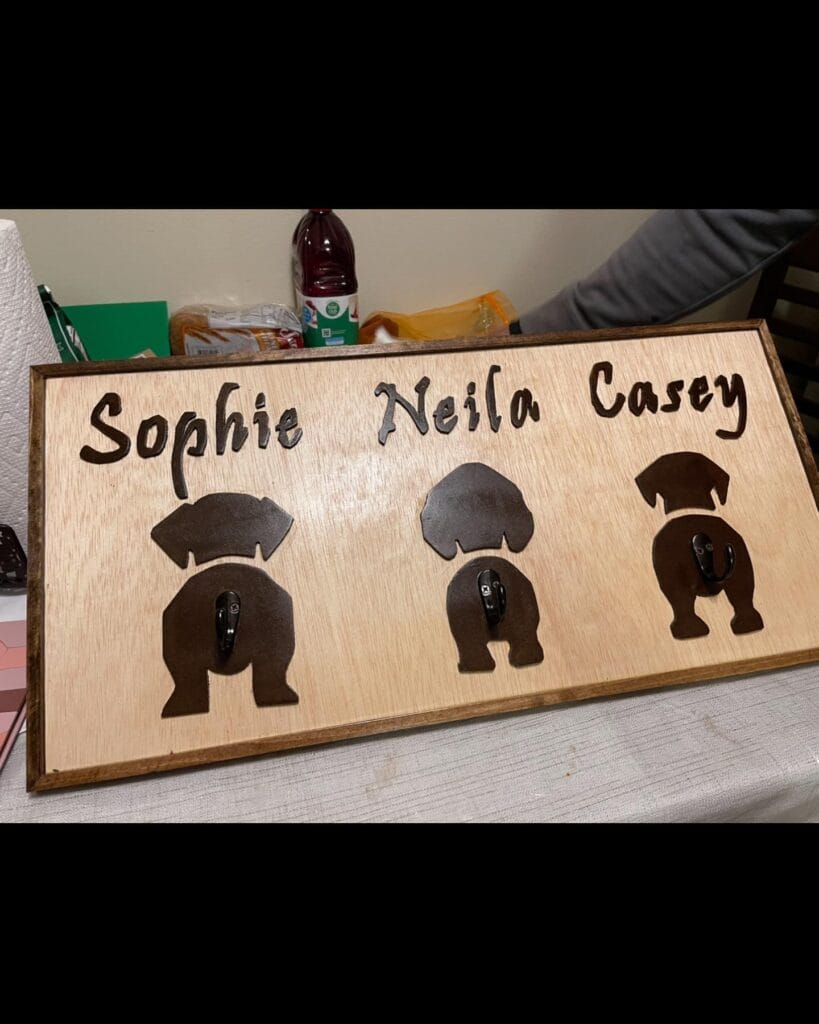
#9: Personalized Dog Butt Leash Holder — A Wooden Sign That Holds Leashes and Steals Hearts
Your golden’s leash is on the floor. Again. Tangled under your shoes, crusted with yesterday’s mud, absolutely nowhere near the door when you’re already running late.
This wood-burned leash holder sign is the fix — and honestly, it’s the most Pinterest-worthy thing I’ve ever seen hanging by a front door.
The one in this photo features three dog silhouettes carved from light birch plywood with a dark walnut stain border. Each dog’s backside — and yes, it’s showing their little butts, which I love — has a black metal hook mounted right underneath. The names Sophie, Neila, and Casey are burned above each pup in a handwritten-style font.
Materials & Tools:
– ⅜-inch birch plywood (main board)
– Dark walnut wood stain (border and silhouettes)
– Black metal adhesive hooks (3, one per dog)
– Wood-burning tool or laser engraver
– Sandpaper (120-grit then 220-grit)
– Stencil paper or Cricut vinyl cuts
– Paintbrush and foam applicator
– Sawtooth picture hangers (back mounting)
Prep Time: 30 minutes | Active Project Time: 3–4 hours | Difficulty Level: Intermediate
Instructions
Start by cutting your plywood to 18 x 9 inches — that’s the sweet spot for three dogs side by side without crowding. Sand it first with 120-grit, then finish with 220-grit until the surface feels like paper.
Print or cut your dog silhouettes using stencil paper. The backside-facing pose is everything here — it gives you a natural spot to mount the hook right at the tail area. Trace each silhouette onto the board with a pencil, spacing them evenly.
Use your wood-burning tool on a medium heat setting to outline and fill each silhouette. Work in slow, steady strokes following the wood grain — this keeps your burn lines clean instead of jagged. Let it cool between passes.
Once the silhouettes cool, apply your dark walnut stain to the border frame using a foam applicator. Wipe excess within 60 seconds or it gets blotchy. The contrast between the raw birch center and the dark border is what gives this piece that high-end look.
Burn or engrave each pet’s name above their silhouette. Then press your black metal hooks firmly at the base of each dog — the adhesive on quality hooks holds up to 7 pounds per hook, which means leashes, collars, and even a small bag hang without a problem.
Mount your sawtooth hangers on the back before the final hang. Level it with a phone app — no guessing.
The hooks-plus-personalization feature means every leash has a home, which payoff is zero morning scrambles and a door that actually looks good.
Seal the whole board with a matte polyurethane spray for durability. Two light coats beat one heavy one every time — heavy coats bubble and cloud the wood grain you worked hard to show off.
📸 Photo credit: Instagram @tsosies_woodworks
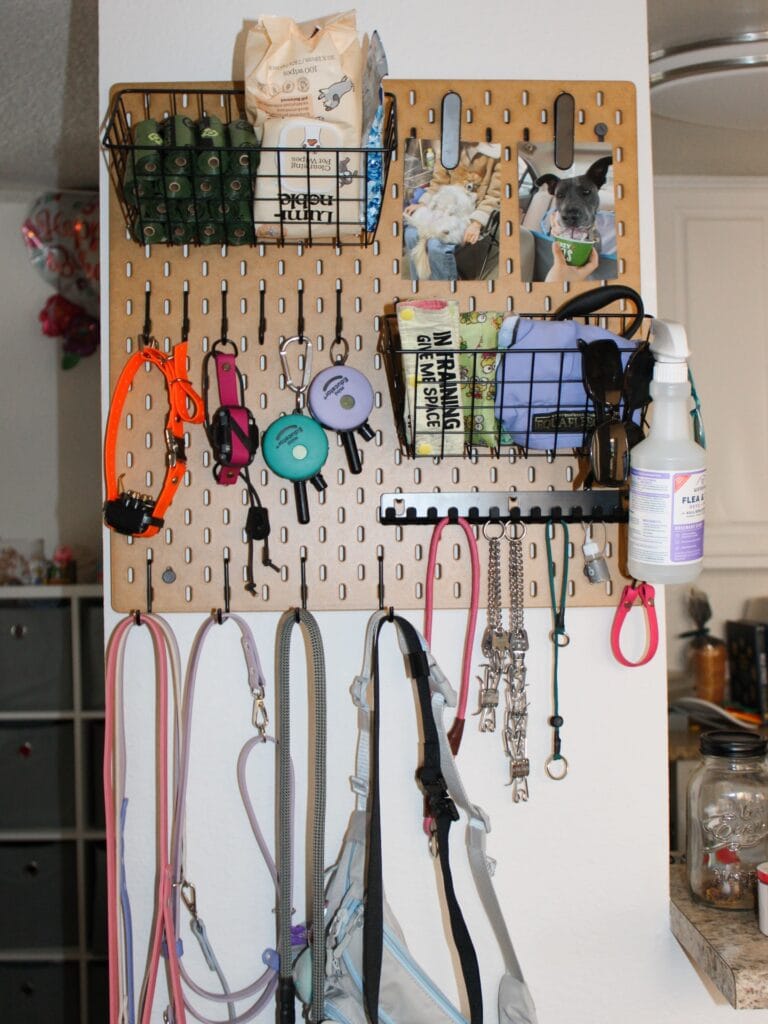
#10: The Pegboard Pet Station That Finally Tamed My Leash Chaos (And Looks Good Doing It)
You know that moment when you’re rushing out the door with your golden, and you’re digging through that pile of leashes by the door, and somehow every single one is tangled? Yeah. That used to be my whole life.
This MDF pegboard wall station is the fix nobody talks about enough.
Prep Time: 30 minutes | Active Project Time: 2–3 hours | Difficulty Level: Beginner-Friendly
Materials & Tools:
– Large MDF pegboard panel (natural/kraft brown finish, approximately 24″ x 36″)
– Black wire baskets (2–3, various sizes)
– Black metal pegboard hooks (assorted — S-hooks, straight hooks, carabiner clips)
– Black horizontal rail hook bar (holds 8–10 leashes)
– Black pegboard shelf clips
– Drill + screws for wall mounting
– Level tool
– Command strips (optional backup anchors)
Instructions
Mount your pegboard flat against a wall column or door-adjacent surface — the image shows it sitting on a white wall panel, which keeps it contained and intentional-looking rather than scattered.
Start by positioning your wire baskets at the top. The left basket holds your poop bag rolls (those green ones stack perfectly in rows) and a 100-count pet wipe package on top. Keep this in mind: storing wipes above everything else means they’re the first thing your hand reaches when you’re rushing out dirty from a rainy walk.
The right basket is your grab-and-go zone — tuck in your “In Training Give Me Space” bandana, your dog’s blue harness, and a spray bottle of flea treatment nearby on a side hook.
Below the baskets, hang your E-collar remotes (the image shows a teal Mini Educator and a purple Educator remote — these clip directly onto pegboard carabiner hooks, which means zero searching before training sessions). Pair that with an orange biothane collar and a pink/black GPS tracker clip on separate hooks.
The horizontal rail bar sits mid-board and handles your heavier gear — chain slip leads, a pink leather lead, and structured gray harnesses all hang without overlapping.
Below the pegboard itself, add 5–6 lower wall hooks for your everyday leashes. The image shows a full rainbow of leads: coral, lavender, gray, black, and teal — each on its own hook so you actually know what you’re grabbing. That leash organization feature means no more knot-digging, which means your walk starts calm instead of frantic.
And honestly? Printing two small dog photos and clipping them to the top right of the board makes the whole thing feel personal, not sterile.
Seal raw MDF edges with a quick coat of clear wood sealant before mounting — it stops moisture warping if you’re near a muddy entryway. Your golden will thank you when walks start on time.
📸 Photo credit: Instagram @lola_the_papillon
The One Mistake That’ll Make Your DIY Leash Holder Fall Apart (And How to Skip It)
Here’s something most tutorials won’t tell you — the wall anchor matters more than the hook itself.
I learned this the hard way. My first leash holder looked so cute, this little rustic wooden board with brass hooks. Then my dog Luna hit the door at full sprint one morning and ripped the whole thing clean off the drywall. Leashes everywhere, a chunk of wall missing. Not fun.
The pro secret? Always mount into a stud, not just drywall. A golden retriever hitting that hook with 60 pounds of excited energy needs serious reinforcement behind it.
Small change, big win: grab a $10 stud finder before you even pick your hook style. That single step saves you the wall repair nightmare.
Also — seal any raw wood before mounting. Wet leashes drip. Muddy leashes drip. Without a sealant coat, that pretty wood warps within a few months and the whole thing looks rough fast.
Get the anchor right first. Everything else is just decoration.
Your Golden Deserves a Clean Home Too
Listen, you’ve already done the hard part — you found solutions that actually work for real dog mom life. Not the Pinterest fantasy version where dogs sit still on white couches. The actual muddy, drooly, hair-everywhere version.
Pick one thing from this list and try it this week. Just one. See how it feels to stop re-cleaning the same spot for the third time on a Tuesday.
Your home can still look good — and smell good — even with a golden retriever running the place. You deserve both.
So tell me — what’s the messiest spot your pup has claimed as their own?

Amr Mohsen is a software engineer who traded his keyboard for a leash — at least on weekends. His love for dogs inspired him to share what he learns as a dog owner and enthusiast, bringing a detail-oriented, research-driven perspective to every article he writes. If it’s about dogs, he’s probably already looked it up twice.


