Have you ever thought about how your dog’s dining setup reflects their personality—or yours? A raised dog bowl might just be the upgrade your pup needs. From sleek stainless steel to charming wooden stands, there’s a whole world of creative designs out there that not only elevate their meals but also your décor. Plus, there are customizable options that can really make their station pop. So, what kind of style suits your furry friend best?
Elegant Elevated Bowl Designs
When you think about feeding your furry friend, do you ever consider the design of their bowl? An elevated bowl can make mealtime more comfortable for your pup.
Plus, it adds a nice touch to your home décor. If you’re feeling crafty, why not explore some raised dog bowls DIY projects? You can use wood, PVC pipe, or even repurpose old furniture.
Just envision transforming a bookshelf into a stylish feeding station. Trust me, it’s easier than you think.
Imagine this: your dog’s food and water in a bowl that’s at the perfect height, without the back strain! It’s functional and fun.
Our Collection
In our collection, you’ll find a mix of styles that’ll make both you and your pup smile.
Picture a modern wooden bowl stand paired with bright, cheerful ceramic bowls, or a sleek stainless steel set that’s as easy to clean as it’s to admire.
And let’s not forget the handcrafted wrought iron stands—who knew dog bowls could be such a decor statement?
Or the collapsible travel bowl stand for those spontaneous adventures; you’ll be ready to go in a jiffy.
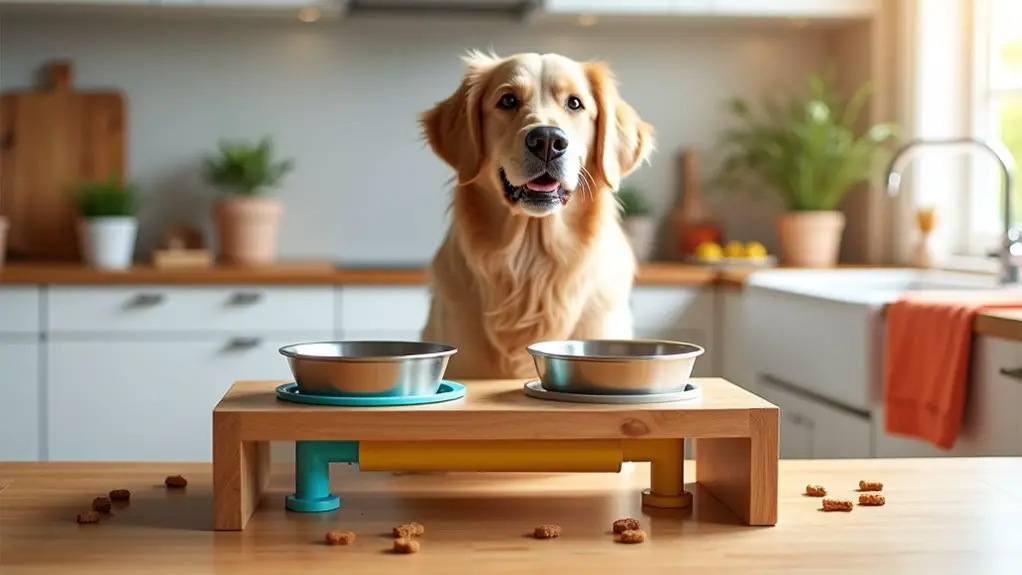
1. Modern Wooden Bowl Stand
—–
Want to elevate your dog’s dining experience while keeping your space stylish? Creating a modern wooden bowl stand is a fantastic DIY project that’s not only budget-friendly but also brings a touch of rustic charm to your home. Incorporating items such as a dental water additive can help enhance your pet’s oral health while they enjoy their meals and provide the perfect way to enjoy luxury elevated dog bowls. These luxury dog collars can further complement your pet’s style during mealtime! Additionally, selecting premium dog food options can help ensure your Chihuahua receives a balanced diet.
It makes mealtime more comfortable for your pup, especially for taller breeds, and can fit seamlessly into your décor. Plus, it’s a great way to show off your handiwork to fellow dog lovers.
Materials Needed:
- 1 wooden board (1”x8”x4’ for the stand)
- 2 wooden bowls (food and water)
- 4 wooden legs (preferably 1”x1” and about 10–12 inches long)
- Wood screws (1.5” screws work great)
- Wood glue (for extra stability)
- Sandpaper (medium and fine grit)
- Wood stain or paint (your choice for finishing)
- Paintbrush or sponge (for applying finish)
- Measuring tape
- Circular saw or hand saw
- Drill
- Screwdriver
Step-by-Step Instructions:
- Measure and Cut the Board: Start by measuring your desired length for the stand. Typically, a 24-inch board works well but feel free to adjust. Cut your wooden board to size. *Remember, straight lines make a neat stand – don’t channel your inner Picasso here.*
- Prepare the Legs: Take your wooden legs and sand them lightly to avoid any splinters. If you want them to look a bit fancy, consider rounding the edges.
- Attach the Legs: Flip the board upside down. Using the drill, mark where you want to position the legs (about 4 inches in from each end). Screw the legs into place with the wood screws – 2 screws per leg for stability works wonders.
- Drill Holes for the Bowls: Mark the center of the board and drill out circular holes for your bowls to sit comfortably in. Make sure the holes are slightly smaller than the bowls, so they fit snugly.
- Finish the Stand: Now it’s time to add your personal touch. Apply wood stain or paint in your chosen color to match your home décor. Once dry, it’s time for the final assembly.
- Set the Bowls: Place the bowls into the holes, fill them up with food and water, and voilà! Your pup’s new dining space is ready to go.
- Admire Your Work: Step back and appreciate your craftsmanship. Take a pic and tag us—because we want to see how adorable your dog looks at their new fancy set-up!
Optional Add-ons/Variations:
- Colors and Patterns: To add flair, you could paint the wooden stand with fun patterns or bright colors. A simple polka dot or a fun stripe could do the trick. Plus, decals of paw prints? Cute overload.
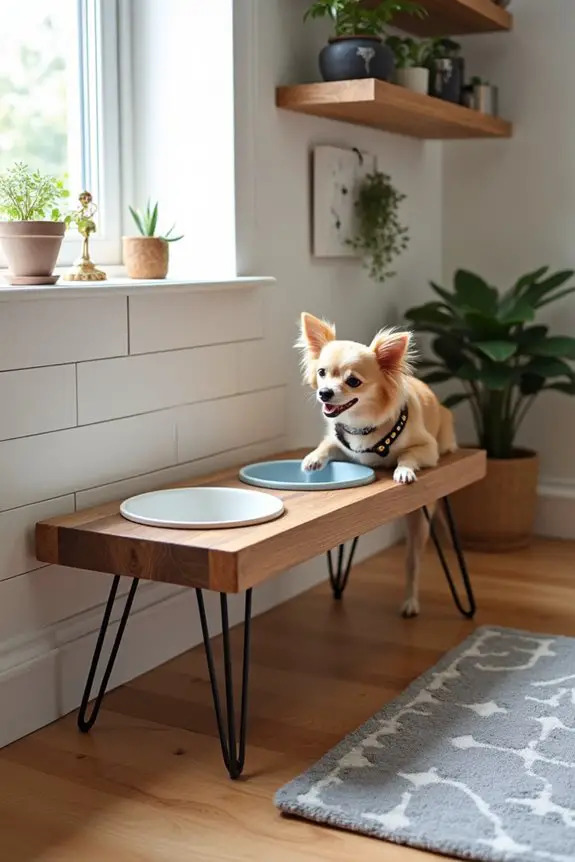
- Change Up the Legs: Instead of plain wooden legs, you could use hairpin legs for a modern twist. They may add a little extra height that could be nice for your furry friend.
Pro Tip:
Make sure to choose bowls that are easy to clean and dishwasher-safe. And if you’re feeling safe (who doesn’t love safety?), doing a quick check for the sturdiness of the stand after a week or so helps guarantee it will stand the test of doggie mealtime excitement.
—–
2. Ceramic Bowls in Bright Colors
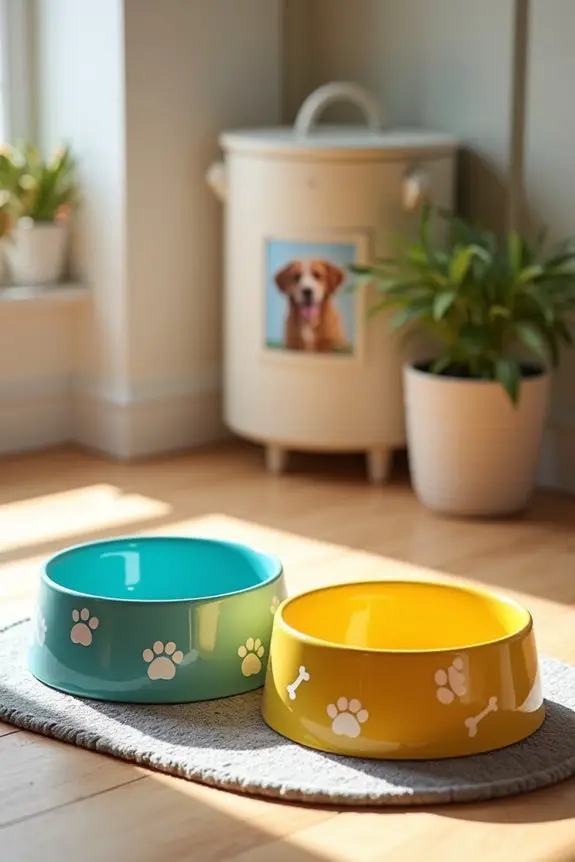
Are you on the hunt for a way to jazz up your dog’s dining area? Search no more. Brightly colored ceramic bowls not only add a pop of fun to your space but also create a cheerful atmosphere for mealtime. They’re durable, easy to clean, and can even help your pup feel more excited about dinner (I mean, who doesn’t love a beautiful bowl?). Plus, investing in vibrant dishes could save you from that constant need for replacing worn-out plastic ones. When selecting bowls for your Doberman, consider the benefits of premium dog food options as they can enhance your dog’s overall dining experience.
Materials Needed:
- Ceramic Bowls (choose bright colors; look for at least two—one for food and one for water)
- Non-slip Mats (optional but recommended for keeping the bowls in place)
- Dishwasher (for hassle-free cleaning)
- Decorative Stickers or Paint (optional for personal touch)
Step-by-Step Instructions:
- Choose Your Bowls: Head to your favorite pet supply store or online shop and pick out a couple of bright, ceramic bowls. Go for colors that pop – think reds, blues, or cheerful yellows. They’ll brighten up not just your dog’s mealtime but your kitchen as well.
- Check the Size: Make sure to select bowls that are the right size for your dog. Too deep can mean a mess; too shallow mightn’t hold enough kibble.
- Add Non-slip Mats: If your dog tends to get a little too excited during mealtime, consider picking up some non-slip mats. These little wonders can keep those bowls right where they belong instead of sliding across the floor.
- Personalize It: Want to add a unique flair? Use some decorative stickers or even paint – just make sure the paint is pet-safe if you’re feeling crafty. A fun paw print or their name in cursive might make dinner that much more special.
- Clean Up Time: Keep the mess to a minimum by running those ceramic bowls through the dishwasher. Easy-peasy. Plus, they’ll come out squeaky clean and looking brand new.
- Set the Scene: Place the bowls on their non-slip mats in your designated dog feeding area. Step back and admire how they look – it’s like setting up a dining table for your furry friend!
- Enjoy Every Meal: Now, watch your pup enjoy every last bite from their vibrant new bowls. Snap a pic and share it with your friends. Because let’s be real, who doesn’t love a good doggy dinner pic?
Optional Add-ons/Variations:
- Mix and Match: Why stop at one set? Grab bowls in different sizes or colors and create a vibrant collection. You could even rotate them to keep things fresh and funky.
- Custom Labels: Consider getting matching personalized bowl mats with your dog’s name to give it that extra stylish touch. It’s a sweet detail that also shows everyone who’s truly in charge around here.
Pro Tip:
Always check for any chips or cracks before letting your pooch chow down. A little damage can lead to big messes or sharp edges that could harm your furry pal. And remember – colorful bowls can elevate the vibe but it’s the love and care you give that makes meal times truly special.
3. Stainless Steel Bowl Set
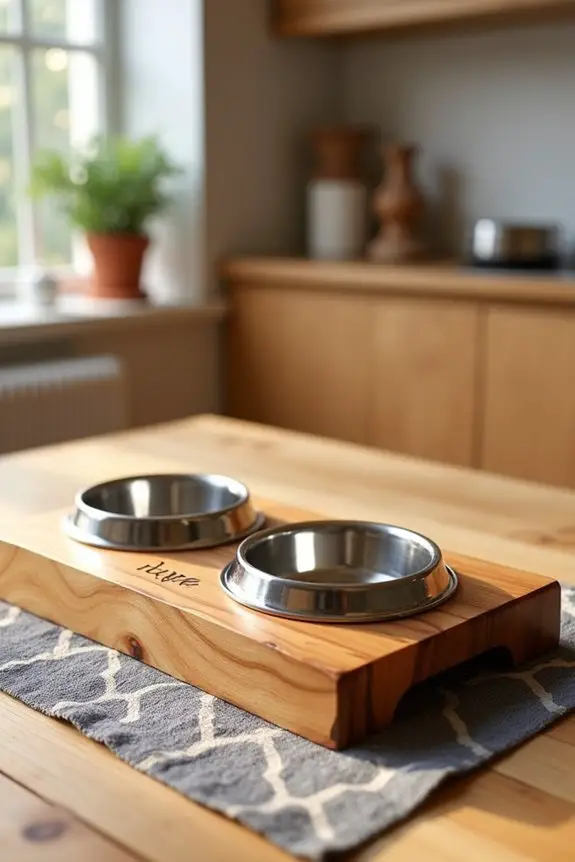
Looking for a functional yet stylish upgrade for your dog’s dining area? DIYing a stainless steel bowl set isn’t just great for your pup; it’s easy on the wallet too. A personalized bowl set doesn’t just look good—it can also help keep your dog comfortable during mealtimes.
Plus, stainless steel bowls are super easy to clean, which means more time for cuddles and less for scrubbing.
Materials Needed:
- Two Stainless Steel Bowls (One for food, one for water)
- Wooden Board (for the base; choose your desired size)
- Non-slip Feet or Pads (to keep the setup stable)
- Sandpaper (optional, for smoothing edges)
- Wood Stain or Paint (optional, for personalization)
- Paintbrush or Cloth (if adding stain or paint)
Step-by-Step Instructions:
1. Pick Your Bowls: Head to your local pet store or online and grab a couple of stainless steel bowls. They’re durable and withstand the wear and tear of daily feeding.
Plus, they come in various sizes.
2. Prepare Your Base: Grab that wooden board. If it’s rough or has sharp edges, use sandpaper to smooth it out.
A well-prepped base not only looks better, but it keeps your pup safe from any splinters.
3. Add Non-slip Feet: Attach non-slip feet or pads to the bottom of the wooden board.
This little trick will help prevent the whole setup from sliding around during mealtime—no one likes a runaway bowl or a startled pup!
4. Personalize Your Base: Here’s where it gets fun. You can choose to paint or stain the board to match your home decor.
If you’re feeling fancy, perhaps add your dog’s name or some cute designs. Just remember, use pet-safe materials!
5. Place the Bowls: Once the wood is ready and dry (if you used stain or paint), take your stainless steel bowls and secure them to the board.
You can use a little adhesive if needed, but most bowls are fit snugly enough that they won’t move around.
6. Set It Up: Now it’s time to find the perfect spot in your home for your new dog bowl setup.
Think about where your pup eats and how you can make that area more inviting.
7. Enjoy Watching Your Pup: With their new stylish stainless steel bowl set, watch your furry friend enjoy their meals like royalty.
And yes, you can snap another picture for the ‘gram because let’s face it, this deserves to be shared.
Optional Add-ons/Variations:
- Different Sizes: Consider creating a set with varying bowl sizes for different meals (like a larger bowl for kibble and a smaller one for treats).
- Theming: How about matching the design to your kitchen or playroom? Choose colors or patterns that reflect your overall home style.
Pro Tip:
To keep things clean, you can simply pop those bowls into the dishwasher for easy more cleanup—because who really enjoys washing dishes, right?
Plus, stainless steel is rust-resistant, making it a great long-term investment for your pup. Enjoy mealtime without the worry!
4. Handcrafted Wrought Iron Stands
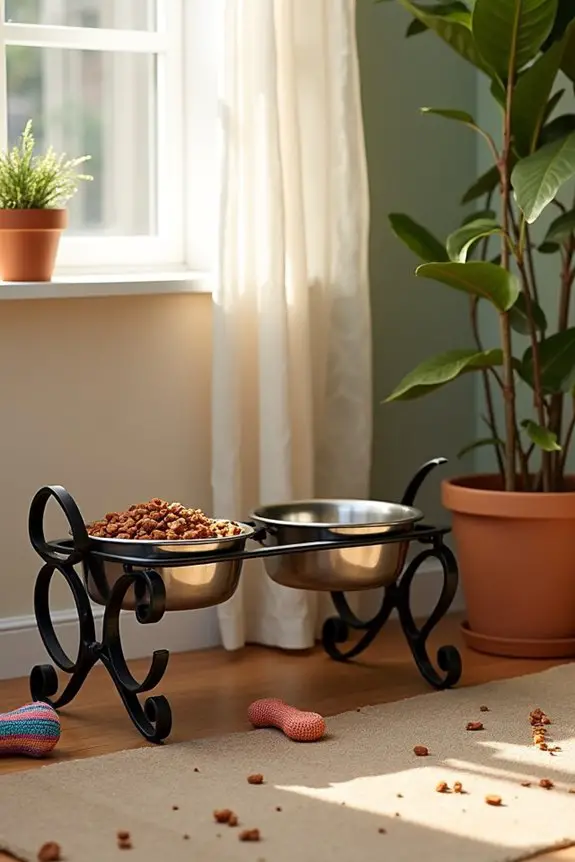
If you want to elevate your dog’s dining experience without breaking the bank or your back, crafting a handcrafted wrought iron stand is the perfect DIY project for you. Not only does it add a touch of elegance to your pup’s feeding area, but it also guarantees your dog can eat comfortably at the right height.
Plus, this project is a fantastic way to brighten up any corner of your home with a personalized touch.
Materials Needed:
- Wrought Iron Rods or Pre-made Iron Stand
- Metal Pipe Connectors (if you’re crafting from scratch)
- Metalwork Tools (saw, welding torch, or strong adhesive for bonding)
- Paint or Rust-Proof Finish (optional, for aesthetics)
- Sandpaper (for smoothing edges)
- Tape Measure (for accurate sizing)
- Safety Goggles (always a must)
Step-by-Step Instructions:
1. Choose Your Design: Whether you want a simple stand or a more intricate design, think about how high it needs to be for your dog’s comfort. Measure your dog from the ground to their feeding height, and jot that number down.
2. Cut the Iron Rods: If you’re using raw wrought iron, cut your rods to the desired height and length using a metal saw. Remember, measure twice, cut once—your pup is counting on you to make it right.
3. Assemble the Base: Lay the cut rods out in a square or rectangular shape for stability. Use metal pipe connectors to join the pieces together securely. Confirm it’s sturdy enough to hold both food and water bowls without toppling over during mealtime.
4. Smooth the Edges: Take that sandpaper and smooth those sharp edges. You don’t want your pup getting snagged or injured, after all.
This step may seem tedious, but trust me—it’s worth it for your fur baby’s safety.
5. Add a Protective Finish: If you want to add some flair or protect your iron from rust, apply a rust-proof finish or a coat of paint. Just make sure the products you choose are safe for pets.
Give it enough time to dry before you bring it inside.
6. Place the Bowls: Finally, set your dog’s bowls in the stand. Test it out to confirm it’s the right height and stable enough.
Adjust if needed—the goal is maximum comfort for your pup.
7. Admire Your Work: Step back and take a look at your masterpiece. Not only have you created a stylish addition to your home, but you’ve also made mealtime a special occasion for your dog.
Optional Add-ons/Variations:
- Paint It Bright: Go bold with vibrant colors or use a stencil to add fun designs that match your home decor. Why not add some paw prints?
- Adjustable Stand: Consider making the height adjustable with removable or collapsible sections. This way, it grows with your puppy, making it a long-lasting investment.
Pro Tip:
Always wear your safety goggles while working with metal. It’s easy to get distracted, but protecting your eyes is essential, especially when using power tools.
Plus, they could be a great fashion statement while you channel your inner craftsman.
Now roll up your sleeves and get crafting. Your dog is sure to appreciate the new classy digs for their dining adventures. And who knows, you might just find your new favorite hobby along the way.
5. Collapsible Travel Bowl Stand
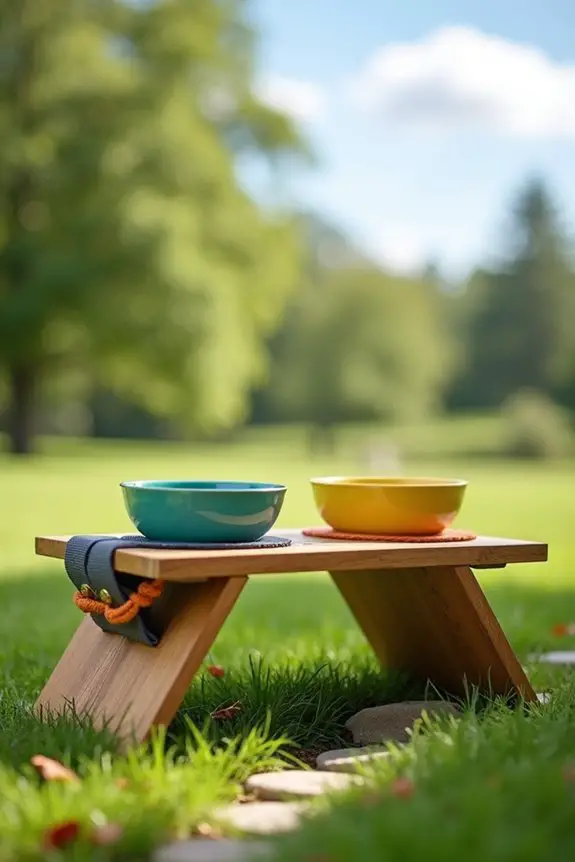
Are you tired of wrestling with your dog’s bulky travel gear every time you head out on an adventure together? Let’s make travels a breeze with a collapsible travel bowl stand. This nifty DIY project isn’t only ultra-convenient for those on-the-go moments but also keeps your pup comfortable and hydrated while looking sharp. Bonus – it saves you money compared to store-bought options!
Materials Needed:
- Lightweight Wooden Dowels (or PVC pipes for a different look)
- Flexible Bungee Cords
- Dog Bowls (choose your pup’s favorites)
- Strong Adhesive or Screws (for securing joints)
- Sandpaper (to avoid splinters)
- Nylon Strap (for the collapsible feature)
- Measuring Tape
- Safety Goggles
Step-by-Step Instructions:
- Determine Dimensions: Measure the height you’d like for your stand based on your dog’s size. A good rule of thumb is that it should allow your dog to eat without bending down too much. Consider their comfort level when dining.
- Cut Your Dowels or Pipes: Using your measuring tape, mark the dowels or PVC pipes to your desired height and cut them with a saw. If you’re like me, let’s just say measuring it a few times is better than cutting once and being left with, well, a wobbly mess.
- Create the Base: From your cut pieces, set up a sturdy rectangle on the ground to form the base. Use your adhesive or screws to join the corner pieces together. Make sure it’s stable—it’s going to hold your dog’s food, after all.
- Attach the Vertical Supports: Take two of your remaining dowels or pipes and stand them up vertically at the back of your base. Connect these with a horizontal piece at the top. You want a solid frame, so double-check everything feels nice and sturdy.
- Add Bungee Cords: Attach bungee cords along the frame to create tension for resistance against wobbling. It’s like giving your pup a strong and secure feeding station during your outings.
- Smooth It Out: Grab your sandpaper and smooth out any rough edges. We want our furry friends to be safe. No one likes splinters, especially not Fido.
- Incorporate the Nylon Strap: This is what makes it collapsible. Attach the nylon strap in such a way that, when released, the stand can fold down flat for easy transport. A simple knot can do wonders.
- Test it Out: Place your dog bowls in the stand and see how it holds up. It’s all about stability and comfort. Adjust as necessary. Remember, if your pup isn’t happy, neither are you.
Optional Add-ons/Variations:
- Paint It: Give your stand a splash of color with non-toxic paint. Choose a fun shade that matches your dog’s personality or your outdoor gear.
- Fabric Cover: Sew or attach a colorful fabric around the base for added aesthetics. A cheerful design can turn a simple stand into an eye-catching piece wherever you go.
Pro Tip:
Always make sure the bungee cords are taut but not overly tight. A little wiggle room allows for comfort but keeps it functional. And hey, if you’ve got an older dog, tailoring the height just slightly lower can help ease their dining experience.
Now, doesn’t that sound like a fun and practical weekend project? Your dog’s travel setup will thank you, and so will your back and your wallet. Happy crafting!
6. Pet-themed Decorative Bowl Stands
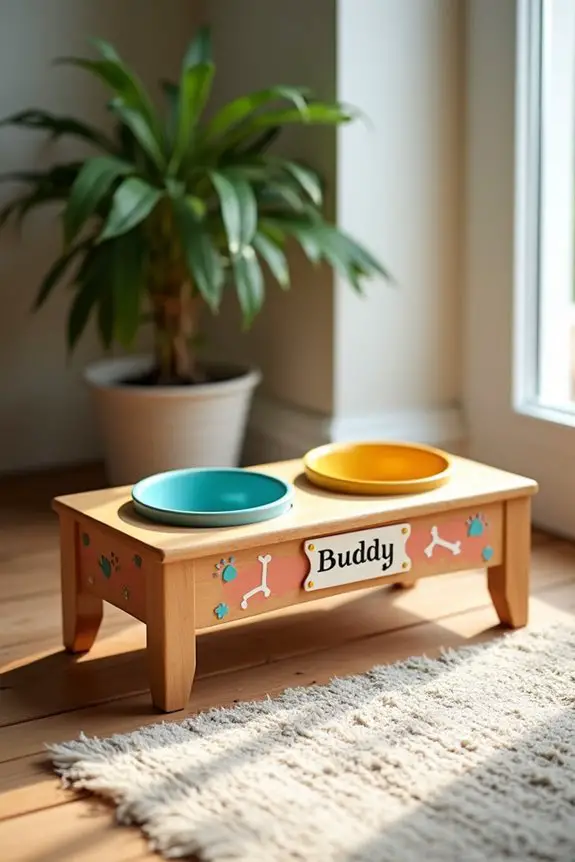
As a loving dog parent, you know that feeding time isn’t just about filling a bowl—it’s an experience worth celebrating. Enter the pet-themed decorative bowl stand. It adds a splash of personality to your space, shows off your furry friend’s style, and, best of all, is a money-saving project that makes your pup feel special.
Ready to make mealtime fun and fabulous? Let’s get started.
Materials Needed:
- Wood (Pine or Birch recommended) for the stand frame
- Wood screws for assembly
- Wood glue for extra support
- Sandpaper to smooth the edges
- Acrylic paint or wood stain for decoration
- Paintbrushes if you’re painting
- Dog bowls (one for food and one for water)
- Measuring tape to get everything just right
- Safety goggles for protection while working
Step-by-Step Instructions:
- Measure and Cut the Wood: Decide how high you want your stand, ideally 3-6 inches above your dog’s shoulder. Cut the wood for the legs and the base to your desired dimensions. Don’t worry if it feels a bit intimidating; just remember, measure twice, cut once.
- Assemble the Base: Using your wood screws and glue, attach the pieces to form a sturdy rectangle. This will be the base of your stand, and it should be stable enough to prevent any tip-overs during snack time.
- Attach the Legs: Securely fix the four legs to each corner of the base. Make sure they’re straight, because let’s face it, nobody wants a stand that resembles a wobbly tower.
- Sand It Down: Use your sandpaper to smooth out any rough edges. It’s about safety and comfort here. We want our dogs to enjoy their meals, not wince at splinters.
- Get Creative with Decoration: Now for the fun part! Here’s where your artistic flair comes in. You can paint, stain, or even add decals that represent your dog’s personality. Is your pup a beach lover? Maybe paint a surfboard theme. Or do they prefer glamour? Some glitter could do the trick.
- Add Bowls: Once everything is dried and looking fantastic, place your dog bowls on top. Ascertain they fit snugly and won’t tip over—Fido won’t appreciate a surprise splash of kibble.
- Final Check: Give the stand a little shake to verify everything is secure. You want it to withstand even the most enthusiastic meal times. If it shakes, a little extra screw tightening may be needed.
Optional Add-ons/Variations:
- Different Colors: Think about using colored paints or stain not just for aesthetic appeal, but to match your home decor or your dog’s collar!
- Personalized Name Plate: Create a small nameplate for the stand, so everyone knows who the royal diner is. It could be painted on or engraved.
Pro Tip:
Before you start painting or decorating, always test your materials on a small hidden area. This will confirm you love the outcome before committing to a whole stand. Trust me, I once discovered too late that my choice of ‘magic glitter paint’ looked more like a disco party gone wrong than a classy dog dining experience.
Now you’re all set to create a decorative bowl stand that not only serves its purpose but also becomes a charming part of your home. Your pup won’t only be comfortable during meals but will have the most stylish dining experience on the block.
7. Customizable Height Adjustable Stand
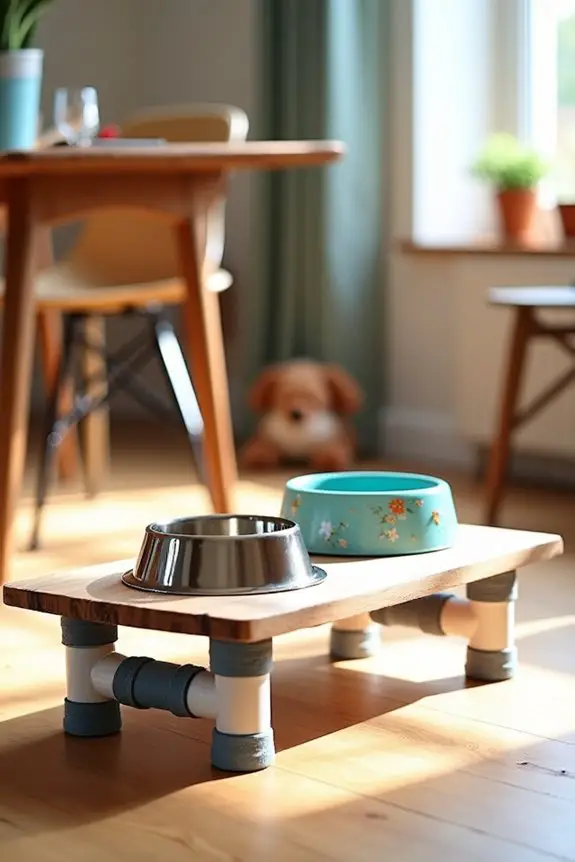
Have you ever watched your dog struggle to eat because their bowl is too low? Or maybe your pup is on a growth spurt and you find yourself constantly adjusting their eating setup. This DIY project creates a customizable height adjustable stand for their bowls, and it’s a game changer. Not only does it save you money on purchasing commercial options, but it also promotes better posture for your dog during mealtime, making that kibble-filled experience far more enjoyable. Let’s get those tails wagging!
Materials Needed:
- Plywood or hardwood for the base
- PVC pipes (choose the diameter based on the size of your bowl)
- PVC pipe connectors (90-degree elbows will work best)
- Wood screws to secure everything
- Wood glue for added support
- Sandpaper to smooth out splinters
- Acrylic paint or wood stain for aesthetics
- Dog bowls (one for food, one for water)
- Measuring tape for precision
- Safety goggles to keep your eyes safe during the project
Step-by-Step Instructions:
- Measure Your Dog’s Height: The perfect stand will keep the bowls at a height that matches your dog’s shoulder height. Use a measuring tape to find this. Write this down—it’s super important.
- Cut Your Base and PVC Pipes: From your plywood, cut out a rectangle that will serve as your base—about 18 inches by 12 inches is a good size for medium to large dogs. Then cut your PVC pipes into sections that are the height you measured earlier.
- Create the Frame: Use your PVC connectors to create an upright frame. Connect two pipes to form a “T” shape. Do this for both sides to create two vertical columns for your bowls.
- Secure the Frame: Attach the top of the vertical columns to the base using wood screws. Use wood glue for extra durability. Make sure it’s sturdy—after all, we don’t want a wobbly, bowl-eating experience.
- Sand and Decorate: Give the edges of your base a good sanding to avoid splinters. Then, add your unique flair with some paint or stain. Whether you go for a bright pop of color or a rustic farmhouse look, this is where you can really show off your style.
- Fit the Bowls: Place a bowl in each frame. Secure them if necessary with additional adhesive options to prevent any sliding—because we all know how excited dogs can get when it’s dinnertime.
- Final Stability Check: Lightly shake the finished stand to confirm everything is tightly secured. If it wiggles too much, tighten screws or recheck those connections. You want this to stay firm as your pup digs in.
Optional Add-ons/Variations:
- Colorful PVC Pipes: Instead of plain white, look for colored PVC or even wrap the pipes in fabric or contact paper to match your home décor.
- Interchangeable Height Adjustments: Create different height levels by using adjustable connectors or additional PVC pipe sections. This allows you to change the height as your dog grows.
Pro Tip:
When working with wood, always remember to wear your safety goggles to protect your eyes from flying dust or splinters.
And here’s a little insider tip: If you’re working with wood that will be painted, applying a primer can give your finish a smoother appearance and enhance the life of the color.
Happy building, and may your dog’s mealtime be filled with wagging tails and happy munching!
Extra Tips & Ideas
While it mightn’t seem like a big deal, adding some personal touches to your raised dog bowls can completely transform mealtime for your furry friend.
Think about it: a custom paw print design or even their name can make feeding time feel special. You could use non-toxic paint or stickers for a fun, colorful vibe, but just make sure they’re safe!
Have you thought about mismatched bowls? It’s quirky and adds character. And let’s not forget about that adorable bandana next to the bowls—adds flair, right?
Play around with different textures or heights too; it could spice things up! Just remember, it’s all about making mealtime as enjoyable for you as it’s for your pup, even if they just gobble it down.
Frequently Asked Questions
What Materials Are Best for Raised Dog Bowls?
Stainless steel and ceramic are great materials for raised dog bowls due to their durability and ease of cleaning. You’ll want something sturdy, non-toxic, and ideally dishwasher-safe to simplify your pet care routine.
Can I Customize My Dog Bowl Design?
Absolutely, you can customize your dog bowl design! With limitless options ranging from colors to engravings, you can transform your pet’s bowl into a masterpiece that’ll make Picasso jealous. Release your creativity and personalize away!
How Do I Clean Elevated Dog Bowls?
To clean elevated dog bowls, remove the bowls and wash them with warm, soapy water. Rinse thoroughly, then dry. For a deeper clean, consider using vinegar or baking soda, ensuring all residues are gone.
Are Raised Bowls Suitable for All Dog Breeds?
Yes, raised bowls are suitable for most dog breeds, but their benefits can vary. They’re particularly helpful for large dogs and those with joint issues, while smaller breeds may not need them as much.
What Height Is Appropriate for My Dog’s Size?
For your dog’s size, the bowl’s height should align with their elbows when they’re standing. Measure your dog from the ground to their elbows, then adjust the bowl height accordingly for comfortable feeding.
Conclusion
So, whether you go for that sleek stainless steel look or a funky wooden stand crafted from a time-worn tree, you can totally elevate your pup’s dining game. Think about adding personalized touches to really make it theirs. Remember, a happy dog makes for a happy home, right? And who wouldn’t want their furry friend dining like royalty? Choose what fits your style, and you’ll both feel like kings of the castle, even if that castle is just your living room.

