Okay, so you know that moment when your golden knocks his water bowl across the kitchen again and you’re standing there in socks, soaking wet, wondering why you haven’t fixed this yet?
Yeah. I’ve been there with my dog Koda, and girl, it broke me a little.
The splashing, the sliding, the mystery puddles you step in at 7am — it adds up fast. And don’t even get me started on how ugly most store bowls look next to your carefully curated kitchen aesthetic.
Here’s the thing though: a raised dog bowl fixes all of it.
No more floor floods. No more eyesore plastic dishes ruining your decor moment.
These 10 raised dog bowls DIY designs are actually cute enough to Pinterest, and your golden deserves a setup that works and looks good doing it.
#1: Donut Dog Bowl — The Most Pinterest-Worthy DIY Pet Project You’ll Actually Make
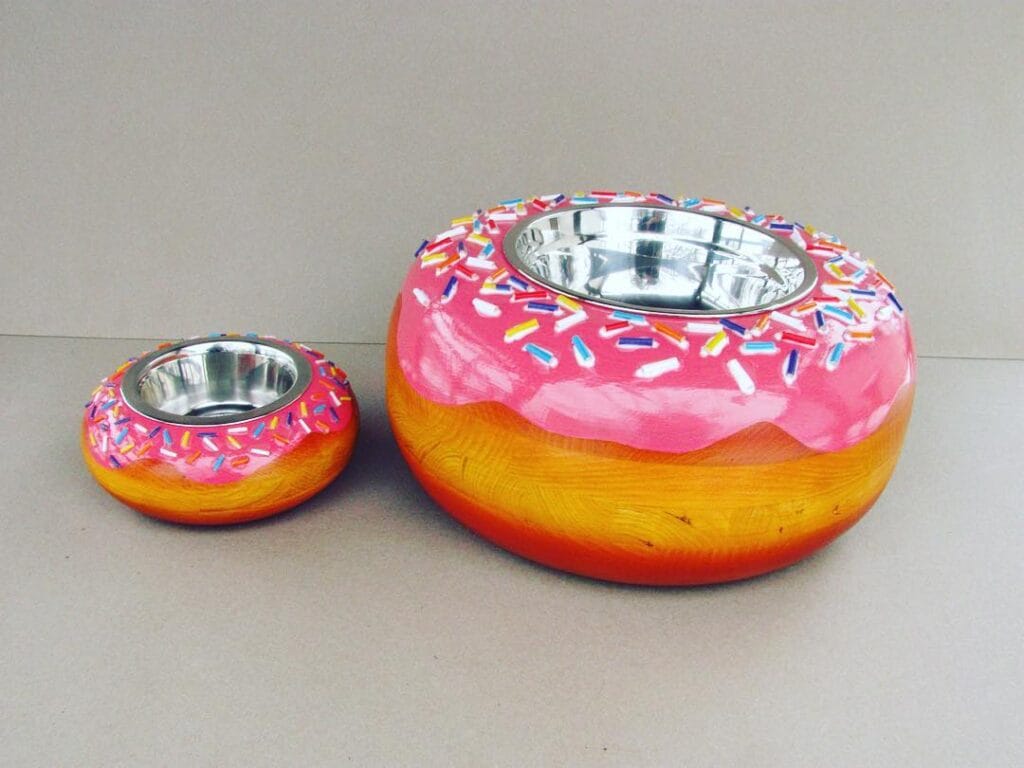
Your golden retriever walks up to her plain metal bowl on the kitchen floor, nudges it with her nose, and slides it three feet across the tile. Again. You’re refilling it for the second time today, and honestly, the whole setup just looks… sad next to your carefully curated home decor.
This donut dog bowl set is everything.
A woodworker on Instagram named @cc2kdesign turned lathe-turned wooden bowls into the most ridiculously charming pet feeding stations I’ve ever seen. Two sizes — a large bowl (roughly 10–12 inches wide) for your golden and a small companion bowl — both carved from natural wood, painted in warm amber and orange tones to mimic a glazed donut base, topped with glossy pink resin “icing”, and finished with hand-painted rainbow sprinkles.
Real talk: the stainless steel insert bowls sit right into the carved center hole — so you get that elevated feeding position that reduces neck strain for bigger dogs, which means less bloating and more comfortable meals.
Materials & Tools
– Wood lathe (or a pre-turned wooden bowl from a craft store)
– Sandpaper (80, 150, and 220 grit)
– Orange and amber wood stain or acrylic paint
– Pink UV resin or high-gloss epoxy
– Acrylic paint in white, red, blue, yellow (for sprinkles)
– Stainless steel replacement dog bowl (sized to fit your opening)
– Small detail paintbrush
– Resin UV lamp or natural sunlight
– Clear polyurethane sealer (food-safe for pet use)
Instructions
Start with your wooden bowl — if you’re skipping the lathe, a round wooden salad bowl from a craft store works perfectly. Sand the entire surface starting with 80 grit, working up to 220 grit until it’s completely smooth to the touch. You want zero rough patches because the paint will catch on them.
Stain or paint the lower two-thirds of the bowl in warm orange and amber tones, blending them while wet to get that natural donut-dough gradient. Let it dry for a full 2 hours.
Now mix your pink epoxy or UV resin and pour it over the top third of the bowl. Tilt slowly so it drips down the sides organically — this is what creates that melted-glaze drip effect you’re seeing in the photo. Work fast because resin sets quickly. Cure under a UV lamp for 5–10 minutes or leave in direct sun for 20 minutes.
While the resin is still slightly tacky, use your detail brush to dab tiny white, blue, red, and yellow acrylic lines across the pink surface for sprinkles. Keep them random and slightly varied in size — that’s what makes them look real.
Once everything is fully cured, seal the entire wooden exterior with food-safe polyurethane. Drop your stainless steel bowl into the carved center opening. Done.
Elevated feeding means your golden eats at a more natural neck angle — the raised position reduces gulping, which cuts down on gas and that post-meal bloat you’ve probably noticed.
And if you’re on a full DIY pet project kick, 13 Genius DIY Dog Stuff Every Pet Parent Needs to Try Today! has some seriously good ideas to keep going.
Making the small companion bowl in the photo is the exact same process — just scaled down for a cat or small dog, which honestly makes the cutest matching set for photos.
Prep Time: 30 minutes | Active Project Time: 3–4 hours (including drying) | Difficulty Level: Intermediate
Keep the bowl away from the dishwasher entirely — hand washing the stainless steel insert only will protect your resin finish for years.
📸 Photo credit: Instagram @cc2kdesign
#2: The Rustic Wood and Metal Raised Dog Bowl Stand That Looks Like It Belongs in a Design Magazine
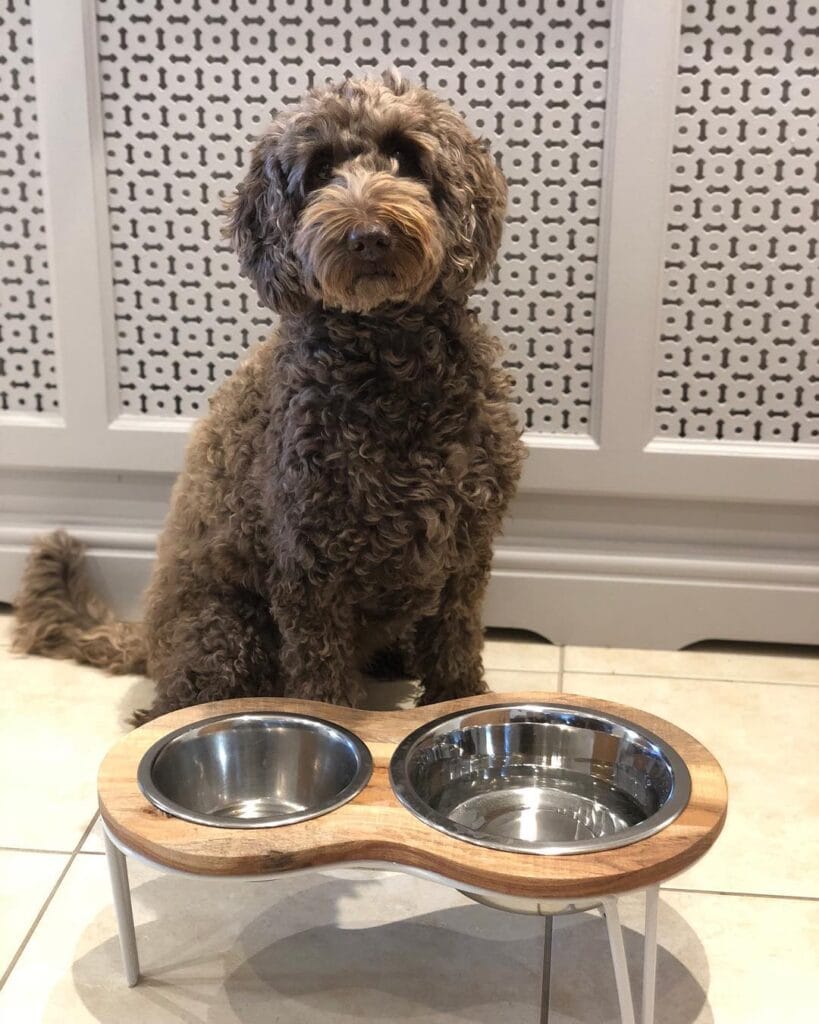
Your golden’s food bowl is sliding across the kitchen floor again — and now there’s wet kibble stuck to the tile grout. You’re on your knees with a paper towel, and honestly? You deserve better than this.
This DIY is the one.
Materials & Tools:
– Mango wood board (approximately 18″ x 10″)
– 2 stainless steel dog bowls (6″ diameter each)
– 4 white metal hairpin legs (6 inches tall)
– Jigsaw or hole saw bit (6.5″ diameter)
– Sandpaper (120-grit then 220-grit)
– Food-safe wood oil or beeswax finish
– Drill + screws
– Pencil for marking
Prep Time: 30 minutes | Active Project Time: 2 hours | Difficulty Level: Beginner-Friendly
Instructions
Start by tracing two circles on your mango wood board, centered and spaced about 1 inch apart. Cut them out with your hole saw — go slow here, the wood grain on mango is gorgeous and worth protecting.
Sand every edge until it feels like warm butter under your fingers. That smooth finish keeps your pup’s fur from snagging when she leans in to eat.
Wipe the whole board down, then rub in two coats of food-safe beeswax oil. This seals the wood against water splashes — and trust me, there will be splashes — while keeping that warm honey-brown color that photographs so well against white tile.
Attach your hairpin legs to the underside corners using the included screws. Drop both stainless steel bowls into the cutouts.
The raised position moves your dog’s eating angle from hunched to natural — better digestion means less bloating, and that payoff alone makes this worth a Saturday afternoon.
Before you decide on the leg height: bigger dogs need at least 8-inch legs to get the full posture benefit.
And if you love this kind of project, 12 Heartfelt Designs for DIY Dog Accessories has so many more ideas like this one.
Seal the underside of the wood too, not just the top. Water wicks from the bottom up, and that’s what warps the board over time.
📸 Photo credit: Instagram @lilli_doodle
#3: Personalized Wooden Crate Dog Feeding Station with Raised Bowls
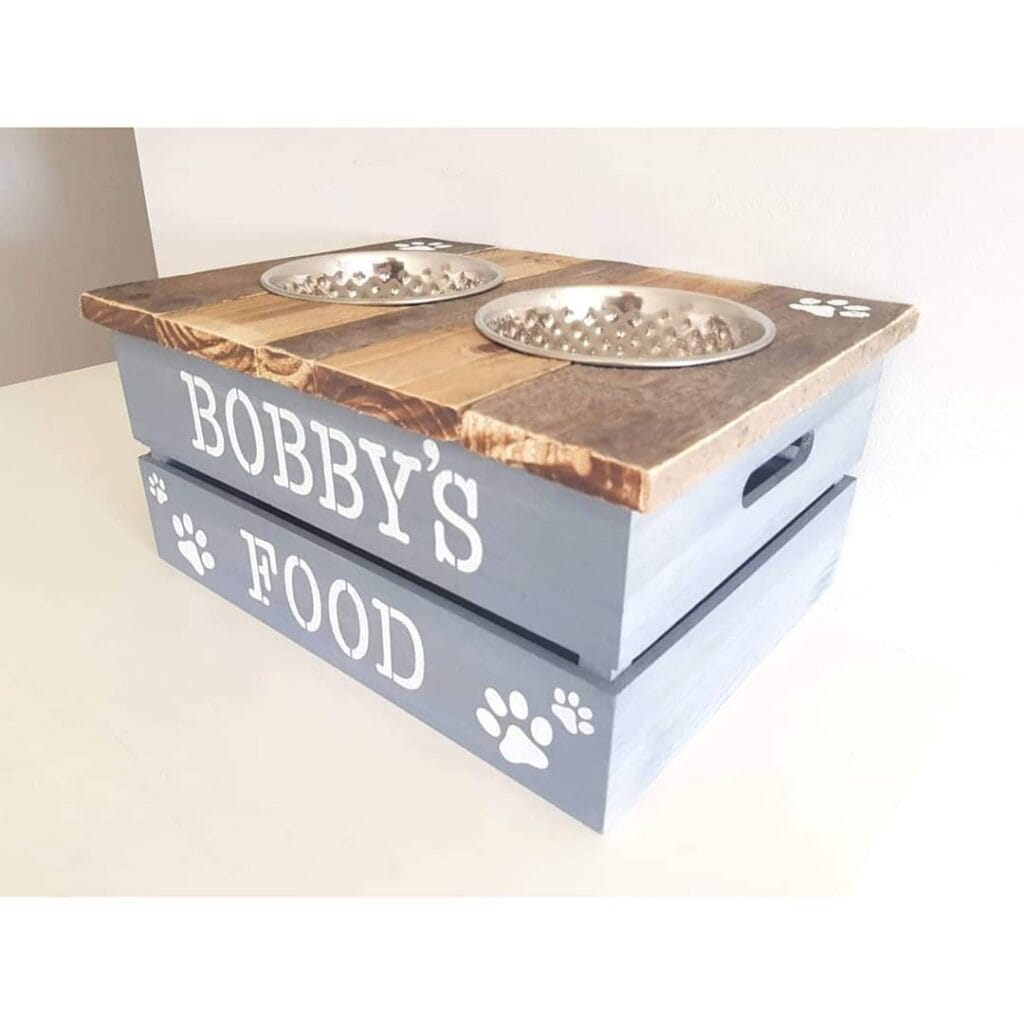
Your golden leaves muddy paw prints everywhere — but somehow her food area feels like the real eyesore. Two mismatched bowls sliding across the kitchen floor, water splashing every time she drinks. Every. Single. Time.
This one hit different when I saw it. A gray-painted wooden crate topped with reclaimed dark-stained wood planks, two stainless steel anti-splash bowls sitting in cut holes, and the dog’s name painted right on the front in white block letters. It looks like something straight off your Pinterest board.
Materials & Tools:
– Unfinished wooden crate (approx. 16″ x 12″ x 6″)
– 2-3 reclaimed wood planks for the lid top
– 2 stainless steel dog bowls (measure diameter before cutting)
– Gray chalk paint + white stencil paint
– Letter stencils + paw print stencil
– Jigsaw for bowl holes
– Wood stain (dark walnut finish)
– Sandpaper (120-grit), wood glue, screws
Instructions
Sand your crate until smooth — splinters are nobody’s friend. Paint the entire crate body in gray chalk paint, letting it dry fully between two coats. While it dries, stain your reclaimed planks with dark walnut stain and let them sit overnight for a rich, deep finish.
Position your planks across the crate top and secure them with wood glue plus screws underneath for stability. Trace your bowl openings using the actual bowl rim as your guide, then cut with a jigsaw. The bowls should drop in snugly — that snug fit keeps them from sliding, which means zero floor splashing and a calmer eating experience for your dog.
Now for the easy part: grab your stencils. Paint your dog’s name plus “FOOD” on the crate front in white. Add paw print accents in the corners for that finished look.
The raised height keeps your golden’s neck at a natural angle while eating — better posture means less strain over years of meals, and that payoff is worth every minute of this build.
Cut the handle openings on the sides if your crate doesn’t already have them — they make moving the station so much easier when you’re mopping.
Seal everything with a matte polyurethane coat so the paint survives daily wipe-downs.
Prep Time: 30 min | Active Project Time: 3-4 hours | Difficulty Level: Beginner-Intermediate
📸 Photo credit: Instagram @walkinthewildtelford
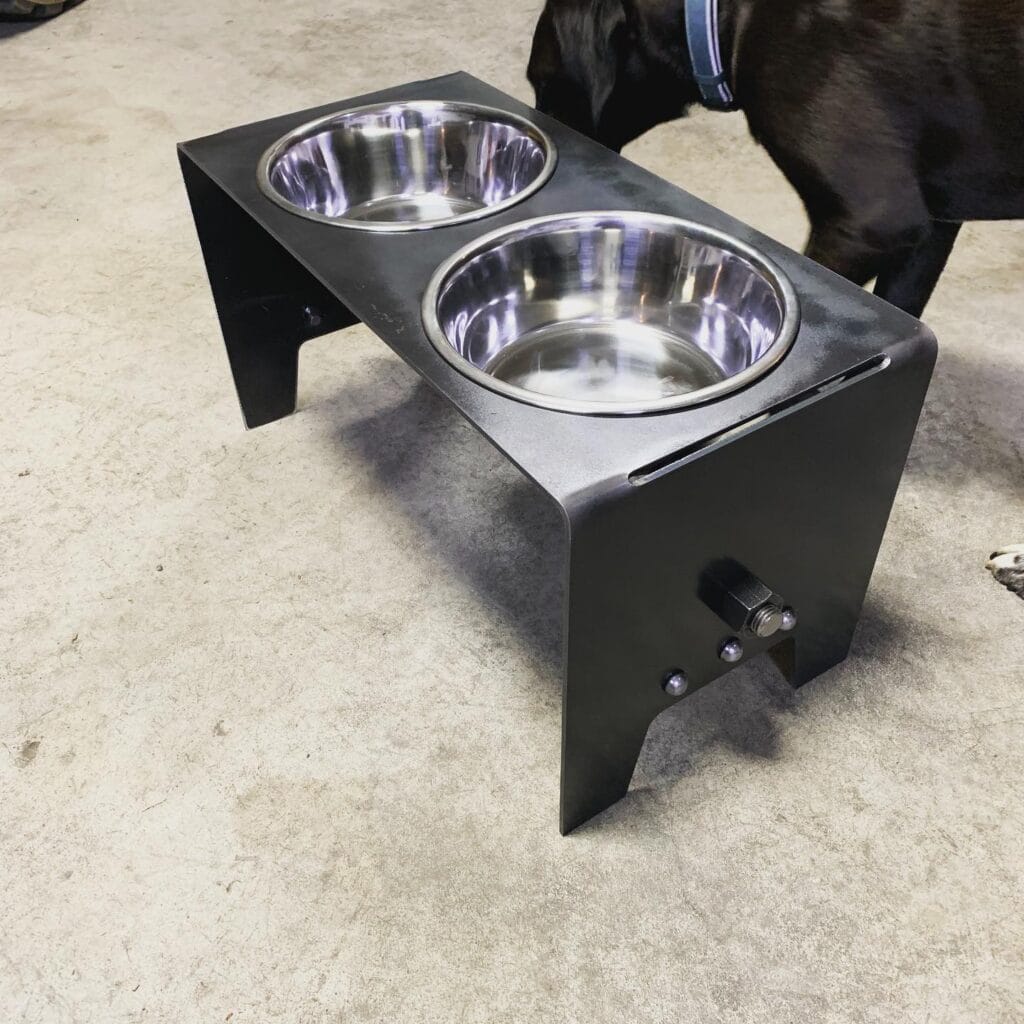
#4: DIY Steel Plate Raised Dog Bowl Stand — Industrial Style Meets Total Function
Your golden keeps nudging her bowls across the kitchen floor mid-meal. You’ve mopped up water splashes again, and honestly? You’re over it.
This build is the one. A welded steel plate raised feeder — raw, clean, and sturdy enough that nothing moves.
Materials & Tools:
– 3/16″ mild steel plate (dark mill finish or powder-coated black)
– Two 6-quart stainless steel bowls
– Two 3/8″ hex bolts with washers and nuts (for cross-brace stability)
– Angle grinder + cutting wheel
– Welder (MIG recommended)
– Drill press + hole saw bit sized to your bowls
– Metal file or flap disc for edge finishing
– Rust-inhibiting primer (optional but smart)
Instructions
Cut your steel into one top panel and two side legs — legs should be about 10–12 inches tall for a large breed. The top panel gets two circular cutouts sized so your stainless bowls drop in and sit flush without falling through.
Weld the legs to the underside of the top panel at 90 degrees. This is where most people rush — take your time on the corners. Clean welds mean no wobble, ever.
Drill your cross-brace bolt holes through both side legs at the lower third. Thread the hex bolt through, add washers on both sides, and tighten the nut down firm. That bolt keeps the whole frame from spreading under a heavy dog’s pressure. And because the frame sits low and wide, your golden won’t be straining her neck downward — better posture means less joint stress over time.
Grind every cut edge smooth. A rough edge on pet furniture is a liability.
The elevated position keeps bowls stable, reduces neck strain, and cuts floor mess — that’s the feature, the benefit, and exactly why this build is worth a Saturday afternoon.
Prep Time: 30 minutes | Active Project Time: 3–4 hours | Difficulty Level: Intermediate
Seal the steel with a wax finish or clear coat if you skip powder coating — mill-scale steel will surface rust in humid spaces. And if you’re already in a DIY pet project mood, 7 Creative Dog Crate Topper DIY Ideas pair really well with this aesthetic.
📸 Photo credit: Instagram @arcwestfab
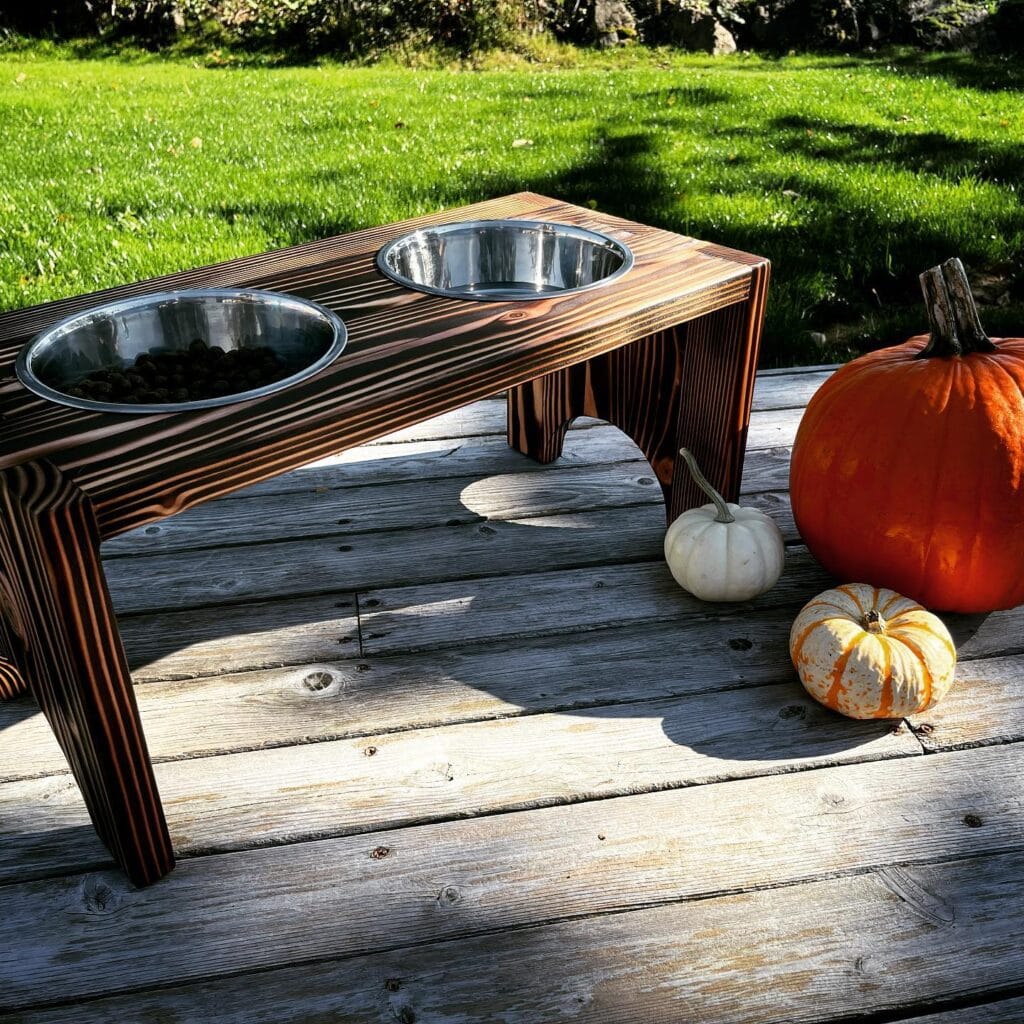
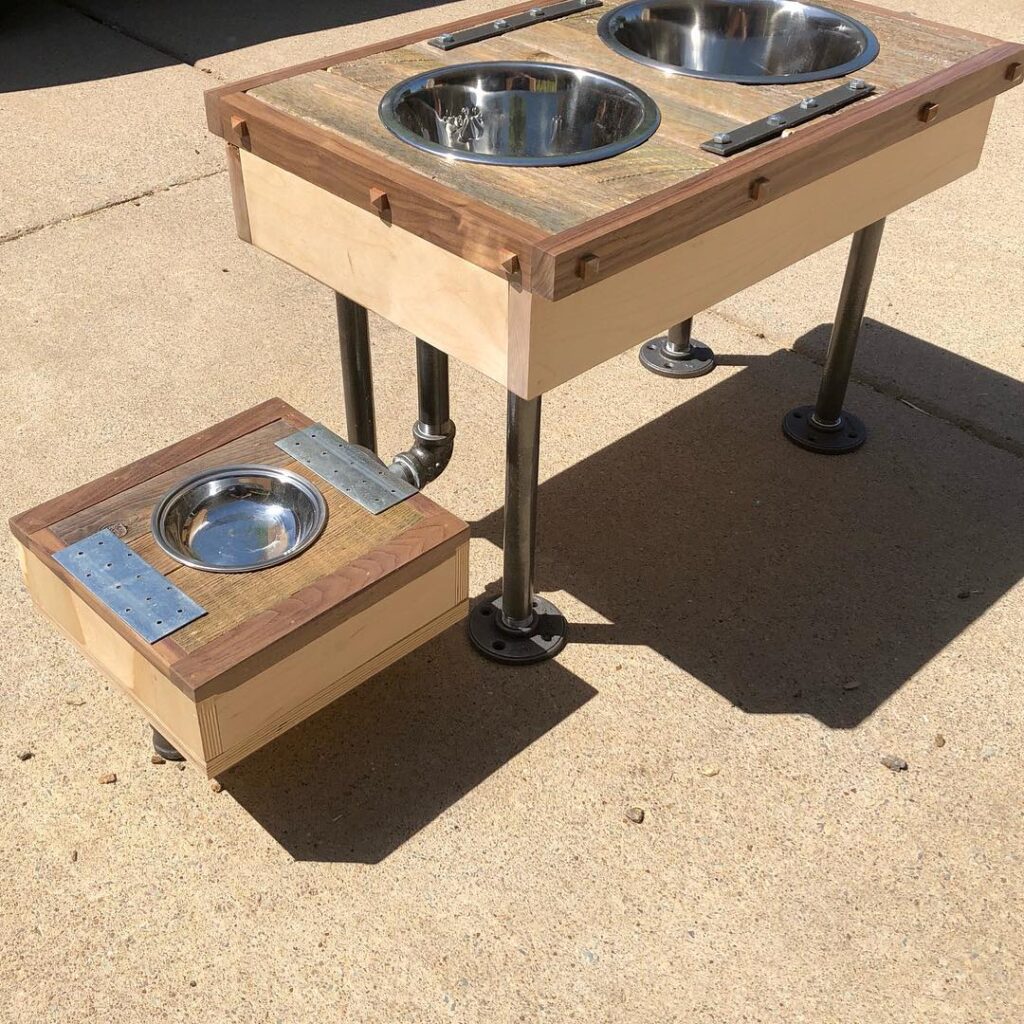
#5: The Industrial Pipe & Reclaimed Wood Raised Dog Bowl Station (With a Bonus Small Dog Feeder!)
Okay, so you know that moment when your golden retriever finishes drinking and just walks away — leaving a trail of water and drool across your kitchen floor? And somehow it always ends up right where you’re about to step in your socks. I’ve been there so many times with my cousin’s lab, and honestly, it drove me insane.
This DIY is the one.
Materials & Tools You’ll Need:
– Reclaimed barnwood planks (for the tabletop surface)
– Walnut wood boards (for the frame border — roughly ¾ inch thick)
– Maple plywood (for the box body — ½ inch sheets)
– 1-inch black iron pipe with floor flanges (x4 legs)
– Pipe elbow connector (for the decorative cross-support)
– Two large stainless steel dog bowls (fits 8-inch diameter cutouts)
– One small stainless steel bowl (for the companion mini feeder — fits 5-inch diameter cutout)
– Flat steel mending plates (decorative hardware accents)
– Wood glue, wood screws, sandpaper (120-grit then 220-grit)
– Jigsaw, drill, pipe wrench, measuring tape
Prep Time: 45 minutes | Active Project Time: 4–5 hours | Difficulty Level: Intermediate
### Instructions
Start by cutting your maple plywood into four panels for the box body — two long sides and two short sides — then glue and screw them into a rectangular frame. Sand every edge down with 120-grit first, then finish with 220-grit so the wood feels smooth under your hands.
Next, cut your reclaimed barnwood planks to fit the top of the box as the surface layer. The weathered grain is what gives this whole thing that Pinterest-worthy, lived-in character. Lay them across the top and secure them with wood screws from below.
Now border the entire top with your walnut wood strips. The walnut’s dark tone against the pale barnwood — that contrast is what makes people stop and stare. Screw the walnut frame down tight, then press your flat steel mending plates into the surface as decorative accents (they add an industrial edge and actually reinforce the top).
Trace your bowl openings — 8 inches for the two large cutouts, spaced evenly — then cut them out with your jigsaw. Go slow on the curves. Test-fit your stainless steel bowls so they rest flush in the hole without dropping through.
Screw your black iron floor flanges into the four corners of the box bottom, then thread your 1-inch iron pipes in. Add the elbow connector between two front legs for that raw industrial look you see in the photo. This is what separates a basic feeder from something that looks like actual furniture.
The raised design keeps your golden’s neck at a natural angle — which means less strain on her joints over time, especially as she gets older. Better posture at mealtime, better digestion, and your floors stay drier. That’s the payoff.
For the mini companion feeder, build a smaller reclaimed wood box with short feet and drop a single 5-inch bowl into the top. Same materials, same vibe — perfect if you ever add a smaller pup to the family.
If you love building cozy custom spaces for your dog, 7 Cozy DIY Indoor Dog Kennel Ideas pair so well with a project like this.
Seal everything with a food-safe finishing oil — it protects the wood from water splashes and makes the grain pop without making it look plastic-y.
📸 Photo credit: Instagram @stonewondesigns
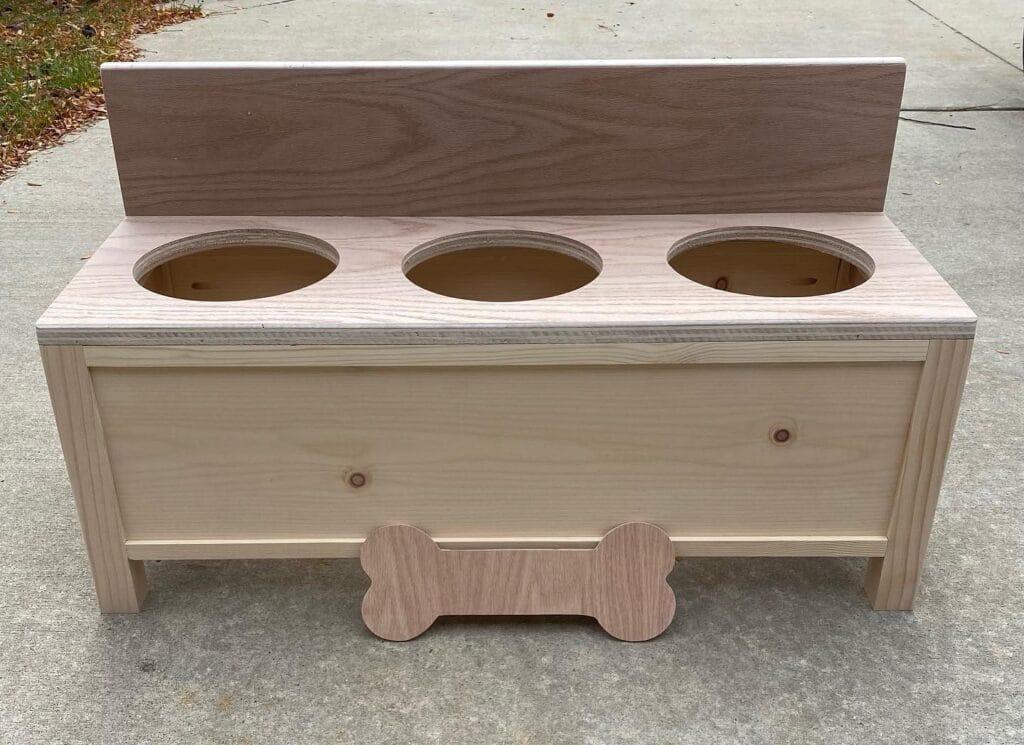
#6: Triple-Bowl Raised Feeder With a Hidden Bone Detail (And Yes, It’s as Cute as It Sounds)
You know that moment when your golden is eating and her water bowl slides across the floor again, and she’s just standing there, neck cranked down, splashing everywhere? Yeah. My friend’s dog did this every single morning and her kitchen mat was soaked by 8am.
This three-bowl feeder fixes that whole situation.
Prep Time: 30 min | Active Project Time: 4–5 hours | Difficulty Level: Intermediate
Materials & Tools:
– ¾-inch oak plywood (for the top panel and decorative pieces)
– Pine 2x4s (for the frame and legs)
– 3 standard dog bowls (measure your bowls first — holes need to match the rim diameter)
– Jigsaw
– Drill + pocket hole jig
– Sandpaper (120-grit, then 220-grit)
– Wood glue + screws
– Optional: stain or sealant
Instructions
Cut your pine frame first — two long side panels, two short end panels, and four legs. The frame in this build sits about 8 inches tall, which keeps a medium-to-large dog’s neck at a comfortable angle. That posture support reduces bloat risk and makes digestion easier — which means fewer messes you’re cleaning up later.
Assemble the box frame using pocket hole joinery. It holds tighter than just screwing through the face, trust me.
Cut your oak plywood top to sit flush over the frame. Then use a jigsaw to cut three evenly spaced circular holes — trace the inside rim of your bowls so they drop in and rest on their lip without falling through.
And here’s the detail that makes this so Pinterest: cut a dog bone shape from a scrap of oak plywood and attach it centered on the front panel. Sand everything smooth so there are zero rough edges near your pup.
The oak top paired with the raw pine base gives you that two-tone look that photographs beautifully on a kitchen floor.
Add a tall oak backsplash panel along the back edge — it catches splashes and honestly makes the whole thing look more finished.
Sand the completed piece with 120-grit first, then finish with 220-grit before staining. The oak takes stain darker than the pine, so embrace the contrast or prime the pine first if you want a uniform color.
Leave the bowl holes unsealed so bowls stay removable for washing.
When your golden eats from an elevated, stable surface, she’s not straining her neck or chasing a sliding bowl — that comfort means she actually slows down while eating, which your vet will appreciate.
Want an easy win? Buy your bowls before cutting any holes. Even a quarter-inch difference in rim size can mean a bowl that falls straight through.
📸 Photo credit: Instagram @superman600rr
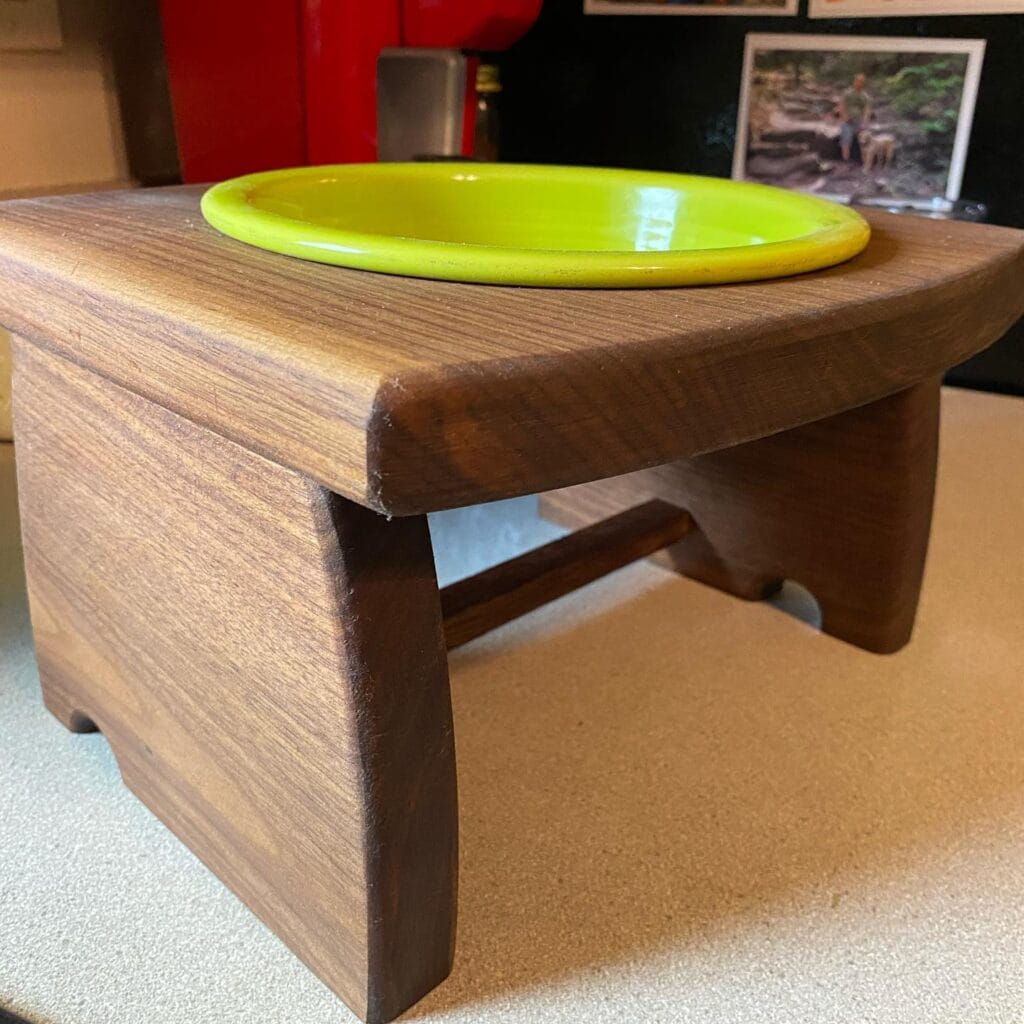
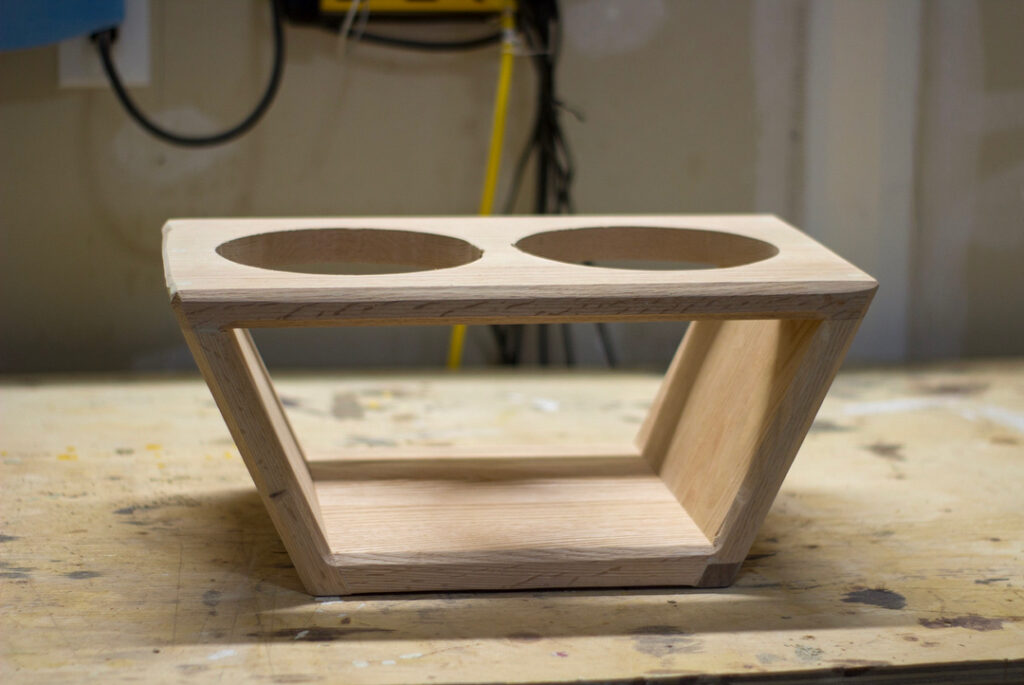
#7: DIY Single-Bowl Walnut Wood Raised Feeder
You know that moment when your golden is scarfing down her food so fast she’s basically got her whole face on the floor? And then she looks up with kibble stuck to her snobby little snout? Yeah. That’s what this build fixes.
This solid walnut raised feeder is exactly the kind of thing you pin at midnight and then actually make. The warm brown grain, the chunky legs, the way that chartreuse green ceramic bowl pops against the wood — it looks like something from a boutique pet shop, not your garage.
Materials & Tools:
– 3/4-inch thick walnut boards (approximately 12″ x 12″ for the top panel)
– 4 walnut leg panels cut to 5″ height
– 1 stretcher rail for center support
– 1 circular bowl cutout sized to your bowl’s rim diameter (roughly 7-8 inches)
– Wood glue + 1.5-inch wood screws
– 220-grit sandpaper
– Jigsaw or router
– Food-safe Danish oil or walnut finishing oil
– One single ceramic dog bowl (shown: bright yellow-green enamel)
Prep Time: 30 minutes | Active Project Time: 3-4 hours | Difficulty Level: Intermediate
### Instructions
Start by cutting your walnut top panel to 12″ x 12″. Mark the center, then trace your bowl’s outer rim with a pencil — you want the bowl to sit in the hole, not fall through, so cut about a half-inch inside that line.
Use your jigsaw to cut the circle opening. Go slow on the curves. Walnut splits if you rush it, and that’ll break your heart considering how expensive this wood is.
Cut your four leg panels at 5 inches tall with a slight inward curve at the base — that’s what gives this feeder its little “feet” that you can see in the photo. Sand everything with 220-grit before assembly, because trying to sand inside those leg joints after gluing is miserable.
Attach the legs to the top panel using wood glue and screws from underneath. Add the center stretcher rail between the two side legs — this keeps the whole thing from racking sideways when your dog’s nosing the bowl around.
And here’s where the payoff really hits: that raised position moves the bowl to chest height, which reduces neck strain and improves your dog’s posture during meals, meaning less gulping, less bloating risk, and way less mess on your floor.
Once assembled, apply two coats of food-safe Danish oil. Let each coat cure for a full 24 hours before dropping the bowl in.
The walnut darkens beautifully as the oil soaks in — you’ll want to just stare at it for a minute, honestly.
Keep this in mind: measure your specific bowl’s rim width before cutting. A bowl that’s too narrow in the rim will just fall straight through, and no amount of sanding fixes that.
If your golden is also a chaos agent who tips her water bowl constantly, you might love pairing this project with a DIY dog washing station outdoor setup — keeps the whole feeding and cleanup routine in one spot.
📸 Photo credit: Instagram @twogreenthumbsandmore
#8: The Rustic Farmhouse Dog Bowl Stand With a Bone Name Tag
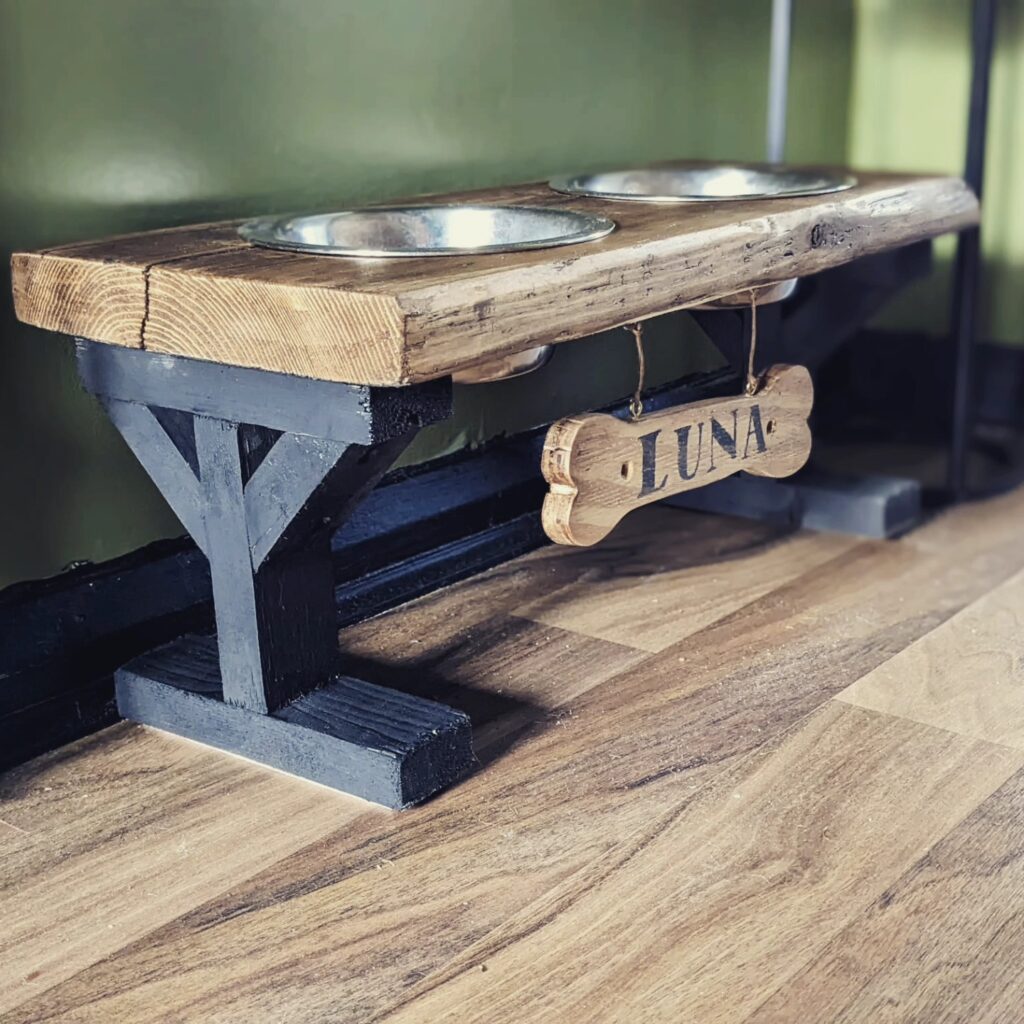
Luna’s owner definitely gets it — and honestly, so do you.
You know that moment when your golden retriever finishes eating and just… walks away, dragging the bowl across your hardwood floors? That scraping sound. The water splashing everywhere. The mess that somehow spreads three feet in every direction.
This reclaimed wood and black-painted pine farmhouse stand is the answer to all of that chaos.
Materials & Tools:
– Rough-sawn reclaimed pine plank (approximately 24″ x 6″ for the top)
– 2×2 pine lumber for the base frame and cross supports
– 2 stainless steel dog bowls (medium size, roughly 5″ diameter)
– Black exterior paint or chalk paint
– Sandpaper (80-grit and 120-grit)
– Wood screws (1.5″ and 2.5″)
– Drill and hole saw bit (sized to your bowls)
– Small wooden bone-shaped tag (craft store find)
– Twine or jute cord
– Wood stain (medium walnut tone)
– Letter stamps or wood-burning pen for the name
Prep Time: 30 minutes | Active Project Time: 3–4 hours | Difficulty Level: Intermediate
Instructions
Start by cutting your reclaimed plank to length — around 24 inches gives you room for two bowls with breathing space between them. Sand the top with 80-grit first, then finish with 120-grit to smooth it without losing that rustic texture. Apply your walnut stain with a rag, wiping against the grain to push color into the natural cracks. Let that dry for at least 45 minutes.
Trace your bowl openings on the plank top — center them with about 4 inches between each circle. Use your hole saw bit to cut through. The bowls should sit snug in the holes, lip resting on the wood, so test the fit before moving on.
And here’s where the magic happens with the base. Cut four 2×2 pieces for the legs — around 6 inches tall for a medium dog. Build a simple rectangular frame and attach the legs at each corner using 2.5″ screws. Add diagonal cross braces on the front and back panels for that farmhouse trestle look you’re seeing in the photo. Paint the entire base in matte black chalk paint — two coats minimum.
Finally attach the plank top to the base frame with 1.5″ screws from underneath.
For the name tag, burn or stamp your dog’s name into the bone-shaped wood piece, then loop natural jute twine through the top hole and tie it to the front cross brace. It hangs right in the center — and it’s exactly the kind of detail that makes guests stop and ask where you bought it.
The raised height keeps your golden’s neck in a neutral position during meals — that posture support means less strain over time, which pays off in fewer vet visits as she gets older.
Small change, big win: sealing the plank top with a food-safe polyurethane coat protects the wood from water and prevents warping after weeks of spilled bowl rinses.
Store the bone tag off the stand during deep cleans — the twine absorbs moisture and can mold if it stays wet too long.
📸 Photo credit: Instagram @rubymills_home_life
#9: Industrial Pipe and Walnut Raised Dog Bowl Stand
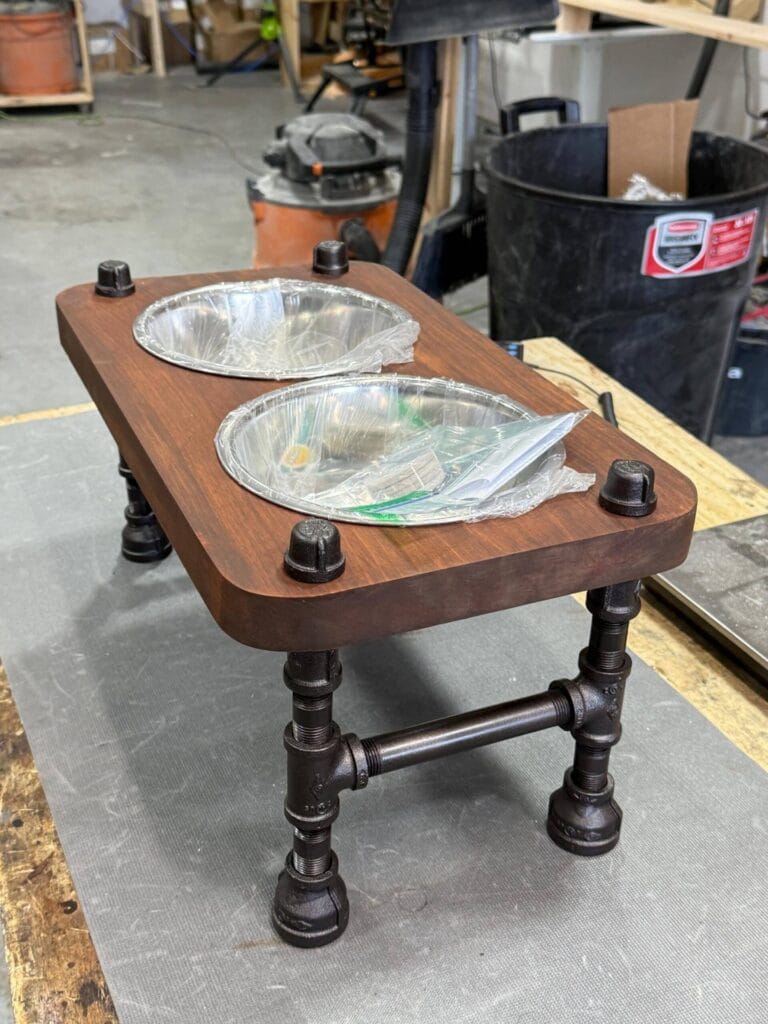
Okay, you know that moment when your golden has just come in from the backyard, she’s soaking wet, and she’s got her whole face buried in a bowl that’s sitting directly on your hardwood floor — and she’s basically pushing it across the kitchen with every single bite? Yeah. My dog did that for two years before I finally said enough.
This build stopped all of that.
Materials & Tools You’ll Need:
– 3/4-inch black iron pipe fittings (floor flanges, tees, nipples, end caps)
– Walnut hardwood board — roughly 14 x 24 inches, 1.5 inches thick
– Two stainless steel dog bowls (sized to fit your cutouts)
– Hole saw bit matching your bowl diameter
– Pipe wrench and thread sealant
– Sandpaper (120-grit then 220-grit)
– Dark walnut wood stain + food-safe polyurethane finish
– Wood screws and a drill
Instructions
Sand your walnut board starting with 120-grit, then finish with 220-grit until it feels like velvet under your fingers. Stain it with dark walnut and let it cure for a full 24 hours — don’t rush this part, the richness of the color is everything.
Use your hole saw to cut two circles sized to cradle your bowls snugly, leaving about a half-inch lip so they don’t fall through. This bowl-securing feature keeps your floors clean and your golden eating at a healthy 8-inch elevation, which reduces neck strain over time — and that payoff shows up years later in her joints.
Assemble your pipe legs using the tees and nipples to create a cross-brace between the legs for stability. Screw the floor flanges up through the bottom of the board. Tighten everything with your pipe wrench — these fittings need to be firm because a 60-pound retriever leaning into her dinner will test every joint.
Drop your bowls in. Done.
The black iron against the dark walnut reads like something straight off your Pinterest board — it fits into a kitchen, a mudroom, even a living room corner. If you love this style, 7 Creative Dog Feeding Station DIY Ideas has more builds worth bookmarking.
Seal the board with two coats of food-safe polyurethane, wiping between coats with a tack cloth. It makes cleanup after messy meals a simple wipe-down instead of a whole scrubbing situation.
Prep Time: 30 minutes | Active Project Time: 3–4 hours | Difficulty Level: Intermediate
📸 Photo credit: Instagram @pipeworkpieces
#10: Build a Sleek Angled Oak Raised Dog Bowl Stand (No Fancy Tools Needed)
You know that moment when your golden retriever finishes drinking and just… walks away, dripping water across your whole kitchen floor? And somehow the bowl ends up three feet from where it started? Yeah. That.
This solid oak double bowl stand fixes all of that. The angled trapezoid legs pull the whole thing together — it looks like something straight off a Pinterest board, but you built it yourself.
Prep Time: 30 min | Active Project Time: 3–4 hours | Difficulty: Intermediate
Materials & Tools:
– 3/4-inch red oak hardwood boards
– Two circular cutouts sized for your bowls (measure first!)
– Wood glue + clamps
– Miter saw (for angled cuts on the legs)
– Sandpaper (120-grit then 220-grit)
– Food-safe wood finish or beeswax oil
Instructions
Cut your top panel first — mine was roughly 14 x 8 inches. Trace your bowls and use a jigsaw to cut the openings. The bowls should sit snug, not fall through.
Cut four leg pieces at a slight outward angle — around 8–10 degrees — so the base sits wider than the top. This angled stance keeps the stand stable even when your dog gets really enthusiastic at mealtime.
Attach a bottom shelf rail between the legs using wood glue and clamps. This is the feature that makes the whole build rigid — a sturdy bottom rail distributes pressure across all four legs, which means zero wobbling even on tile floors.
Sand everything smooth. Wipe with a damp cloth and apply two coats of food-safe beeswax oil.
The raised height reduces strain on your dog’s neck and joints — totally worth the afternoon of work.
Leave the wood unfinished for that raw workshop look, or go full honey oak with a light stain. Both are gorgeous. And honestly? Leaving it natural ages beautifully over time.
📸 Photo credit: Instagram @aevilleneuve
The One Measurement Most DIY Raised Bowl Builders Get Wrong
Okay, real talk — I learned this the hard way when I built my first raised bowl stand for my neighbor’s lab mix.
Everyone obsesses over the wood type and the finish. Nobody talks about the actual height.
Here’s the pro secret: measure from the floor to your dog’s lower chest, then subtract 4-6 inches. That’s your bowl height. Most people just eyeball it or copy a generic measurement they found online — and then their dog ends up straining their neck downward anyway, which defeats the whole point.
I watched Cooper (my neighbor’s dog) hunch over that first stand I built and felt terrible. Built version two the right way, and the difference was immediate.
Also — and this one’s a money-saver — skip the pre-made wooden crates as your base. They look cute but they warp fast with water splashing. Solid pine with a waterproof sealant coat holds up so much better long-term.
If you’re already in project mode, these creative dog house DIY plans pair really well with a raised bowl weekend build.
Your Home Can Be Clean AND Golden-Retriever-Approved
Look, we both know your dog isn’t going anywhere. And honestly? You wouldn’t want him to.
But muddy paws on your linen sofa and golden fur on every throw pillow don’t have to be your permanent reality. The right setup — the right mat, the right cover, the right routine — makes a real difference.
Start with one thing. Just one. Maybe it’s a dedicated dog bathing station so bath nights stop feeling like a wrestling match in your bathroom.
Your beautiful home and your messy, lovable dog can coexist. I promise.
So — what’s the one spot in your house your golden has completely taken over? 🐾

Amr Mohsen is a software engineer who traded his keyboard for a leash — at least on weekends. His love for dogs inspired him to share what he learns as a dog owner and enthusiast, bringing a detail-oriented, research-driven perspective to every article he writes. If it’s about dogs, he’s probably already looked it up twice.


