
Okay, so your golden retriever is precious — but girl, that crate sitting in your living room? It’s basically screaming “I gave up on decorating.”
I felt that so hard last spring. I’d spent weeks getting my space just right — cozy throws, that perfect neutral rug — and then there’s this big metal eyesore plunked right in the middle of everything. My cousin walked in and goes, “Is that a jail cell?” I wanted to disappear.
Here’s the thing — your dog deserves a cozy space AND your home deserves to still look like yours.
That’s exactly why I pulled together these 10 DIY dog cage designs that actually pull double duty as real furniture. We’re talking pieces that blend right into your decor, not fight it. And if you want even more inspo, these dog cage furniture DIY ideas are chef’s kiss.
Your home. Your dog. Both happy.
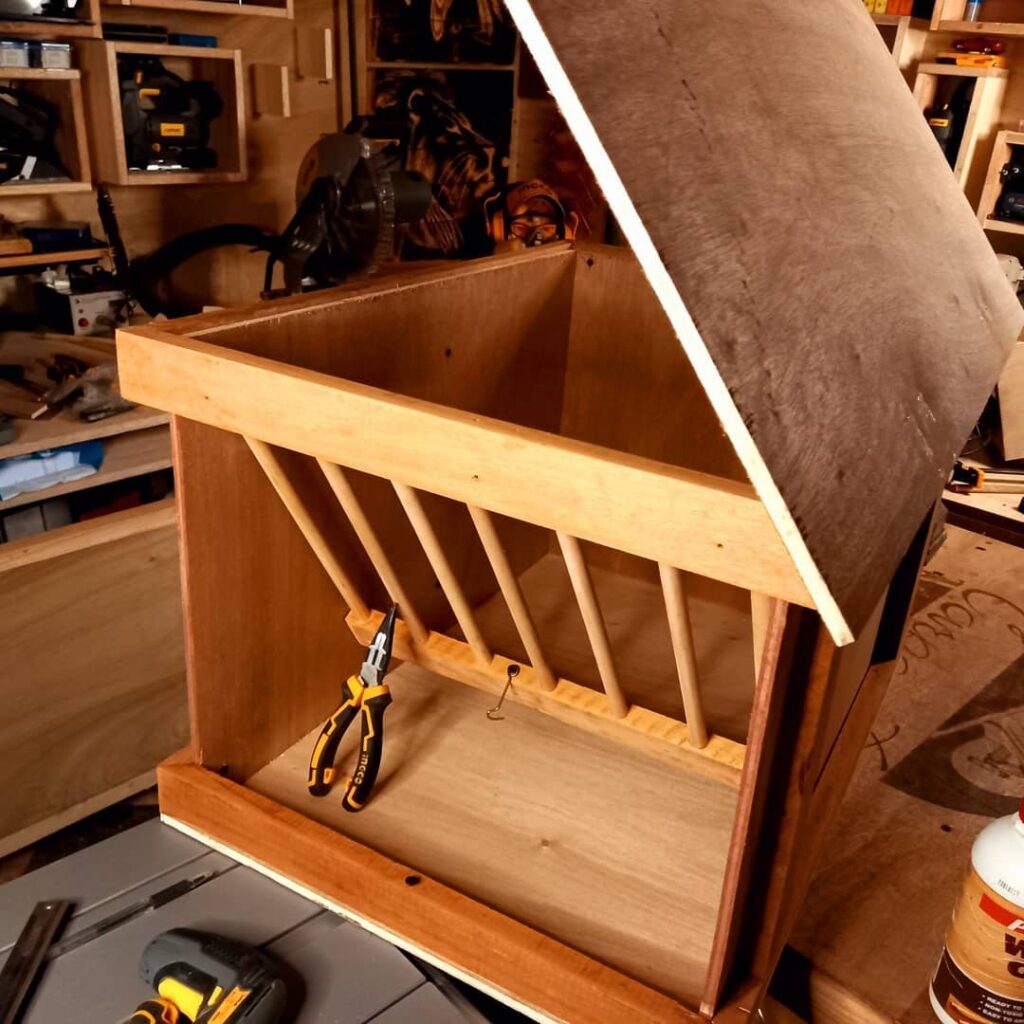
#1: DIY Wooden Hay-Style Dog Kennel With a Flip-Top Lid
Okay so you know that moment when your golden comes barreling in from the backyard, shakes mud everywhere, and then just flops right onto your freshly vacuumed rug like she owns the place? Yeah. She kind of does. But having a dedicated space that’s actually hers? That changes everything.
This handmade kennel is giving full Pinterest-board energy and I am here for it.
Materials & Tools You’ll Need:
– ¾-inch plywood (for the side panels, back panel, base, and lid)
– Hardwood dowels (approximately ½-inch diameter, cut to matching lengths for the front gate)
– Wood glue (I spotted what looks like PVA wood glue in the background — that white bottle is doing heavy lifting here)
– Wood screws — 1¼-inch and 2-inch lengths
– Sandpaper — 120-grit then 220-grit for finishing
– Piano hinge or two barrel hinges for the flip-top lid
– Small hook-and-eye latch to keep the lid closed
– Drill, jigsaw, miter saw, clamps, measuring tape, pencil
Prep Time: 30 minutes | Active Project Time: 6–8 hours | Difficulty Level: Intermediate
Instructions
Start by cutting your ¾-inch plywood into two identical side panels — these form the signature triangular A-frame silhouette you see in the photo. The angled top edge is what gives this kennel that barn-roof look your feed is going to obsess over. Cut that angle at roughly 45 degrees so both panels mirror each other.
Next, cut the back panel from plywood to fit flush between the two side pieces. This back panel keeps the structure rigid, so take your time getting the dimensions tight. Glue and screw it into both side panels using 2-inch wood screws placed every 6 inches along the edges.
Now cut your base panel. It sits inside the frame and rests on a lower horizontal support beam — you can see that detail clearly in the photo where the kennel sits lifted slightly off the surface. This raised base keeps your girl off cold floors, which means better joint comfort, especially as goldens age.
And here’s where it gets fun. The front gate uses ½-inch hardwood dowels arranged at a diagonal angle — not straight up and down. That angled layout distributes pressure across the frame, so the gate stays strong even when a 60-pound dog leans against it. Drill matching angled holes into a top rail and a bottom rail, then press each dowel in with wood glue. No nails needed there.
The flip-top lid is the feature that makes this design genius. A single piano hinge runs along the full back edge of the lid, attaching it to the top of the back panel. The lid opens wide — you can see it propped fully open in the photo — so cleaning inside takes zero effort. That easy-access lid means you actually clean the space regularly, which keeps your dog healthier and your home smelling better.
Sand everything starting with 120-grit, then finish with 220-grit for a smooth surface your dog won’t snag fur on. Wipe down with a damp cloth before applying any stain or sealant.
If your golden already has an outdoor setup, pairing this indoor kennel with something from 17 Creative DIY Dog Run Ideas for Your Furry Friend gives her a full indoor-outdoor world that’s completely hers.
Cut your dowels slightly longer than needed, then trim them flush after the glue dries. That gives you a cleaner finish than trying to pre-cut them to exact length before assembly.
📸 Photo credit: Instagram @blazing_art_thou
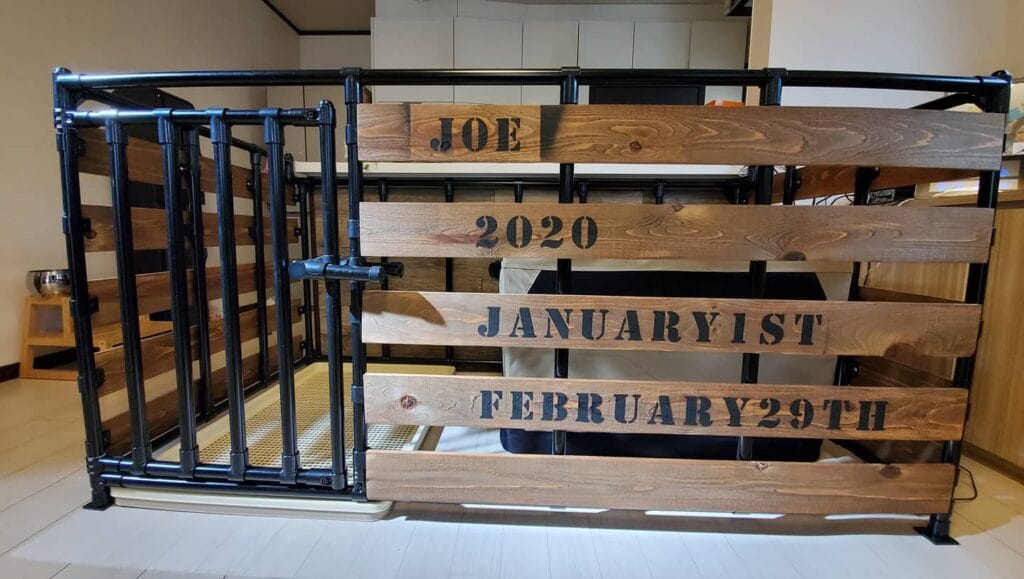
#2: DIY Industrial Pipe and Wood Dog Pen (With a Personalized Name Plaque!)
Okay, so you know that moment when your golden retriever decides the living room is the pen? Like, Bailey just sprawls across the entire floor, tail wagging into your coffee table, and you’re stepping over her every five seconds trying to get to the kitchen. Girl, I felt that for years.
This black iron pipe and stained wood dog pen is the answer you didn’t know you needed. And honestly? It looks like something straight off your Pinterest board.
Materials & Tools:
– ¾-inch black iron pipes (various lengths)
– Black pipe fittings (T-joints, elbows, floor flanges)
– 1×6 cedar or pine boards (stained dark walnut)
– Pipe wrench and screwdriver
– Wood stain + brush
– Stencils and black paint for lettering
– Metal wire mesh panel (for the floor base)
– Self-tapping screws
– Hinges for the gate door
Instructions
Start by cutting your boards to matching lengths — the ones in this build run about 48 inches wide. Stain them dark before assembly so the edges soak evenly. While those dry, build your pipe frame by connecting your ¾-inch iron pipes using T-joints at each corner. The pipes screw hand-tight first, then you snug them down with a wrench.
Slide the boards horizontally between the pipe uprights, spaced about 4 inches apart, and secure with screws. The gap spacing gives your dog airflow, which means less anxiety and more calm — and that payoff means fewer scratch marks on your floors.
The gate on the left side uses two hinges bolted directly to the pipe frame — it swings clean and latches with a simple hook. Lay the wire mesh panel flat as the floor base to keep things easy to wipe down.
For the name planks, cut three boards slightly shorter than the front panels. Stencil your dog’s name, birth year, and dates using a bold block stencil and black craft paint. Seal everything with a matte polyurethane coat so the lettering doesn’t scratch off.
These 13 Genius DIY Dog Stuff Every Pet Parent Needs to Try Today! ideas pair so well if you’re building out a whole dog-dedicated corner.
Sand any board edges before assembly — splinters on soft paws are not the vibe. And always test the gate latch before leaving your pup unsupervised.
Prep Time: 1 hour | Active Project Time: 4–6 hours | Difficulty Level: Intermediate
📸 Photo credit: Instagram @c0zy4
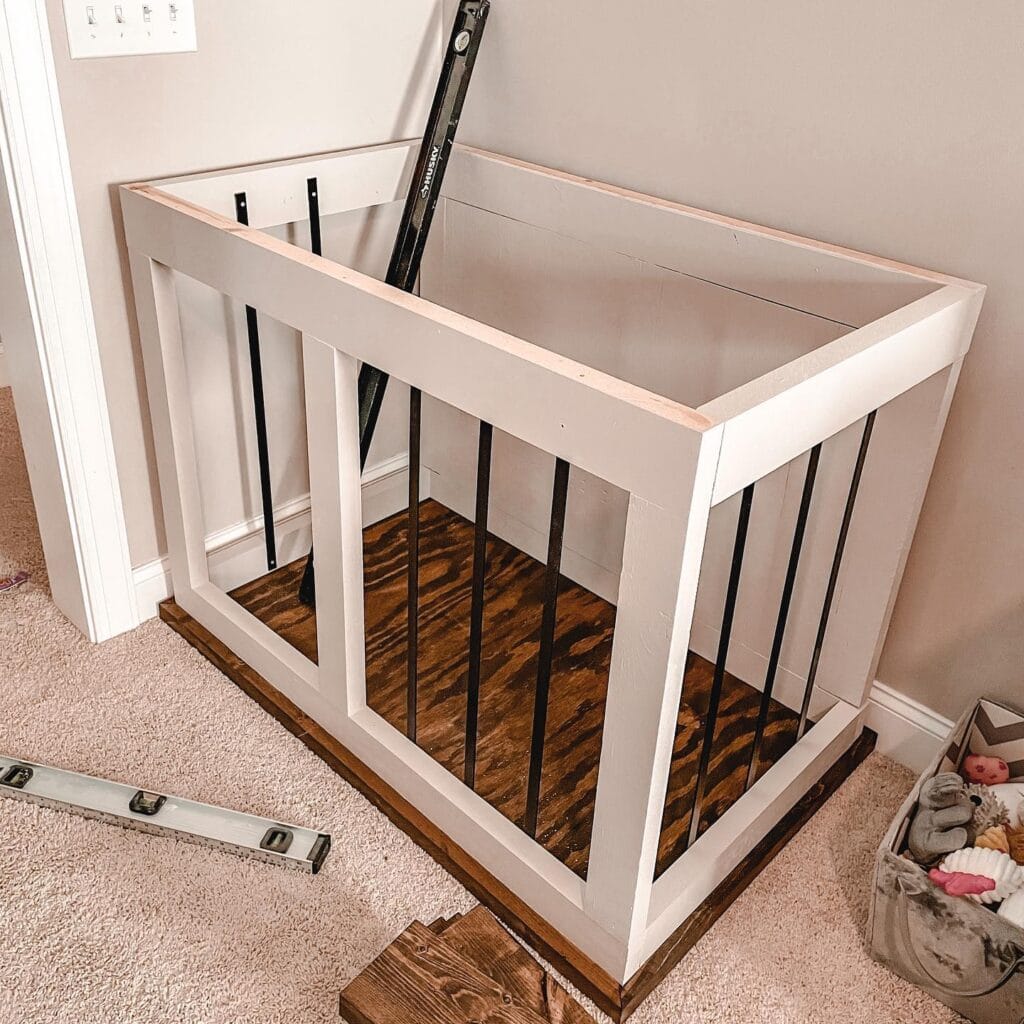
#3: DIY Wooden Dog Crate with Metal Bar Panels (The One That Actually Looks Good in Your Living Room)
Okay, so you know that moment when your golden retriever decides the corner of the room is basically her personal chaos zone? Fur everywhere, toys scattered, and that plastic crate just screaming “I do not belong here.” Girl, I felt that so hard when my cousin had the same situation with her lab.
This build is exactly what you need.
Prep Time: 1 hour | Active Project Time: 4–6 hours | Difficulty Level: Intermediate
Materials & Tools:
– 2×4 pine lumber (frame structure)
– 1×6 pine boards (top frame and base platform)
– ⅝-inch plywood (floor panel — stained dark walnut)
– Black metal flat bar rods (¼-inch x 1-inch, cut to 18-inch lengths)
– White chalk paint or semi-gloss white latex paint
– Dark walnut wood stain
– Metal L-brackets (for top frame reinforcement)
– Wood screws, drill, miter saw, level tool, sandpaper
Instructions
Start by cutting your 2×4 pine into four corner posts at 30 inches tall. Sand every edge — your golden’s nose will find splinters. Then cut your top frame pieces and bottom base frame from 1×6 boards, assembling them into two rectangular frames: one for the top and one for the base.
Paint all your wood pieces with two coats of white semi-gloss before assembly. Trust me on this — painting flat pieces first saves you so much frustration later.
Attach the corner posts to the base frame using metal L-brackets, like the ones visible in the image. Secure them tight. Space your black metal bar rods at 3-inch intervals along each side panel, drilling pilot holes top and bottom so the wood doesn’t split. Slide each rod in and secure with screws.
The dark walnut stained plywood floor panel sits inside the base frame — this feature protects the carpet underneath, which means zero mystery stains soaking through after muddy walks.
Secure the top frame last, using L-brackets on the interior corners to keep everything square. A level tool confirms your structure is true before anything dries permanently.
And the payoff? A crate that looks like furniture. Your golden gets a den that feels calm and secure, and you get a piece that actually fits your Pinterest-worthy home aesthetic alongside other builds like these DIY elevated dog bed ideas.
If you want a door, add a small hinged panel using the same metal rod design on one short side — it keeps the look consistent.
Seal the stained floor panel with two coats of polyurethane. It makes cleanup after muddy paws a literal wipe-and-done situation.
📸 Photo credit: Instagram @homesweetstickelmaier
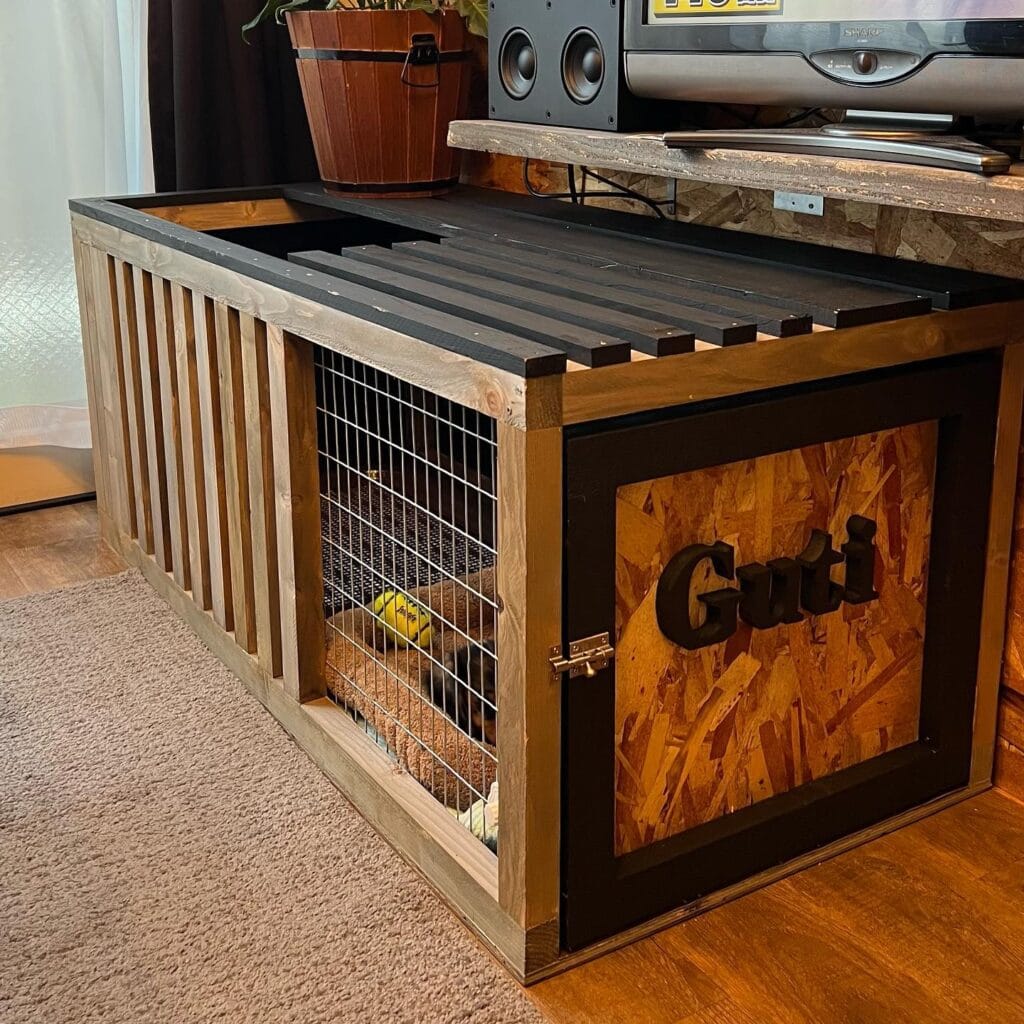
#4: The “Guti” Named Personalized Wooden Dog Crate That Doubles as a TV Console
You know that moment when your golden retriever parks herself right in the middle of the living room, and her bulky plastic crate is just… there, clashing with everything you’ve worked so hard to style?
Yeah. I felt that so hard when my cousin built this for his dog Guti, and I genuinely couldn’t stop staring at it.
This beauty is a custom-built wooden dog crate that slides right under the TV console — it’s literally part of the furniture. The frame uses natural cedar 2×2 lumber for the vertical slats on the sides, with a black-painted OSB panel door at the front featuring 3D raised block letters spelling out the dog’s name. The top is lined with black-stained wooden slats spaced just right to let air flow through, and the entry uses a welded wire mesh panel secured with a brass latch.
And the whole thing sits on hardwood flooring without scratching — the base is flush and clean.
Materials & Tools You’ll Need:
– Cedar 2×2 lumber (side slats and frame)
– OSB board (front door panel)
– Welded wire mesh panel (door insert)
– Black exterior wood paint or stain
– Natural wood stain (cedar tone)
– 3D wooden or MDF letters
– Brass barrel bolt latch
– Wood screws and corner brackets
– Circular saw and miter saw
– Drill and bits
– Sandpaper (120 and 220 grit)
– Wood glue
– Measuring tape and carpenter’s square
Instructions
Start by cutting your 2×4 lumber into four pieces for the main rectangular base frame — two at 48 inches for the length and two at 24 inches for the width. Drill and screw these together at each corner using corner brackets for extra hold, because this base needs to carry real weight.
Next, build the four vertical corner posts using 2×4 lumber cut to 28 inches tall. Attach one post to each corner of the base frame using 3-inch wood screws, making sure each post is perfectly plumb with your carpenter’s square before tightening — a slightly off post will throw off every single slat later.
For the side panels, cut your 2×2 cedar slats to 28 inches and space them 2.5 inches apart across each side of the frame. Screw each slat into the top and bottom rails. The cedar wood grain stays natural and unstained on the sides, which creates that warm contrast against the black top — that color split is what makes the whole piece look intentional and not just “homemade.”
Build the top panel separately using 1×3 black-stained planks laid side by side with half-inch gaps between them. Attach this panel to the top of the four corner posts. Those gaps aren’t just decorative — they give Guti real ventilation, which keeps her calmer and cooler during those long crating hours.
For the front door, cut your OSB board to fit the front opening, then frame it with black-painted 1×2 strips to give it that finished panel look. Cut a wire mesh insert for roughly the top two-thirds of the door, staple it to the back of the frame opening, then cover the edges with 1×2 trim so there are zero sharp edges. Mount your 3D letters with wood glue, let cure for 24 hours, and attach the door to the frame using two heavy-duty hinges. Add your brass barrel bolt latch at mid-door height for easy single-hand opening.
Sand the entire piece with 220-grit sandpaper before your final coat of paint. That last light sand is what gives the black sections that furniture-store finish instead of a garage-project finish.
One thing to remember: cut a thin piece of non-slip rubber mat to line the interior floor — it protects your hardwood and gives Guti actual traction so she’s not sliding around every time she settles in.
The personalized name panel feature means your dog has her own named space — and honestly, guests stop and ask about it every single time. If you love this idea, 14 Stylish DIY Dog Crate Furniture Ideas You’ll Love has even more inspo for making your crate look like it belongs in a design magazine.
Prep Time: 30 minutes | Active Project Time: 6–8 hours | Difficulty Level: Intermediate
Seal the entire exterior with a water-based polyurethane coat after painting — dog noses, paws, and the occasional spilled water bowl won’t stand a chance against it.
📸 Photo credit: Instagram @mokuzaiman2019
#5: DIY Dog Crate Console Table (With a Styled Top That’ll Make Your Living Room Look Intentional)
Prep Time: 30 min | Active Project Time: 2–3 hours | Difficulty Level: Beginner-Friendly
—
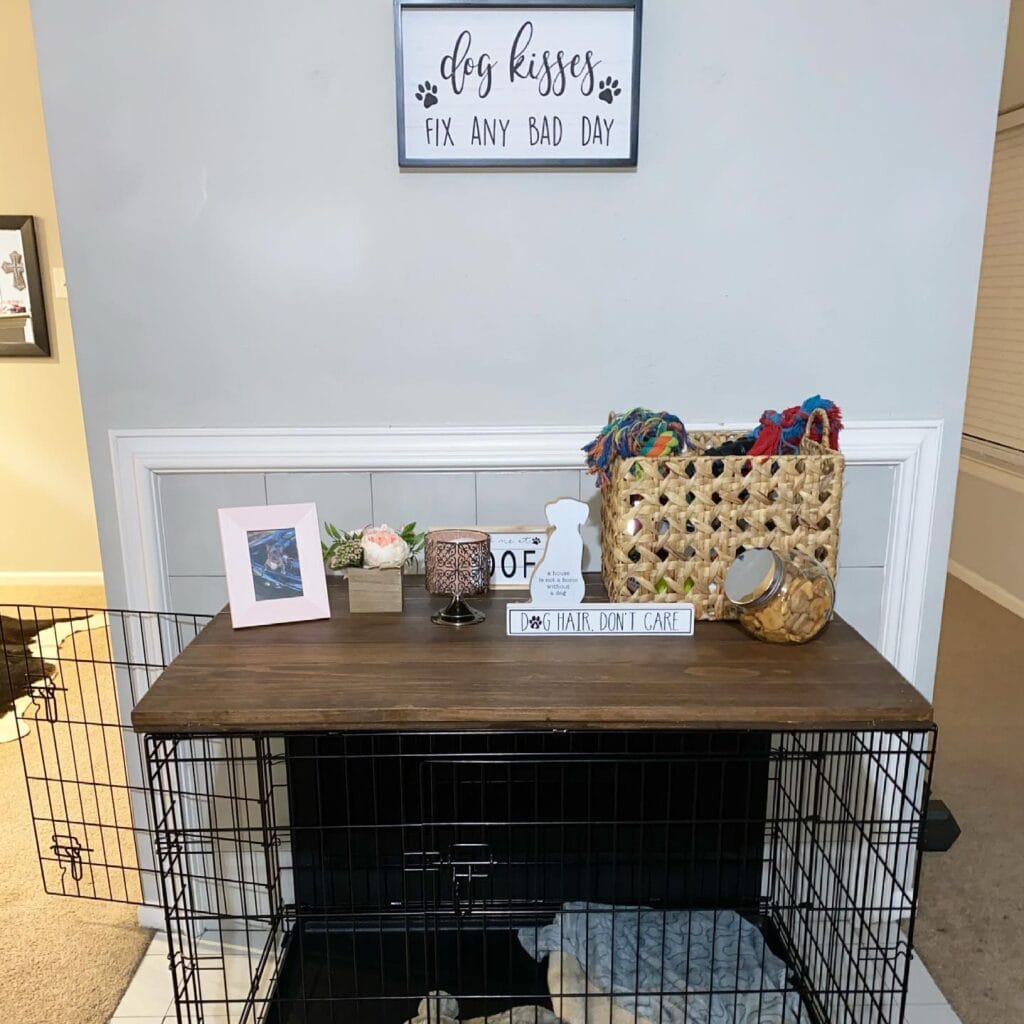
Okay, you know that moment when your golden’s crate is just sitting there in the middle of your living room like an eyesore you’ve been ignoring for six months? Yeah. Mine was blocking the whole entryway and I kept stubbing my toe on it every morning. Not cute.
This setup completely changed how I think about crates. A wire dog crate topped with a stained wood console surface turns the whole thing into actual furniture. And the styled top — the woven basket full of rope toys, the little “Dog Hair, Don’t Care” sign, the treat jar — makes it look like something off your Pinterest board, not a kennel.
Materials & Tools:
– Standard wire dog crate (double-door, black metal)
– 1-inch thick pine or poplar board cut to crate dimensions
– Dark walnut wood stain + foam brush
– Sandpaper (120-grit, then 220-grit)
– Woven basket for toy storage
– Small decorative signs, candle holder, photo frame
– Glass treat jar
Instructions
Sand your board smooth starting with 120-grit, then finish with 220-grit for a clean surface. Apply two coats of dark walnut stain, letting each coat dry 45 minutes before the next.
The stained wood top sits directly on the crate frame — no hardware needed — which means your golden still has full airflow and visibility inside.
Style the top in three zones: personal (photo frame, florals), functional (treat jar within your reach, not theirs), and playful (toy basket on the right side). That three-zone layout keeps it looking curated, not cluttered.
The best part: a wall sign above the crate ties the whole station together. The “Dog Kisses Fix Any Bad Day” framed sign in the image adds that cozy, dog-mom energy without trying too hard.
For more styling directions, 7 Creative Dog Crate Topper DIY Ideas has some really good variations if you want to mix up the materials.
Seal your wood with a matte polyurethane coat — it protects against spills (because someone always knocks over the water bowl) and keeps that rich stain looking fresh for years.
📸 Photo credit: Instagram @pepper.exotics
#6: DIY Farmhouse Dog Crate Furniture (The One That Actually Looks Good in Your Living Room)
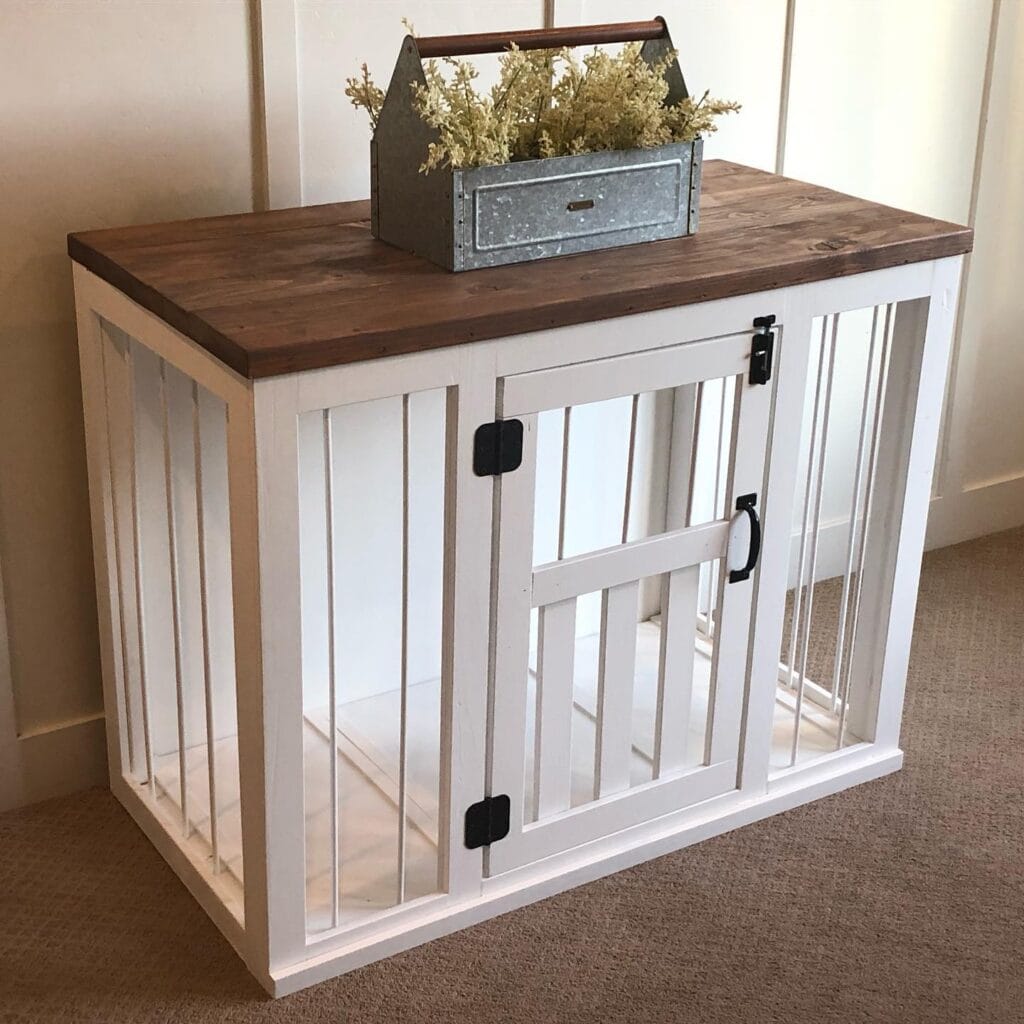
Okay, so you know that moment when your golden retriever finally settles down after zooming around the house, and you look over at that black wire crate sitting in the corner of your living room… and you just cringe? Yeah. Mine looked like a prison cell next to my couch. It drove me absolutely crazy.
This white painted wood dog crate with a stained walnut-toned top is the answer to that specific pain. It doubles as an end table, holds your farmhouse decor on top, and your dog gets a cozy den that feels intentional — not like an afterthought.
Materials & Tools You’ll Need:
– 2×4 pine lumber (for the frame)
– 1×2 pine slats (for the vertical bars on all four sides)
– 1-inch thick pine board (for the top surface — approximately 36″ x 20″)
– Black iron hinges (x2) and a black iron latch handle
– White chalk paint or milk paint (flat finish holds best)
– Dark walnut wood stain for the top
– Sandpaper (120-grit and 220-grit)
– Wood screws (1.5-inch and 2.5-inch)
– Drill, miter saw, tape measure, and wood glue
– Galvanized metal toolbox planter (for styling the top — totally optional but chef’s kiss)
Instructions
Start by cutting your 2×4 pine into four corner posts at 28 inches tall each. These form the skeleton of the whole structure, so take your time getting them square — I actually messed this up my first build and the door never hung right.
Cut your base frame pieces from 2×4 as well: two pieces at 36 inches for the length and two at 20 inches for the depth. Screw them together into a rectangle using 2.5-inch screws with wood glue at every joint for extra strength. Then attach your four corner posts upright to each corner of that base.
Now cut your 1×2 pine slats to fill in the sides and back. Space them about 2.5 inches apart — wide enough for airflow, tight enough that your golden can’t squeeze a snout through and steal your snacks. Attach each slat with 1.5-inch screws top and bottom. Do this on both side panels and the full back panel.
For the door opening, frame it out with two vertical 2×4 pieces down the center-front of the crate, leaving a gap of about 14 inches for the door frame itself. Build the door separately from 1×2 slats mounted inside a 2×2 frame, then hang it using your black iron hinges. Add your black iron latch handle on the right side — the kind with that little D-ring pull looks exactly like what’s in this build.
Sand everything with 120-grit first, then finish with 220-grit before painting. Apply two coats of white chalk paint, letting it dry fully between coats. The chalk finish gives it that soft farmhouse look without being shiny or plasticky.
The top is where it gets really fun. Cut your pine board to 36″ x 20″, slightly wider than the frame so it overhangs on all sides by about an inch. Sand it smooth and apply dark walnut stain in long strokes with a cloth. Two coats of stain plus one coat of matte polyurethane keeps it protected from water bowls and clumsy golden paws. Screw it down from the inside of the frame so no hardware shows from the top.
Real talk: the stained top is what makes this piece look like furniture instead of a craft project. It’s the contrast between the warm brown wood and the crisp white base that catches everyone’s eye.
Prep Time: 30 minutes | Active Project Time: 6–8 hours | Difficulty Level: Intermediate
Style the top with a galvanized metal planter box filled with dried greenery, just like in the photo — it pulls the whole farmhouse vibe together. And if your golden is on the bigger side, check out 7 Cozy DIY Dog Beds for Large Dogs to add some cushion inside the crate.
The enclosed den space means your dog gets a calm, secure spot — the crate functions as furniture, saves floor space, and keeps your living room looking pulled together without hiding your dog away.
Seal all paint edges lightly with a fine sandpaper after the final coat for that smooth, professional finish you see in the photo. It removes any brush texture and makes the white look clean and intentional.
📸 Photo credit: Instagram @thedevondowdell
#7: The Designer Dog Crate That Doubles as a Side Table (Birch Plywood + Acrylic Build)
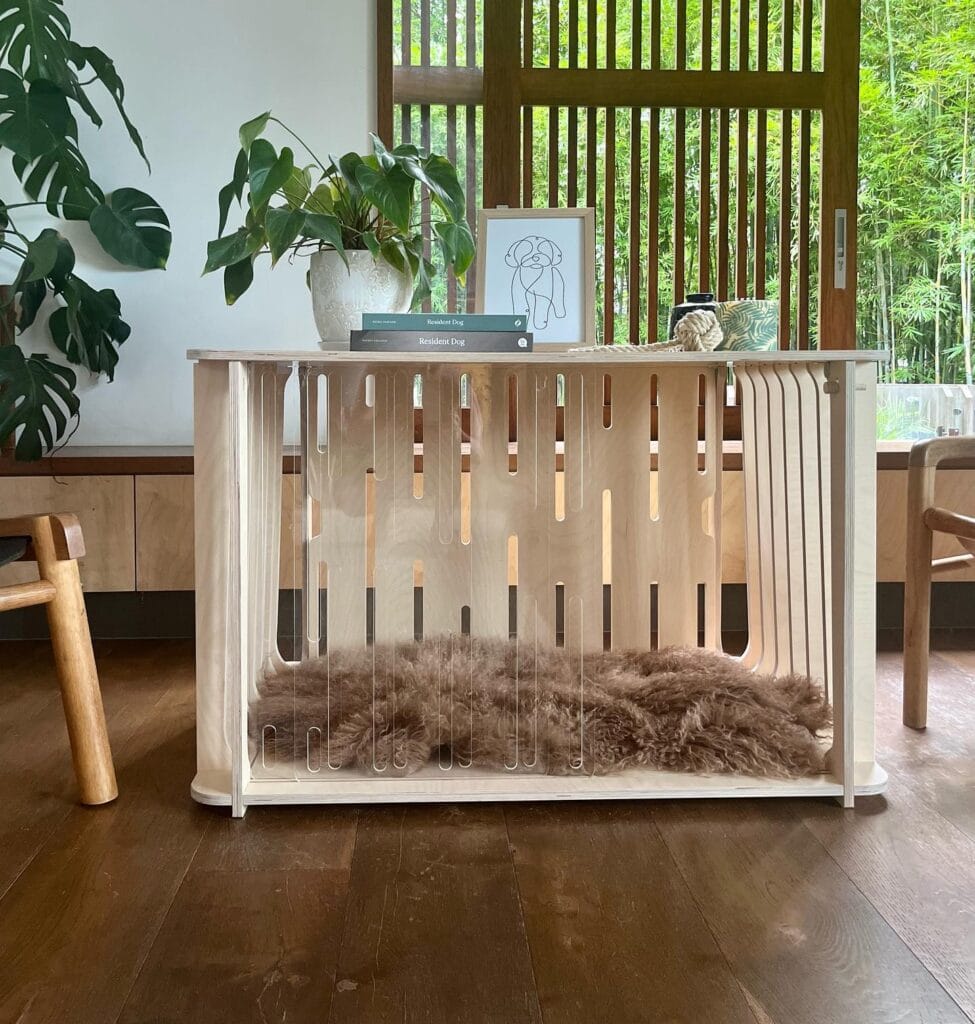
You know that moment when your golden tracks mud across the living room and makes a beeline for her crate — that sad plastic kennel shoved in the corner that ruins your whole aesthetic? Yeah. Mine used to live behind the couch because I couldn’t stand looking at it.
This build changed everything.
Prep Time: 1 hour | Active Project Time: 4–6 hours | Difficulty Level: Intermediate
Materials & Tools:
– 3/4″ Baltic birch plywood (two 24″ x 36″ sheets)
– 1/4″ clear acrylic sheet (24″ x 36″)
– Rounded pine dowels (roughly 3/4″ diameter, cut to 22″ lengths — you’ll need about 15)
– Sandpaper (120-grit and 220-grit)
– Wood glue + clamps
– Jigsaw with a fine-tooth blade
– Drill with 1/4″ and 3/4″ bits
– Matte water-based polyurethane (clear finish)
– A fluffy sheepskin liner (that brown one in the photo is everything)
Instructions
Start by cutting your birch plywood into two 24″ x 36″ side panels, one 36″ x 18″ top panel, and one base panel the same size. The top panel is what makes this piece furniture — not just a cage — so keep it flat and clean. Sand all four panels with 120-grit first, then finish with 220-grit until the surface feels like skin.
Mark your dowel holes 2 inches apart along both side panels, 1 inch from the edge. Drill clean 3/4″ holes all the way through. This spacing mimics the photo’s airy slat look, and it gives your dog visibility without making her feel exposed. That matters more than people think — dogs feel safer when they can see out but still feel enclosed.
Slot the dowels through both panels and secure with wood glue at each entry point. Clamp everything overnight. Don’t rush this step — a wobbly frame means a crate your golden will bump open at 3am.
For the acrylic front panel, cut it to 22″ x 18″ using your jigsaw with the fine-tooth blade. Score the cut line first with a utility knife to prevent cracking. Drill two 1/4″ mounting holes at the top edge, then attach it with small barrel bolts so it swings open like a door. The acrylic front is what makes this design so sharp — your dog gets airflow, you get a clear view of her, and guests see something that looks like it came from a boutique furniture store.
Apply two coats of matte polyurethane to all wood surfaces. Let it cure fully — at least 24 hours — before your dog goes anywhere near it.
Drop in the sheepskin liner and done.
Here’s the takeaway: birch plywood is strong enough to handle a 60-pound dog leaning against the sides, the acrylic door keeps her contained without making the space feel like a cage, and the flat top gives you actual surface space for books and a plant.
My friend built this for her lab and styled it with two stacked coffee table books and a monstera. Her guests thought it was a credenza.
Make sure the polyurethane is fully cured and odor-free before your dog uses it — their noses are sensitive and a strong chemical smell can make them avoid the crate for weeks.
📸 Photo credit: Instagram @thepawsroom_dogcratefurniture
#8: DIY Dog Crate End Table With a Wood Frame (The Coziest Hideout Your Golden Will Ever Have)
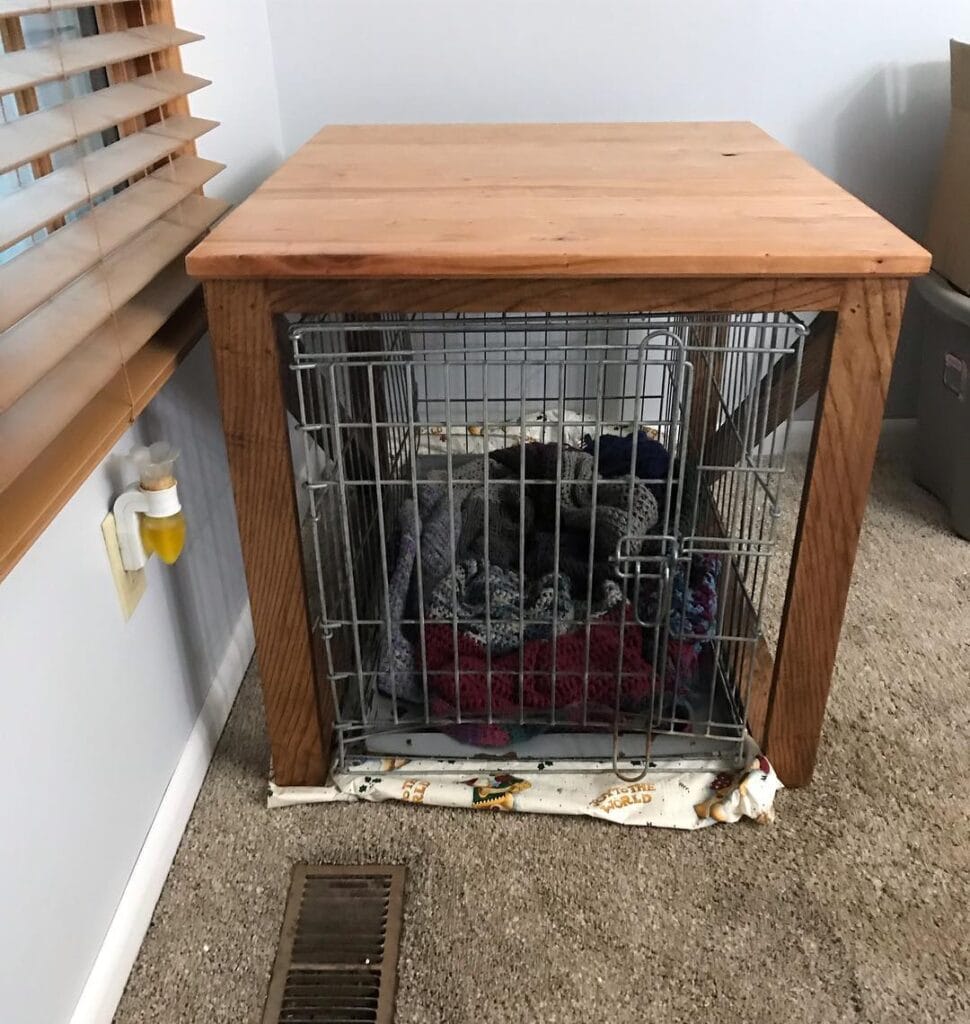
Okay, so you know that moment when your golden is sprawled across the living room floor, and her crate looks like an absolute eyesore next to your carefully curated furniture? Yeah. Mine was sitting right next to my couch looking like a prison cell, and I couldn’t take it anymore.
This build wraps a standard wire crate inside a solid oak wood frame with a flat-top surface that doubles as an end table. The one in the photo uses red oak lumber for the corner posts and a wide plank tabletop — that warm honey tone blends right into a cozy living room.
Materials & Tools
– Red oak 2x4s (for the four corner posts)
– 1×6 or 1×8 oak planks for the tabletop surface
– Medium wire dog crate (the photo shows a standard single-door wire crate)
– Wood screws and wood glue
– Sandpaper (120-grit then 220-grit)
– Stain or wood finish in a warm walnut or natural oak tone
– Circular saw or miter saw
– Drill and drill bits
– Measuring tape and speed square
Instructions
Start by measuring your wire crate on all four sides — height, width, and depth. You want the frame to sit just around the outside edges of the crate, so your cut dimensions should add roughly ¾ inch on each side to account for the wood thickness.
Cut your four corner posts to match the exact height of the crate plus the tabletop thickness. The photo shows posts that sit flush with the crate bottom and rise straight up, so aim for that clean vertical line. Sand each post with 120-grit first to knock down the rough edges, then follow with 220-grit for that smooth-to-the-touch finish.
Build the tabletop by arranging your oak planks side by side and gluing them together with wood glue. Clamp them flat and let them cure for a full 24 hours. This glued-panel top is what gives you that wide, sturdy surface — strong enough to hold a lamp, a book, your Sunday morning coffee. And that solid top surface means your dog gets a darker, den-like space inside, which actually helps anxious dogs settle faster. That’s the payoff: a calmer dog and a better-looking room.
Once your top panel is dry, attach it to the four corner posts using wood screws from underneath so no screw heads show on the surface. Slide the wire crate inside the frame — no permanent attachment needed, which means you can pull it out for cleaning whenever you want.
Apply your stain in long strokes following the wood grain. Two coats give you that rich, saturated tone you see in the photo. Let it dry overnight between coats.
Line the inside of the crate with a few layered blankets the way the photo shows — a holiday print liner on the bottom, then stacked knit throws on top. It makes the whole space feel less cage and more actual cozy corner.
Finishing the inside edges of your frame with a router and a simple round-over bit before assembly will make the whole piece look intentional and store-bought. Also, if your dog is a chewer, seal the interior-facing wood edges with a pet-safe polyurethane finish — it protects the wood and keeps your pup safe.
Prep Time: 30 minutes | Active Project Time: 4–6 hours | Difficulty Level: Intermediate
📸 Photo credit: Instagram @treemendouswoodworking
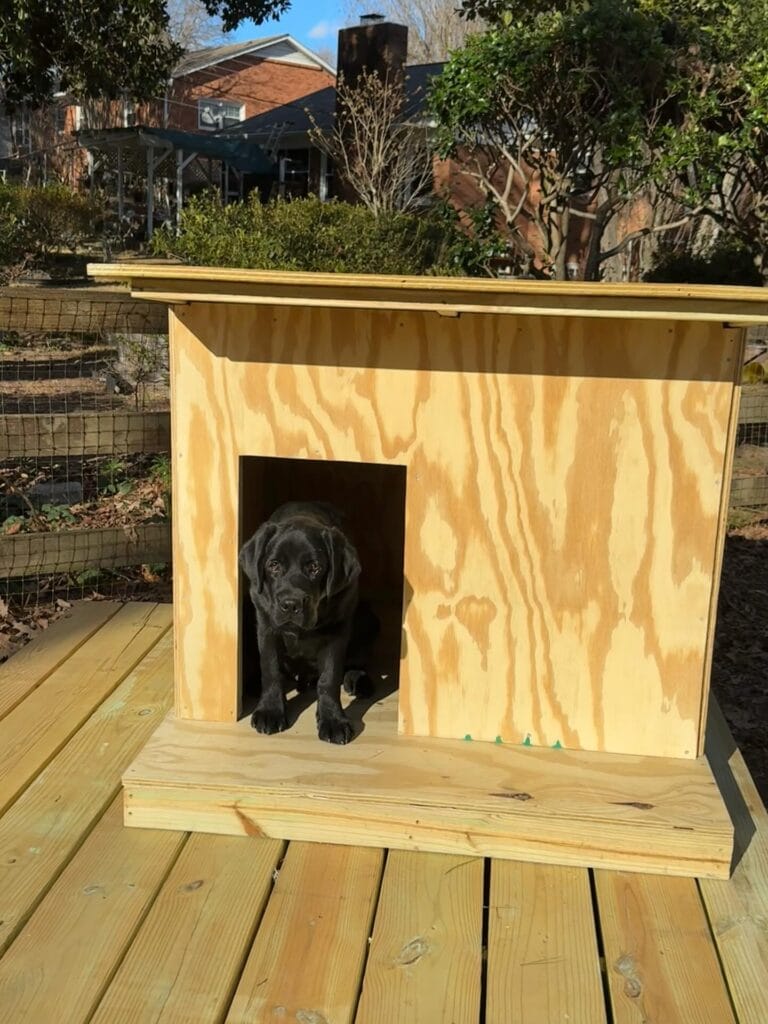
#9: Build a Modern Flat-Roof Dog House From Plywood (That Actually Looks Good)
Your golden retriever has claimed the couch, the rug, and honestly probably your favorite throw pillow. Finally giving them their own space? That’s the move.
This build — straight from the image — is a clean, modern flat-roof dog house made from ¾-inch plywood sheets and pressure-treated pine decking. The natural wood tones give it that Pinterest-worthy look without trying too hard.
Materials & Tools
– ¾-inch plywood (for walls and roof)
– Pressure-treated 2×6 pine boards (for the raised platform base)
– 1×3 pine trim strips (roof edge detail)
– Wood screws (2-inch and 3-inch)
– Circular saw, drill, measuring tape, sandpaper (120-grit)
– Exterior wood sealant
Instructions
Prep Time: 30 min | Active Project Time: 4–6 hours | Difficulty Level: Intermediate
Cut your plywood into four wall panels and one roof panel. The door opening in the image sits center-left, approximately 12 inches wide by 14 inches tall — big enough for a lab-sized dog to walk through without crouching uncomfortably, which means they’ll actually use it.
Build the base platform first using pressure-treated 2×6 boards laid flat. This raises the house off the ground — the raised platform keeps moisture out, regulates floor temperature, and protects your dog’s joints during cold months. And that payoff matters long-term.
Attach the four wall panels using 3-inch screws at every corner. Pre-drill to avoid splitting. Lay the roof panel flat across the top, then nail down the 1×3 trim strips around the perimeter edge — that’s the detail you see in the image that makes it look finished and intentional.
Sand every exposed edge to 120-grit smoothness. Apply two coats of exterior sealant, letting it dry fully between coats.
The whole structure sits on a pressure-treated wood deck, which pairs perfectly if you’re already building out your backyard. Speaking of which, 15 DIY Dog Playground Ideas for Your Backyard has some great companion builds if you want to keep going.
Leave the interior bare or add a cedar shaving floor liner — cedar naturally deters fleas and keeps the space smelling fresh longer than regular bedding.
📸 Photo credit: Instagram @winston_the_bear_dog
#10: DIY Double-Door Wooden Dog Crate That Looks Like Actual Furniture
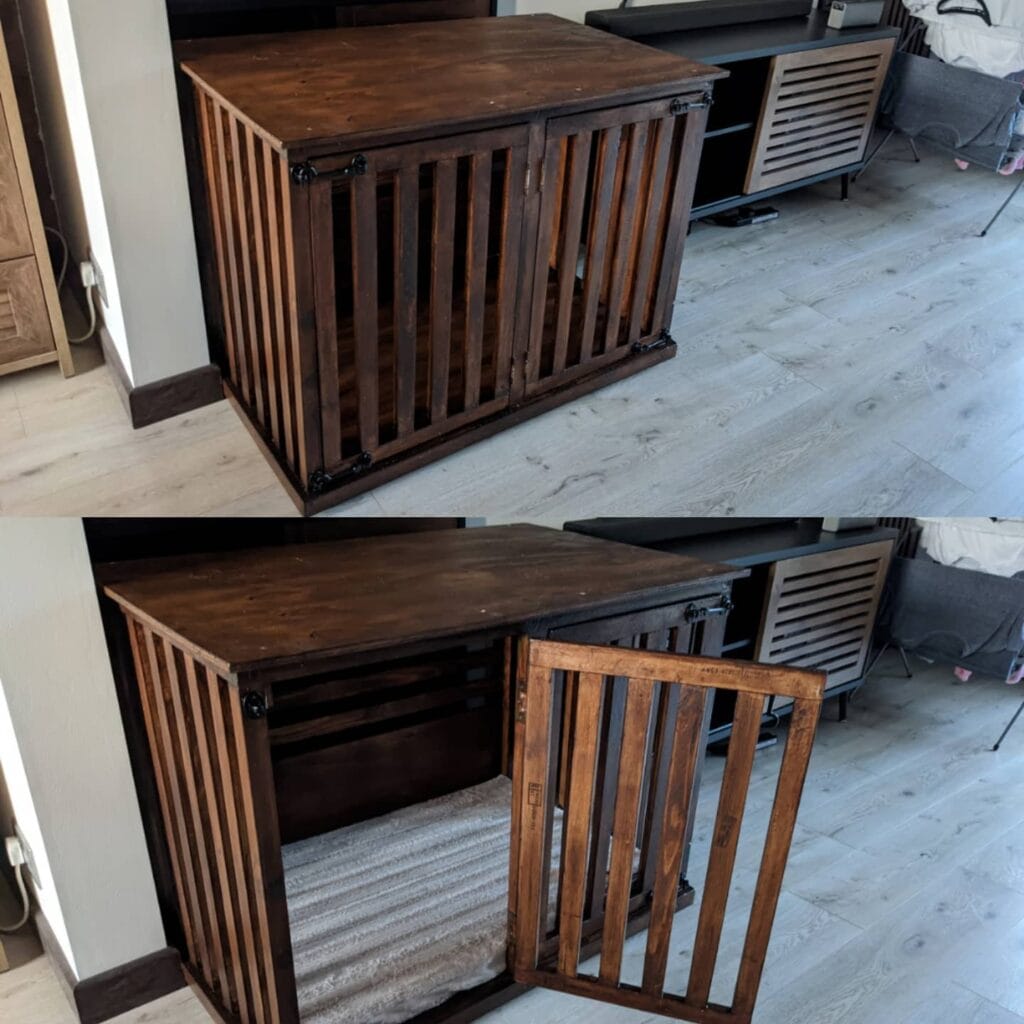
Okay so you know that moment when your golden retriever just… claimed the entire living room? Like, her dog bed is somehow always in the middle of everything, there’s a chewed corner on your favorite rug, and your guests are doing that awkward shuffle trying not to trip over her stuff.
That was me every single weekend until I built this.
Materials & Tools You’ll Need:
– 2×4 pine lumber (dark walnut stain finish)
– 1×2 slat boards for the vertical bars
– ¾-inch plywood for the top panel and base
– Black metal hinges and barrel bolt latches
– Wood stain in dark espresso/walnut tone
– Sandpaper (120-grit and 220-grit)
– Wood screws (2-inch and 3-inch)
– Drill, miter saw, measuring tape
– A thick washable dog mat (fits the interior floor)
Prep Time: 1 hour | Active Project Time: 6–8 hours | Difficulty Level: Intermediate
Instructions
Start by cutting your 2×4 frames into four identical rectangular sections — two for the sides, one for the back, and two swing-out front doors. The double-door design is everything here because it gives your golden easy access from either side, which means less anxious scratching at the gate.
Sand all pieces with 120-grit first, then finish with 220-grit before staining. That second sanding pass is what makes the dark espresso stain absorb without blotchiness — do not skip it.
Once dry, attach your 1×2 vertical slats with 2-inch screws spaced 3 inches apart. Even spacing is what gives this that clean, furniture-grade look that makes people actually think it’s a sideboard.
Assemble the frame using 3-inch screws at every corner joint. Attach the top ¾-inch plywood panel flush across the full length — this top doubles as a display surface for your plants or frames, which means the crate earns its floor space instead of just taking it.
Hang both doors using black metal hinges mounted at the top and bottom of each door frame, then add your barrel bolt latches at the center meeting point. The latch placement here matters: center-mount them so both doors stay secure without rattling.
Slide in a thick washable mat and your girl has her own cozy corner that finally doesn’t clash with your decor.
The slat spacing keeps airflow moving through the crate, so your dog stays comfortable even on warm days. Built from solid pine with a plywood top, this thing holds weight without wobbling — you can genuinely stack books or a small lamp on top.
If you’re deep in a DIY phase for your pup, 7 Natural DIY Dog Shampoos for a Soft Coat Without Harsh Chemicals pairs perfectly with this project for a full spa-and-den weekend.
Pre-drill every hole before driving screws into the slat boards — pine splits fast at the edges and a cracked slat will throw off the whole clean look you’re going for.
📸 Photo credit: Instagram @yosha1008
The One DIY Cage Mistake That’ll Cost You a Full Rebuild
Okay, real talk — the biggest mistake people make with DIY dog cages? Building the frame before measuring their dog in a natural resting position.
Not standing. Not sitting. Sprawled out like your golden just ran three laps around the backyard and collapsed.
I learned this the hard way. Built this gorgeous cedar frame, sanded it smooth, even stained it to match my living room floors. Then my friend’s lab laid down inside it and her tail was literally pressed against the wire. Had to tear the whole side panel off.
Here’s the pro secret nobody talks about: add 8-10 inches to your dog’s full stretched length — not just their height. Golden retrievers especially need that extra sprawl room.
Also? Use hex bolts instead of wood screws at every corner joint. Wood screws loosen after your dog bumps the frame a dozen times. Hex bolts stay locked.
Why this works: a cage that fits your dog and your aesthetic becomes furniture, not an eyesore — which is exactly the Pinterest-worthy setup you’re going for.
Your Golden Deserves a Clean Home (And So Do You)
You’ve got the Pinterest-worthy living room. The gorgeous rug. The sofa you actually love sitting on.
Don’t let muddy paws and dog hair be the reason you can’t enjoy it.
Pick one thing from this list and just start there. Seriously, even one good tool changes everything — I went from dreading rainy walks to not even flinching when my dog bolts through the door.
And hey, if you’re already going full DIY mode, a dedicated dog bathing station might be your next best move.
So tell me — what’s the messiest moment your golden has ever blessed you with? 🐾

Amr Mohsen is a software engineer who traded his keyboard for a leash — at least on weekends. His love for dogs inspired him to share what he learns as a dog owner and enthusiast, bringing a detail-oriented, research-driven perspective to every article he writes. If it’s about dogs, he’s probably already looked it up twice.


