
Your golden retriever is adorable. The wire crate sitting in the middle of your living room? Not so much.
That bulky metal box clashes with everything — your throw pillows, your carefully curated gallery wall, all of it. And you’ve tried hiding it with a blanket, but honestly? It just looks worse.
Real talk: your home deserves better than “dog kennel chic.”
I went through the exact same thing with my pup last year. I kept scrolling Pinterest, drooling over these beautiful homes, then looking at my own space and cringing at that eyesore in the corner.
That’s why I pulled together these 14 diy dog crate furniture ideas that actually look like real furniture — pieces you’d want in your home. No more choosing between your dog’s comfort and your decor.
#1: Ornate White Birdcage Dog Crate — The Pinterest Dream Den Your Golden Deserves
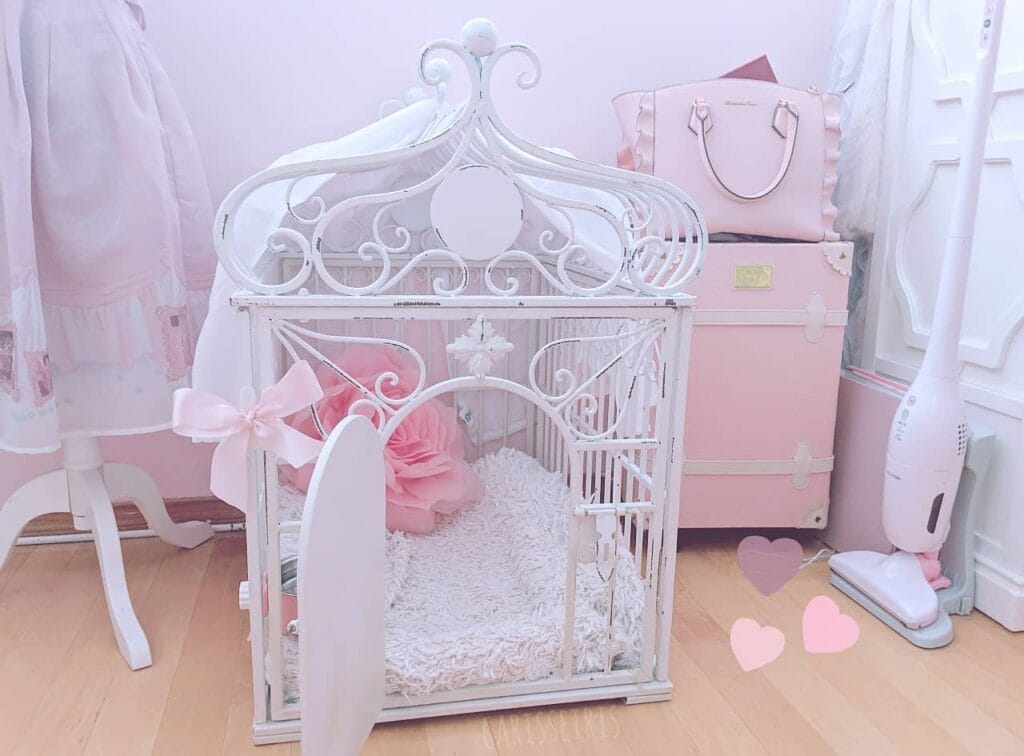
You know that moment when your golden has zero interest in her plain wire crate and just… stares at you with those eyes? Yeah. Mine did the same thing.
This white distressed metal birdcage crate is the one.
Materials & Tools:
– Large decorative wrought iron birdcage frame (approx. 24″W x 20″D x 36″H)
– White chalk paint + distressing sandpaper (220-grit)
– Fluffy white shag mat for flooring
– Pink satin ribbon (1.5″ width)
– Oversized paper flower decor (blush pink)
– White hanging ornament (cage interior)
– Rust-proof sealant spray
Instructions
Sand the frame lightly first — that lived-in, chippy finish you see in the photo isn’t accidental. Apply two chalk paint coats, letting each dry fully, then sand edges to reveal bare metal underneath. The distressing gives texture and hides future scratches from paws.
Lay the shag mat flat on the base — the thick pile cushions joints and keeps your golden comfortable during long naps. Tie the pink ribbon bow on the side door. Hang the white ornament inside as a focal point.
Add the oversized paper flowers in the back corner. They’re purely decorative but visually anchor the space and make the whole setup feel intentional.
Keep the door hinge lightly oiled so it swings quiet — a startling creak during crate training undoes everything.
Prep Time: 20 min | Active Project Time: 3 hours | Difficulty Level: Intermediate
For more ideas like this, 7 Creative DIY Dog Cage Furniture Ideas has some serious inspiration.
📸 Photo credit: Instagram @carisseiris
#2: Double Dog Crate with Wooden Top and Blue Steel Frame
Your golden retriever just bolted inside after a muddy backyard sprint, and now you’re watching her shake off on your cream couch again. You need a spot that’s hers — but one that doesn’t look like a pet store exploded in your living room.
This double crate is exactly that.
Materials & Tools:
– 2×4 pine lumber for the frame
– Cobalt blue wood paint or spray paint
– Stainless steel rods (⅜ inch diameter)
– Natural pine plank for the tabletop
– Blue suede fabric for crate curtains
– Black D-ring straps for curtain ties
– Hinges and latch hardware for doors
– Drill, saw, sandpaper, measuring tape
Instructions
Cut your pine frame pieces first. Build two identical 24×36 inch box sections side by side. Drill evenly spaced holes along the top and bottom rails, then thread your stainless steel rods through — this keeps your pup safe but gives that clean, furniture-store look.
Paint everything cobalt blue before attaching the tabletop. The solid pine slab rests flat on top, giving you actual surface space for your lamp or coffee station.
Cut the blue suede fabric into curtain panels, attach black D-ring straps as ties, and snap them along the top rail. Your dog gets a cozy den vibe, which reduces her anxiety at night.
Sand any rough rod edges before your dog moves in.
Prep Time: 30 min | Active Project Time: 6–8 hours | Difficulty Level: Intermediate
📸 Photo credit: Instagram @furnature.ae
#3: The “Lulu Suite” – DIY Modular Dog Playpen With Teepee Bed & Crate Station
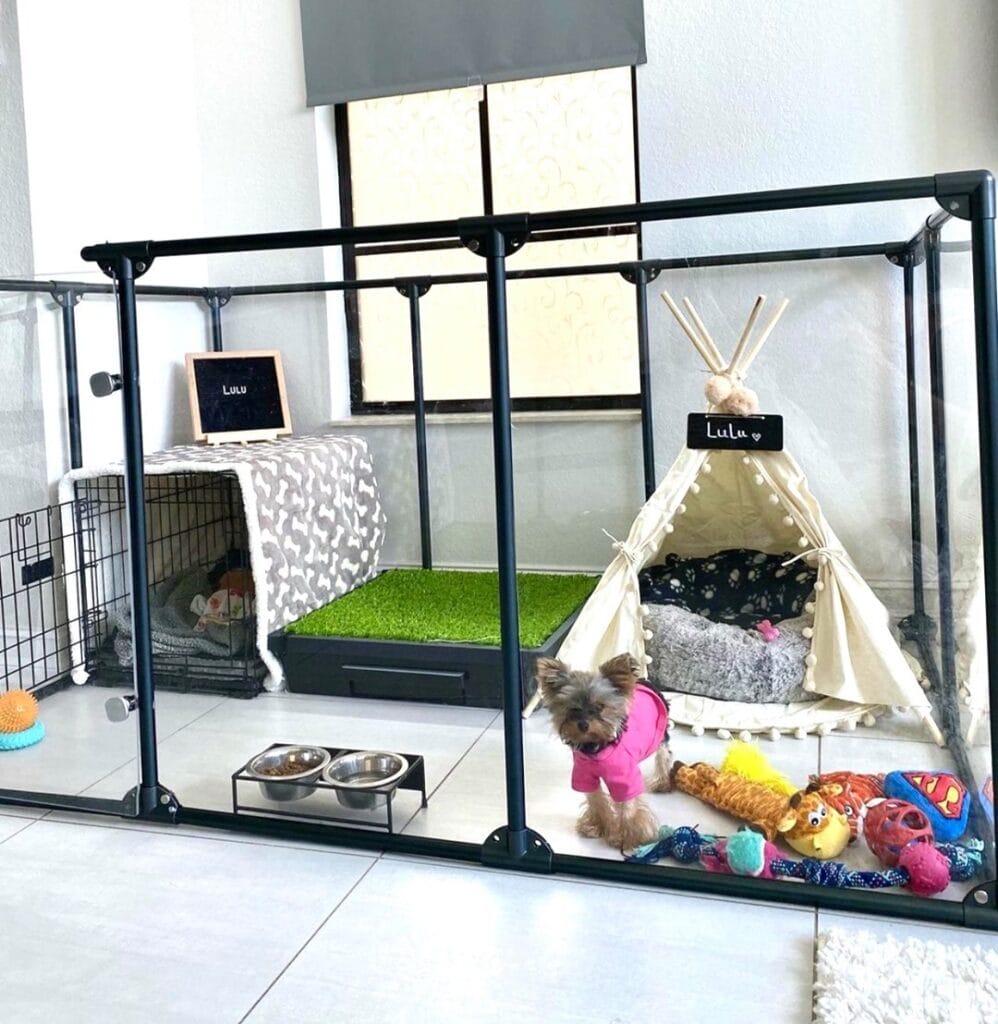
Your golden’s crate is shoved in the corner, the food bowls are sliding across the floor, and somehow there are toys everywhere. You deserve better. So does she.
This setup uses a black steel modular pipe frame with clear acrylic panels to create a defined pet zone that actually looks intentional in your home.
Materials & Tools:
– Black powder-coated pipe connectors + poles (1-inch diameter)
– Clear acrylic side panels
– Wire dog crate (covered with a bone-print fleece blanket)
– Artificial grass pee pad tray
– Canvas teepee with pom-pom trim
– Elevated double stainless steel bowl stand
– Assorted plush toys
– Small chalkboard name signs
– Screwdriver, measuring tape
Instructions
Measure your space first — this build fits roughly a 5×3 ft footprint. Assemble the pipe frame using corner connectors, snapping the acrylic panels into place. Slide the crate left, drape the blanket over it for den-like comfort, which helps anxious dogs decompress faster. Center the grass tray between zones. Position the teepee right, layering gray plush cushions inside. Hang the chalkboard signs and set the bowl stand near the front panel.
Cut the acrylic panels slightly smaller than each frame opening so they slot in without cracking.
📸 Photo credit: Instagram @clearly_loved_pets
#4: Skateboard Deck Gallery Wall With Built-In Dog Crate Console

Your golden retriever has claimed the living room floor again — right in the middle of everything, on your favorite rug.
This dark gray, double-bay dog crate console is the setup that fixes that. It gives your pup a cozy den while doubling as a media console with two top drawers and a flat surface you can actually style.
Materials & Tools:
– ¾-inch plywood (birch or MDF)
– Dark charcoal gray chalk paint + sealer
– Black metal bar handles and cage-style door hardware
– Drill, circular saw, sanding block
– Soft dog bed insert
Instructions
Cut your plywood into side panels, a top, divider, and base. Sand everything smooth before assembling with wood glue and screws. Paint two coats of dark charcoal, letting it cure fully. Mount the black metal grate doors using heavy-duty hinges. Slide the drawers in last — they keep leashes and tennis balls actually out of sight.
The solid top surface holds decor weight easily, meaning your gallery wall moment stays intact above it.
Hang three skateboard decks vertically above the console alongside vinyl records and posters for that editorial edge.
Paint color matching your bookshelf creates a collected, intentional look — not an afterthought. And your dog gets a den that feels like theirs.
Prep Time: 1 hour | Active Project Time: 6–8 hours | Difficulty Level: Intermediate
📸 Photo credit: Instagram @kustomkennels
#5: Paint a Plastic Crate Sage Green for a Crate That Looks Like Furniture
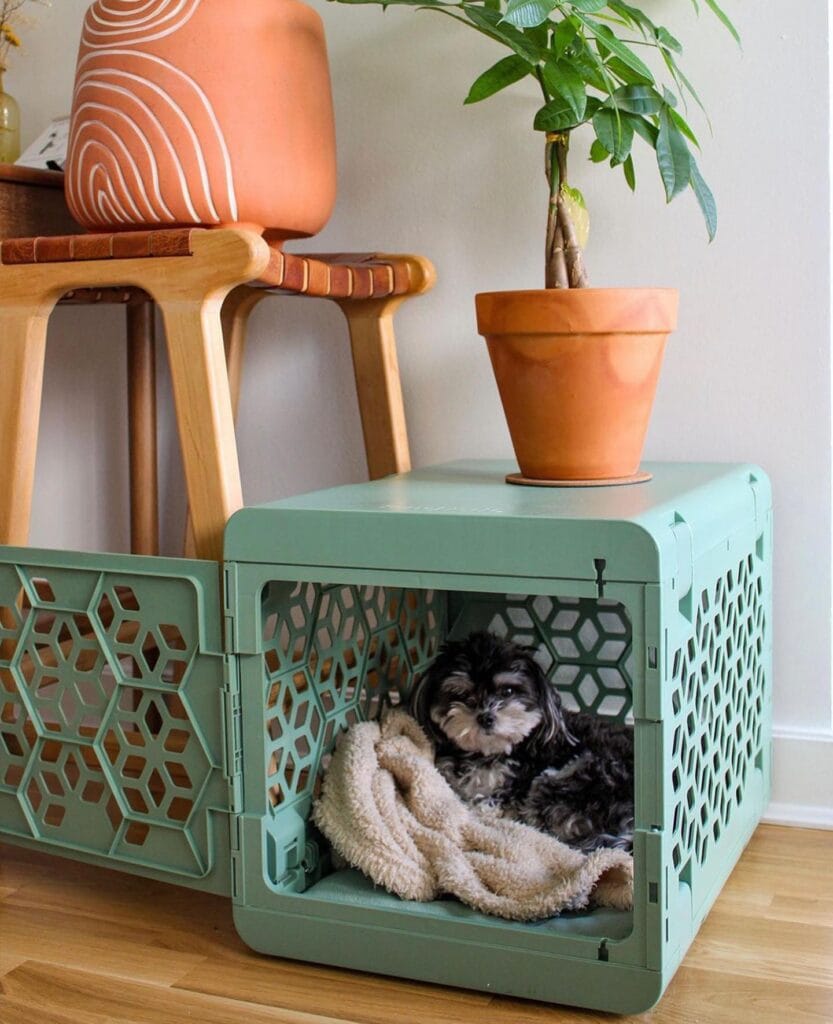
Your golden’s crate is that eyesore in the corner. The one you throw a blanket over before guests arrive.
Materials & Tools:
– Plastic collapsible dog crate (honeycomb panel design)
– Sage green spray paint (plastic-bonding formula)
– Terra cotta pot + trailing houseplant
– Fluffy sherpa blanket in cream or tan
– Fine-grit sandpaper, painter’s tape
Instructions
Lightly sand the crate surface so the paint grips. Spray two thin coats of sage green plastic-bonding spray paint, letting each coat dry fully before the next. The honeycomb panels catch light and create shadow detail that makes the finish look intentional, not DIY.
Tuck the sherpa blanket inside — soft bedding means your dog chooses to stay in there willingly. Set a terra cotta pot on top and suddenly your crate reads as a side table.
And that’s the whole payoff: one crate does two jobs, saves floor space, and guests never ask “what’s that thing?”
Sand before painting or the color chips within a week — plastic needs that tooth to hold.
📸 Photo credit: Instagram @kindtailco
#6: TV Stand Dog Crate Combo With Mesh Cabinet Doors
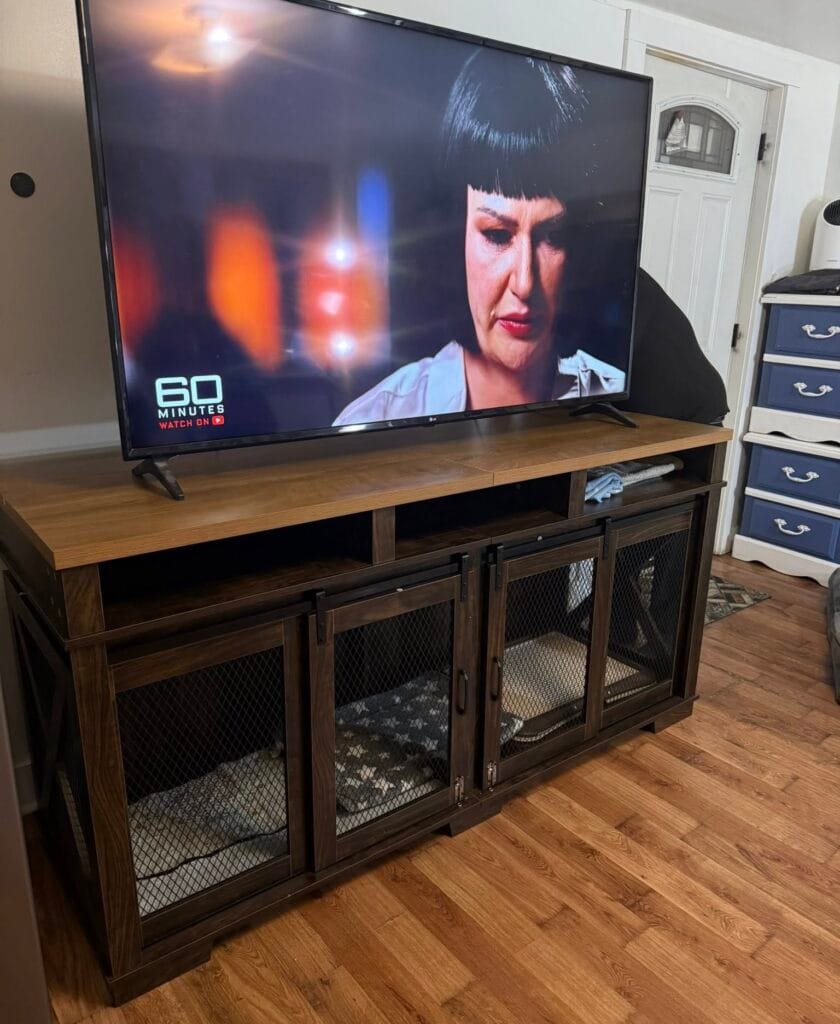
Your golden is always somewhere she shouldn’t be — sprawled across the couch, wedged under the coffee table, staring at you while you watch TV. Mine does the exact same thing. But this TV stand build? It gave my girl her own spot right in the middle of everything.
Materials & Tools:
– Rustic brown oak TV console (65″ wide)
– Black metal mesh cabinet doors with sliding barn-style hardware
– Soft camo-print sleeping pads (cut to fit each compartment)
– Screwdriver, drill, measuring tape, sandpaper
Instructions
Sand all edges first — your dog will rub against them daily. Slide the metal mesh doors onto the bottom track before attaching the top rail. The mesh door design means airflow stays consistent, your dog feels included, and you get furniture that looks intentional.
Line each compartment with a fitted cushion pad. The two-section split gives dogs their own defined sleep zones — huge win for multi-dog homes. Check out 7 Cozy DIY Dog Beds for Large Dogs for cushion sizing ideas.
And honestly? Nobody walking in would even guess it’s a crate.
Prep Time: 30 min | Active Project Time: 3–4 hours | Difficulty: Intermediate
Keep the TV mount centered — bottom-heavy consoles tip forward if the weight distribution is off.
📸 Photo credit: Instagram @georgette_miller_01
#7: Stacked Holiday Dog Crate with Festive Garland Trim
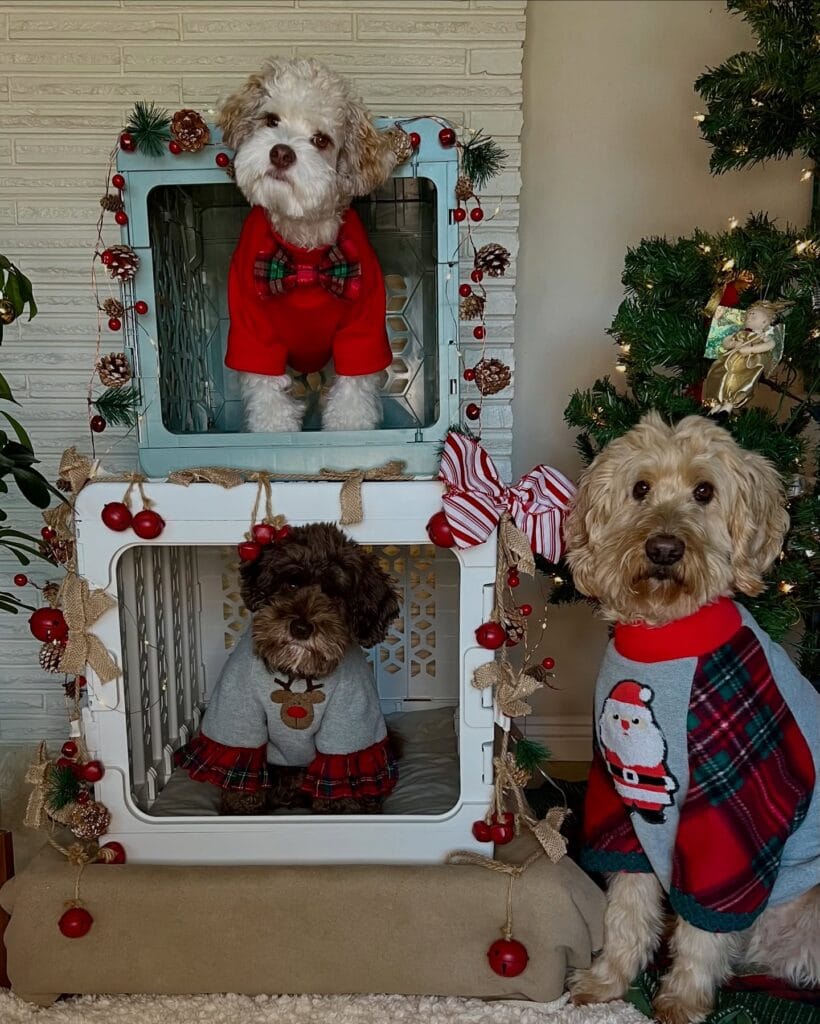
Your golden probably has that crate — the bulky wire one sitting in the corner, clashing with every throw pillow you’ve carefully chosen. Mine too, girl. Mine too.
This setup? It’s two white plastic modular crates stacked vertically, decorated with red berry garland, burlap ribbon bows, and pine cone string lights. Each pup gets their own level, dressed in matching Christmas outfits. The whole thing sits against a white brick fireplace wall next to a lit Christmas tree.
Materials & Tools:
– 2 white plastic stackable dog crates (medium + small)
– Red berry garland (approx. 6 feet)
– Burlap ribbon, pine cones, jingle bells
– Zip ties or hot glue gun
– Faux greenery sprigs
Instructions
Stack the smaller crate on top of the larger one, securing both with zip ties through the corner vents — this keeps it stable and your dog feels safe with zero wobble. Weave the berry garland along the front edges, tucking pine cones into corners with a hot glue gun. Layer burlap bows at the seams between crates. Add a candy-stripe bow on the side facing your tree.
Stacked crates mean two dogs get individual cozy dens, which reduces territorial stress between pets — exactly what you need during chaotic holiday gatherings.
Keep the bottom crate bedding thick and cushioned. Dogs instinctively prefer den-like enclosed spaces, so a plush crate pad makes the lower unit feel extra secure for a smaller or shyer pup.
📸 Photo credit: Instagram @lolaaaabear
#8: White Furniture-Style Dog Crate With Side Extension Panel
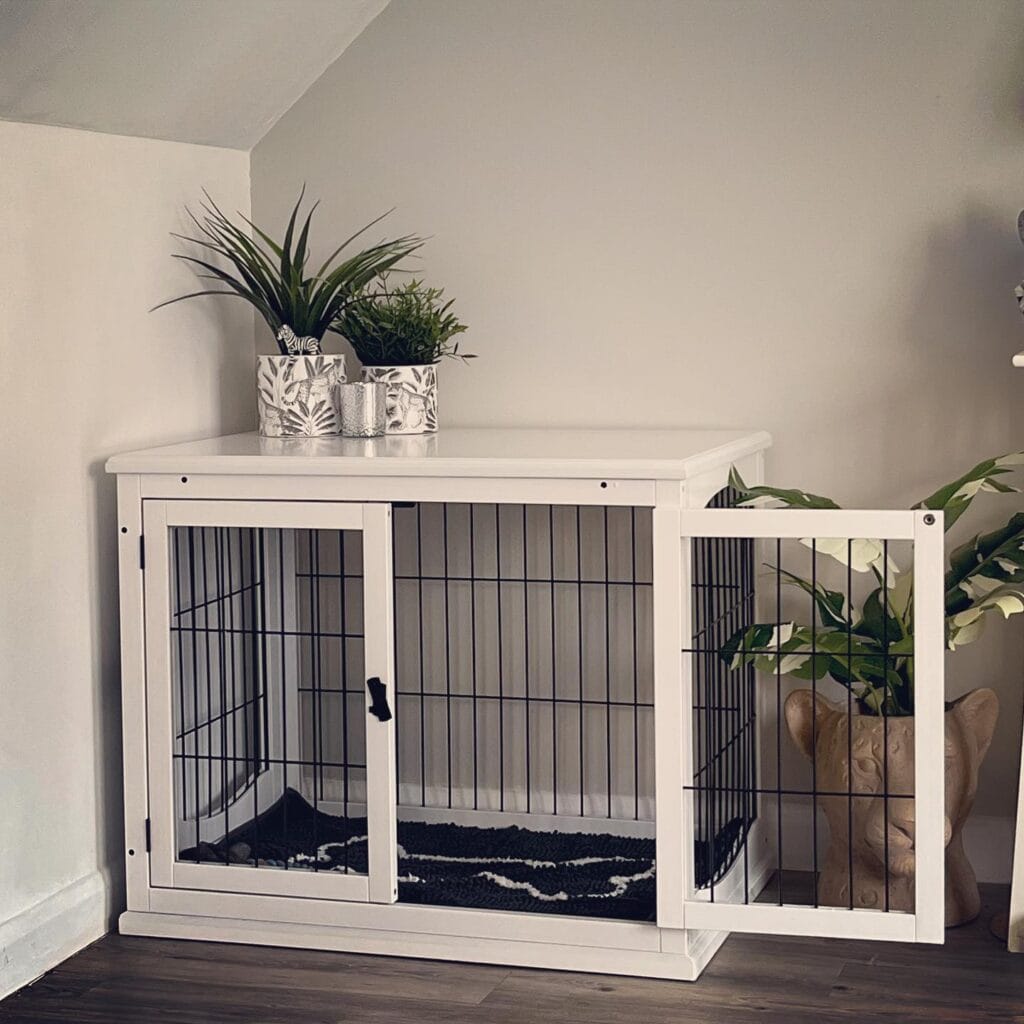
Your golden retriever just bolted through the back door — again — wet paws, muddy belly, heading straight for your linen sofa. And your old wire crate? Sitting in the middle of the living room like an eyesore you’ve been tolerating for two years.
This one changes everything.
Materials & Tools:
– 3/4-inch white-painted MDF boards (top panel, side panels, base)
– Black wire grid panels (front x2, side x1)
– Black metal door hinges and latch hardware
– White wood screws
– Drill, measuring tape, sandpaper
Instructions
Cut your MDF panels to create a 48-inch wide x 32-inch tall cabinet frame. Attach the wire panels inside the front-facing openings using staple gun and trim pieces — this keeps the wire flush so your pup can’t catch a paw. Hang two front doors using black piano hinges, then add the separate side extension panel on the right using a single bolt hinge. That side door means easier access when your retriever refuses to walk out straight. Finish with a smooth top panel for your plant display.
Sand every edge. Golden retrievers lean hard against crate walls, so smooth edges matter.
Prep Time: 30 min | Active Project Time: 4–5 hours | Difficulty Level: Intermediate
📸 Photo credit: Instagram @myhomebykrystal
#9: White Painted Dog Crate End Table With Wire Insert
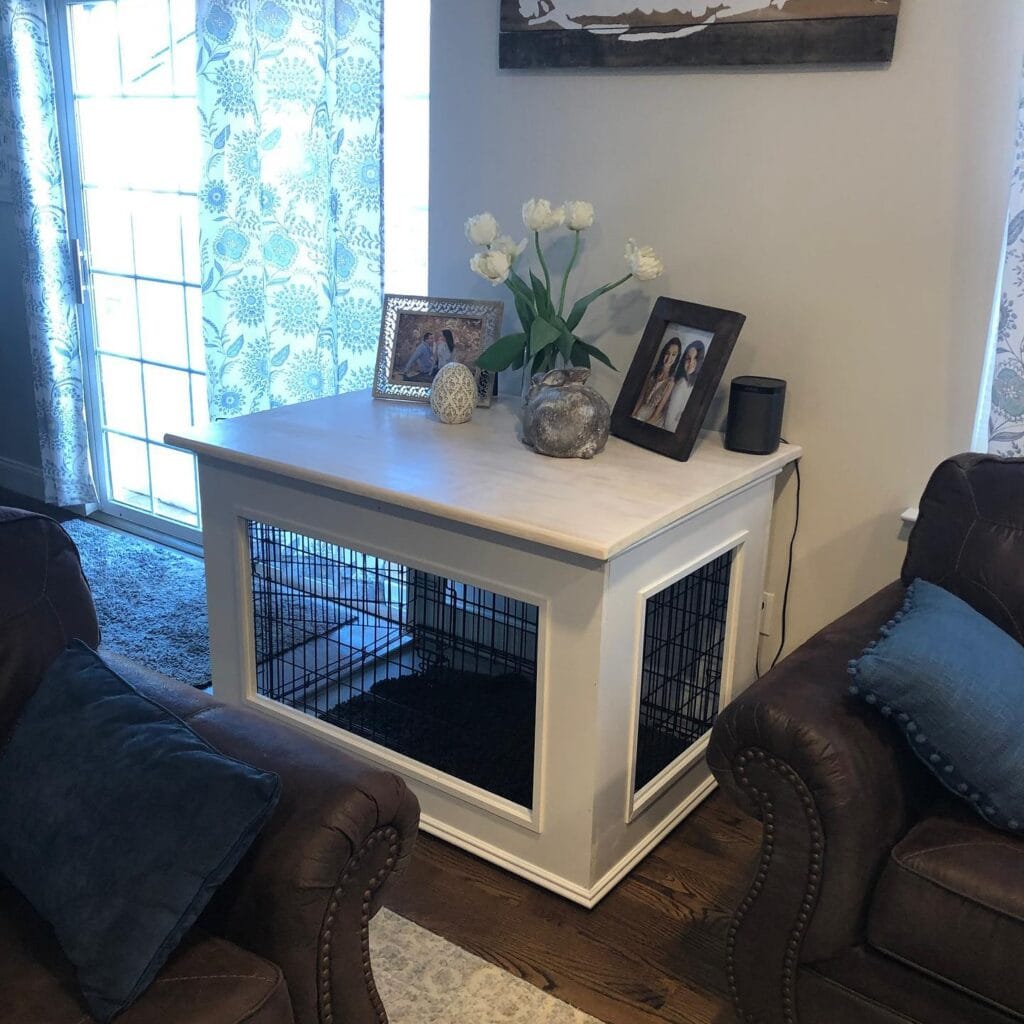
Your golden retriever finally has a “spot” — but that wire crate sitting between your two sofas is screaming chaos in your otherwise Pinterest-perfect living room.
I built something almost identical to this last spring and honestly couldn’t believe how much it changed the whole vibe.
Materials & Tools:
– ¾-inch plywood or pine boards
– White chalk paint + dark wax finish
– Crown molding (baseboards for trim detail)
– Standard wire dog crate (fits inside frame)
– Wood screws, sandpaper, wood glue
– Miter saw, drill, paintbrush
Instructions
Build a four-sided open frame using pine boards, sized to slip over your existing wire crate. Attach crown molding along the bottom base — this is what gives it that furniture look. Cut a flat plywood top panel and secure it with wood glue and screws. Sand everything, then apply two coats of white chalk paint. Finish with a dark wax coat rubbed in and wiped back for that antique texture.
And the top becomes a full side table — photos, flowers, your Amazon Echo — all of it.
The wire crate stays inside the frame, so your dog keeps their familiar den while your living room looks completely intentional.
Paint the trim slightly darker than the main body for extra dimension.
📸 Photo credit: Instagram @palmesecontracting
#10: Under-Stair Dog Crate Built Into the Wall (The Sneaky Good One)
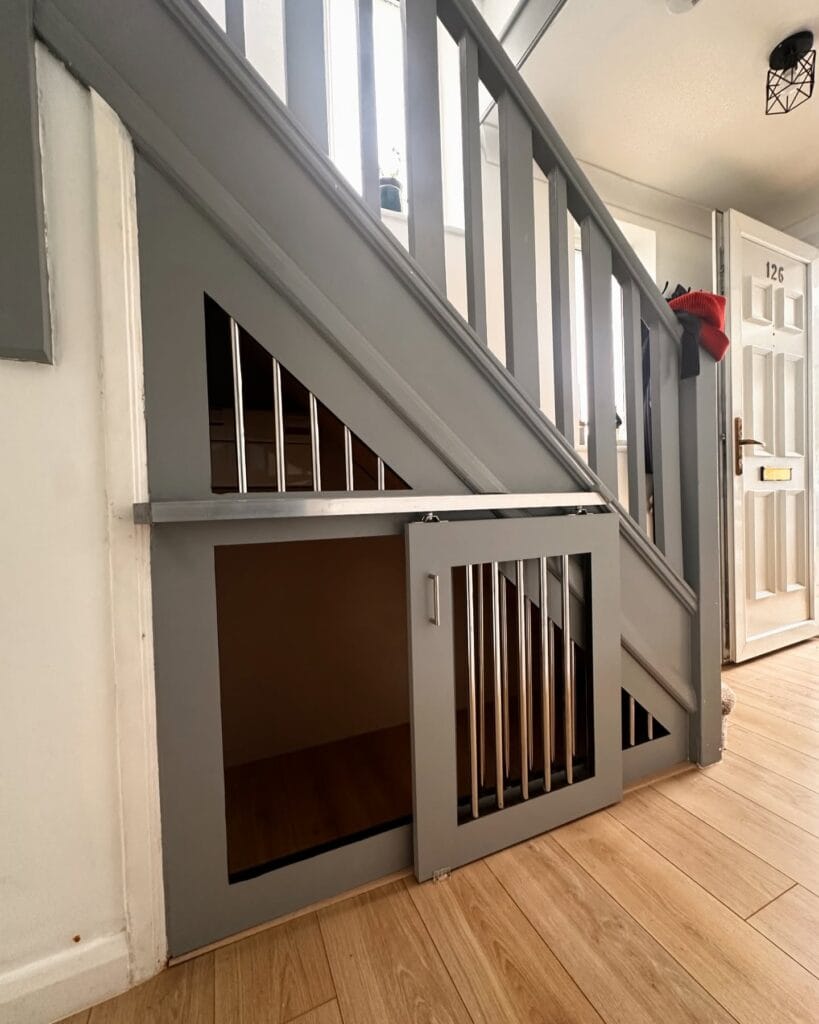
You know that awkward space under your stairs that just collects dust and random shoes? Yeah. That space is about to become your golden retriever’s favorite spot in the whole house.
My neighbor did this last year and I literally stood in her hallway with my mouth open.
Prep Time: 2 hours | Active Project Time: 2–3 days | Difficulty Level: Advanced
Materials & Tools:
– 3/4″ MDF or plywood sheets (painted grey, like Farrow & Ball Moles Breath)
– Stainless steel rod balusters (ventilation + visibility)
– Piano hinge for the upper vent panel
– Barrel bolt latch
– Miter saw, drill, wood filler, sandpaper
Instructions
Frame the opening with 3/4″ plywood flush to the stair skirt. Build a bottom panel first — this becomes the crate floor your dog actually sleeps on.
Cut the angled face frame to match the stair pitch exactly. Install stainless steel rods vertically for airflow — your dog breathes easier and can see out without feeling trapped.
The upper triangular section gets a hinged vent panel using a piano hinge, so you control airflow. Built-in ventilation means your pup stays cool, which means zero anxious panting on hot days.
Paint everything warm grey for a cohesive look. The slide-door panel adds security without making it feel like a cage — built-in structure means your dog associates it with comfort, not punishment.
Sand every edge twice. Splinters happen fast and dogs explore with their mouths.
📸 Photo credit: Instagram @pittprecisionltd
#11: Easter-Themed DIY Dog Crate with Holiday Decor
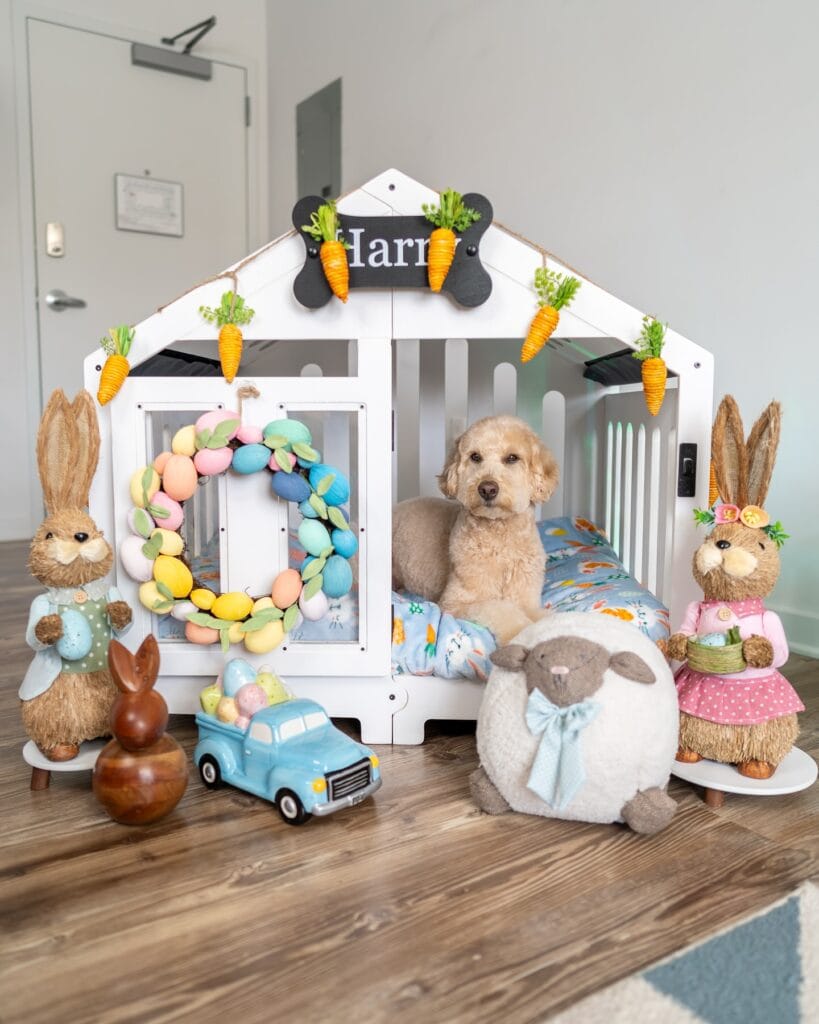
Your golden is sprawled across the living room floor, and that plain wire crate is just… there. Clashing with everything you carefully curated.
This Easter setup for Harry is what dreams are made of.
Materials & Tools:
– White wood dog crate furniture (slatted sides, house-shaped roof)
– Black chalkboard bone-shaped name sign
– Faux carrot garland (orange raffia carrots on twine)
– Pastel Easter egg wreath (multicolor fabric eggs, green leaves)
– Two straw bunny figurines (dressed in blue and pink)
– Plush lamb stuffed animal
– Blue ceramic pickup truck with Easter eggs
– Spring-print dog bed (blue floral/carrot pattern)
Instructions
Start by placing the spring-print bed inside the crate. Hang the bone-shaped chalkboard sign centered at the roof peak using twine. Drape the carrot garland across both rooflines. Mount the Easter egg wreath on the front panel window. Arrange the bunny figurines on small white pedestals on each side. Position the lamb and ceramic truck at the entrance.
Seasonal decor refreshes the crate every few months — your dog gets a cozy familiar space, and your living room gets a Pinterest moment.
Prep Time: 10 min | Active Project Time: 20 min | Difficulty Level: Easy
Swap the figurines yearly without replacing the whole crate setup. The base stays neutral in white, so any holiday palette works against it.
📸 Photo credit: Instagram @raisingharry
#12: Corner Dog Crate Furniture with Octagonal Top
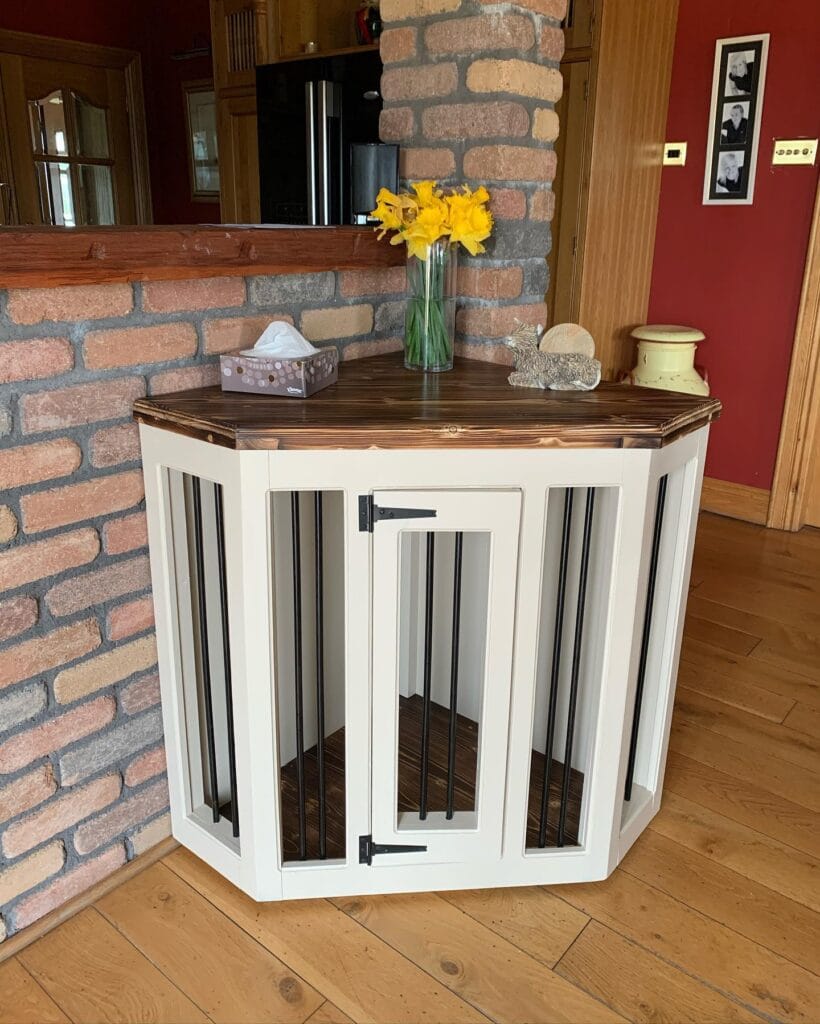
Your golden retriever has claimed the corner of your living room — muddy paws, scattered toys, that ugly wire crate you keep meaning to “deal with.” This is the fix.
Materials & Tools:
– 2×6 pine boards (frame + flooring)
– White chalk paint (body panels)
– Dark walnut stain (top surface)
– Black metal rods (bar inserts)
– Black iron hinges (x2 per door)
– Miter saw, drill, sandpaper
### Instructions
Cut your pine boards into an octagonal top — the angled cuts are what give this piece that furniture-store look. Paint the frame panels crisp white, then stain the top in dark walnut. The contrast does all the heavy lifting.
Build your side panels first, then slot the black metal rods vertically into pre-drilled holes. Attach the door using iron strap hinges for that modern farmhouse detail. Your dog gets a cozy, den-like space — enclosed but never dark.
And because the corner placement uses dead space you weren’t using anyway, your living room actually gains breathing room.
Prep Time: 30 min | Active Project Time: 6–8 hours | Difficulty: Intermediate
The stained wood top doubles as a side table — add flowers, a tissue box, a decorative bunny — and nobody even questions whether it’s a dog crate.
📸 Photo credit: Instagram @srd_woodcrafts
#13: Farmhouse Coffee Table Dog Crate With Hidden Storage
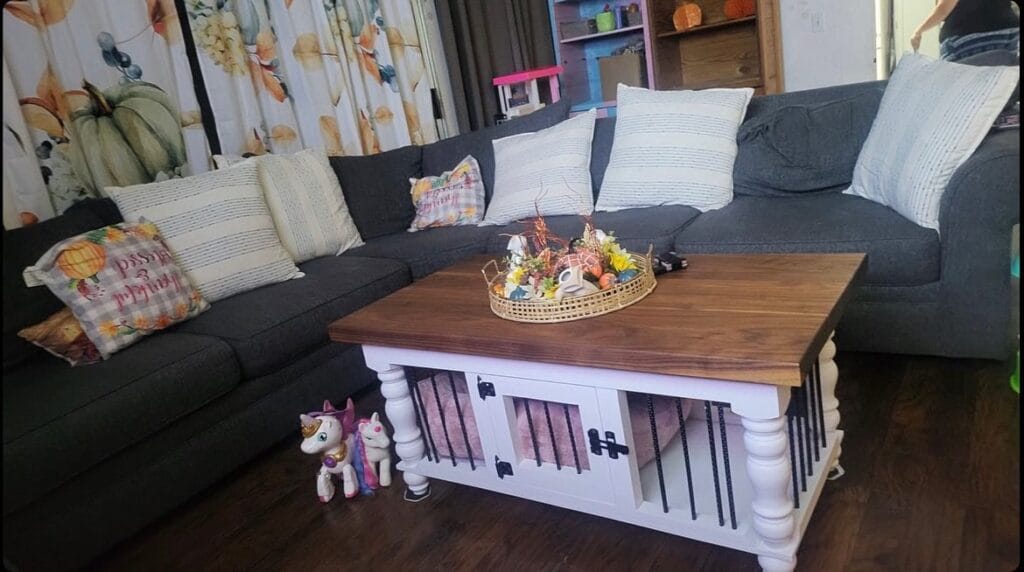
Your golden is finally napping — but that chunky plastic crate is still sitting there, clashing with every throw pillow you own.
This build hits different. It’s a walnut-top coffee table with a white-painted base, turned spindle legs, and two side-by-side crate compartments lined with pink cushion bedding. Black hardware latches keep the doors secure. And the rattan tray centerpiece on top? Chef’s kiss.
Materials & Tools:
– 2x walnut wood planks (tabletop)
– White chalk paint + primer
– Turned wooden spindle legs (4)
– Black iron gate hinges + latches
– Vertical wood slats (crate sides/doors)
– Pink crate cushions
– Drill, wood screws, sander, paintbrush
Instructions
Build your base frame first using 2×4 lumber, then attach spindle legs at each corner. Sand smooth before applying two coats of white chalk paint. Assemble vertical slat panels for the crate doors — spacing slats 1.5 inches apart gives airflow without escape gaps, so your dog stays cool and calm inside. Attach black hardware latches to each door. Lay your walnut planks across the top frame and secure from underneath. Drop in the pink cushions.
Keep the legs slightly longer than a standard crate height — that extra 2-3 inches makes the tabletop surface actually functional.
📸 Photo credit: Instagram @standstrongsawworks
#14: Space-Themed Dog Crate Nook with Bunny Mural and Glitter Bone Pillows
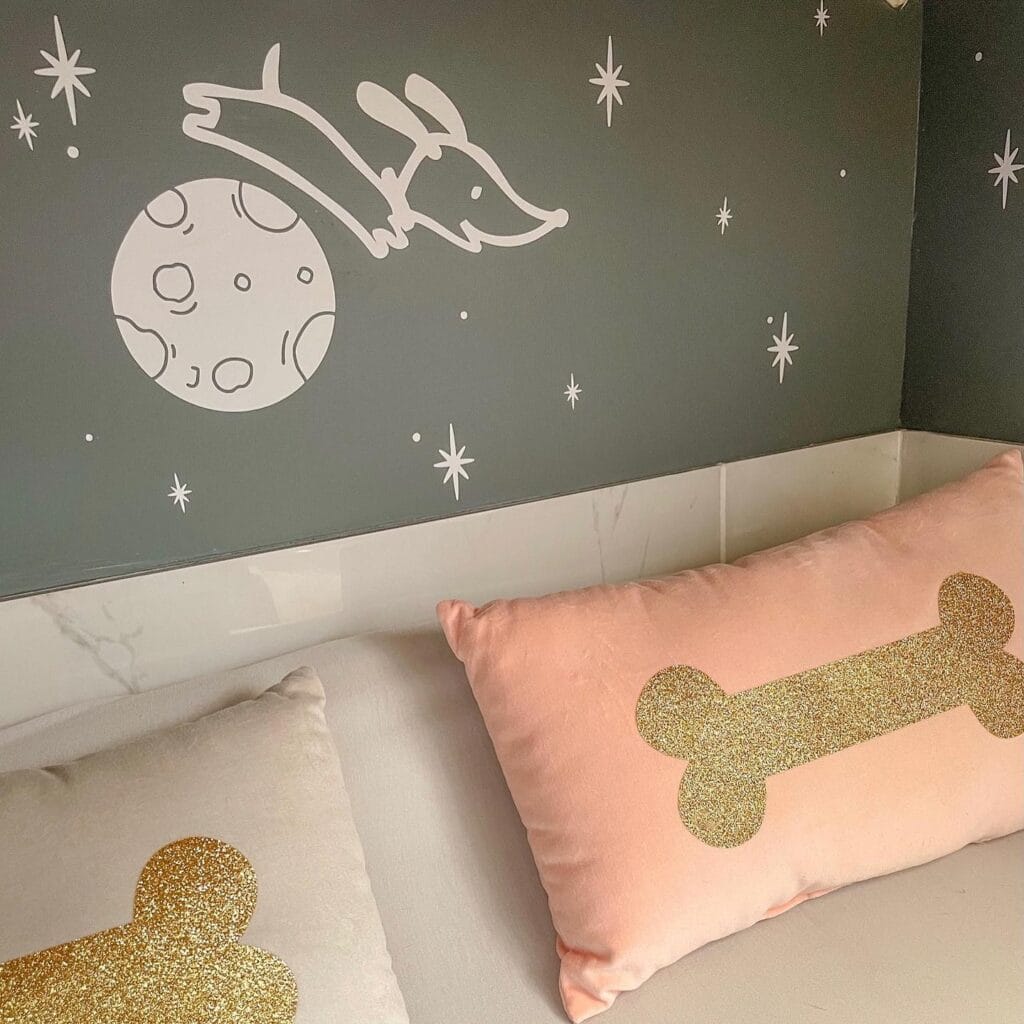
Your golden’s crate looks like a plastic bin shoved in the corner. Every guest notices it. You’ve been staring at that sad setup for months.
This one? It’s a whole moment.
Prep Time: 30 min | Active Project Time: 4–5 hours | Difficulty Level: Intermediate
Materials & Tools:
– Sage green wall paint
– White vinyl wall decals (bunny + moon + star shapes)
– White marble contact paper for crate interior panels
– Blush pink and cream lumbar pillows
– Gold glitter fabric paint + bone-shaped stencil
– Foam brush, scissors, ruler
Instructions
Paint the crate nook walls sage green first. Let it dry completely before touching anything else — rushing this wrecks the decal adhesion.
Press your white vinyl bunny-and-moon decals onto the back wall, centering the moon at eye level. Space the star decals randomly. Random actually looks more intentional than perfect grids.
Line the crate interior panels with white marble contact paper, smoothing out bubbles with a credit card as you go. This gives your dog a clean, wipeable surface — mud paws stay manageable.
Stencil gold glitter bone shapes onto both pillows using fabric paint. Two coats give better coverage. The glitter finish catches light and photographs beautifully for Pinterest.
Let everything cure 24 hours before your dog settles in.
The sealed contact paper walls mean one damp cloth handles cleanup — zero scrubbing, zero replacing panels every season.
📸 Photo credit: Instagram @thegoodwrench
The One Measurement Mistake That Ruins Most DIY Dog Crate Furniture
Okay, real talk — most people measure their dog wrong before building, and it costs them so much wasted wood and money.
Here’s the pro secret nobody tells you: measure your dog diagonally — nose to the base of their tail while they’re standing, then add 4 inches. That diagonal measurement is actually your dog’s true “turning radius” inside the crate. My cousin built the most gorgeous console table crate last spring, gorgeous stain, perfect finish… and her lab couldn’t turn around inside. The whole thing had to be rebuilt.
Also? Don’t skip the ventilation math. You want at least 20-25% of each side panel as open space — whether that’s slats, mesh, or cut-outs. Dogs overheat faster than you’d think inside a wood enclosure.
One more thing that changed everything for me — use furniture-grade plywood, not standard pine boards. Pine warps within months from dog breath moisture alone.
And if you want more inspo while you’re planning, 7 Cozy DIY Dog Bed Frame Ideas for Pups pairs perfectly with whatever crate style you’re building.
Your Dog’s Comfort Starts This Weekend
Pick one project. Just one. Grab some fabric scraps, a staple gun, or even an old sweater — and start there.
I promise your golden will notice. Mine padded over to her new bed, circled it three times, and refused to leave. That’s the whole win right there.
And honestly? These projects aren’t just for your pup. A cozy, Pinterest-worthy dog corner that you actually love looking at — that’s the real payoff.
So tell me — which project are you tackling first, and is your golden the type to supervise the whole build or just show up for the finished product? 🐾

Amr Mohsen is a software engineer who traded his keyboard for a leash — at least on weekends. His love for dogs inspired him to share what he learns as a dog owner and enthusiast, bringing a detail-oriented, research-driven perspective to every article he writes. If it’s about dogs, he’s probably already looked it up twice.

