
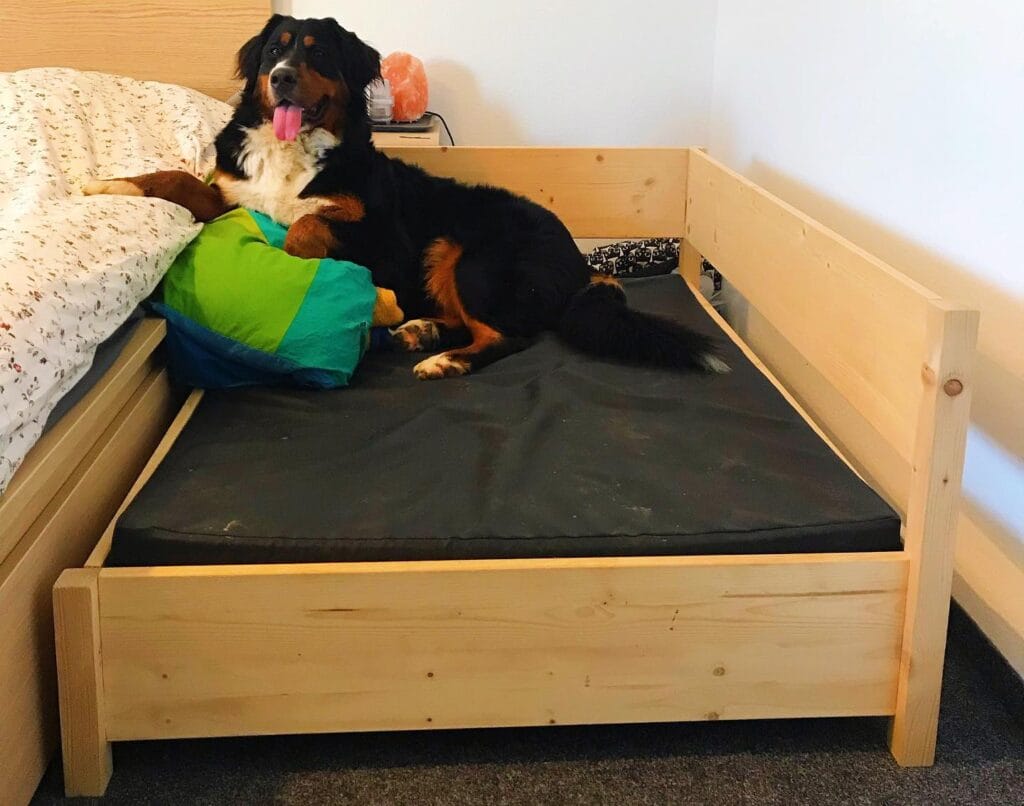
I know your golden retriever is the love of your life, but girl, the kennel was a disaster!
Mine was a beat up wire dog crate shoved in the corner of my living room. I would put a blanket over it whenever I had people over so it didn’t look like I was hiding something.
I know that you’ve got a gorgeous Pinterest worthy home. Your throw pillows. Your coordinated colors. Then you’ve got that sad metal cage in the corner like it doesn’t even try.
At the same time, your dog deserves a “real” space to occupy at home.
Here are 13 amazing DIY dog kennel ideas that you can actually build yourself. Some of them are cozy indoor builds while others are rugged outdoor dog kennels. All of these dog kennels will definitely look like they belong in your home!
#1: Open-Front Pallet-Style DIY Dog Kennel With Raised Platform Bed
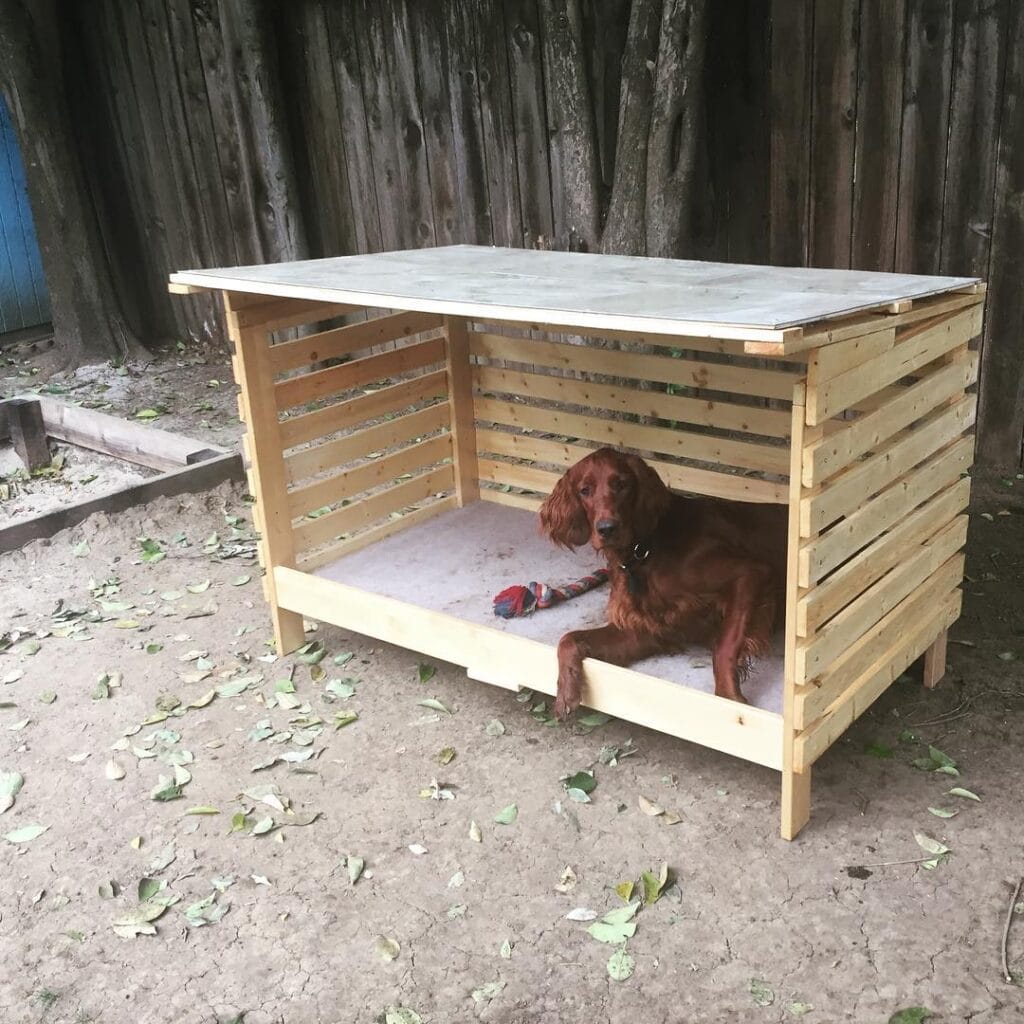
Your golden retriever just ran through the backyard… again. Muddy paws, wet fur. She heads straight for your linen sofa.
I gave her this natural pine wood kennel. It has an open front and a raised platform with slatted sides and a flat roof. She likes to lie on the platform.
Materials & Tools
– Pine lumber boards (horizontal slats, approx. 1″ x 4″)
– 4×4 pine posts for corner legs
– Plywood sheet (3/4″ thick) for roof and platform floor
– Wood screws, drill, saw, sandpaper (120-grit)
– A rope chew toy (your dog’s job)
Instructions
Cut your four corner posts at 24 inches tall. Screw your horizontal slats across three sides, leaving the front completely open. This way she won’t feel trapped. Screw your plywood platform flush across the base frame. The raised floor will keep her off the cold damp ground. This will help to keep her joints from stiffening in the morning. Cap the top with your plywood roof sheet.
sand all the edges, rough wood and dog skin not very pleasant.
One thing to remember: I sealed the wood with a pet-safe outdoor sealant before she moved in.
Add a DIY dog collar for a homemade dog collar vibe.
Prep Time: 30 min | Active Project Time: 3–4 hours | Difficulty Level: Beginner-Intermediate
📸 Photo credit: Instagram @irishsetter_maui
#2: Double Dog Kennel Furniture with Rebar Bars and a Live-Edge Top
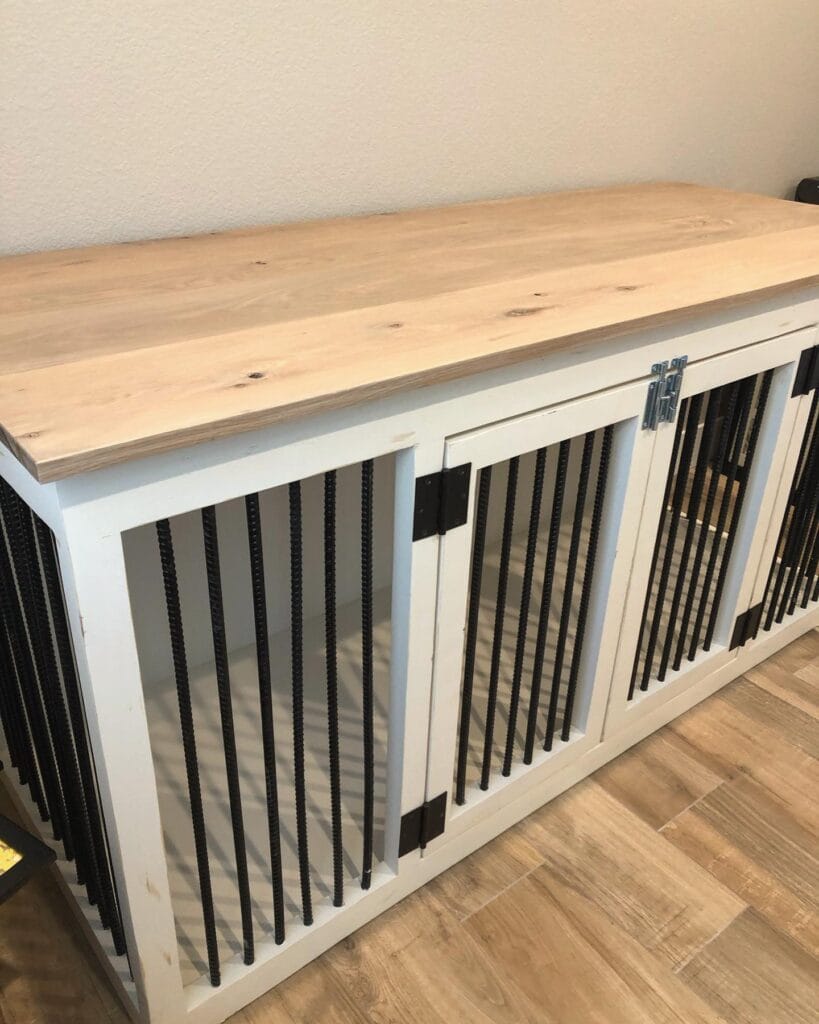
Your golden is finally calm… except she just drooled all over your couch cushion. And her wire crate in the corner looks more like it belongs in a garage.
This build changes that completely.
– 2×4 lumber (white-painted pine frame) – 3/8″ rebar rods (black, threaded/ribbed texture) – Live-edge wood slab (natural finish top) – Black metal hinges + door latches – Sandpaper, drill, screws, wood paint (white) – Circular saw, miter saw
Instructions
Build two identical, white-painted wooden frames side by side, each roughly 24″W × 24″D × 28″H. Drill evenly spaced holes top and bottom, then insert black rebar rods every 3 inches; because the rebar cannot be chewed, your dog can be safely inside without you replacing broken plastic panels. Attach hinged doors with black iron hardware. Lay the live-edge slab over the top as a single surface, so it can also be used as a console table.
The ends of the sand rebar are smooth before they are inserted. Your dog’s face will be rubbing against these bars every day.
Prep Time: 1 hour | Active Project Time: 6–8 hours | Difficulty Level: Intermediate
📸 Photo credit: Instagram @dadthebuilder
#3: Built-In TV Stand Dog Kennel (The One That Makes Your Living Room Look Like a Pinterest Board)
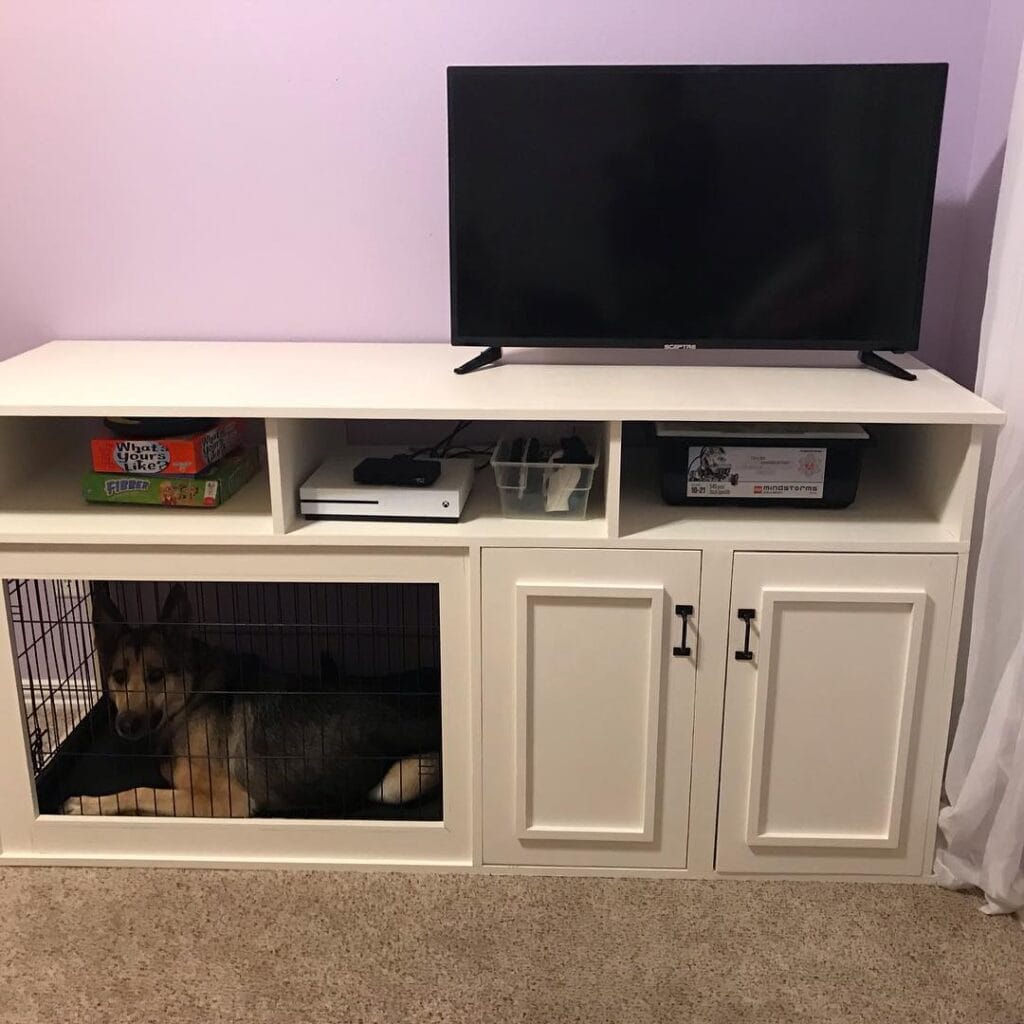
Do you hate it when your super cute Golden is sprawled out in her wire crate right in the middle of the living room, and your guests come in and you “die a little inside”? Well, this build is for you!
materials/tools: – ¾ inch white MDF panels – white cabinet doors with black hardware – wire crate insert (36-inch) – wood glue + pocket screws – white paint + primer
Instructions
First we’re going to build a 72-inch wide entertainment frame made of MDF. Pocket screw three open shelves across the top. We leave the left lower bay open for the crate to slide right in. Mount the two cabinet doors on the right side. Sand every edge, prime, and then roll on two coats of white paint.
4. Obviously, paint the crate black so it blends with the hardware on the other side. That’s just detail work.
It’s easy to hide the “dog stuff” with a cute, built-in look! A cozy little space she’ll want to retreat to… Win-Win. And if you have a crazy dog lover on your list, 12 Heartfelt Designs for DIY Dog Accessories is a must!
Sand the edges of your MDF at least two times before you paint it. This is a raw MDF and it will show every bump in the wood.
⏱ Prep Time: 1 hour | Active Project Time: 6–8 hours | Difficulty Level: Intermediate
📸 Photo credit: Instagram @lisafelthousphotography
#4: The Staircase Dog Kennel — A Two-Level Wooden Crate With a Pink Roof
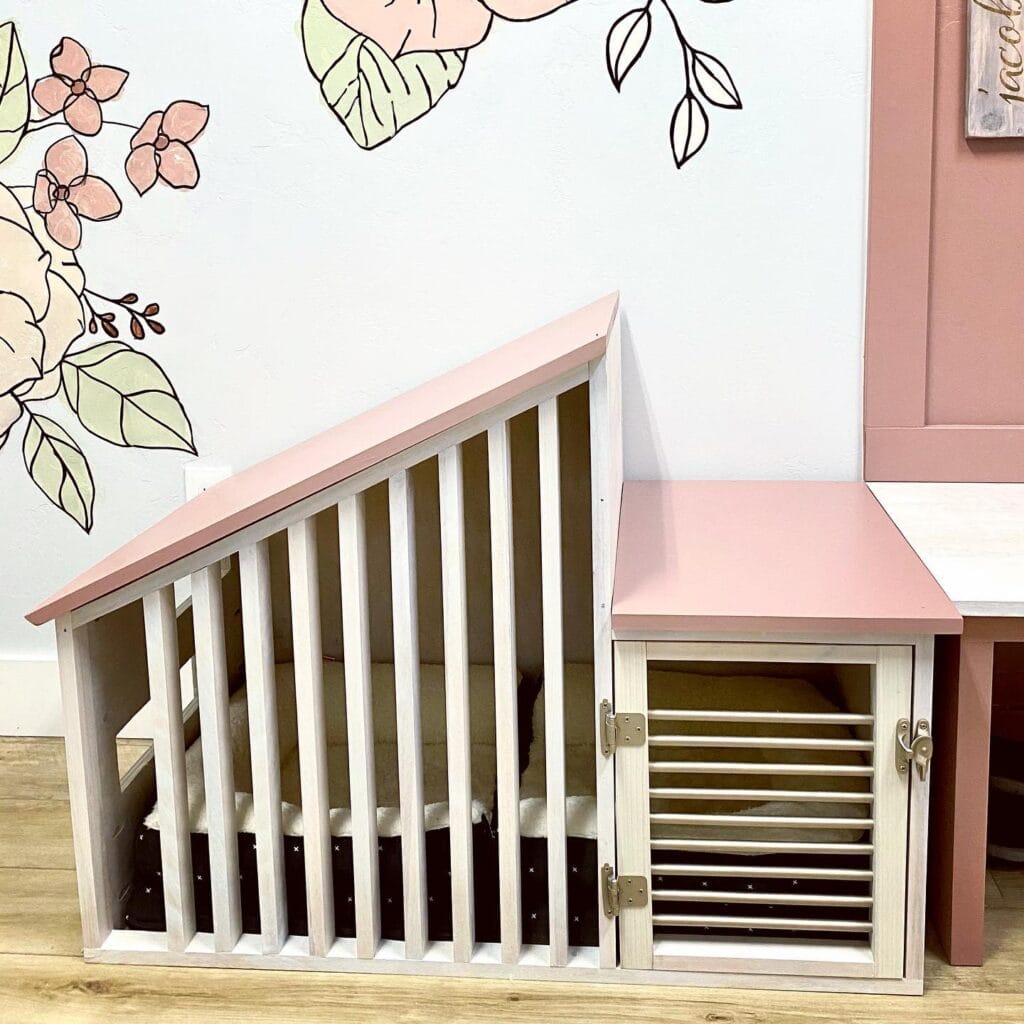
Your golden is sprawled across your couch again, and you are just staring at that blank corner of the room thinking… there has to be a better way.
I admit I stopped scrolling a moment when I came to this one. It’s a two-level wooden kennel, built to look like a tiny house, with a slanted pink-painted roof, vertical white-washed slats on the open side, and a small slatted door with silver hinges and a latch on the lower compartment.
Materials & Tools: Plywood sheets For the roof and the base. 1×2 pine wood slats For the vertical bars. Pink matte paint and whitewash stain Silver cabinet hinges And a latch for the front door. Wood screws A drill. Saw. Sandpaper.
Instructions
Build the base of the kennel with plywood. Then, attach the slats vertically using pine. You want the slats to be close enough together that your dog will feel cozy, but not so close that it stifles airflow. Make the back panel of the kennel taller than the front so that you have a slanted roof. Sand everything well and then stain the slats with whitewash. Paint the roof panels dusty pink. Attach the smaller lower-compartment door with two hinges and a latch. Add a cushion inside each level.
She has two sleeping zones, one on the open upper level and one in the enclosed lower den.
Prep Time: 30 min | Active Project Time: 4–5 hrs | Difficulty: Intermediate
📸 Photo credit: Instagram @joyinbecoming
#5: Built-In Double Dog Kennel With Upper Loft Space
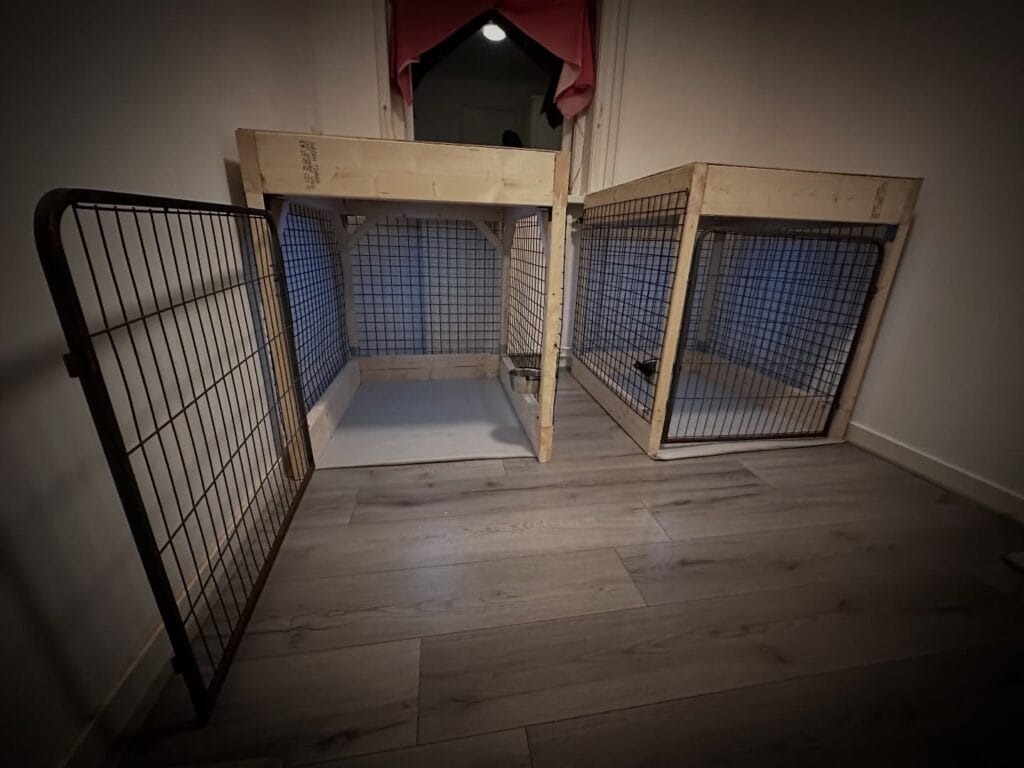
Prep Time: 1 hour | Active Project Time: 6–8 hours | Difficulty Level: Intermediate
You know, it’s one of those days where your dog tracks mud on the floor again and you’re thinking…there has to be a better setup than this.
This built-in double kennel is just the better setup.
Materials & Tools:
– 2×4 pine lumber (frame)
– ¾-inch plywood sheets (floor base + upper loft deck)
– Welded wire mesh panels (sides + doors)
– Heavy-duty hinges (x4)
– Magnetic door latches
– Drill, circular saw, staple gun, sandpaper
Instructions
Build a 24×36-inch kennel and a 24×36-inch kennel on either side of the first kennel using 2×4 pine. Cut your ¾-inch plywood to fit the shared upper loft area of the kennel. This gives your dog a ledge to rest on and makes the kennel stronger. Attach the welded wire mesh to each side panel using a staple gun. Frame the doors with 2×4 scraps and hang them with the heavy-duty hinges. Add a magnetic latch so that the doors stay shut, but open easily.
With mesh sides, the airflow will stay constant for your dog, keeping him cool, calm, and comfortable in his crate.
Sand every edge before your pup goes near it, because splinters happen fast.
Check out these 14 Stylish DIY Dog Crate Furniture Ideas You’ll Love if you want some nice finishing touches.
📸 Photo credit: Instagram @malinois.adventures
#6: The Personalized Paw-Print Palace (With Edison Lights!)
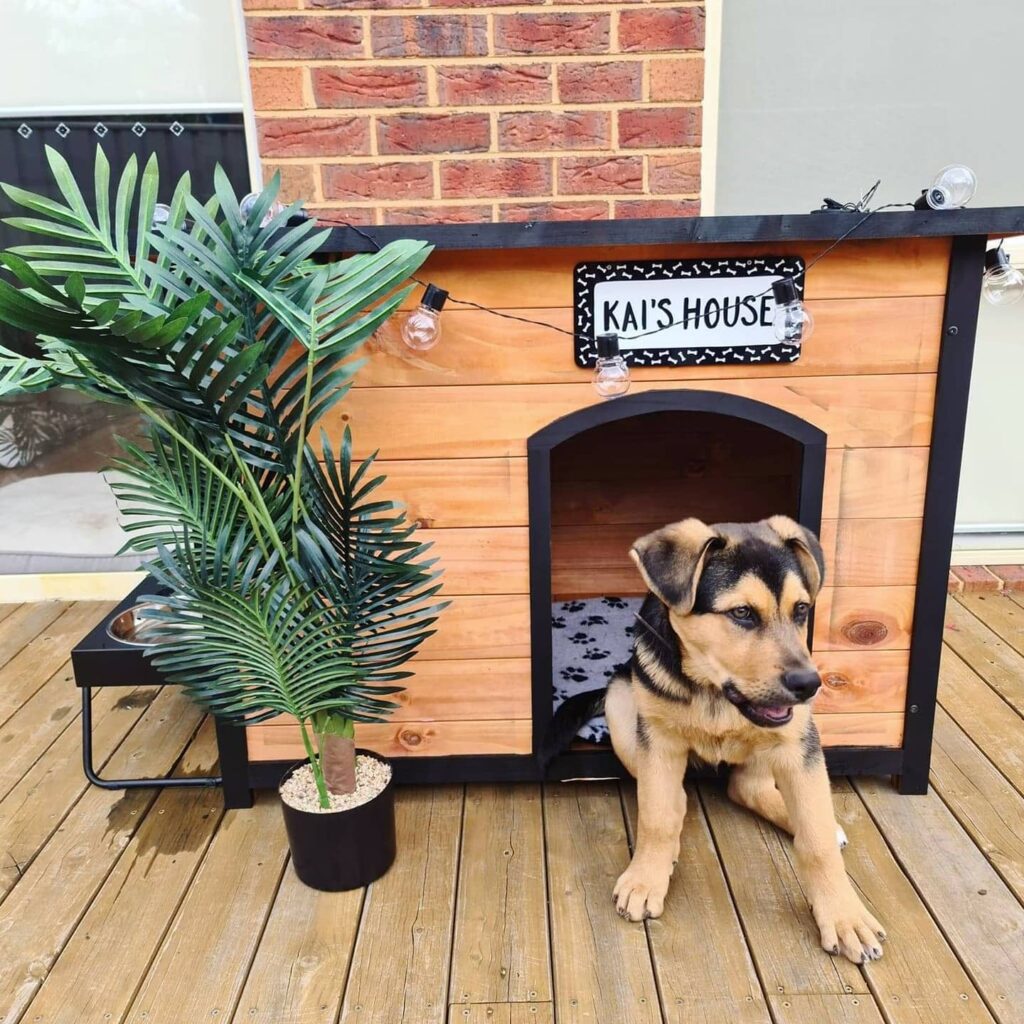
Okay, this one. You know when your golden is flopped outside on the deck looking at you like she deserves better accommodations? Yep, Kai’s owner did.
Prep Time: 1 hour | Active Project Time: 3–4 hours | Difficulty Level: Intermediate
– cedar wood planks (natural warm-honey finish) – black exterior paint (trim + frame) – custom name sign (black background, white lettering) – string edison bulb lights – paw-print fleece blanket – elevated metal food bowl stand – faux palm plant + black pot – jigsaw, drill, sandpaper, paintbrush
Instructions
I’ve built a few kennels for the dogs. I bought a box frame of cedars planks and cut an arch in one side. I sanded all the edges smooth. The dog brushes against them every day. I painted all the trim pieces matte black, BEFORE assembly, not after. I added the name sign up above the arch. I draped Edison string lights across the roof for a warm glow at dusk. I added a paw print mat inside and an elevated bowl stand on the left side. The kennel is constructed of cedar so it breaths in heat and won’t get rotten and soggy.
Tip: I like to have the interior liner removable so I can take it off to wash it if needed.
📸 Photo credit: Instagram @kai.and.roman
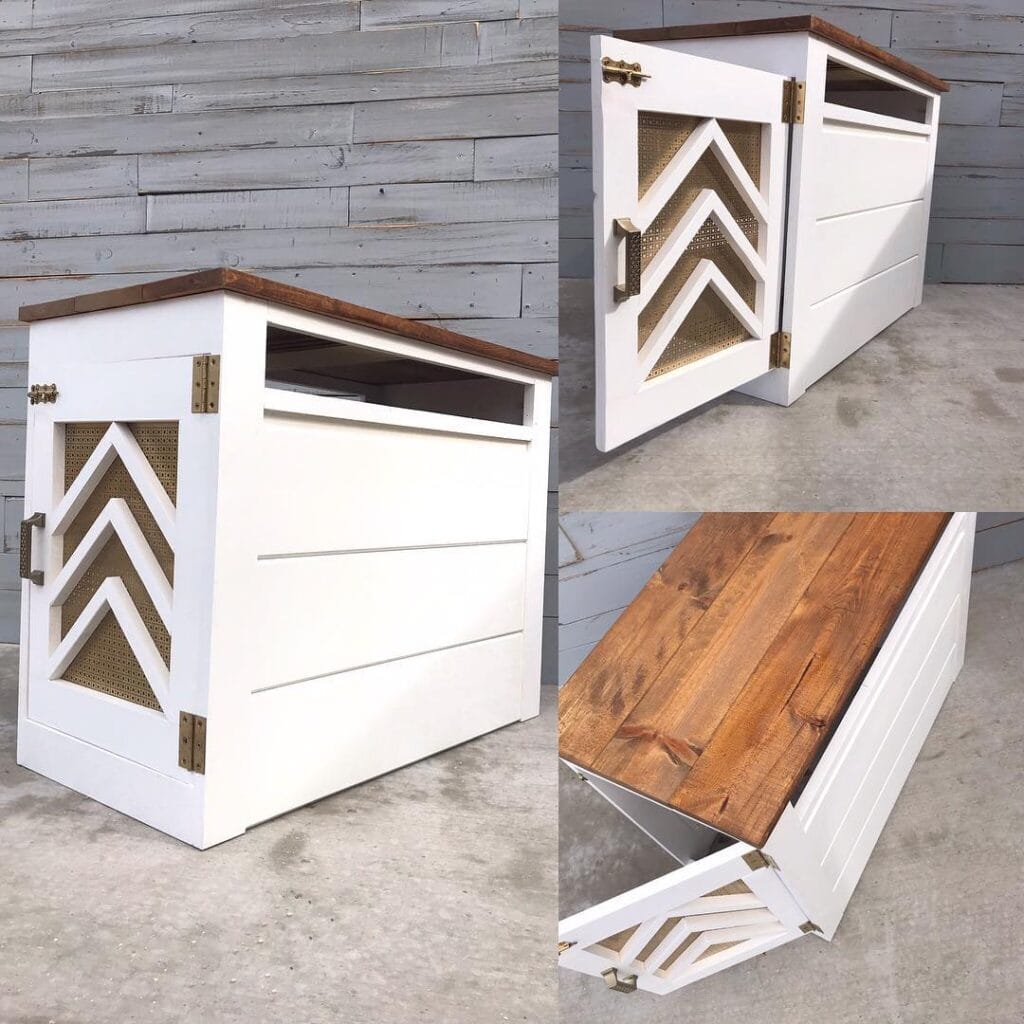
#7: The Farmhouse Dog Kennel End Table with Chevron Door & Lift-Top Storage
What dog does this remind you of? I know mine immediately jumps on the living room rug after her muddy walk and just decides to take over. You know the one.
This white-painted wood kennel also makes for a cute end table with its stained pine top, white MDF body, chevron-cut door panels backed with brass mesh screening, and antique brass hinges throughout. The lift top lid can open for toy storage. Chef’s kiss.
Materials & Tools:
— ¾” MDF boards (sides, back, base)
— Solid pine planks (top, dark walnut stain)
— Brass decorative hinges (door + lid)
— Brass mesh sheet
— White chalk paint
— Jigsaw, drill, wood glue, brad nailer
Instructions
Saw the panels for the box frame and nail them together. Cut out a chevron pattern into the door panel using a jigsaw (3 V shapes). I backed the cut outs with brass mesh and stapled it from the inside. Attach the door with heavy duty brass hinges. Add a handle. Put a horizontal slot at the top of the door for ventilation and attach the lid with a lift hinge. The lid is made from pine and opens backwards. Sand everything down and prime it with white paint. Apply 2 coats of white chalk paint. Finish the pine lid with dark walnut stain.
Great ventilation. Less whining. I think my dog feels less confined.
Prep Time: 30 min | Active Project Time: 6–8 hrs | Difficulty Level: Intermediate
📸 Photo credit: Instagram @shesthecarpenter
#8: Build a Slatted Wood Dog Kennel That Actually Looks Good in Your Backyard
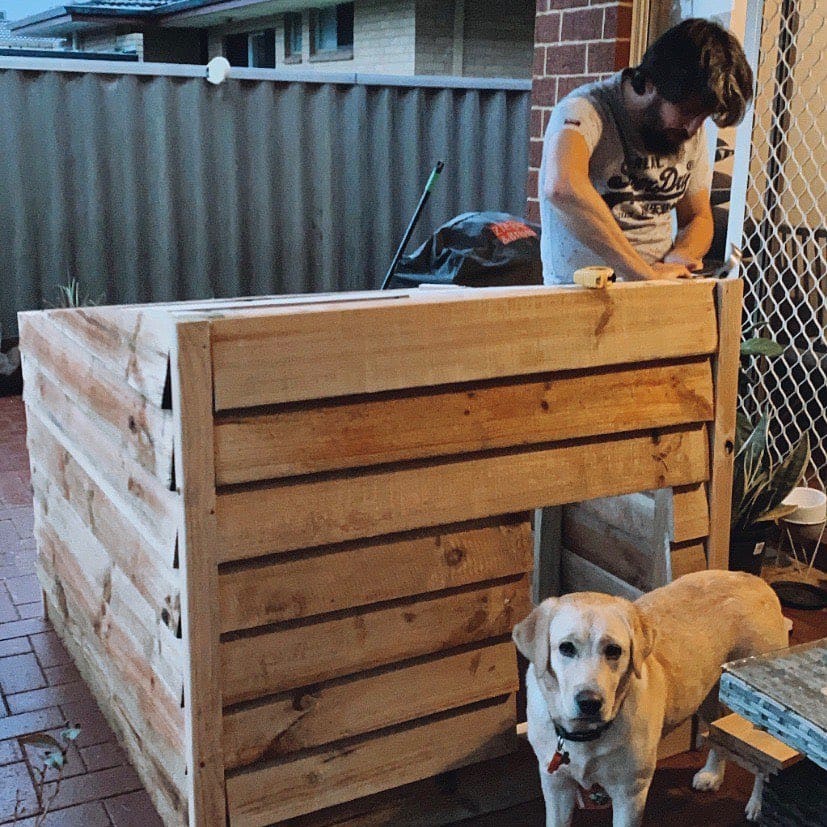
You know when your dog comes in from the rain, shakes off, and then just stands there looking at you, where’s my spot? Yup, my dog needs a space.
This cedar slatted kennel is giving me such a Pinterest vibe! It’s a fun project and could totally be built over a weekend.
– Cedar fence pickets (approx. 1″ x 6″ x 6′) – 2×4 timber for the frame – Wood screws (exterior grade, 2.5″) – Drill, saw, measuring tape, sandpaper.
Instructions
Make a rectangular frame out of 2×4’s that will be about 4’x3’x4′ tall. Attach cedar slats horizontally on all four sides, leaving ½” gaps between each board for air flow. This will keep her cool in the summer and give the kennel a more slatted look. Make a frame in the front panel for a doorway. Add a flat plywood roof and sand every edge so that there are no splinters.
Seal everything with exterior wood stain. The brown tone you see in the above image is the color of warm honey.
By leaving some of those slatted gaps open, air can flow through the crate which can keep the dog comfortable so that it will actually use it.
Prep Time: 20 min | Active Project Time: 6-8 hrs | Difficulty: Intermediate
📸 Photo credit: Instagram @quincyincyspider
#9: Double Dog Kennel Furniture Console (The One That Looks Like a Sideboard)
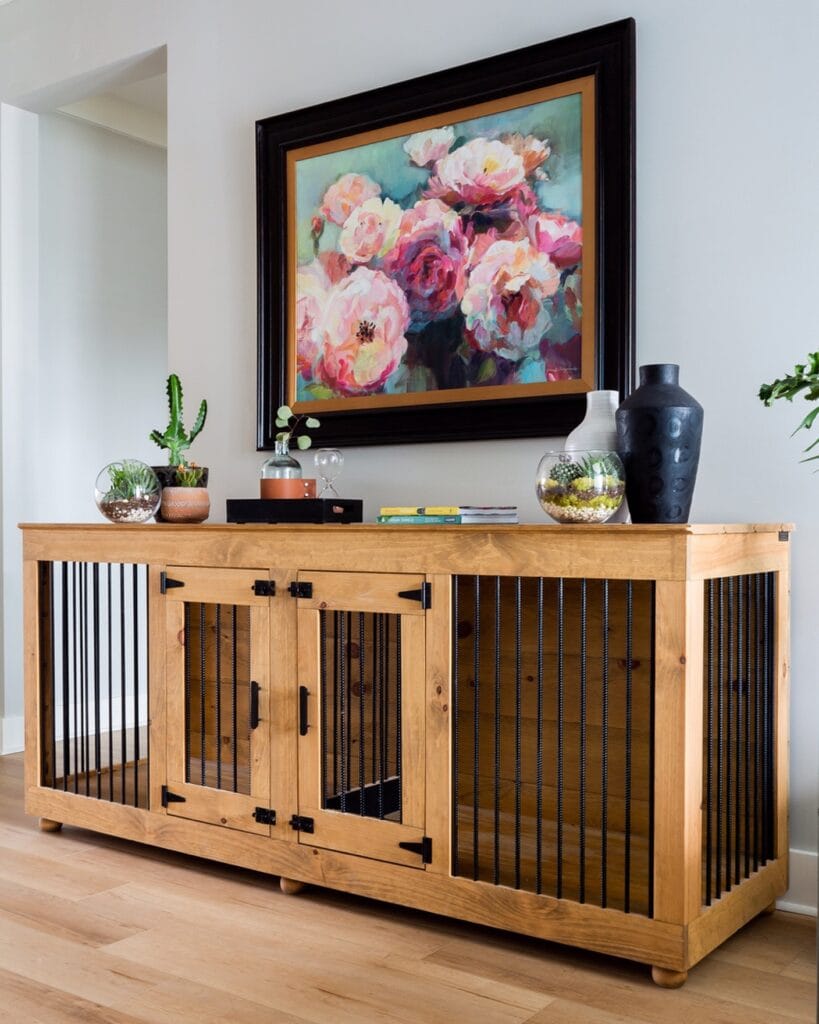
I can just imagine when people walk into my cousin’s house and immediately see the giant plastic crate sitting in her entryway. My cousin’s golden retriever lived in a black wire box that made her nice room look like a disaster!
This build fixes that.
Prep Time: 1 hour | Active Project Time: 6–8 hours | Difficulty Level: Intermediate
Materials & Tools:
– Knotty pine boards (natural honey finish)
– Black steel rebar rods (¾-inch diameter) for side panels
– Black iron barn-door hinges and handles
– Pocket hole jig, drill, wood screws
– 4 bun feet (wooden, pre-turned)
– Sandpaper (120 + 220 grit), wood stain, clear sealant
Instructions
First build a 72-inch wide by 36-inch tall rectangular frame using pine. Make a dividing wall down the center of the kennel so there are two separate kennels. This way your golden gets her own side.
Drill holes at even intervals along the top and bottom rails and insert rebar rods vertically for the side panels. The open design lets air flow through to your dog and she will never feel trapped in her cage.
2) Frame double doors with pine slats and matching rebar inserts. Attach barn hinges and handles. Attach bun feet underneath.
I sanded the rest of the wood down pretty smooth, with two coats of stain and one coat of sealant. The solid pine top doubles as a display shelf, so I get to ditch that ugly crate that it’s stored in, as well.
… For extra cleanup ease keep your kennel interior lined with a washable mat for cleanup in under 30 seconds.
📸 Photo credit: Instagram @culoramegreen
#10: Double Dog Kennel With Separate Runs and a Shared Shelter
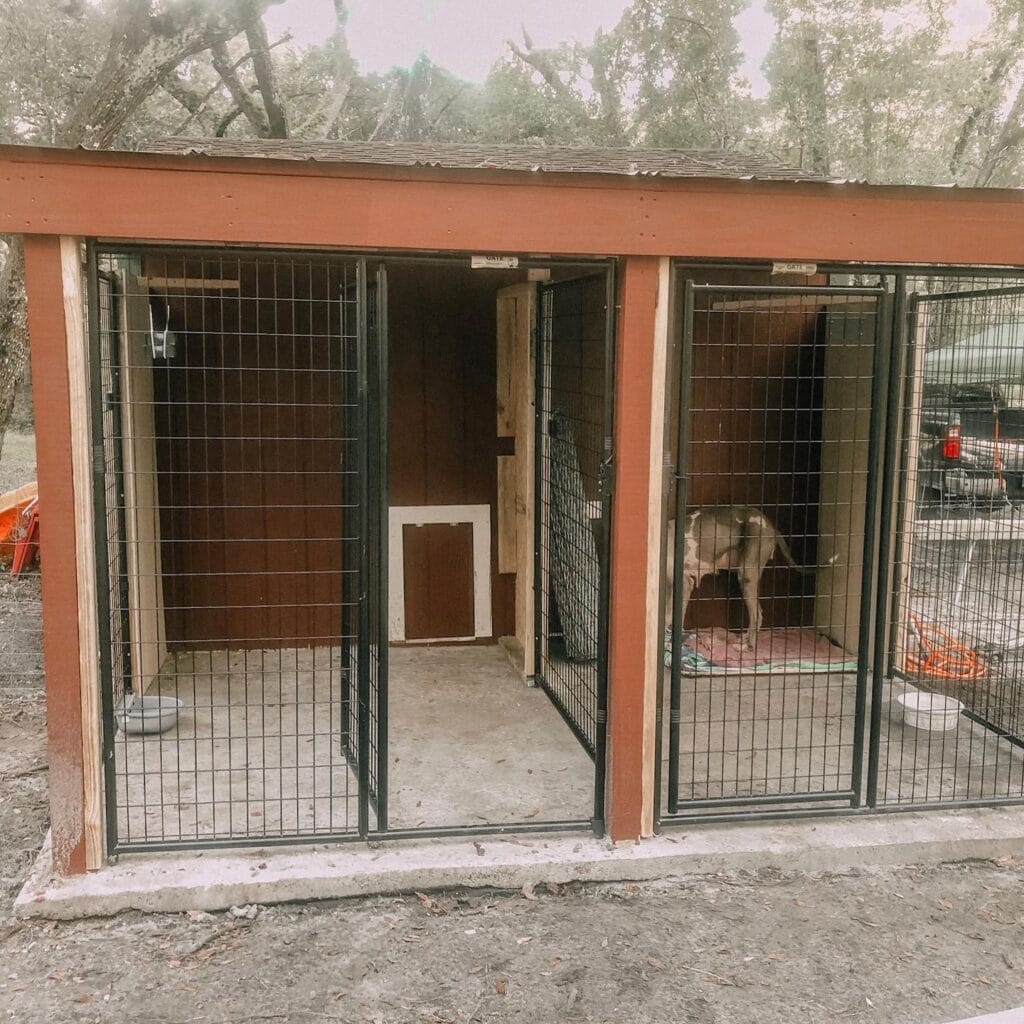
How is your pup finally living her best life, but also dragging mud, pine needles, and a general disaster inside each and every time?
This red-painted wood kennel is the answer.
Prep Time: 2 hours | Active Project Time: 2–3 weekends | Difficulty Level: Intermediate
Materials & Tools: 2×4 lumber T1-11 wood siding painted barn red Concrete base 4-inch slab Black welded wire kennel panels with swing gates Asphalt shingle roofing Small pet door insert 10×12 inches Drill, circular saw, level Exterior wood screws
### Instructions
Build your concrete slab first. It will give your dog a clean dry area instead of a mud pit. Pour and cure it and then start building up.
Build two separate stalls side by side that are about 4×6 feet inside, and use the T1-11 siding for the back and side walls. These will keep drafts out.
Mount the black wire panels across the front of each stall, with heavy exterior screws. The panels are made with a feature strong welded wire construction, and will allow better airflow so your dog will stay cool without escaping.
We framed a small dog door cutout between the indoor shelter and the run so that she could move between them on her own terms.
3. Finish the top with asphalt shingles. Add a hook to hold a water bowl so it doesn’t tip over inside each stall.
Paint two coats of exterior paint in barn red to seal it.
Have the gates hinged outwards (easier to clean, trust me).
📸 Photo credit: Instagram @rachf.lifestyle
#11: Build a Sturdy Outdoor Dog Kennel With a Separate Covered Shelter
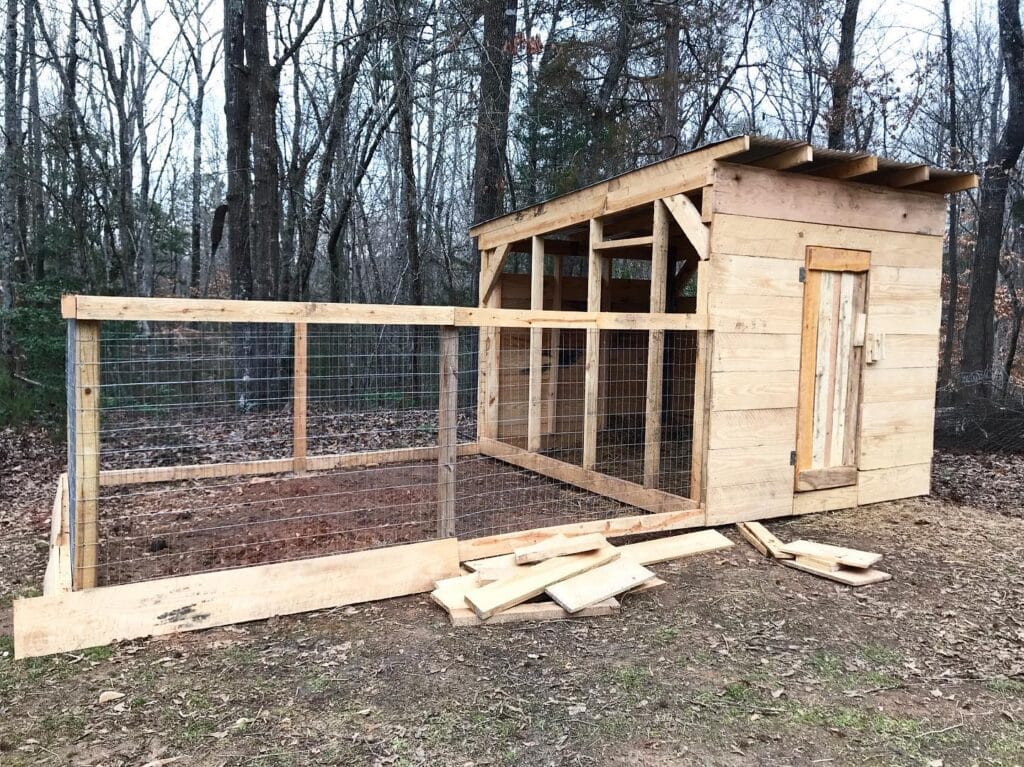
My golden is finally starting to love the backyard. Except when she tracks mud, shreds my garden and I have nowhere safe to contain her outside. This one solves that problem.
Prep Time: 2 hours | Active Project Time: 2–3 days | Difficulty Level: Intermediate
Materials & Tools: 2×4 and 2×6 lumber Cedar or treated pine Reclaimed wood planks Welded wire mesh panels (16-gauge) Metal roofing sheet or corrugated panels Wood screws, hinges, door latch hardware Circular saw, drill, level, measuring tape.
Instructions
I framed the shelter box with 2×6 lumber, constructing a lean-to roof so that rain runs back. I clad the walls with reclaimed boards, leaving a space on one side for windows framed with 2×4 posts.
Now just attach the welded wire mesh to the front of the shelter. The run is probably going to be around 8×10 feet which is plenty of room for your dog to move around and not have the opportunity to escape. You will staple the wire mesh to the frame and use wire clips to attach the mesh to the frame every 6 inches.
Hang a plank-built door with heavy-duty hinges. The mesh panel of the door lets air through to keep the run cooler in the summer.
The roof overhangs a run entrance so dogs are not caught in the rain when leaving the run.
Save the leftover lumber scraps for the perimeter ground boards, and the dog won’t dig under.
📸 Photo credit: Instagram @the_river_goat
#12: Open-Frame Dog House Bed with a Chalkboard Name Sign
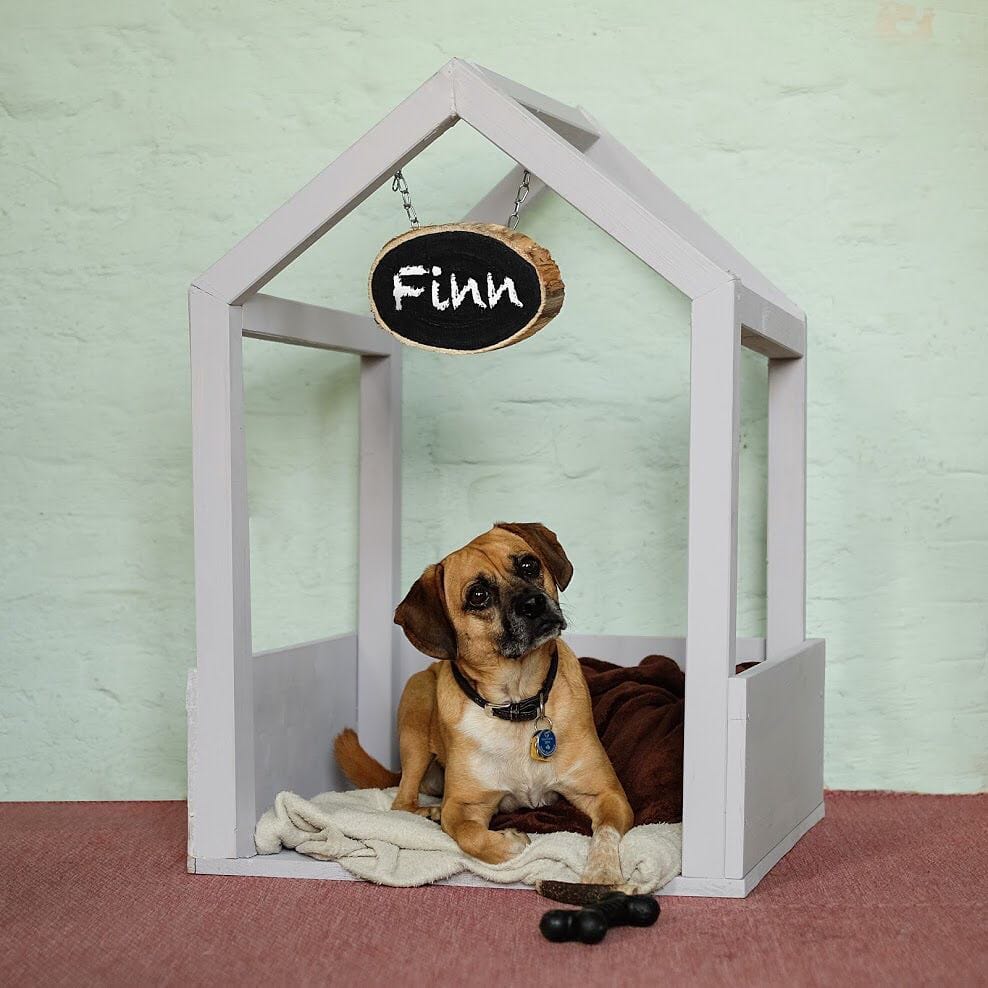
Not only is your golden retriever hogging the couch every night, but your living room looks like a dog toy explosion. This open-frame dog house bed is just the thing your dog will surely claim as her own.
– 2×2 pine wood boards – gray-painted Chalkboard-painted wood slice + small chain – Soft cream fleece blanket + dark brown throw – Wood screws, drill, sandpaper – Gray chalk paint + brush
### Instructions
Cut the 2×2 pine boards into a “house” shape. It should have 4 vertical pieces (these will be the posts) and a flat base with a peaked roof at the top. Sand every edge of the boards so that they don’t snag Finn’s fur.
Drill the frame together. Then, paint the frame and everything inside light gray. When dry, you can add a low wooden front panel to keep the blankets inside.
Paint the wood slice with the chalkboard paint and write her name in chalk. Then hang it from the peak of the roof with the small chain links.
Cover her with a cream fleece blanket first then put the brown throw on top – this helps trap warmth making her cosy throughout the cold nights.
Because the open frame means she never feels trapped, which makes the anxious dogs actually want to use it.
I cut a few extra wood slices to have fun changing out her name sign seasonally.
Prep Time: 30 min | Active Project Time: 3 hours | Difficulty Level: Intermediate
📸 Photo credit: Instagram @toombaumarkt
#13: Repurposed Wine Barrel Dog Kennel (The Most Pinterest-Worthy Doghouse Ever)
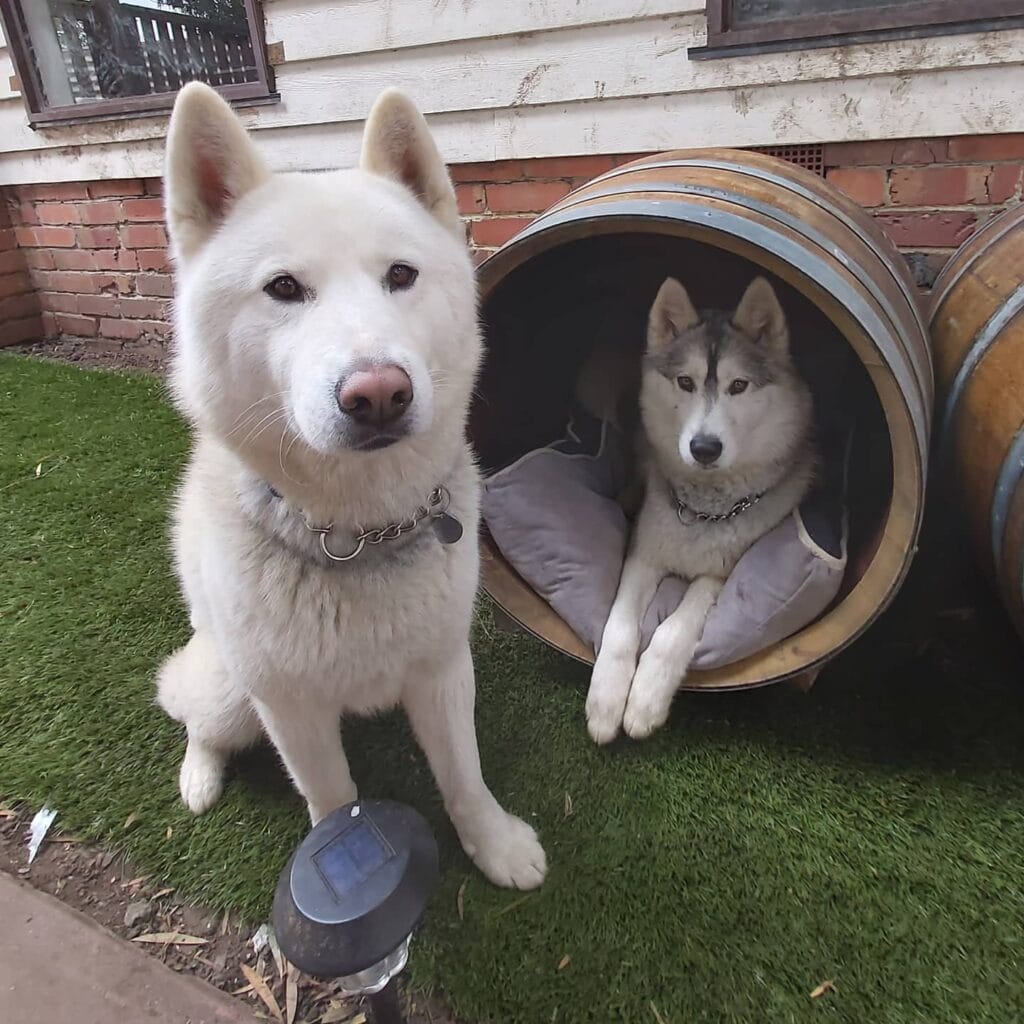
Isn’t your dog worth more than some lame plastic kennel shoved in a corner? This wine barrel kennel? I’ve had guests stop in their tracks to photograph it.
Materials & Tools: • 1 large oak wine barrel • Gray fleece or canvas cushion that fits the floor of the barrel • Metal hoop bands (already on the barrel, just clean them up) • Sandpaper (120-grit) • Wood stain/sealer in walnut or natural oak • Drill & jigsaw (if you want to widen opening on barrel)
Instructions
I then sand the inside of the barrel until it is smooth (NO splinters allowed!) Seal the inside of the barrel with a pet safe sealant. Let cure for 48 hours. I then added a round bolster cushion (in this case a gray one). And I put the barrel on its side against a wall for support.
Two barrels side-by-side give each pup their own space — that’s the setup shown here, and it works.
Size the opening to be no more than about ¾ of the barrel’s diameter so your dog feels cozy but not cramped.
Prep Time: 20 min | Active Project Time: 2–3 hours | Difficulty: Beginner-Friendly
📸 Photo credit: Instagram @wilburrheaandfig
The One Kennel Mistake That’ll Cost You Two Builds (Not One)
Probably the worst DIY mistake I see being made time and time again is building the floor of the kennel flush with the ground.
It looks nice, but there is moisture that seeps up from underneath and makes the base rot in one season. By the time winter is over, your baby will be sleeping on a soggy mess.
Instead, try raising the floor with pressure-treated runners. Even 4 inches of air-flow beneath the wood will keep it dry, making it easier to clean. In addition, your pup won’t be absorbing the cold from the ground in the winter.
I’d recommend making the door opening at least 6″ wider than your dog’s shoulders are now because goldens fill out later. I built the door opening in my cousin’s kennel that was for her “almost full grown” dog and we had to rebuild the door frame 8 months later.
Also, skip the carpet remnants inside, which trap bacteria and smell like a nightmare after two rainy weeks. Stick with raw pine or rubber matting.
If you want to keep your dog happy in his space, these DIY dog enrichment ideas pair perfectly with a well-built kennel.
Your Golden Deserves a Spot That Feels Like Home
And, if you’ve gone as far as to decorate your space with the cutest throw pillows and the best bookshelves, adding a space for your pup can only make the whole picture feel more complete. It doesn’t have to be a complicated or expensive endeavor either. Some of the sweetest setups I’ve seen have come from an afternoon, a little wood, and the perfect playlist.
Start small. Pick one corner, one project, one weekend and just do it.
If you want some more inspo for a DIY dog bed frame, these were some ideas I found that are super cute — my cousin made one last fall for her dog off Pinterest and it looks great!
So tell me — what’s the first spot in your home you’d claim for your golden?

Amr Mohsen is a software engineer who traded his keyboard for a leash — at least on weekends. His love for dogs inspired him to share what he learns as a dog owner and enthusiast, bringing a detail-oriented, research-driven perspective to every article he writes. If it’s about dogs, he’s probably already looked it up twice.



