
Affiliate Disclosure: This post contains affiliate links. This means that I earn a small commission if you purchase any items through my links. I only recommend products that I know will help you and your pup.
Your dog is bored and your couch cushions are paying the price. Those $40 rope toys only last three days before they are ripped apart and scattered across your living room floor.
You just spent $200 on dog park memberships this year, but the closest one is a 25 minute drive and between work and errands you’re lucky if you get there twice a week. As a result, your pooch’s pent-up energy turns your Pinterest-worthy backyard into a minefield of dug up flower beds and destroyed patio furniture.
The solution isn’t an expensive toy subscription or driving across town daily.
I know that there are plenty of dog parks around, but I personally love bringing my pup into our yard to play. Not only can I keep an eye on her, but I can do it without sacrificing our homes aesthetic. These 9 creative dog ideas are a must for any pup lover’s yard. Most of these are super simple, take less than 2 hours to create, and cost less than $50 using materials from your local hardware store.
Before you start, grab a quality cordless drill/driver kit and exterior wood screws assortment—these two tools will handle 90% of the projects below.
If you’re ready to reclaim your couch and give your dog the backyard they deserve, here are some tips for building a dog playground in your backyard that looks intentional not chaotic.
Essential Tools for Every Project Below
You’ll use these across multiple builds:
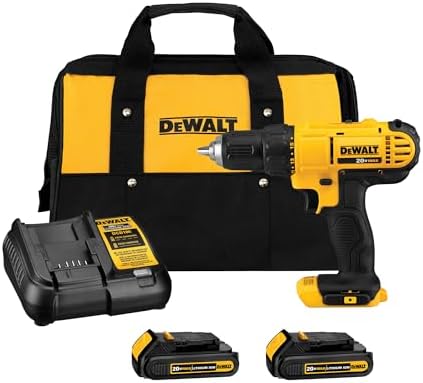


Most of the projects that require these attachments also need lumber (2x4s, 4×4 posts, plywood) that you can get at your local hardware store or order online.
#1: Multi-Level Agility Station (Raised Platform, Ramp, and Storage Zone)
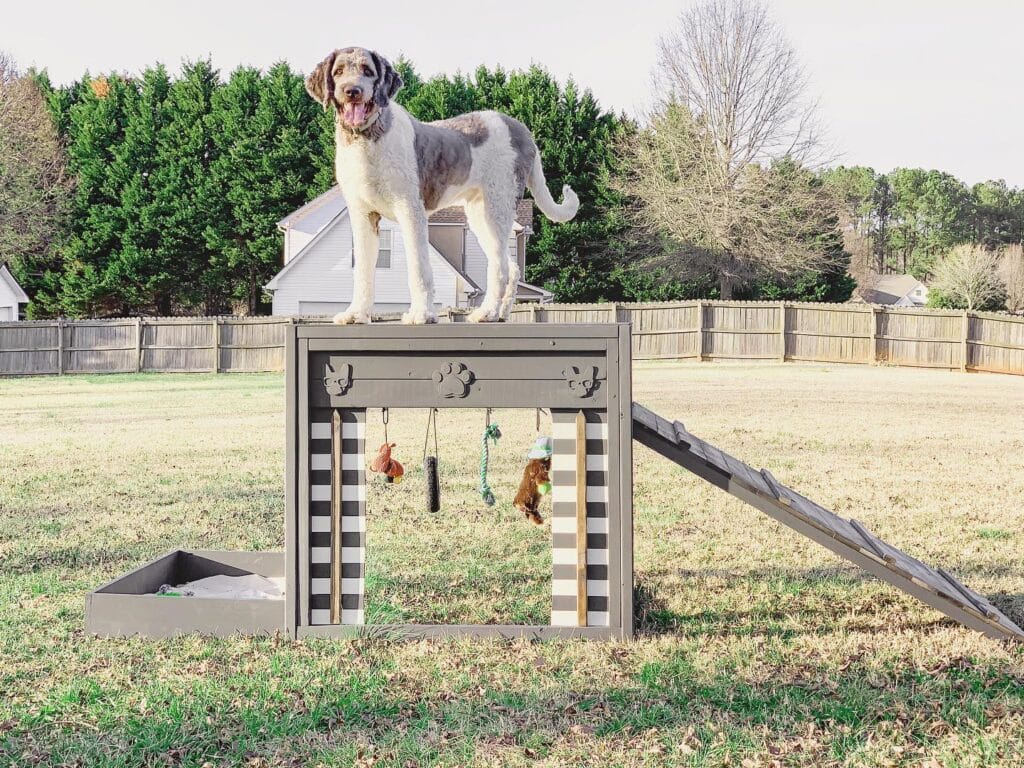
This is what happens when you build a multi-level agility station with a 4 foot wide platform that sits about 2 feet high… she circles the yard 3 times and then launches herself on to it and does a victory pose! Complete with a wooden ramp and hooks for storing items under it.
The setup works brilliantly in a medium to large backyard for dogs 30 pounds and up. You’ll need two 4×4 pressure-treated posts, several 2×6 pine boards for the platform top, 3/4-inch plywood for the sides (decorated with cut-out paw prints), sandpaper assortment to smooth every edge, and a drill with 3-inch exterior deck screws. The angled ramp attaches to one side at roughly 30 degrees, giving your dog an easy climb up. Underneath, you can hang leashes, toys, and ropes on simple cup hooks so everything stays organized instead of scattered across your patio.
Your dog builds confidence by climbing, surveying her territory from up high, then bounding back down the ramp with her tongue flapping. It trains balance and body awareness so you can move on to more challenging agility work, which means she’s mentally exhausted after just 15 minutes instead of bouncing off your walls all evening. Add a GPS dog tracking collar if your adventurous pup tends to explore beyond the fence line during outdoor playtime.
The gray-and-white color scheme matches modern backyard furniture without looking like a chaotic playground. After she races through her mini-course—ramp up, platform pause, ramp down, repeat six times—she collapses on an orthopedic memory foam dog sofa and doesn’t beg for fetch until tomorrow. Between play sessions, keep her coat healthy with regular baths using best homemade dog shampoo so all that outdoor fun doesn’t leave her smelling like yard adventures.
Pro tip: Paint the ramp surface with non-slip deck coating or glue down rubber stair treads so your dog doesn’t slip during rainy-day zoomies.
📸 Photo credit: Instagram @unknown
#2: The Modular Cottage Playground (Mix-and-Match Zones, Zero Yard Chaos)
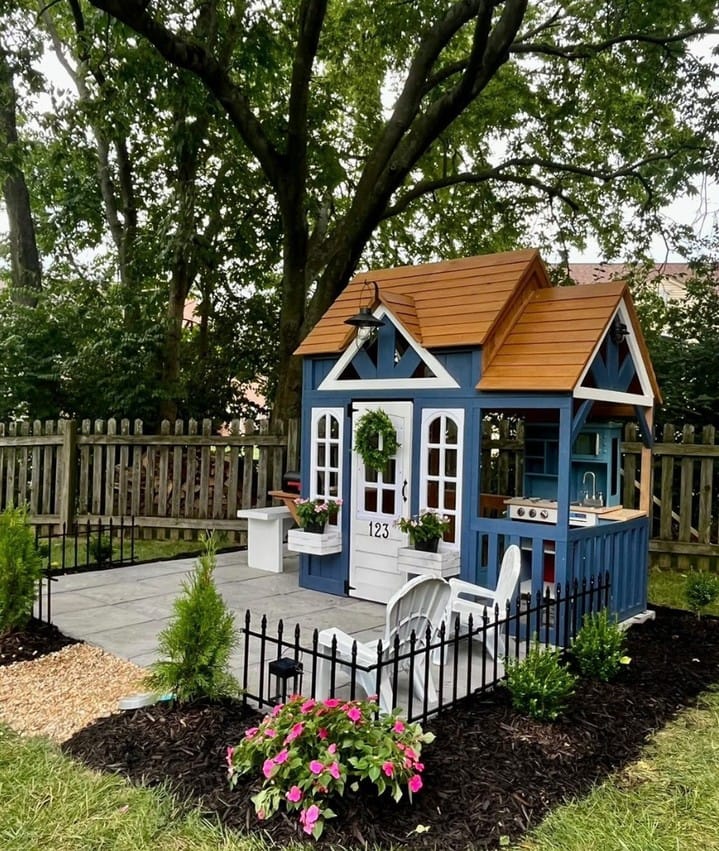
My dog runs out the back door, skidding to a halt on the patio, and she beelines for the blue cottage tunnel, disappearing inside for three seconds and popping out of the side window to jump on the deck platform with her favorite rope toy. It is the quickest, most random looking set-up you could imagine, but it’s really a compact 8×10-foot set-up that works for a small to medium dog that looks like intentional garden design.
The playhouse runs along the outside of the yard in a U-shape. The cottage is in the middle and is flanked by a white picket gate entry, a mini front porch with planters, and a pass-through tunnel. There is also a small patio area on the right side of the playhouse. There is a toy kitchen area on the patio that can also be used as a shady spot to rest. There is a very small deck which connects the playhouse to the cottage which is 12 inches high and is perfect for small dogs to learn how to jump up and down without fear of falling off a high platform. The playhouse is surrounded by black iron fencing, mulch beds and flowering plants making the playhouse part of the landscape instead of just another dog toy.
You’ll need plywood sheets, 2×4 lumber, cedar shingles for the roof, exterior paint in coordinating colors, deck screws, sandpaper, and a circular saw. Sand every edge until it’s smooth as your kitchen table so paws won’t snag splinters. Anchor corner posts 18 inches deep with concrete so nothing wobbles when your dog launches off the platform.
A typical 15-minute session might include sniffing a planter, opening the gate, crawling through the tunnel, bounding onto the deck, grabbing a ball, and racing back down the hill. She’ll circle the structure a few times and then flop under the kitchen overhang panting. The different textures underfoot (smooth pavers, soft grass, and gritty deck), different heights to climb over or squeeze under, and tight spaces to squeeze through keeps her brain busy and builds confidence in anxious dogs and burns energy in bouncy ones.
Paint the cottage in colors that match your house trim or garden shed so it looks intentional from your kitchen window. The copper roof and white accents here echo farmhouse style, but you could do modern gray, coastal turquoise, or natural wood stain. Plant low-maintenance perennials around the mulch border so it blends into landscaping instead of screaming “dog stuff.” Keep a weatherproof bin (or a Heavy-Duty Indestructible Dog Crate works great for outdoor toy storage) tucked beside the cottage to corral balls and ropes after playtime.
For safety, check that the deck railing height prevents jumping off the wrong side, seal all wood with pet-safe exterior stain, and make sure the tunnel opening is wide enough your dog won’t get stuck mid-wiggle. Add rubber stair treads to the deck steps for traction when paws are wet. Position the structure where you can see it from inside so you’ll notice if your dog needs a water break or starts overheating.
This is good impulse control training. Ask the dog to sit at the gate, release her, and race through the tunnel. Call her back to the porch to get a treat. Change the toys weekly. Rotate the snuffle ball in the planter box, put a new rope on the kitchen window, toss a puzzle toy on the deck. After three rounds through the course, she will trot inside, flop down on the bed, and sleep for two hours instead of pacing the hallway for attention.
Start with the platform and tunnel and add the cottage roof and any decorations when you see how your dog will use the space.
📸 Photo credit: Instagram @kidkrafttoys
#3: Backyard Halfpipe Skate Park (Athletic Dogs, Maximum Burn)
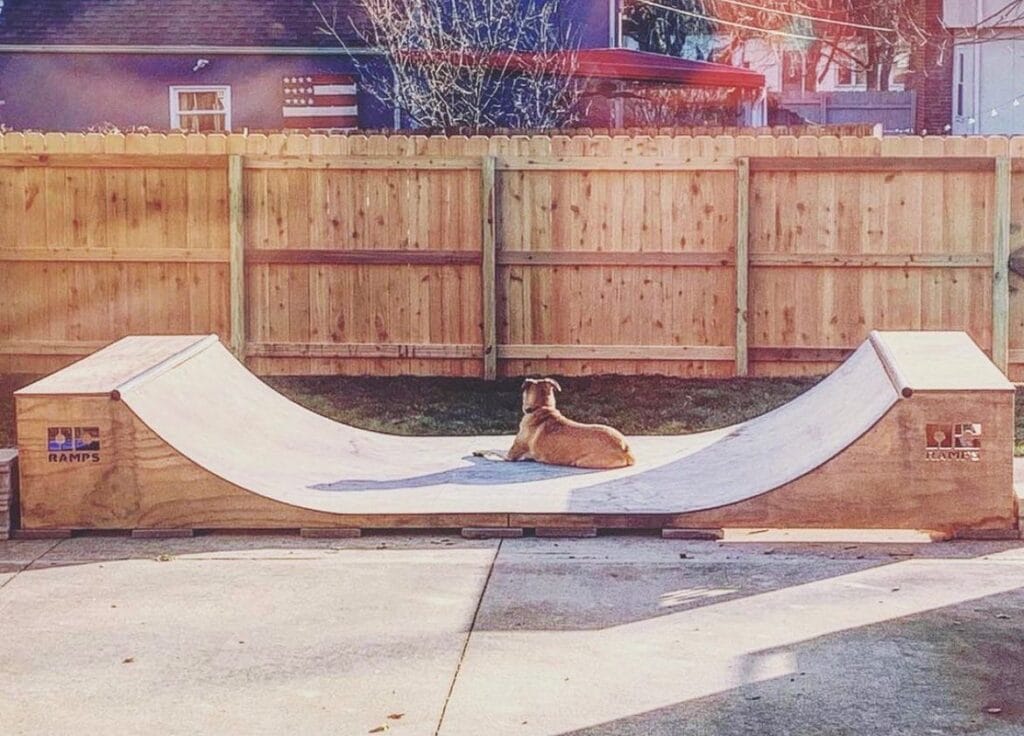
His golden retriever races down one ramp, slides across the bottom, then scrambles up the opposite side with a huge grin. He circles back and does it again and again – six more times in four minutes.
This U-shaped halfpipe sits 12 feet long and 4 feet wide, built from 3/4-inch plywood sheets with 2×4 framing underneath. You’ll need a circular saw, drill, 60-grit sandpaper, outdoor wood stain, and non-slip rubber mat material for the bottom surface. The ramps angle at roughly 30 degrees—steep enough for momentum but safe for paws. Sand every edge until it’s baby-smooth, then coat exposed wood with weatherproof wood sealer so it doesn’t splinter or warp after rain.
Medium to large athletic dogs burn serious energy here. Your pup sprints up one side, catches air at the top, then races down and repeats until his tongue hangs sideways. It builds core strength and confidence so you can tire out high-drive breeds in 15 minutes which means you’re not dealing with shredded couch cushions at 9 p.m. Line the bottom with rubber matting from an Insulated Outdoor Dog House for traction during fast turns.
Place it beside your fence line with mulch borders. Throw some mulch on the base for a more rustic look and a shaded spot to rest with water bowls 10 feet away. After three rounds, he will be laying on the ground panting happily. This looks great with garden beds or you can stain it gray or cedar to match your deck. Enjoy this photo with one of our stylish Best DIY Dog Collars: A Comprehensive Guide.
Watch for overheating – Cool water breaks every 10 minutes.
📸 Photo credit: Instagram @oc_ramps
#4: Backyard Agility Course with Cedar Kennel Rest Station (Multi-Zone Play, Built-in Downtime)
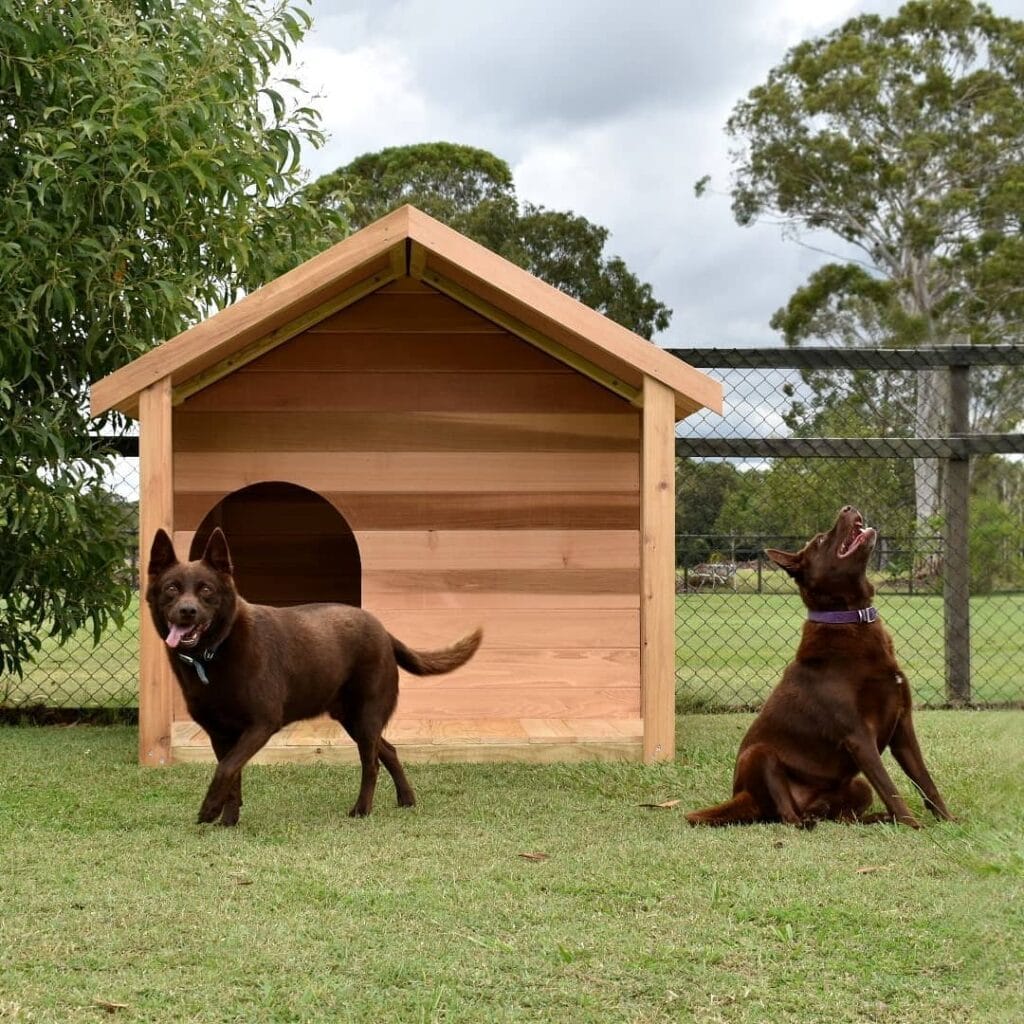
For most of those 18 minutes, your dog is rocketing through a 4-foot long tunnel, scrambling up a wooden ramp and then back to sniff around a sandbox you dug near the fence line. Your dog is happy, panting from her workout but contentedly collapsed under the shade of her cedar dog house with her tongue hanging out.
This multi-zone playground uses your existing backyard grass as the base so you don’t need rubber mats for most areas. Position a cedar A-frame kennel (like the one shown) as your centerpiece rest zone, then arrange a PVC tunnel 8 feet to the left, a 6-foot wooden ramp angled 20 degrees against the fence, and a 3×3-foot sandbox filled with play sand near the back corner. Add weave poles from five 1-inch PVC pipes spaced 18 inches apart, driven 8 inches into the ground. Your dog moves through each station following your voice or a Remote Training Dog Collar System for recall practice between obstacles.
Sand all wooden edges until smooth as glass so paws don’t snag on splinters. Secure ramp boards with countersunk screws and paint surfaces with non-slip deck paint in charcoal or cedar tones that match your fence. The course teaches impulse control—your dog waits at the tunnel entrance until you say “okay”—which means fewer door-dashing incidents when you’re unloading groceries. If you want to give him 24/7 access, an automatic dog door lets him zoom outside whenever energy strikes, then come back in when tired.
If you want to run a mini-course at your home, you can do a tunnel sprint then a sandbox break and some treat time at the kennel door. He will leave muddy prints along his favorite path in 3 days but he will sleep for 90 minutes instead of pacing your living room. Switch the direction of the tunnel once a month and hide some new rope toys in the sandbox for him to sniff out.
Pro tip: Place a galvanized water bucket in the shade of the kennel and refill it every morning so your dog can drink between sprints without having to come inside.
📸 Photo credit: Instagram @stillagroup
#5: Backyard Agility Course Built from Lumber Scraps (Multi-Zone Play Station, Cuts Down Indoor Chaos)
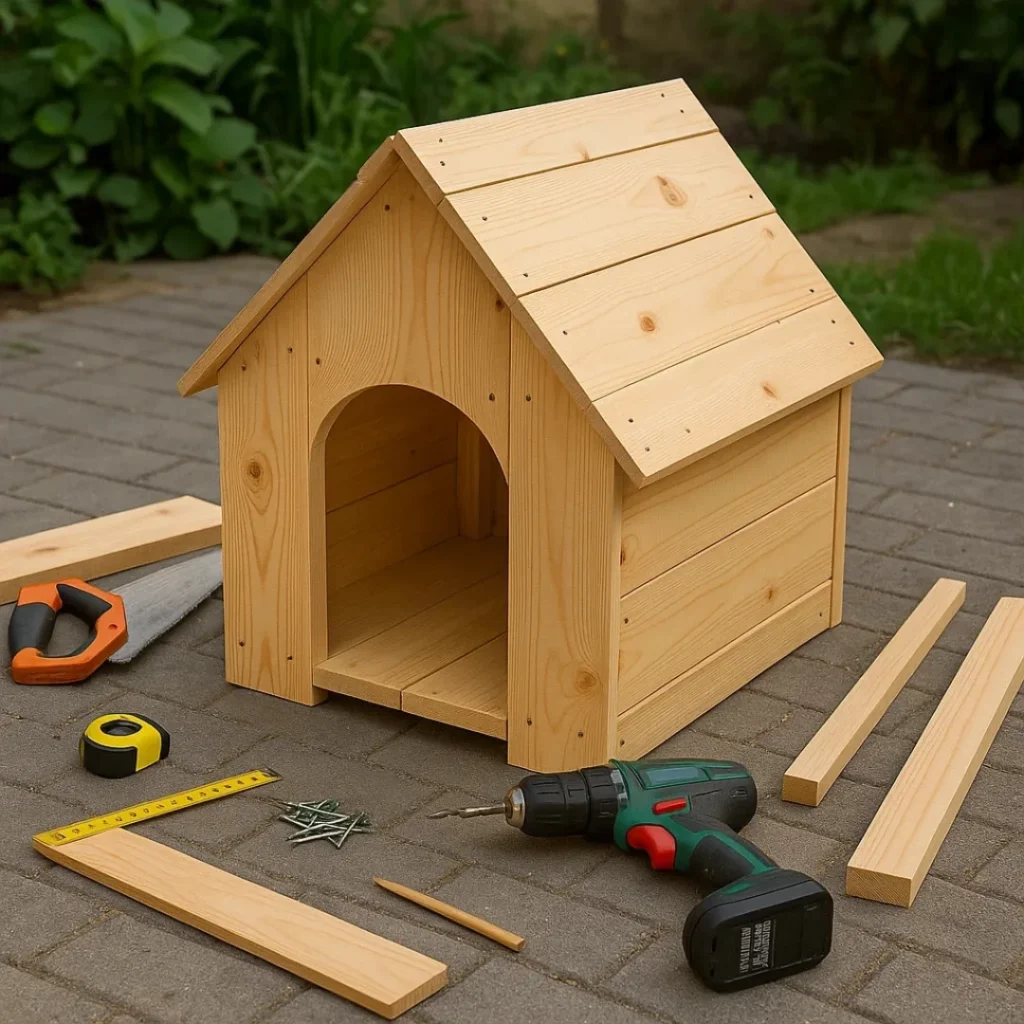
My dog bolts out the door, heads straight for the wooden tunnel and proceeds to scramble up the ramp with muddy paws. This DIY backyard playground fit’s into a 15×20-foot side yard and works well for medium to large dogs with some serious energy to burn.
The layout flows left to right: tunnel entrance (3 feet long, built from fence boards), weave poles (5 PVC pipes spaced 24 inches apart), balance beam (6-foot-long 4×4 post raised 8 inches), and a ramp (4-foot incline with cross-slat steps). You’ll need basic tools—drill, saw, sandpaper assortment, measuring tape—plus lumber, screws, and rubber stair treads for traction. Sand every edge until splinter-free, then coat high-traffic surfaces with non-slip deck paint. Anchor posts 12 inches deep so nothing wobbles when your dog launches off the ramp at full speed.
It meets sprinting needs (the tunnel sprint), balance challenges (beam walking), and problem-solving (figuring out the weave pattern) all in one loop. Try this mini-course: sit-stay at the tunnel entrance, call your dog through, guide them over the weave poles with a dog treat training pouch clipped to your belt, then release them up the ramp. After fifteen minutes, he’ll collapse on his outdoor bed instead of shredding throw pillows—you’ll actually see the difference in afternoon behavior.
The natural wood blends seamlessly with garden beds and looks intentional from your patio, not like random junk. Store toys in a weatherproof bin, and rotate obstacles monthly so the course stays fresh. If you’re ready for more ambitious builds, check out DIY Dog Houses – How to Build the Perfect Home for Your Dog for sheltered rest zones. Add shade cloth over the rest area and a water station at the finish line so your dog doesn’t overheat. Consider a Convertible Dog Bike Trailer nearby for quick trips to extended trail adventures after mastering the home course.
Pro tip: Place some really delicious treats or toys inside the opening of the tunnel once a week. Your dog will obsess over that spot and will want to play every time he is in the yard.
📸 Photo credit: Instagram @woodworkingmylove
#6: Backyard Agility Adventure Zone (Multi-Level Training Course That Transforms Destructive Energy Into Focused Play)
Whether your dog zips through the tunnel, scrambles up the blue ramp, balances on the yellow beam, or circles back to the red tire jump in a few seconds, your dog can have a blast running figure-8s through the ramp, tunnel, and balance beam without running into dead ends.
The tunnel sits at ground level between two trees, creating a shaded sprint zone. A four-foot wooden ramp angles up to a platform where your dog can survey the yard. The red tire jump mounts to a sturdy post at knee height—perfect for medium to large dogs who need confidence-building jumps. Weave poles made from PVC pipes stand 18 inches apart along one edge. Sand the wood edges until they’re baby-smooth and paint everything with non-slip deck coating so paws grip even when wet. If you want a more permanent setup, a Large Outdoor Dog Kennel Run creates defined boundaries. For water-loving dogs, add a Hydrotherapy Dog Pool Ramp near the tunnel exit.
By the end of a 15-minute session, your dog will likely collapse on the grass with muddy paws and tongue hanging out. The couch cushions stay clean all afternoon.
Pro tip: Every week, switch the direction of the tunnel or the tire jump so your dog’s brain doesn’t get bored and start memorizing the routine.
📸 Photo credit: Instagram @woofdriver2
#7: Two-Story Backyard Agility Palace (Elevated Play Meets Ground-Level Challenge)
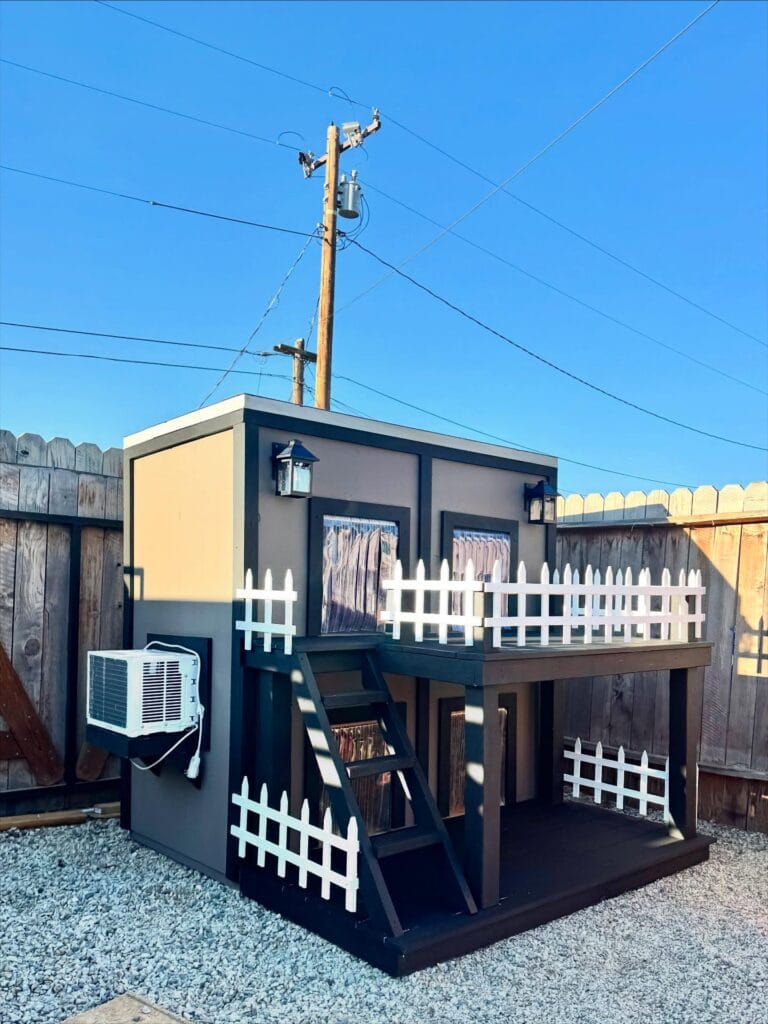
Stand back! Because when my dog sees this she launches herself up the dark green ramp, scrambles across the balcony, and peeks out over the white picket railing like she owns the entire yard! It’s definitely a fun backyard set up for dogs, that includes an elevated deck (about 4 feet high) and ground level obstacles to create a full agility circuit for medium to large dogs.
The upper level features a platform with white picket fencing, two windows with curtains, and outdoor lanterns for visibility during evening play sessions. It’s built from pressure-treated lumber and painted in charcoal gray with tan accents so it looks like intentional backyard architecture, not random pet clutter. The lower level includes an open shelter area where your dog can cool down on an Orthopedic Joint Support Dog Bed between sprints.
Build the ramp at a 30-degree angle with horizontal wooden strips every 6 inches for traction. Sand all edges until smooth, then add outdoor-grade non-slip tape so your dog doesn’t slip mid-climb. Secure posts with concrete footings and cross-bracing underneath so nothing wobbles when she lands hard after a jump.
Here’s a sample play session: you toss a ball from an Automatic Ball Launcher for Dogs, she retrieves it, races up the ramp, drops it through the balcony opening, then circles back down the stairs you’ve added on the opposite side. Fifteen minutes of this, and she’s sprawled on the lower-level bed, panting happily instead of digging holes near your garden fence. After intense play, try these refreshing Frozen Dog Treats: Delicious & Easy DIY Recipes to Keep Your Dog Cool to help her rehydrate and cool down.
Rotate challenge levels by moving the ball launcher to different spots or adding weave poles made from PVC pipes around the structure’s perimeter, which keeps her mentally engaged and prevents boredom.
📸 Photo credit: Instagram @hd_doghouse_jg
#8: Treehouse-Style Platform Playground (Elevated Adventure Zone, Full-Body Workout)
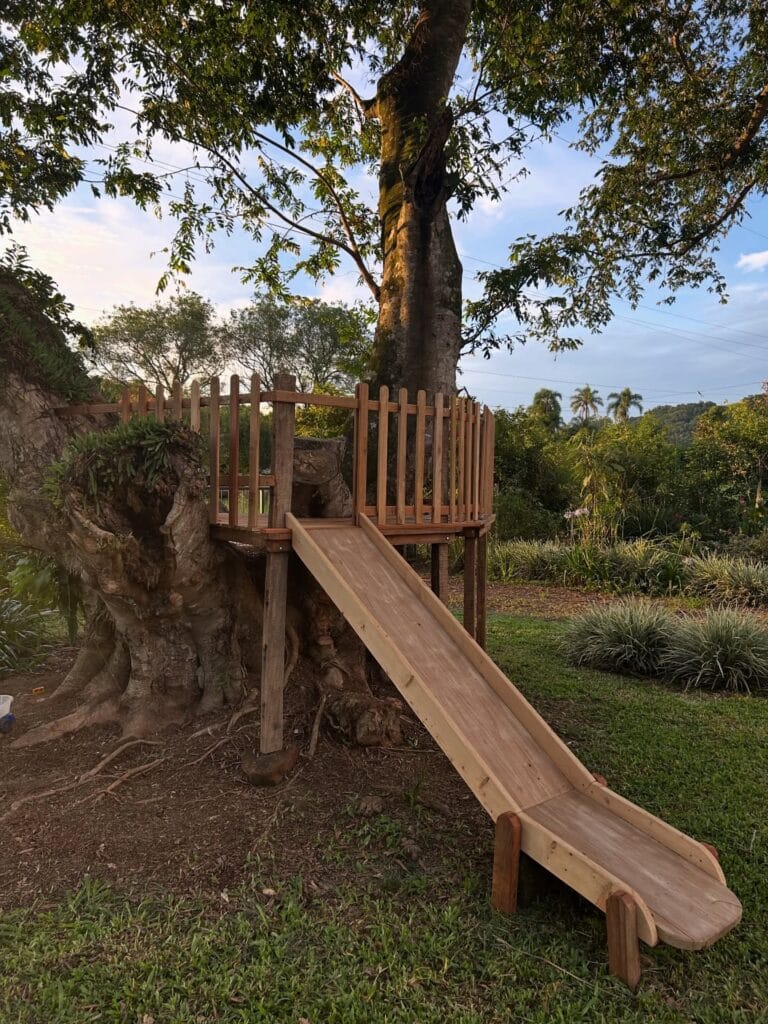
Your dog runs up the slide backwards, scrambles up on the platform, and then peers over the railing like a tiny security guard surveying the yard. This elevated playground turns a tree into a multi-level play zone, and a medium to large dog’s confidence builder. It allows your dog to burn some energy and satisfy his urge to climb and survey his territory.
The platform sits about 3 feet above ground. There are vertical slat railings on 3 sides and a smooth wooden slide angled down from the platform to ground level. The platform is built around the tree trunk and branches so that you don’t damage the roots or the trunk. The dog climbs up the slide to the platform (paws gripping the horizontal wood ridges on the slide) and surveys the elevated view for a minute then slides down on its belly, or more carefully walks down backwards. In a typical session, the dog does this about 6 times, then sprints around the tree in circles and lies down panting under the shade.
Build it with pressure-treated lumber for the deck frame, cedar slats for railings, and sanded pine for the slide surface. Secure posts into concrete footings 2 feet deep so nothing wobbles when your 60-pound dog launches onto it. Round every corner with 80-grit sandpaper, countersink all screws, and apply non-slip rubber stair treads to the slide. It keeps paws stable going up which means fewer slips and more confidence tackling new challenges. Use a tactical dog harness with handle during first introductions so you can support nervous climbers.
The platform provides an awesome physical workout that your dog won’t get from flat ground fetch. Climbing works his hindquarters and his core and balancing on the deck sharpens his coordination. Steep angle, controlled descent and sitting on the deck to control the slide strengthens shoulder muscles. Mental stimulation includes problem solving the angle of the climb and the steepness of the slide. Impulse control comes when you ask for a sit stay at the top and release them to slide. Create a mini-course: recall to the base, “up” command, pause at the platform, “off” and down the slide to your arms.
Natural wood tones blend with garden landscaping instead of screaming “dog equipment.” The structure frames the tree rather than fighting it, and green grass surrounding the slide landing keeps the whole setup looking intentional. Position a matching wooden toy box nearby painted the same stain color. Keep a premium leather collar hanging on one railing post as your “playground collar” so it’s grab-and-go ready.
Safety checks weekly: Make sure all the slats of the railing are tight and won’t slide out. Check the slide to make sure it’s not splintered and the post to make sure it won’t wobble. For some dogs, you may need to lower the platform to only 2 feet off the ground for senior dogs and puppies under 6 months of age. Throw a shaded mat on the ground for your dog to rest on in between climbs. Look for signs of panting or a wobbly landing. If your dog is overly panting and wobbly when they land, you may want to give them a drink and let them rest for a bit. You can tell it’s working if there are muddy paw prints on the slide, leaves all over the deck, and your dog is exhausted at the end.
First start with just the platform. Add the slide once your dog confidently jumps up using a step stool.
📸 Photo credit: Instagram @umagurianamarcenaria
#9: Backyard Agility Course With Rubber Tile Safety Flooring (Multi-Zone Play Stations, Full-Body Exercise)
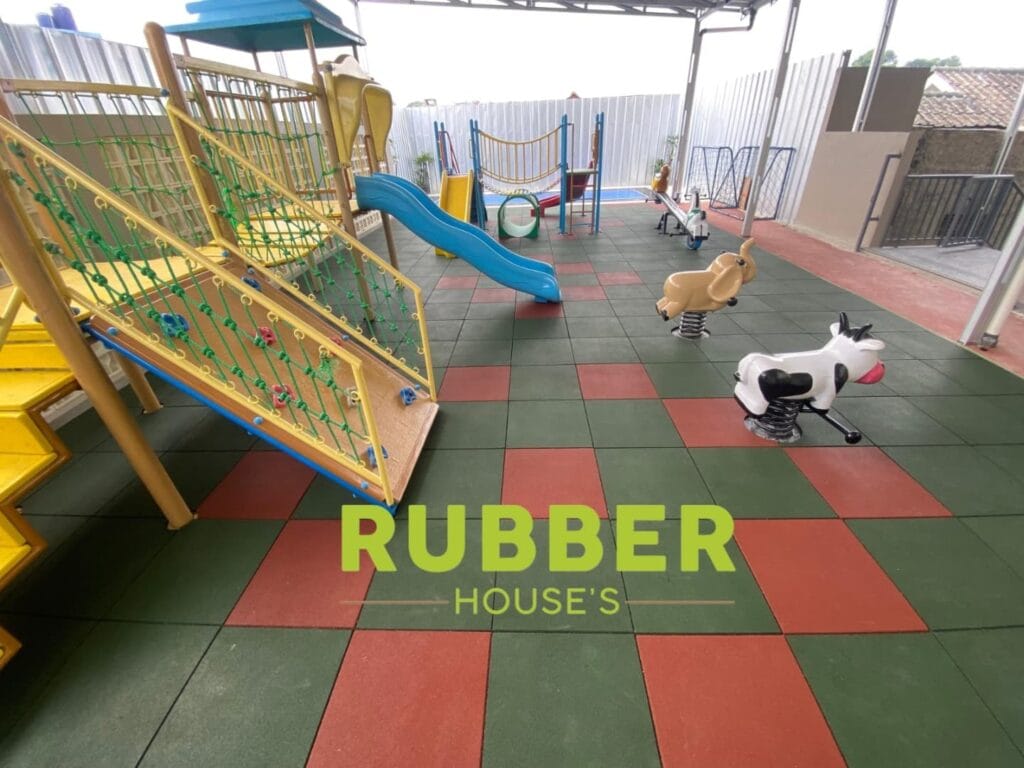
MOLLY DASHES THROUGH THE YELLOW TUNNEL, THEN CLIMBS UP THE ROPE-WEB CLIMBER AND SKIDS DOWN THE BLUE SLIDE WITH HER TONGUE FLAPPING. She circles back to the spring-mounted cow rocker and bounces twice before she sprints off to the shady rest area — all in less than 90 seconds.!
This DIY dog playground works best for small to medium dogs in a backyard or large patio space, roughly 15×20 feet. The rubber tile flooring creates defined play zones in alternating green and terracotta squares, giving your dog solid traction when she’s launching off the climber or pivoting around obstacles. You’ll need basic materials: PVC pipes for weave poles, plywood and 2x4s for the ramp (sanded smooth with rounded edges), an old kiddie slide secured to a sturdy platform, rope netting tied to a wooden frame, and spring-mounted ride-on animals. Add a portable shade canopy, rubber mats under high-impact zones, and an elevated wooden dog feeder station in the rest area with fresh water. Your drill, saw, measuring tape, and sandpaper handle most assembly—just secure every post deep enough that nothing wobbles when he slams into it at full speed.
The layout flows naturally: tunnel on the left, climber & slide in middle, spring rockers/swings on right; feeding station at back. He sniffed the tunnel entrance then army-crawled through it; saw the climber and scrambled up the rope webbing with his claws in each knot. He got on the slide, which most dogs hesitate to do the first time, then tried to climb up it because he liked it so much. Weave poles (5 PVC pipes, 18 in apart, in rubber floor holders) sharpen his agility and focus. The spring animals are fun for his prey-drive, without actually having any prey, and the swings are good for balance-training, since they move.
It’s time for a mini-course! Run him through the tunnel, over the climber, down the slide, weave through the poles and then to the rest zone for his reward from your Dog Chew Treats: Healthy & Easy Homemade Recipes. Run him for 20 minutes and he’s worn out. He’ll flop down on the mat in the shade with his muddy paws and grin like a goober and then take a nice nap for two hours without scratching the couch or raiding the garbage or whining at the window.
The color-blocked flooring keeps the space looking intentional instead of chaotic, blending with your patio furniture and garden beds. Rotate obstacles monthly: flip the tunnel direction, move the weave poles into a curve, add a balance beam made from a sanded 2×6 propped on cinder blocks. Store toys in a weatherproof bin near the feeder station, and hose down the rubber tiles weekly so the whole setup stays Instagram-worthy. When you load him in the car for errands, protect your seats with a waterproof back seat cover for dogs—he’ll be muddy and blissed-out every single time.
Supervise every session until he masters each obstacle. Watch for signs he needs a break, such as panting heavily, slowing down, or lying in the shade instead of running the course.
📸 Photo credit: Instagram @rubber_houses
Your Dream Dog Space Starts Today
You’ve got nine great playground ideas that will transform your backyard into the doggie playground of his dreams. Don’t have the time or budget to do it all at once? Start with one and build from there.
Whether you are looking to expand your dog’s running space or just make him a backyard super star, these DIY dog run ideas are the perfect addition to any dog’s space. Pair your new playground with a comfy DIY dog bed to catch a few winks after a full day of zooming around! Add in a few of these DIY dog treats to reward him for all of his hard work when training in his new space.
Pin this to your Pinterest so you’ll have it on hand when you’re ready to build and see what your pup’s tail will wag the hardest for!
Frequently Asked Questions
Q: How much does it cost to build a backyard dog playground?
Most single-obstacle projects (ramp, platform, tunnel) cost $30-75 in materials. A full multi-station playground runs $150-300 depending on size and complexity. The biggest expenses are pressure-treated lumber and weatherproofing supplies.
Q: What is the best surface to make a dog playground on? My dog would tear up anything but dirt. Thanks!
Natural grass works great for most setups. For high-traffic zones (under ramps/platforms), add rubber flooring tiles or mulch to prevent mud and provide traction.
Q: How do I make my homemade dog equipment safe?
Sand all edges until smooth, countersink screws below the surface, use non-slip deck coating on ramps/platforms, and anchor posts 12-18 inches deep. Test stability before letting your dog use it.
Q: Can I build these if I’m not handy?
Yes! Projects #2, #5, and #9 are beginner friendly. I would suggest starting with a tunnel or a weave poles. Then move to something like the platforms and ramps once you’re comfortable with your cuts and drilling.

Amr Mohsen is a software engineer who traded his keyboard for a leash — at least on weekends. His love for dogs inspired him to share what he learns as a dog owner and enthusiast, bringing a detail-oriented, research-driven perspective to every article he writes. If it’s about dogs, he’s probably already looked it up twice.



