
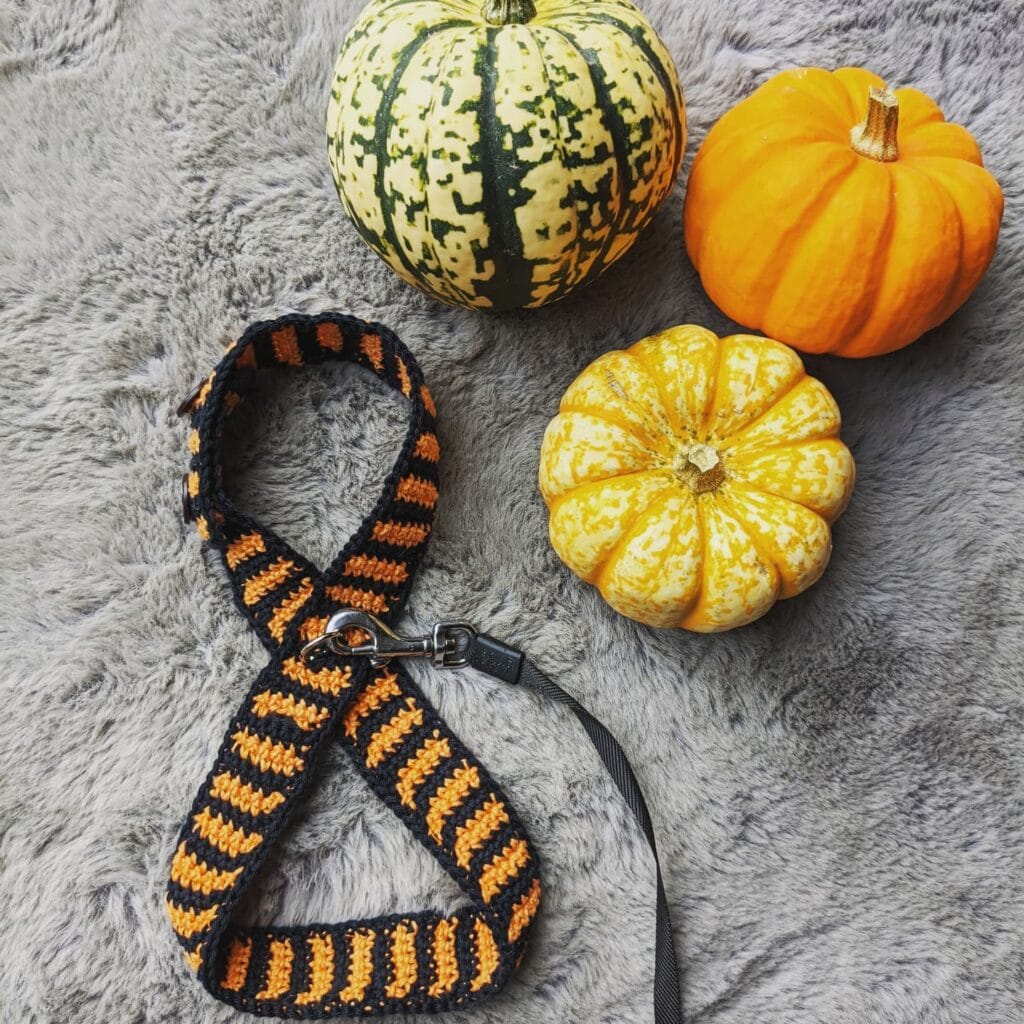
I love it when my golden comes barreling through the door with muddy paws and a tail that is going 100 mph and his harness just snaps. That has happened to me with my sister’s lab. I wanted to cry for her.
But store harnesses are either too expensive or they fall apart after three walks and good luck finding one that actually fits your chunky, fluffy dog.
And did you know that the right fit can make walks calmer? Less pulling, less chaos, less you getting dragged down the street in your slippers.
Well, I had a fun time looking for the best free dog harness pattern options to offer you all and I have to admit I’ve found some of the cutest ones. Here are 10 free dog harness patterns that I’ve found to be beginner friendly, easy to customize and fun to sew.
#1: Free Dog Harness Pattern: The Classic Step-In Style That Actually Fits Right
You know that moment when you’re rushing out the door, coffee in one hand, leash in the other, and your golden is spinning in circles while you’re trying to clip that harness? Yeah, I know that chaos.
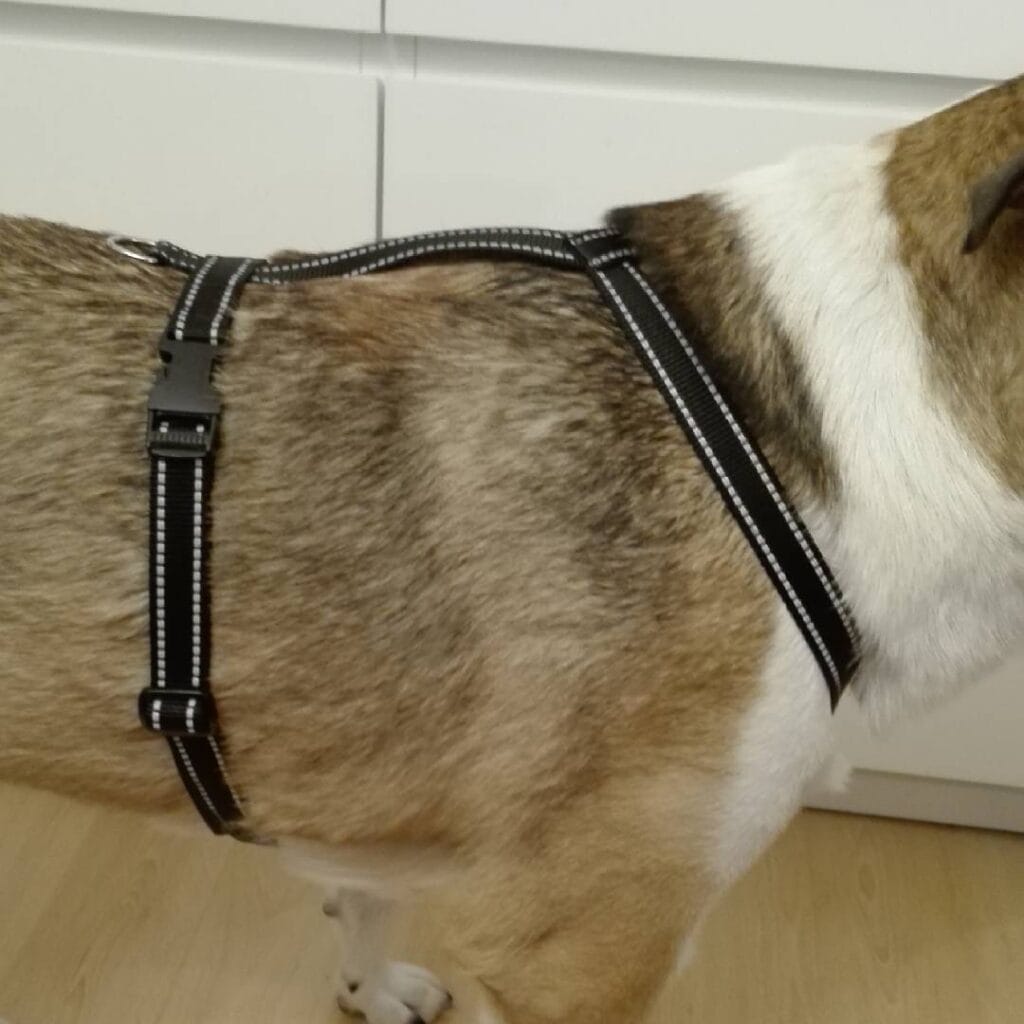
A no-nonsense harness, with a snap-step-in design that every dog should have. This harness has black reflective nylon webbing across the chest and back, and there are two parallel reflective strips sewn onto each strap. The belly strap sits just behind the front legs and keeps the pressure off the throat.
You will need 3/4-inch black nylon webbing (purchase at least 6 feet for a medium-to-large size dog) as well as two side-release buckles, two D-rings and a slider adjuster for the chest strap. For a more visible reflective detail, we sewed on silver reflective ribbon to the webbing to help it stand out against the golden color of our dog.
First, cut the chest strap. Then cut the belly loop. The belly strap attaches to the chest piece via a single center D-ring on the back – this is where the leash attaches, and it ensures that the belly loop stays in the middle.
Fit check: put two fingers under every strap. too tight chafes. too loose she will slip off on you when you take her out.
If you like sewing things for your dog, then check out 19 Dog Bed Sewing Patterns You’ll Actually Use
📸 Photo credit: Instagram @elisafromfinland
#2: Macramé Dog Harness Pattern (Boho-Chic & Handmade)
Your golden looks like a fluff ball, and you can’t help but want to dress him or her in the cutest harness! But why buy store bought when you could customize your own. Every store bought harness just seems to look wrong on your fluff ball. They are too plasticky or too sporty. You want a harness that matches your style.
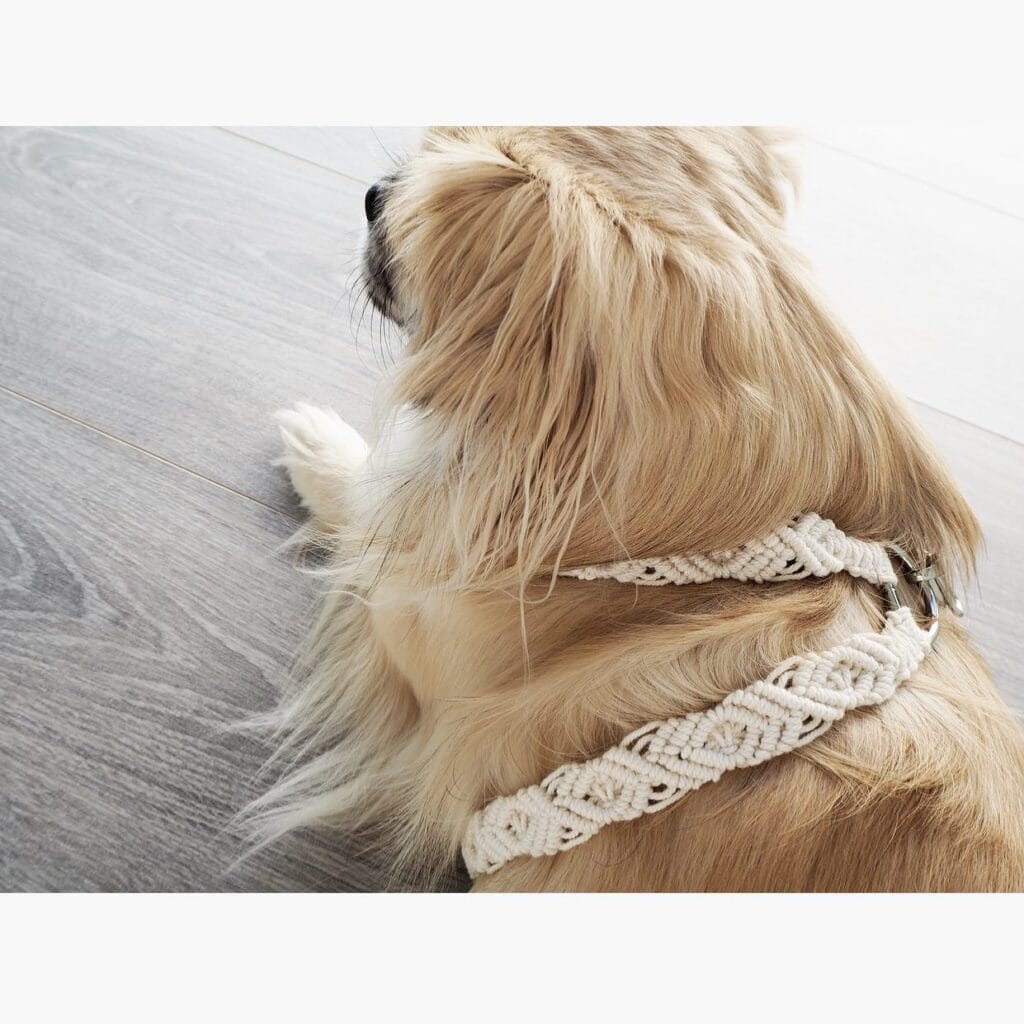
This is a macrame harness, that is exacly that. The piece is made of natural cotton rope, about 4mm thickness. And the ropes are knotted in a repeating diamond lace pattern that sits flat against the dogs chest and back. The color cream-white is lovely against the golden fur.
Not too long ago, my dog, Bear, started to cough up a storm after walks. After a few walks with my fist in his mouth trying to get him to cough, I decided that it was time to get to the root of the problem. After much research, I came across the Adjustable Front Harness and decided to give it a try. Not only is the Adjustable Front Harness easy to use and comfortable for my dog, but the knot work makes it a flat, wide strap (roughly 1.5 inches wide) to better distribute pressure over the dog’s chest (instead of his neck), making him more comfortable on longer walks.
first, cut six cords that are 30 inches each, fold them in half and mount them on a dowel rod while you’re working on the harness. this way the tension is even and you dont get a twisted harness that digs into your shoulders.
If you wash it by hand, do so in cool water, so that the cotton does not shrink and warp the fit. I’d also suggest knotting a little extra length into the chest strap adjustment point so you can resize it if necessary.
📸 Photo credit: Instagram @creating_is_my_therapy
#3: The Aztec Cross-Back Dog Harness Pattern (Free Sew-Along)
you know the feeling when your golden is pulling toward every squirrel in the park and the harness is just… sliding sideways? yeah, this one’s for you.
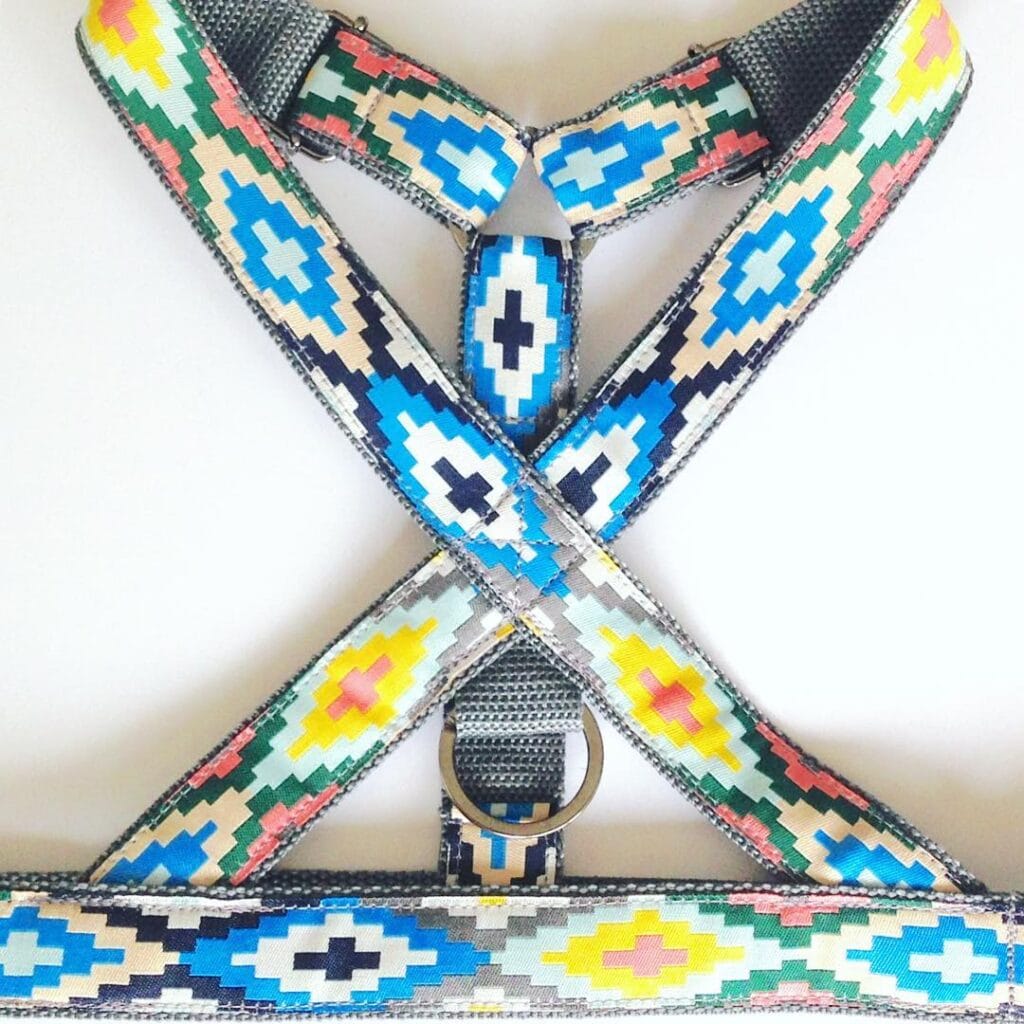
This harness uses a cross-back X-panel design with two straps that are diagonal, connecting at the chest and then cross over the back, attaching to a belly band that has a brass D-ring at the bottom. Because it lays flat against the dog’s body, it doesn’t bunch up like a regular harness can.
To make the strap I used 1.5 inch gray nylon webbing. On top of that I put a printed jacquard ribbon in an Aztec design that is made up of sky blue, navy, coral, yellow and mint against a cream background. I sewed the ribbon edge-to-edge so it wrapped around the full width of each strap.
Well, the chest piece is a [http://www.bullydogsupply.com/P-1504.html#7_padded loop] covered in the same blue diamond-pattern ribbon. Since the pads add padding, the pressure is spread out over the sternum of your dog instead of one thin line. So, no rubbing! I like it!
You will need two side release buckles, one adjustable slider, and one O-ring (the bronze finish would look nice against the colorful ribbon. Cut your webbing to 12″, 18″, and 24″ depending on the girth of your dog. You can adjust from there.
Sew the cross straps on before the belly band goes on as it is easier to keep the ribbon in the right place.
📸 Photo credit: Instagram @hundekollektivet
#4: The Yellow “Needs Space” Dog Harness — A Free Pattern for Reactive or Anxious Dogs
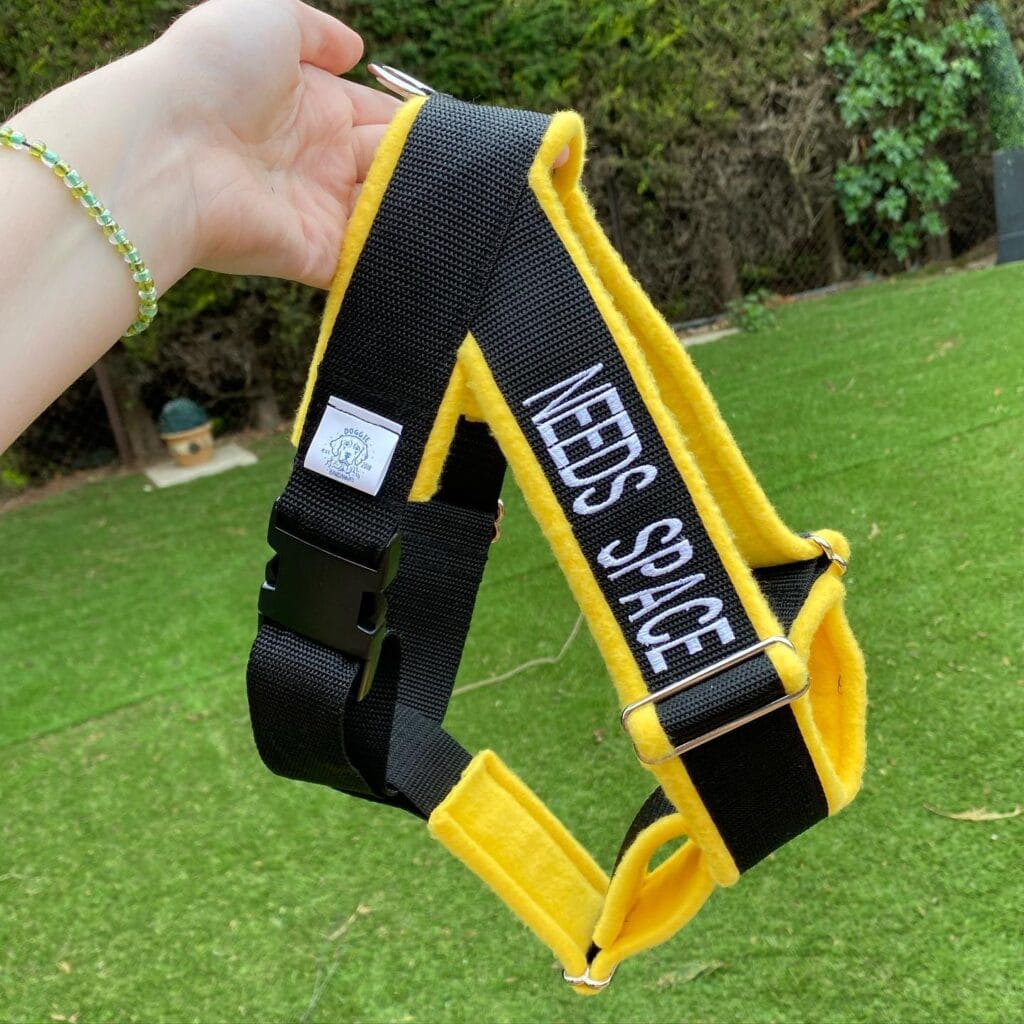
Your golden is the sweetest thing at home. But the second another dog rounds the corner while on a walk, all hell breaks loose. Pulling, lunging, and worst of all, that awful sound she makes. And you are just standing there, trying to signal to strangers, please back off with nothing but your eyes.
This yellow and black “Needs Space” harness is the answer to that exact moment.
The bright yellow fleece top panel is stitched over a black nylon webbing base. The white embroidered lettering on the top panel reads “NEEDS SPACE” in bold block letters. The bright color of the fleece against your dog’s chest helps the message stand out for any onlookers. There is a quick-release black buckle on the belly strap and two silver D-ring sliders that can be used to adjust the fit on the girth and on the chest band.
If you’d rather sew this yourself, you will need 1/4 yard of yellow anti-pill fleece, 1.5 inch black nylon webbing (about 2 yards), one side release buckle, two D-rings, and any basic embroidery font on your machine. The top panel of the fleece is topstitched onto the webbing so strangers can see it. The fleece top also provides your dog with a little buffer before a situation escalates.
Yellow is the color of give this dog space. I stitched the embroidery first, then attached the fleece to the webbing. It was much easier to hoop that way.
📸 Photo credit: Instagram @doggie_bandannas
#5: The Snake-Textured Red Leather Dog Harness Pattern (Step-By-Step DIY)
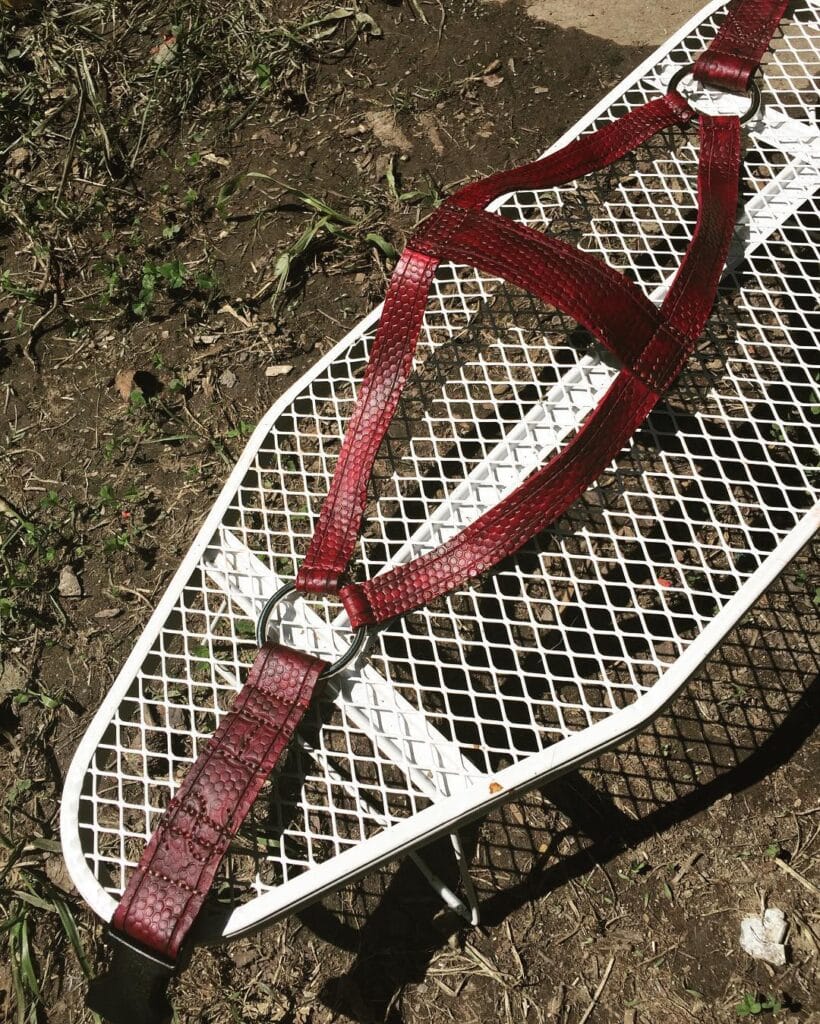
You know how sometimes your golden pulls so hard on a walk that you feel like you are water skiing behind her? This harness pattern is exactly what we both need to talk about.
This deep burgundy snake embossed leather harness is giving me serious Pinterest vibes. It is sure to stop people in the park asking where you bought it! It is a Y-front style harness with two D-ring connectors in brushed silver. The harness is stitched together with what looks like hexagonal embossed genuine leather in a rich wine-red tone. The design sits flat across the chest and crosses at the back so it does not apply pressure on your dog’s throat.
Supplies: 1.5 inch wide embossed leather strips, 2 stainless steel D-rings, leather punch, waxed thread, and a stitching pricking iron. The length of the cross-back strap is quite important. It should be cut longer than you think you will need. This is due to the fact that goldens adjust quickly.
. Lay the straps out flat on a table or whatever, before you sew anything. Make sure that the ‘Y’ is perfectly centered or the harness will twist on your dog’s chest.
Embossing leather sounds scary, but using pre-embossed craft leather sheets from Etsy makes this a weekend project, not a six-week nightmare.
📸 Photo credit: Instagram @caelanjefferyart
#6: The Beagle-Tested Harness Pattern That Actually Stays Put on the Trail
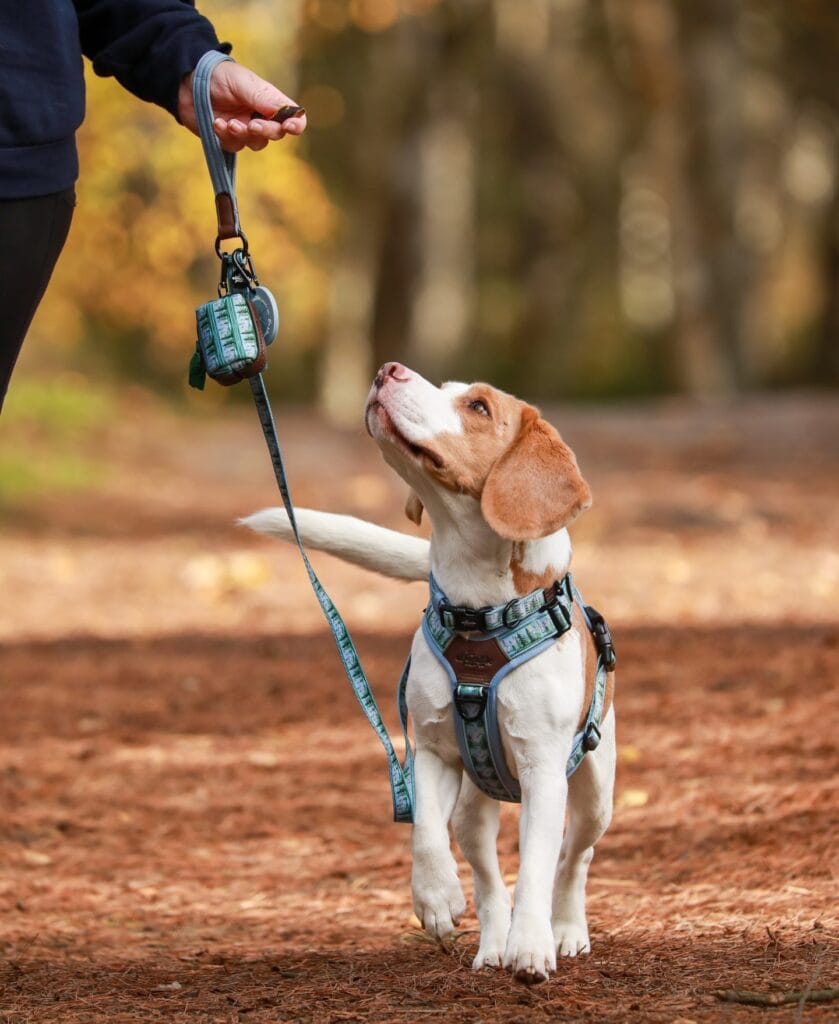
Have you ever thrown a golden bolt and it lands nice and clean but the harness twists sideways pulling your dog’s whole body at a weird angle? This pattern fixes that!
This style of harness (seen on this sweet beagle) has a front-clip chest plate and uses two horizontal straps that run across the body. The teal and sage patterned webbing (it looks like tiny pine trees) lays flat against the chest without bunching. The padded back panel distributes the pressure of the leash across the shoulders rather than the throat.
If you would like to make this yourself, you will need 1.5 inch nylon webbing for the main body straps, 1 inch webbing for the chest connector, tri-glide sliders and side release buckles. The green printed fabric overlay shown is just a decorative piece of cotton canvas printed with a green print that I stitched over the main fabric.
Cut your chest piece out at 8 inches wide for a medium dog. Leave at least 2 inches of adjustment on each side of the belly strap so you don’t have to re-sew after every gain or loss.
Love the matching poop bag dispenser on the leash. Definitely clip it to the D-ring on the handle of the leash and not on the harness – keeps it off of your dog’s back.
Wash and dry your belt: Reinforce every buckle attachment point with a box-X stitch using heavy-duty upholstery thread. That helps distribute the pull force over a wider surface and means fewer blown seams on your woodland walks.
📸 Photo credit: Instagram @theadorablepoochco
#7: Free Paracord Martingale Dog Harness Pattern – The Teal & Black Braided Collar That Actually Stays Put
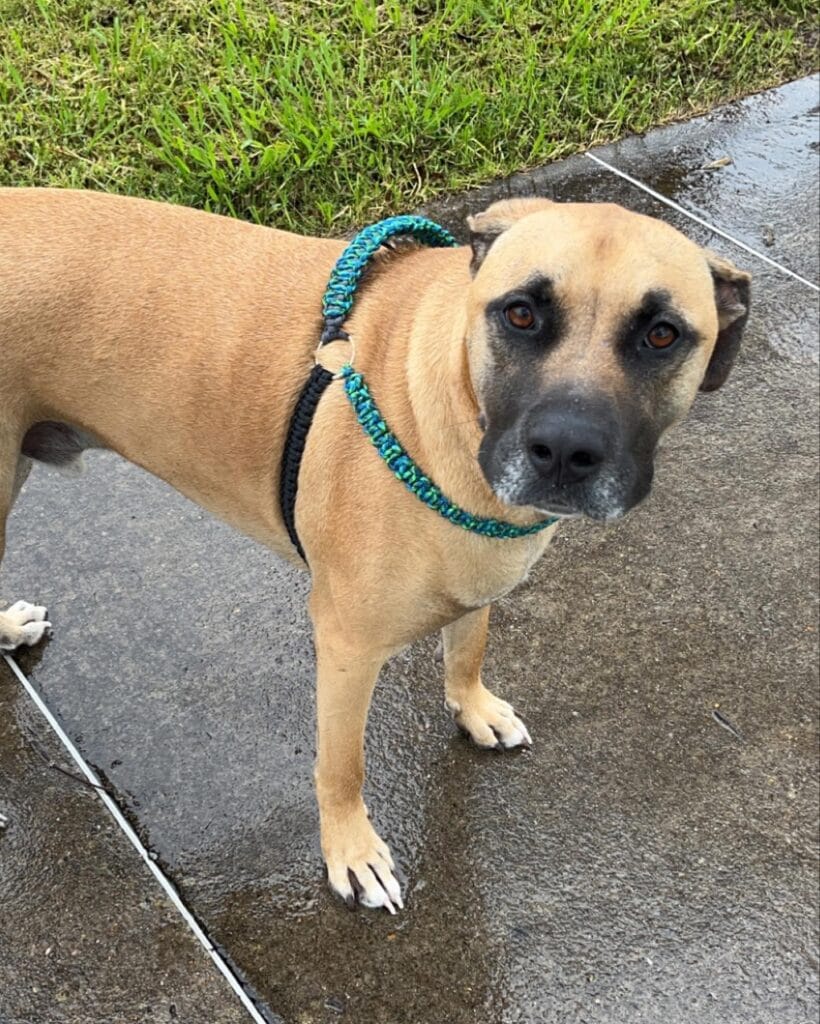
Oh, you know the moment that your goldens are walking and they “lunge” at a squirrel, and the flimsy nylon collar that you are holding slides up over the ears? That is the exact problem that this collar was built to prevent.
It is a paracord martingale collar braided in teal, green, and black 550 paracord. The loop through loop cobra braid will tighten a little when a dog pulls, and then releases when the dog relaxes. No choking. No escaping. Just control.
You will need around 20 feet of teal/green paracord, 10 feet of black paracord and 2 D-rings, one ¾ inch ring for the control loop and one 1 inch ring for the clip. The braid I used was a two color cobra weave, but I worked the sections separately so that the braid is color-blocked across the band instead of in the loop.
To begin measure your dogs neck, then add 1.5 inches to the length for the finished flat collar length. For a larger breed dog you will want to go up to a length of 25–30 feet of paracord.
Iron every cut end with a lighter. A fraying collar end can get caught on anything and the collar will unravel quickly. Sealed ends means this collar will last for years, not months.
📸 Photo credit: Instagram @kylescreates
#8: Free Dog Harness Pattern: The Padded T-Shape Harness with a Quick-Release Buckle
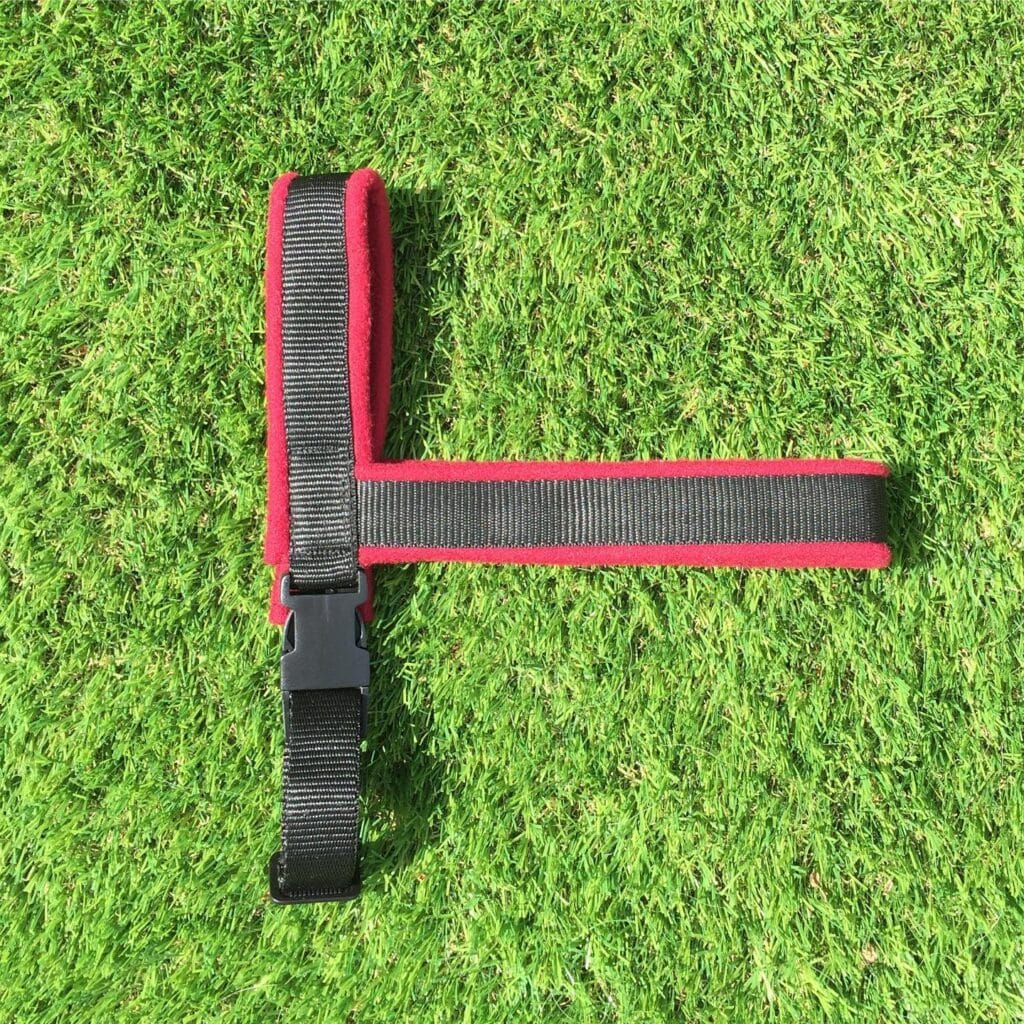
There have been many times when I was taking my golden to the park and the leash was cutting right into the neck. This is the reason why this harness pattern has been created.
Well, this is a T-shape padded harness. The black is the nylon webbing while the red fleece is the padding that wraps the straps where they lay against your dog’s chest and back. A T-shape distribution of pressure to the body instead of the throat. And that quick-release side-release buckle at the chest makes it easy to get on and off your dog.
Cut two pieces to make a: a. a long vertical strap. The strap should be approximately 14–16 inches long for a medium size dog and a shorter horizontal chest strap that is approximately 10–12 inches long. The red fleece covers the 1-inch black polypropylene webbing. Sew the red fleece to the webbing around the edge with a straight stitch. The buckle joins both straps together in the centre.
Obrigado! É uma tipificação fabulosa!! I did the first version without the fleece lining and my dog had a rub mark after a walk. Even adding a thin layer of fleece made a huge difference!
The fleece on the webbing reduces the amount of friction that the webbing will have on the fur, which makes walking more comfortable for the dog. My dog no longer fusses or pulls when I walk her on this harness.
I always have a bright colored fleece on my dog. It makes it so much easier to find her at dusk.
📸 Photo credit: Instagram @doggie_bandannas
#9: The Sherpa Harness Pattern That Looks Like a Million Bucks (And Costs Almost Nothing)
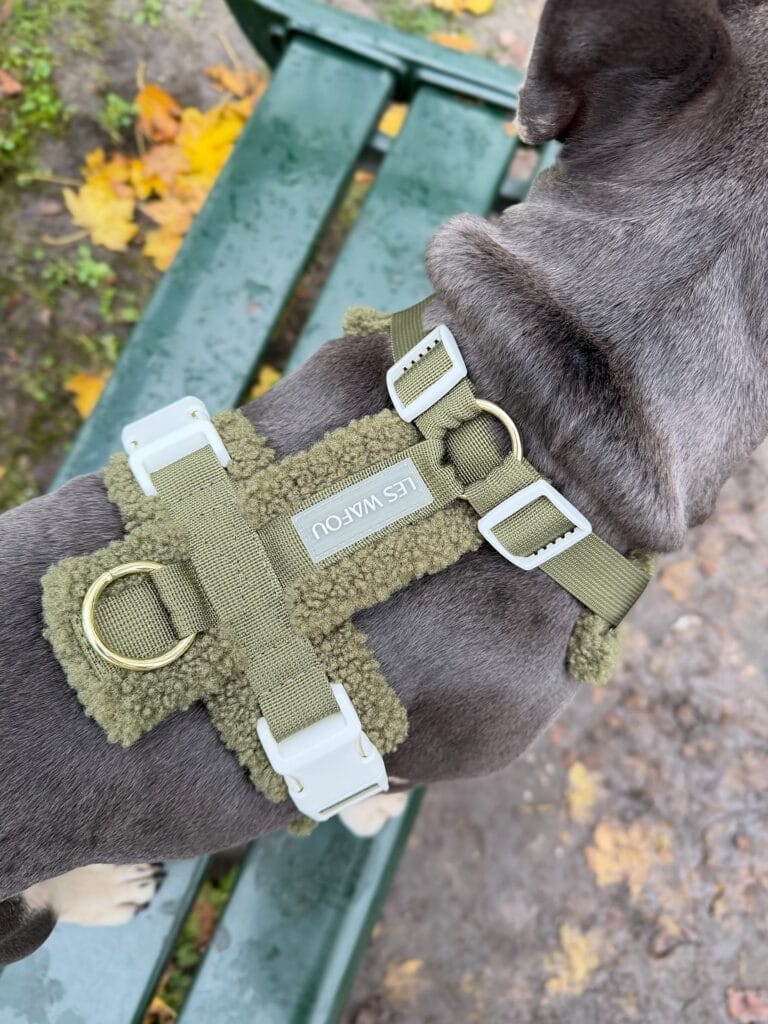
Your dog has been pulling on walks again and your old harness is leaving marks on her chest fur. You want something that fits, does not dig in, and looks cute enough to post on your Instagram during your Sunday morning park adventures.
I love this olive green sherpa-and-webbing harness! It’s cozy-meets-functional and I’m obsessed. The chest plate has been designed with a Les Wafou-style boucle teddy fleece over a structured nylon webbing base and I love the combo of gold D-rings with white plastic quick release buckles. It sits flat against my body, distributing the pressure on my chest and it doesn’t bunch up around my armpits.
You will need the following: Olive green 1 inch nylon webbing for the straps, A piece of sherpa or boucle fabric panel that is cut to the width of your dog’s chest, Two white side release buckles, One D-ring in brass, One sliding tri-glide adjuster (for the neck strap), and one fabric panel to go between the webbing strip on the chest strap.
Besides looking snazzy, the stitches will also ensure that the panel doesn’t twist whilst walking, meaning no further stops to reposition the panel.
Cut your panel to about half an inch smaller than your webbing edges so the raw edges don’t get frayed out through the buckles. Give a quick burn with a lighter to seal the raw edges of the nylon.
📸 Photo credit: Instagram @_jackthefrenchiee
The Measurement Trick That Saves Your Free Pattern Every Single Time
Often when you are looking for a free dog harness pattern you may find that the girth measurement is all that is required. However, not many patterns measure it correctly.
For a standard free pattern, they tell you to measure your dog’s chest width. What you should measure is behind the front legs. Where they tell you to measure is the widest point, and my dogs’ chests differ by 3-4 inches between these two places. That’s why if I followed these patterns, the harness would either chafe or just fall off.
Unfortunately, I have learned that lesson the hard way after wasting a full yard of nice canvas on my cousin’s lab mix. The harness looked so cute on Buddy, but he hated it after 10 minutes because it rubbed his armpit raw.
My own pro tip is to add 1/2 inch ease allowance to the measurement behind the legs. Since Golden Retrievers are so fluffy, their “true size” is actually smaller than the pattern suggests.
One more thing: Always interface your strap pieces. Uninterfaced straps will twist under pressure and the hardware will slide sideways. This can be a safety issue as well as an aesthetic one.
Your Sofa (and Your Sanity) Deserve This
Actually you don’t have to choose between a beautiful home and your golden retriever. What you do need to choose is the right furniture for both.
Pick one piece. Start there and see how it feels to not hold your breath every time your pup jumps up.
And if you’re thinking about your backyard and the best dog backyard ideas for a safe and fun outdoor space, rabbit hole may be your next rabbit hole because once you start creating a space that works for both of you, it’s hard to stop.
Which room in your house needs to be rescued most right now? _ Meow_.

Amr Mohsen is a software engineer who traded his keyboard for a leash — at least on weekends. His love for dogs inspired him to share what he learns as a dog owner and enthusiast, bringing a detail-oriented, research-driven perspective to every article he writes. If it’s about dogs, he’s probably already looked it up twice.



