
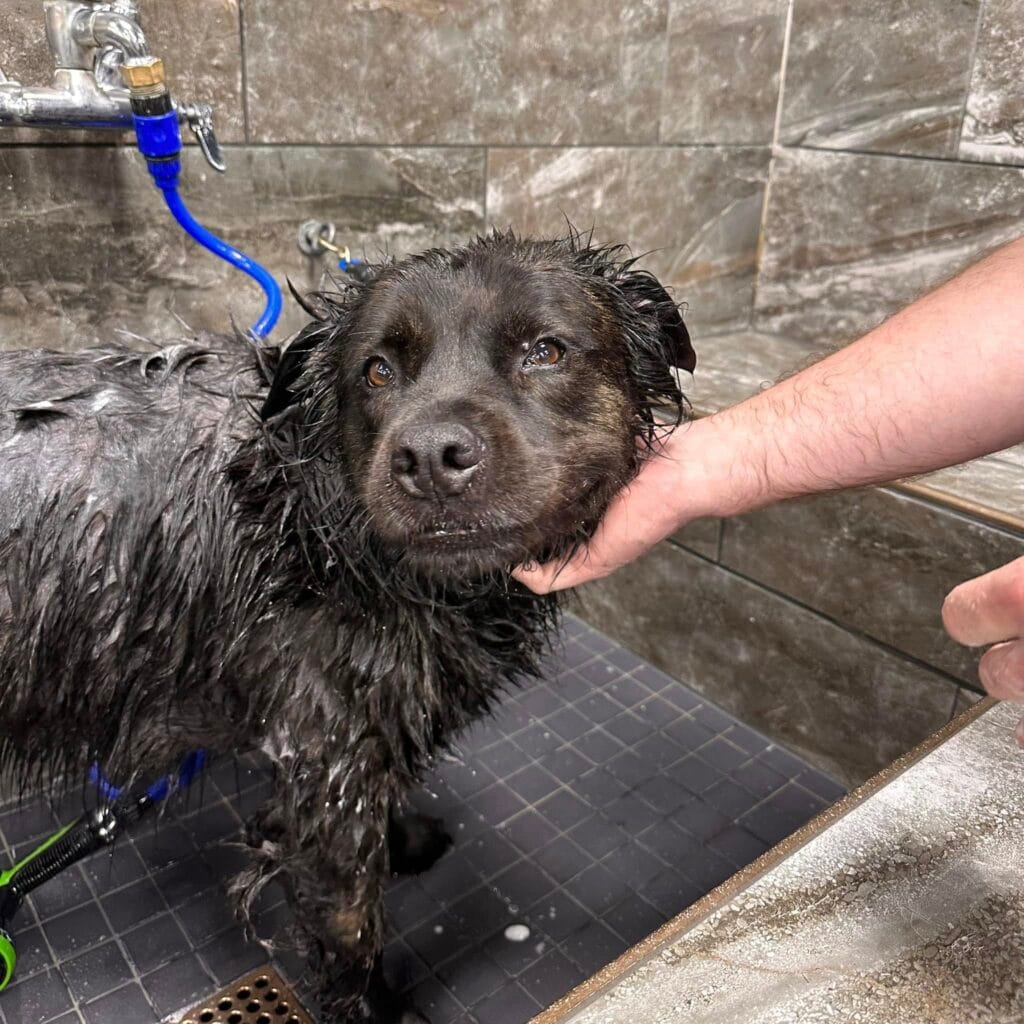
Your golden is adorable…but bath day is not her favorite.
Mine used to run away as soon as she heard the water running. And it was a disaster. It was a mess with mud all over the floor and me crying in the bathroom.
As you might have noticed, I’ve been using my dog bath kit less and less lately. The truth is that although it has a tendency to run everywhere, I prefer not to use it anymore. Even when I did, bath day was still a punishment for us both.
No more chasing a wet dog down the hallway. No more scrubbing grout for an hour after.
These are the 10 dog grooming salon designs I wish I’d had from the start – some are on a budget, some are seriously Pinterest-worthy and all are designed for real dogs that have no chill about being clean.
#1: The Tiled Dog Wash Station That’ll Make Bath Time Actually Enjoyable
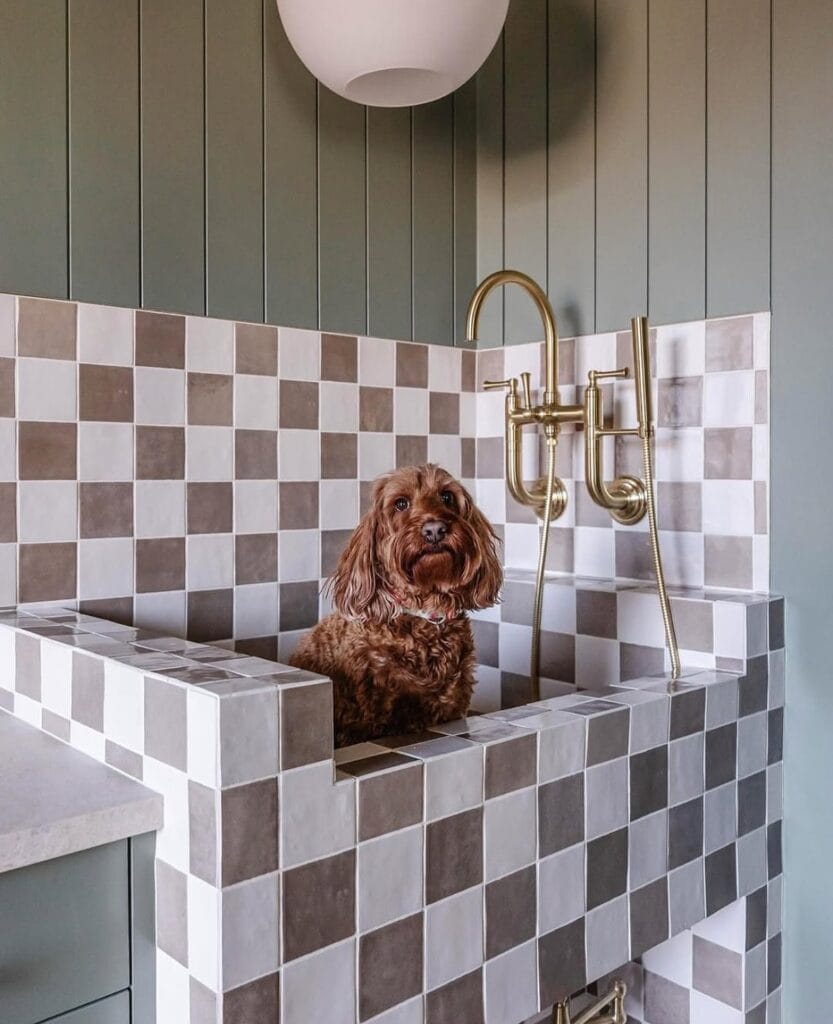
I know the feeling. You’re standing in the kitchen, your golden retriever has just bolted through the backyard, it’s been raining and now she is giving you that look… the look that she knows she needs a bath but keeps backing away from the tub. My friend Dani has a golden too and she used to wrestle hers into the laundry sink everyday. Water everywhere. Dog shaking suds onto the ceiling.
This built-in dog wash station is actually a game-changer, and it might be the most Pinterest worthy functional thing I’ve ever seen in a mudroom.
Prep Time: 2–3 days (tile curing) | Active Project Time: 6–8 hours | Difficulty Level: Intermediate
Materials & Tools You’ll Need:
– Zellige-style ceramic tiles in white and taupe/gray (approximately 4×4 inch squares for the checkerboard pattern)
– Waterproof tile adhesive and unsanded grout in a neutral gray
– Thinset mortar
– Concrete backer board for the basin walls and floor
– Brass wall-mount faucet with handheld sprayer attachment (the one in the image is a bridge-style brass fixture)
– Prefabricated fiberglass basin or custom-poured concrete basin insert (approximately 24×30 inches interior)
– Waterproof membrane (like Schluter KERDI)
– Tile spacers (1/8 inch recommended)
– Notched trowel, tile cutter or wet saw, grout float, sponges
– Green shiplap-style wall panels for the upper wall surround (painted in a sage or muted olive)
– Brass towel hooks and cabinet pulls for below-basin storage
– Globe pendant light in frosted white for overhead lighting
– P-trap drain kit compatible with your basin depth
– Silicone caulk in white for seam sealing
Instructions
First, draw out your basin opening in your mudroom or utility room. Frame your walls of the station with 2×4 lumber at 24 inches deep and 30 inches wide. You want to make sure that your dog has enough room to stand and turn around without bumping the walls. Line every framed surface with concrete backer board before any other work is done and apply your waterproof membrane over this. If you skip this step, water will rot your framing in a year or less.
Once the membrane has cured (give it a full 24 hours) you can start to lay your checkerboard tile pattern. I mixed my white and taupe 4×4 zellige tiles together with some 1/8 inch spacers to keep the tiles tight. I started with the bottom of the basin and tiled up the inside walls. I tiled the exterior face of the basin and then the cap edge last. This is the edge that people will see most so I took my time mitering the corners at 45 degrees.
It is important that you do not grout your tiles for at least 24 hours after tiling. Use unsanded grout and a rubber grout float to apply it in the joints at a 45 degree angle in small sections. Wipe off any excess with a damp sponge using circular motions.
Mounting my brass bridge faucet 48 inches from the floor means I don’t have to bend over my dog when giving her a 20 minute bath. My new 20 inch detachable brass sprayer has an adjustable pressure device. This means I can control the water flow to my dog’s coat, so she does not panic shake when the water hits her face.
Install your sage green shiplap panels above the tiled backsplash wall. Paint them a muted olive-green (something like Farrow & Ball’s Mizzle or Sherwin-Williams Retreat, since I’m not sure of the name of the color in the picture – sorry!). Add a frosted globe pendant light centered over the basin – the light bounces into the station without casting harsh shadows.
Seal every grout joint with a penetrating grout sealer after the grout has cured. Dog shampoo and water are harsh on the grout and this step will pay for itself in the long run.
The zellige tile surface cleans with one swipe, the brass fixtures develop a warm patina over time instead of looking dated, and the built-in basin keeps all the muddy water contained so your floors stay dry and your dog has room to stand comfortably.
I store my shampoo, towels and brush in the bottom of this cabinet. It’s nice to have everything just where I need it before I take the wet dog up to dry him off and take him outside.
📸 Photo credit: Instagram @carterfamilyranchhome
#2: Built-In Tiled Dog Wash Station (The One That’ll Make Your Muddy Pup Situation So Much Better)
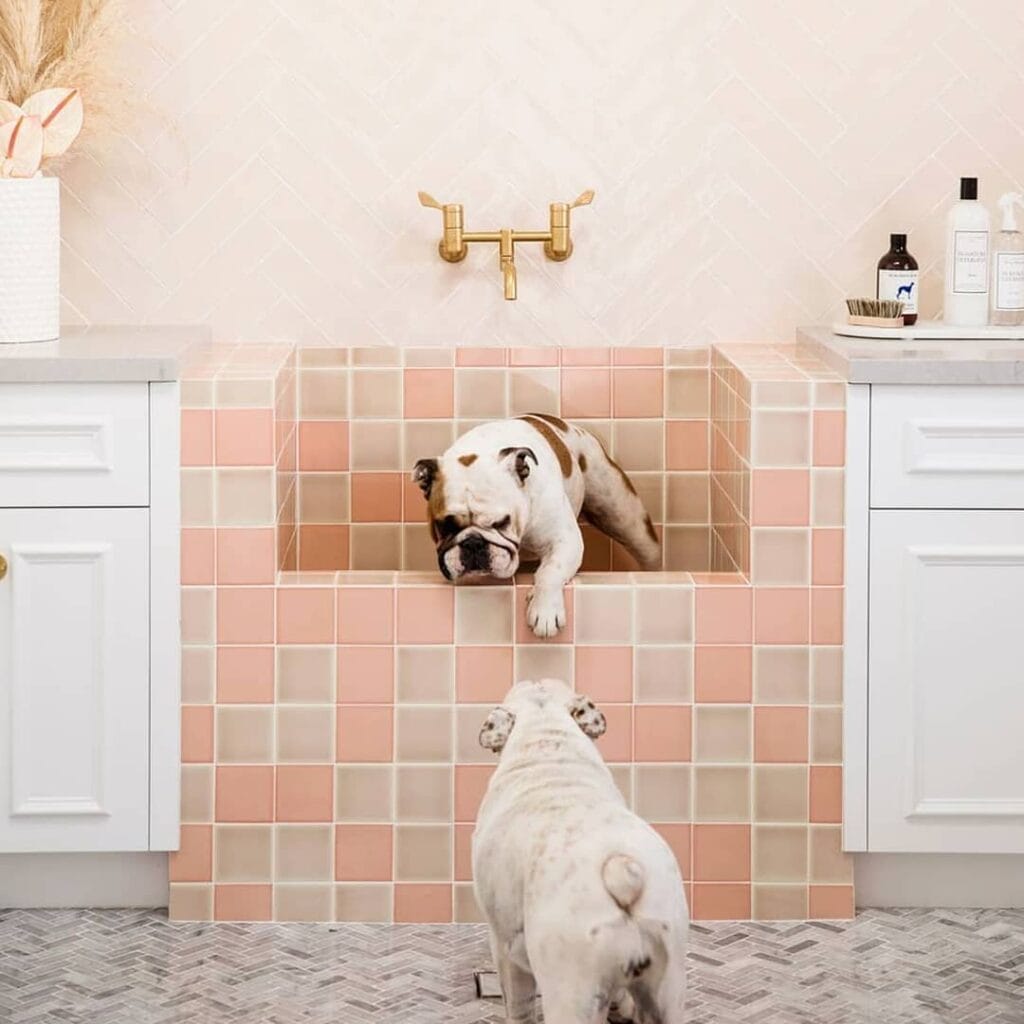
You know that moment where your golden comes bounding in from the backyard with muddy paws, and then heads straight for the couch? I have a cousin with a lab and that’s what she did every single Sunday last winter and she was losing her mind.
A built in dog wash station is a godsend for all of that chaos.
– 4×4 inch ceramic tiles in blush pink and warm taupe/beige (mix both to make a checkerboard pattern), large-format herringbone tiles for the wall backsplash (cream/off-white) Mortar, grout and tile adhesive Wall-mounted brass pot filler faucet White shaker-style cabinetry on both sides Gray marble herringbone floor tiles Cement board for waterproofing the basin Tile saw, trowel, level, measuring tape
Prep Time: 2–3 days (drying/curing) | Active Project Time: 2 weekends | Difficulty Level: Intermediate–Advanced
### Instructions
Start by framing your basin opening in between the two cabinet units. The basin in this photo is a little on the 18-20 inches deep and 30 inches wide, so it’s plenty big for a big dog, and it doesn’t take up too much space.
So, Your First Step in waterproofing the bathroom is to waterproofer the inside walls (not including the shower walls) before you tile them. This will save you a big headache later on if you have a problem with moisture. Drywall does not like moisture.
Layer your blush pink and taupe 4×4 tiles in a checkerboard pattern across the basin face and inside. Alternate colors as you work. The two-tone tile design adds visual interest to the basin, and the ceramic surface means cleanup is a cinch.
Position your wall mounted brass pot filler over the sink and about 48 inches from the floor. The articulating arm swivels out so you can squirt water wherever you want. No more fumbling with the handheld sprayer, while your dog wiggles around.
Grout everything with a light gray or warm white grout to tie the colors together. Seal it well. And don’t forget to seal the floor tiles – your dog will shake water everywhere.
Real talk: Adding open countertop space on both sides (like in this photo) would add room for dog shampoo, a brush, and towels in arm’s reach. No more running across the house dripping wet.
My white shaker cabinets (shown above) flanking the station keep everything out of sight and makes my whole set-up look Pinterest-worthy even on a Tuesday.
Tile the back wall in a classic cream herringbone pattern; the pattern bounces light around, making the space look bigger.
If you love to build stuff for your pup, 13 Genius DIY Dog Stuff Every Pet Parent Needs to Try Today! has lots of ideas that you could combine with your pup’s new setup.
We’ve read grout haze is all real, wipe tiles down with a damp sponge before the grout has fully set not after for an hour scrubbing.
📸 Photo credit: Instagram @get_patch
#3: Convert Your Shower Into a Dedicated Dog Wash Station
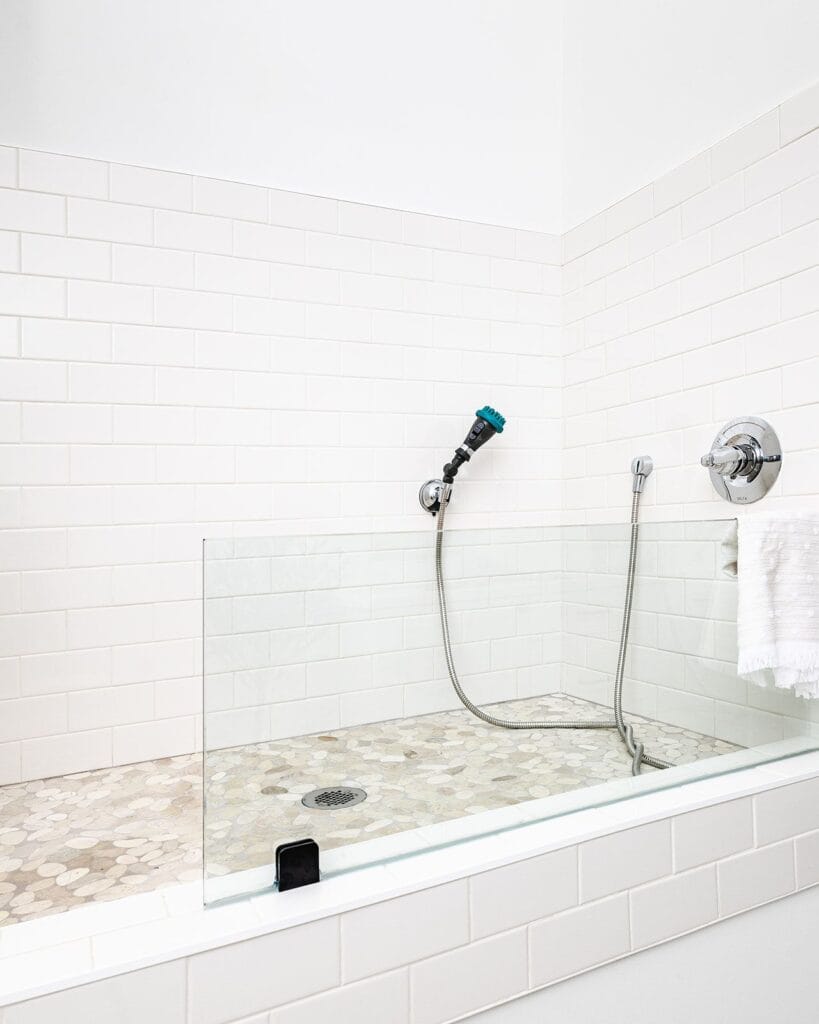
Have you ever had that moment where your golden came trotting in from the backyard, paws caked in mud, tail wagging like she had no idea what she just did to your floors? And you’re standing there with a towel, already dreading the bathtub?
Yeah. This setup fixes all of that.
Prep Time: 30 minutes | Active Project Time: 4–6 hours | Difficulty Level: Intermediate
What You Need:
– ½-inch tempered glass panel (custom cut, approximately 24″ x 36″)
– Handheld sprayer with multi-setting nozzle (the teal-and-black one in the photo is a garden-style sprayer — perfect for thick golden retriever coats)
– Stainless steel braided hose, minimum 60 inches
– Pebble mosaic floor tiles in neutral beige and cream tones
– White subway tiles, 4″ x 8″, for walls
– Chrome suction-mount bracket for the sprayer
– Delta chrome wall valve with handheld port
– White towel bar, chrome finish
– Square floor drain with grid cover
Instructions
First lay your pebble mosaic tiles on the shower floor. The texture on the tiles gives your dog grip so she doesn’t slide around, which means she stays calm the whole time and you actually finish giving her a bath!
Run the subway tiles straight up all four walls with bright white grout. Seal everything before the first wash.
Attach the Delta chrome valve to the wall in the middle, then connect the 60-inch braided hose to it. Attach the multi-setting sprayer to the chrome suction bracket and position it high enough to reach her back without bending down awkwardly.
And last, but not least, I put in the glass splash panel. I went to our local glass shop and had them cut it to fit the exact shape of my shower lip. It works great as a splash guard but doesn’t close the space off so much that my dog feels like she’s in a trap.
Put a chrome towel bar right at the entrance, so the towel is within arm’s reach the second she steps out of the shower, before she shakes everywhere.
Tiles can stain with heavy dog use so I recommend a monthly spray of white grout sealer to keep things looking Pinterest clean. Speaking of Pinterest, if you’re looking for another fun weekend project, you’ll love 14 Creative DIY Elevated Dog Bed Ideas You’ll Love.
📸 Photo credit: Instagram @hawkinsandgraydesign
#4: Build a Pinterest-Worthy DIY Dog Wash Station (That Actually Works)
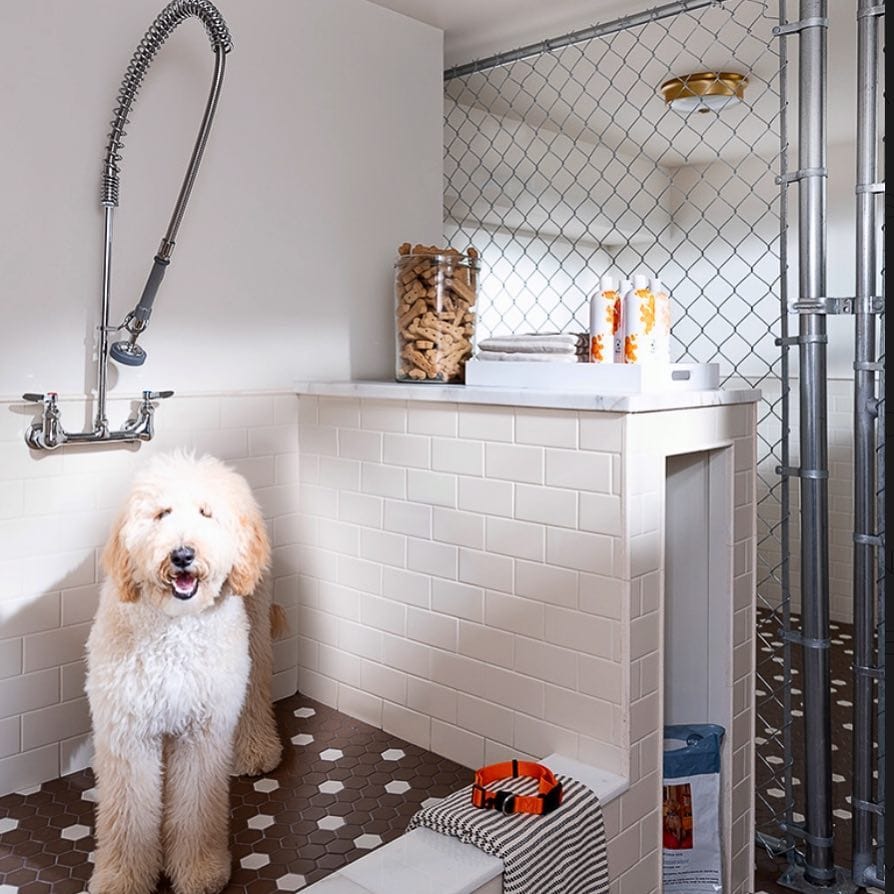
Ah, that glorious moment when your golden comes barreling through the back door, after a rainy walk, his paws caked in mud, tail going a million miles a minute, intent on curling up on the couch — yes, the white couch.
After my dog Koda decided to turn my bathroom into a disaster zone one too many times, I built this.
Materials & Tools You’ll Need:
– White subway tiles (4×8 inches) for the tub surround and half-wall
– Dark hexagon mosaic floor tiles (brown, 1-inch)
– White marble slab for the countertop (or marble-look laminate)
– Wall-mount faucet with pull-down sprayer hose (stainless steel, coiled)
– Metal chain-link panel for the kennel section (galvanized steel)
– 3/4-inch galvanized steel pipe for the kennel frame
– Glass treat jar (wide-mouth, at least 32 oz)
– Tile mortar, grout, caulk
– Tile saw, level, drill, pipe wrench
Prep Time: 2 hours | Active Project Time: 2–3 weekends | Difficulty Level: Intermediate
### Instructions
Use 2×4 lumber to build your half-wall to a height of about 36 inches, the height of a counter. This way you will have a dedicated grooming surface for all her shampoos and treats that keeps them off the floor and within arm’s reach while you’re trying to wrestle a soaking wet 60 pound dog.
Once the frame is up you will move on to cement board, then lay your white subway tiles in a brick pattern. I used white mortar and tried to keep my grout lines around 1/16 inch so that water can not sneak in between the tiles later. The subway tile surround will look just like those fancy spa grooming spas, but it is yours.
The dark hexagon floor tiles go down with a contrasting dark grout. I love how it hides grime between washes. The patterned floor goes a long way at hiding paw prints from the dog so it still looks nice on a Tuesday.
Top off your half-wall with a white marble slab. I use a 12×36-inch piece and turn it into a staging area for shampoo, conditioner, and a large glass jar of bone treats (the positive association bathtime is very important).
My wall-mount faucet is at 54 inches high with the coiled, pull-down sprayer. The extendable hose reaches every inch of my dog so I don’t have to awkwardly reposition her every 30 seconds.
The kennel is constructed from 1 inch galvanized pipe, and there is chain-link panels bolted directly to the pipe. It is 36 inches wide by 48 inches tall so a golden can stand up inside and shake off before she’s unleashed into the house.
I usually hang a flush-mount light inside the kennel part for visibility. A small thing, but adds to the overall appearance of being intentional.
Finally, seal all your tile work with a penetrating grout sealer once everything cures. This might take a little longer, say 72 hours. This will help to keep your grout from absorbing water and make your station look brand new for years.
– I store an orange nylon collar hook on the side of the half-wall (where I throw her leash when I’m giving her a bath) so I’m not searching for it when she’s in the tub.
My dogs have a built in grooming counter where the treats, towels and shampoo are kept so that bath time doesn’t involve a 45 minute wrestling match to retrieve all the things we need to give a bath.
If you love how the kennel section looks tucked into this station, 14 Stylish DIY Dog Crate Furniture Ideas You’ll Love is full of inspo for making the enclosure feel more like furniture than a cage.
Go around every seam where the tile meets the wall or the floor with 100% silicone caulk in white. That’s the step that a lot of people skip and then wonder why their walls are growing mold a year later.
📸 Photo credit: Instagram @melanieturnerinteriors
#5: Built-In Tiled Dog Wash Station (The One That’ll Make Your Bathroom Look Like a Spa)
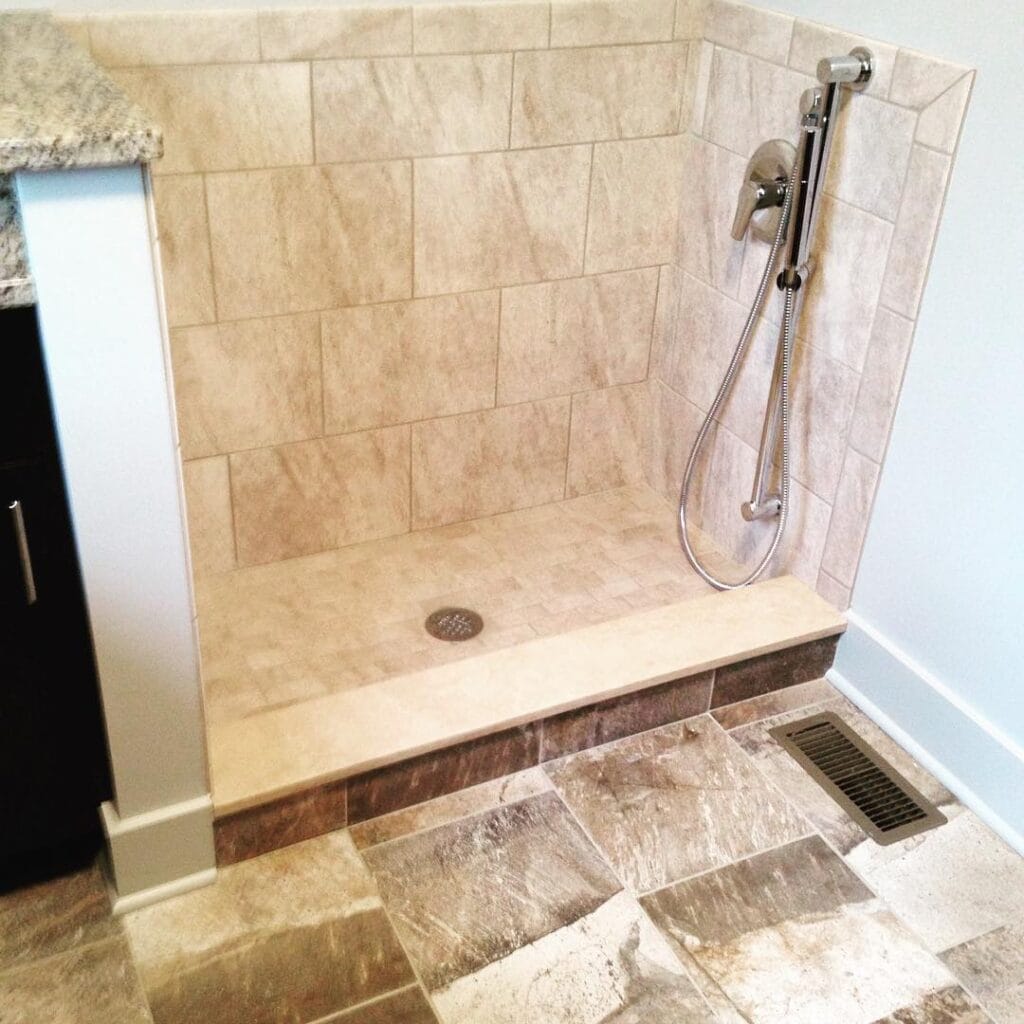
Prep Time: 2–3 days (drying/curing) | Active Project Time: 6–8 hours | Difficulty Level: Intermediate
i can’t even imagine how you must feel when my golden rolls in god knows what and i’m trying to bend over in the bathtub with her shaking mud all over the walls. i’ve been there with my cousin’s lab and i wanted to cry.
This built-in washer is the answer to all of that chaos.
Materials & Tools You’ll Need:
– 12×24 inch rectified porcelain tile (wall) in a warm beige/cream tone
– Dark walnut-toned floor tiles for the raised base fascia
– Natural stone-look floor tiles (12×12 inch) for surrounding bathroom floor
– Chrome handheld shower system with adjustable slide bar
– Round chrome floor drain (4-inch)
– Pre-sloped shower pan mortar bed
– Waterproof tile backer board
– Polymer-modified thinset mortar
– Unsanded grout in warm beige
– Notched trowel, level, tile saw, grout float
Instructions
Before you begin laying the tiles, determine the size of the station you would like to build. For this project the station will be roughly 36 x 48 inches and will sit about 6 inches off the floor. Cut out the platform from the treated lumber you have purchased, and then you will want to cover all sides with the waterproof backer board. You will want to make sure there are no gaps in the backer board because water will find a way in. I overlapped the seams on the backer board and sealed them with mesh tape and thinset.
Mix your thinset to a peanut butter consistency. If it is too runny, it will be a problem. Set your wall tiles in a running bond (think bricks) using the cream porcelain. Set it bottom to top. The running bond will give you the spa look without extra expense.
Be sure to slope your mortar bed towards the round drain at least a ¼ inch drop per foot before you tile the floor of the dog house. This will ensure that the water drains toward the drain, and not under your pup.
The chrome slide-bar shower system mounts directly into the tiled wall with toggle anchors. It is height adjustable, so you can lower the head to rinse muddy paws or raise it up for a full rinse, thus making baths half the hassle they used to be, and making your dog less squirmy without the full onslaught of the spray.
Finish the raised edge of the platform with a bullnose tile in the same cream porcelain. Grout everything with unsanded grout in a warm beige and then seal all grout lines once the grout is cured.
seal your grout in the first week at least twice. Once at 48 hours and once at 72. The sealant will help keep the dark grout from staining from dog shampoo a permanent stain.
📸 Photo credit: Instagram @riverbirchdesignco
#6: Built-In Dog Wash Station with Zellige Tile and Brass Fixtures
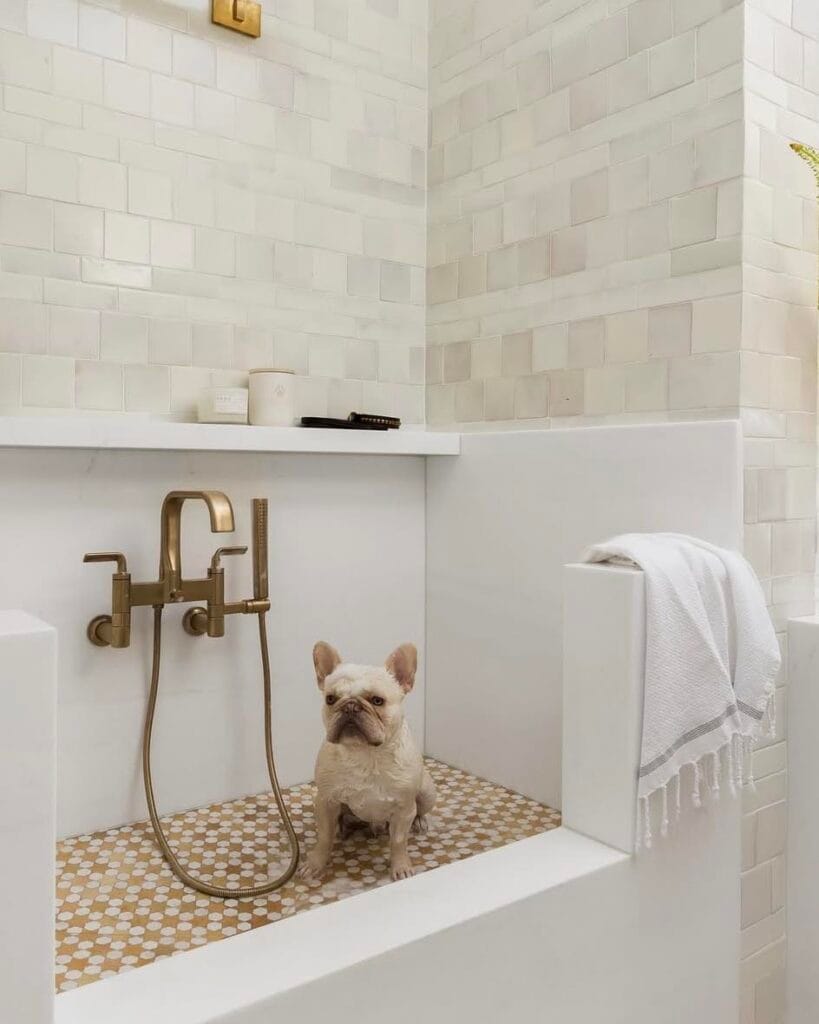
You know that moment when your golden retriever bolts through the back door after a rainy walk and before you can even react she has muddy paws all over the couch, the rug, and your actual face. Well, this DIY is for that moment.
The greatest built-in dog wash station of all time. White zellige subway tile walls, tan and white penny tile floor and brushed brass fixtures. Could this be any cuter and more Pinterest worthy?
Materials & Tools:
– Zellige subway tiles (white, approx. 4×8 inches)
– Penny mosaic floor tiles (tan and white mix)
– White cement board for the enclosure walls
– White quartz or solid surface for the shelf and ledge
– Wall-mount faucet with hand sprayer (brushed brass finish)
– Brass towel bar
– White tile grout + waterproof grout sealer
– Mortar adhesive
– Tile saw, level, trowel, sponge
Instructions
Frame your enclosure first with 2×4 studs, then cover with cement board (never do this inside without cement board near water), cut cement board to make a ledge (my ledge was probably only about 18 inches high), so your dog can step in without you breaking your back.
Install the zellige tiles on the walls with mortar working from bottom to top in rows. When installing zellige, do not worry about the edges of the tiles being perfect. This style of tile has a natural rough edge. After 48 hours let it cure and then grout.
* Lay your penny tiles on the floor with waterproof adhesive. Seal everything twice.
You can mount your brass wall faucet with handheld sprayer at around 24 inches off the floor. It’s low enough to rinse your dog’s paws but high enough to give a full bath. The handheld sprayer feature allows you to give your dog a specific rinse so your dog will not get panicky, soaked or drenched.
Float a white quartz shelf over the station for shampoo, brushes and a candle because you deserve the ambiance of bath time as much as the cat.
When I shower my dog I hang his towel bar on the side wall next to the shower. Much easier than having him try to run out of the bathroom while I’m in there!
seal the grout lines with a penetrating waterproof sealer – reseal every 6 months. the grout in these areas will get hit by cold water over time and you dont want to have to replace all the grout.
Prep Time: 1 day | Active Project Time: 3–4 weekends | Difficulty Level: Advanced
📸 Photo credit: Instagram @thedesignory
#7: Built-In Tiled Dog Bath Station (The One That’ll Make Your Laundry Room Look Like a Spa)
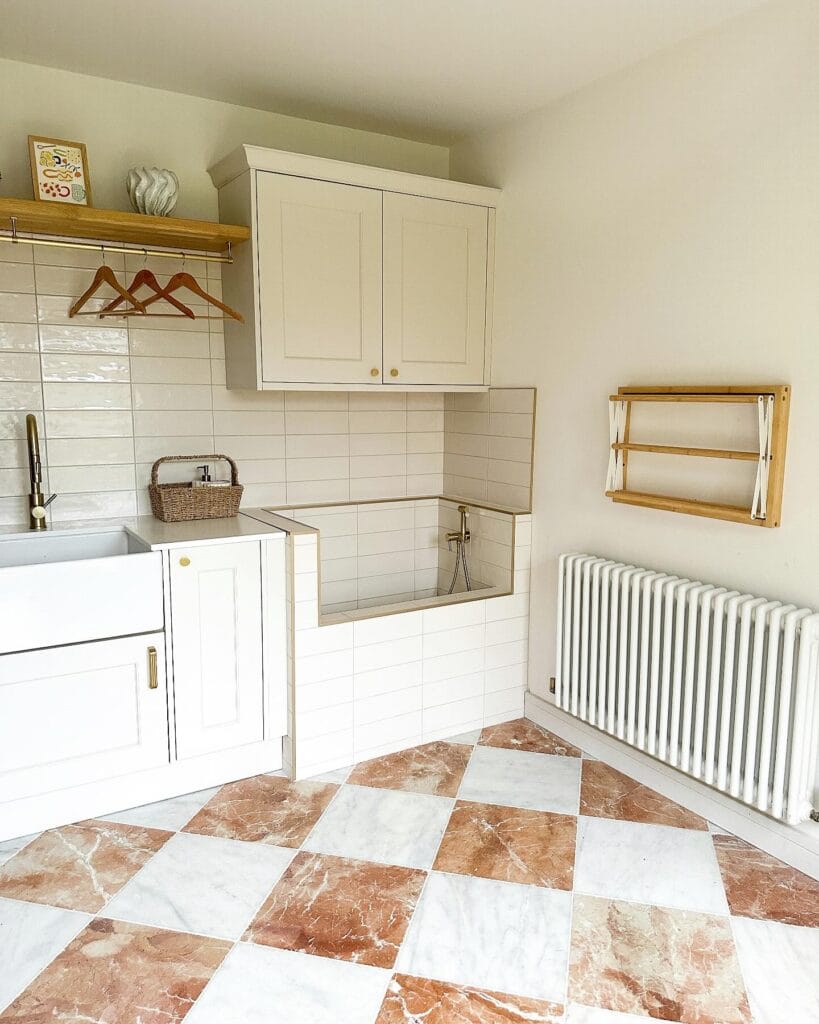
Picture this – my dog bolted through the backyard, rolled in something unidentifiable, and is now standing at the back door with a look of pride on her face (well, that’s what I’m telling myself because I really don’t know what she’s proud of). I’m blocking the hallway with one hand on her collar as I try to get her to the tub without her shaking mud on the walls.
This built-in dog wash station is exactly what I’m talking about when I say function meets gorgeous!
Prep Time: 2–3 days | Active Project Time: 6–8 hours | Difficulty Level: Intermediate
Materials & Tools:
– White ceramic subway tiles (3″x6″) for the walls
– Rose marble and white marble checkerboard floor tiles (12″x12″)
– Brass trim edging strips for tile borders
– Shaker-style white MDF cabinet panels (upper and lower)
– Brass cabinet hardware (knobs and pulls)
– Stainless steel countertop sheet
– Brass wall-mount faucet with handheld sprayer
– Cement board backer for tiled walls
– White grout and tile adhesive
– Waterproof silicone sealant
– Tile saw, level, drill, screwdriver
Instructions
The first step to creating your dog bath corner is to frame it. Frame it with 2×4 lumber, 24″ wide x 18″ deep x 24″ tall. You should cover the inside walls and floor with cement board before any tile goes up. This will ensure you don’t have any mold issues in 6 months.
Put the white subway tiles on the inside walls of the bath first, working from bottom to top in horizontal rows, firmly pressing each tile into the adhesive and using spacers to maintain a consistent space between each grout line. Apply the brass trim edging along the top edge of the tiled nook to give the edge a finished look and to protect the tile edge from chipping.
Attach the brass handheld sprayer to the back wall of the nook, about mid-height. The sprayer has a flexible hose attached, so you can control where the water goes. No more soaking the ceiling, or you!
After the bath nook is grouted and sealed, install your shaker cabinet panels on either side of the tub. You can install the lower cabinet for hidden storage for dog shampoo, towels, etc. The upper cabinet can be used for brushes, nail clippers, etc. I mounted a wooden shelf above the tub with a hanging rod to hang damp towels (this is the wooden shelf you see in the picture).
Put the last of the floor in, which is the checkerboard marble in alternate rose marble and white marble in a diagonal pattern. Seal the tiles in the floor with a stone sealant, as the marble is porous, and dog bath water will stain it.
The handheld sprayer feature keeps rinsing under control, so less stress for your dog and less water everywhere, which means bath time actually ends with a happy pup instead of a standoff.
One thing to remember: Let the grout cure for a full 48 hours before running any water through the station. I see this done too soon and you can crack the grout lines.
Hang a small wall mounted bamboo drying rack on the side wall for wet cloths and her towel. The rack folds flat so that it’s not taking up any space when you’re not using it, but I think about it every time I see it.
📸 Photo credit: Instagram @renovationliving
#8: Built-In Tiled Dog Wash Station (The One That Makes Bath Time Actually Bearable)
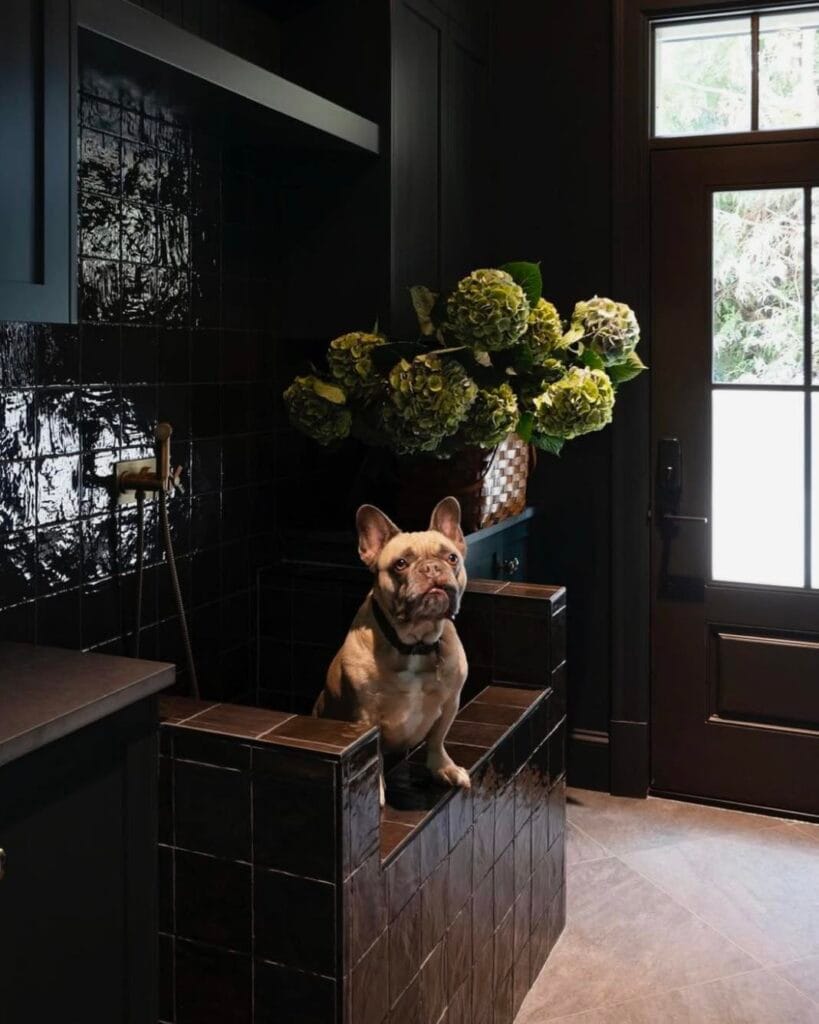
You know that moment when your golden comes barreling through the back door after rain and you’re standing there with a towel thinking “there has to be a better way”! This is the better way.
I stopped mid-scroll when I saw this dog wash station from @thedesignory. It’s dramatic and moody and it actually works.
Prep Time: 1–2 days (tile curing) | Active Project Time: 6–8 hours | Difficulty Level: Intermediate–Advanced
Materials & Tools:
– Glossy black ceramic subway tiles (4″x4″ or 4″x8″)
– Dark brown bullnose tile for the step edges
– Waterproof cement board backing
– Brass handheld showerhead with wall-mount valve
– Tile adhesive, grout, grout sealer
– Stone or porcelain floor tiles for surrounding area
– Wet saw, trowel, level, caulking gun
Instructions
Use cement board to build the platform. A two level platform is best as the smaller dogs will be able to get on it without you wrenching your back. Make the platform about 18″ x 24″ for the interior bathing area. Make the step of the platform 8-10″ high.
Attach the cement board, then lay your glossy black tiles from the bottom up. You probably also don’t want a bunch of sharp cornered tiles to hook your dog’s paws if he’s squirming.
Place the valve at eye level on the wall. This way you won’t have to bend over to turn it on and off, and it is higher than a dog’s belly so the dog goes in rather than being lifted in. Also, this saves the mess of the dog shaking off water.
Good news: Seal the grout with a penetrating grout sealer after you’re done to prevent mold from getting into the grout, the easiest cleanup is just wiping the grout down.
I would love to see this paired with 7 Creative Ideas for Your DIY Dog Washing Station pin board because there are so many possibilities for storage next to this dog wash.
A small ledge tucked behind the tub is perfect for shampoo. Black grout hides dirt between cleanings and looks very expensive.
📸 Photo credit: Instagram @thedesignory
#9: Built-In Pet Shower Nook with Stacked Laundry Alcove
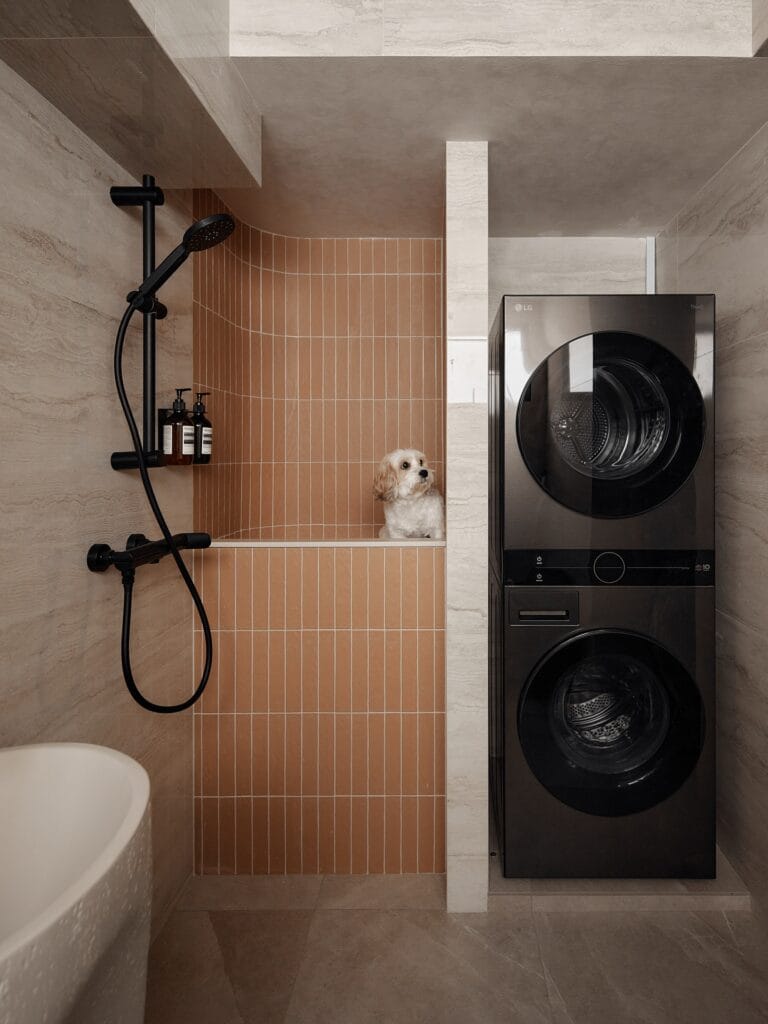
Who here has a dog that loves to run in the rain? Ours does and I know that before I can even react she’s shaking the mud all over the tile in our hallway. Oh, my dog.
Yep. This is the moment the built-in dog shower nook was made for.
It’s everything you want in a pet wash station: a tiled area with warmth-inducing terracotta subway tiles (those slim 2″x8″ stacked vertical tiles), a matte black adjustable shower rail with handheld sprayer and a built-in bench ledge at a height of about 18″ to keep your dog in place while you rinse him off.
Right next to it is a stacked LG WashTower in matte black that handles the muddy towels right after.
Materials & Tools
– 2″x8″ terracotta ceramic subway tiles (vertical stack layout)
– White tile grout (sanded, for spacing contrast)
– Matte black adjustable shower slide rail with handheld sprayer head
– Matte black wall-mount soap/shampoo dispenser shelf
– Built-in concrete or tile bench ledge (~18″ from floor)
– Waterproof backer board for wet area walls
– LG WashTower stacked unit (washer/dryer combo)
– Tile adhesive, trowel, grout float, level, drill
Instructions
The first step is to waterproof your nook walls completely with backer board before any tile goes on the surface. If you don’t, your tile will be gone within two years, so don’t rush it.
Apply tile adhesive and set your terracotta tiles vertically in a stacked pattern, keeping the grout lines as close together as possible, at 1/8″. Standing the tiles vertically will draw the eye upwards and make this small nook feel taller.
I built my ledge at 18″ which is perfect for the medium to large sized dog (my goldens); not so high that they can’t get up, but high enough that they don’t have to sit on their haunches. It keeps me from having to hunch over a sink or tub drain, and it keeps her from getting stressed while I try to force her into the tub.
Hang the matte black slide rail at around 60″ off the floor, but put the handheld sprayer head so you can reach down towards the floor to the bench. This is because I found that the handheld sprayer rinsed away all the undercoat fur that had been trapped after a few minutes in the spray booth, and that less moisture trapped in the fur meant less skin problems.
Install your shampoo shelf right at arm’s length from the sprayer. Grout everything with white sanded grout to pop against the warm terracotta.
In the previous laundry room, this smaller alcove was separated from the larger room by a narrow dividing wall. Since laundry has to be done anyway, I set up the stacked LG WashTower in the small alcove next to the large laundry room, so that I would not have to walk across the house to put dirty laundry in the washer. It’s so convenient to just toss wet dog towels from the bath to the WashTower.
Once the grout has cured for less than 72 hours, you will want to seal your grout with a penetrating tile sealer. You will want to re-seal your grout every 12 months.
Prep Time: 1 day | Active Project Time: 3–4 days | Difficulty Level: Intermediate
The real deal-breaker for me was the bench ledge – having a calm dog on a stable surface means that you actually enjoy bath time instead of dreading it.
📸 Photo credit: Instagram @leinterioraffairs
#10: Build a Patterned Tile Dog Shower That’s Actually Beautiful Enough for Your Pinterest Board
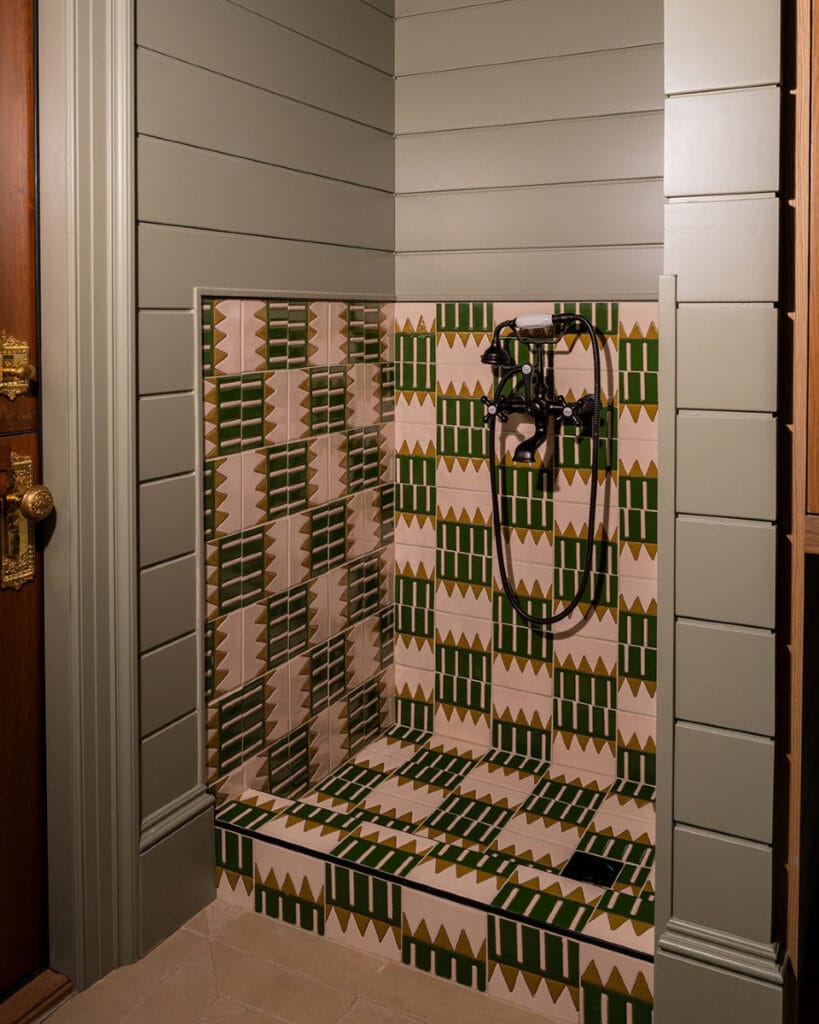
Do you know that moment when your golden retriever bounds into the house through the back door, with mud caked on her paws, and makes a beeline for your cream-colored sofa? Yeah, that moment. My friend has a golden too and she told me last week that she spent 20 minutes chasing hers around the bathroom with a cup and a prayer.
This built-in dog shower fixes that mess once and for all.
Materials & Tools:
– Pink ceramic base tiles (field tiles, approx. 4×8 inches)
– Forest green and olive/gold decorative accent tiles with geometric triangle and rectangle patterns
– Black matte floor drain insert
– Oil-rubbed bronze handheld shower fixture with cross-handle valves
– Cement board backer
– Waterproof tile adhesive and unsanded grout in cream
– Tile cutter or wet saw
– Notched trowel, level, sponge, grout float
Instructions
frame the shower niche into an existing corner wall using cement board. i cut mine to about 36″ wide by 48″ tall. leaving 6″ raised threshold at the bottom of the bench. that way it keeps the water in and gives the dog a clear “step in” boundary.
Apply waterproof adhesive and then set your pink field tiles in as the base layer across all three walls. Set your patterned accent tiles in vertical columns, alternating the green and gold pattern every two field tiles. There should be enough repetition to make it calming for your dog, not overwhelming.
Make use of this raised tile threshold to install the same patterned tile. Because of the slight lip of the threshold, water can remain inside, so the room stays dry and bath time doesn’t feel like a production.
Flush the black floor drain level with the tile bed, and attach your handheld bronze fixture at elbow height so you can control the direction of the rinse. Grout everything in cream to make those green geometrics pop.
Seal all the grout lines twice before using it for the first time. And, it’s just a thought, but I always warm the water up a little, otherwise, the dogs bolt every time!
Pair this shower up with a batch of 7 Natural DIY Dog Shampoos for a Soft Coat Without Harsh Chemicals and bath day becomes something you actually look forward to.
Prep Time: 2 hours | Active Project Time: 2–3 days | Difficulty Level: Intermediate
📸 Photo credit: Instagram @clayimports
The One Bathing Mistake That Soaks Everything (And How to Stop It)
One thing no one tells you until it’s too late: wet dog shakes start before you even think they do.
You are taking a shower in your golden and suddenly the water drops on the ceiling. It has happened to me twice.
The first secret is keeping one hand on her shoulder while doing the whole trick. It makes her feel safe and will often delay the shake until you’re ready to do it.
Keep this in mind: The water temperature is more important than you realize. To us, it feels nice and relaxing, but to a dog it is too warm and causes anxiety. Lukewarm water, like slightly cool bath water, is more relaxing to a dog.
Also, you have to rinse from the neck back. Never rinse the head first. Soap in the eyes or ears makes future baths into wrestling matches.
PS — I wouldn’t try drying her ears out with a cotton swab. Just use a dry microfiber cloth and press it gently against the outside of the ear canal.
Your Floors (and Your Sanity) Deserve This
Pick one room. Start there. Don’t try to change everything in your house over the weekend, just swap out the rug in the room your dog spends most of her time.
Once you see how easy it makes cleanup, you’ll want to do the whole house! That’s just how it goes.
If you’re already deep in the “making life with your dog cuter and easier” rabbit hole, dog enrichment ideas for happy pups may be your next rabbit hole to fall into.
Which room is your golden totally ruling right now? 😀 https://t.co/h5XGxrjxNh

Amr Mohsen is a software engineer who traded his keyboard for a leash — at least on weekends. His love for dogs inspired him to share what he learns as a dog owner and enthusiast, bringing a detail-oriented, research-driven perspective to every article he writes. If it’s about dogs, he’s probably already looked it up twice.



