Your walls tell a story — and right now, yours might be missing the best chapter.
I remember finally finishing my living room gallery wall, super proud of it… and then my friend walked in and said “but where’s Biscuit?” She meant my dog. And honestly? She was right. The whole room felt incomplete.
Here’s the thing — your golden retriever lives in that space. His fur is on the couch, his nose print is on the window, and his energy fills every corner. But your walls? Total strangers to him.
That gap between your Pinterest-worthy decor and the actual love story happening in your home — that’s what dog wall decor fixes.
These 10 ideas will make your space finally feel like yours — dog and all.
#1: DIY “Jessie” Dog Name Sign with Clock Wall Display
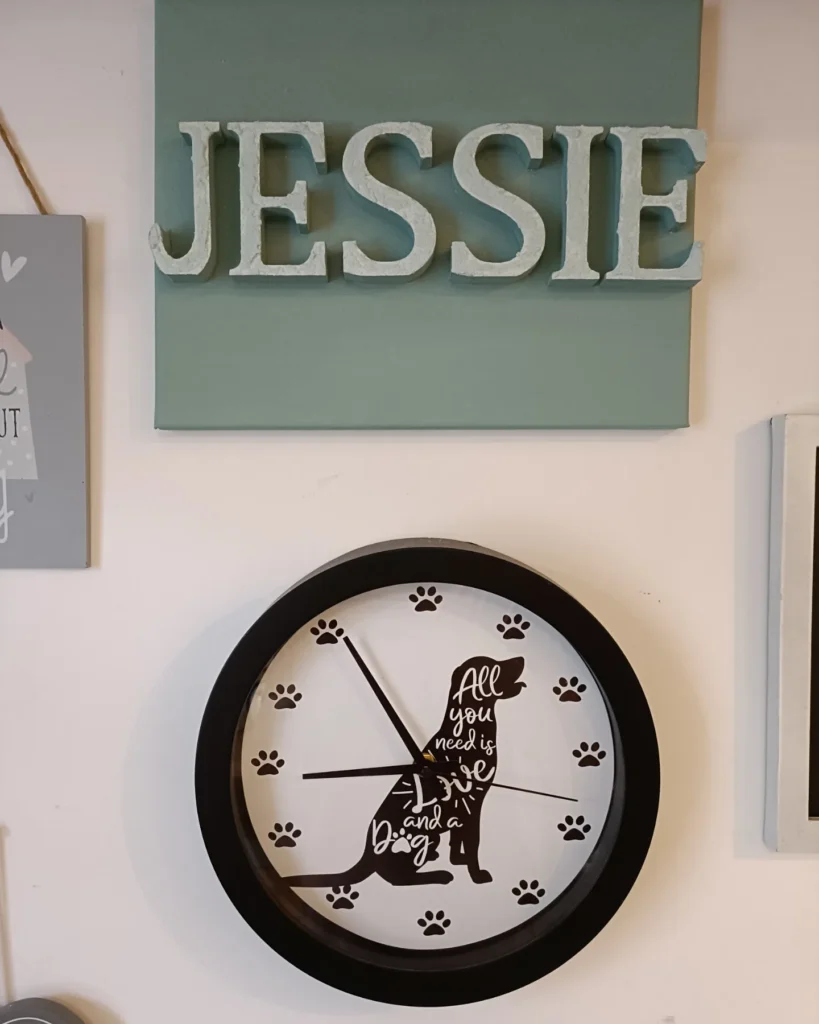
Okay, so you know that moment when your golden retriever trots past the hallway and you just wish the wall said something about her? Like, she owns that house and everyone knows it — but the decor doesn’t.
This wall setup is giving me all the feelings.
Materials & Tools You’ll Need:
– 12×12 inch canvas board (pre-painted in sage/muted teal)
– 3D foam or MDF block letters (roughly 2-inch height)
– Chalk paint in sage green and off-white
– Fine-grit sandpaper (220 grit)
– Strong craft adhesive (like E6000)
– 10-inch round black-frame wall clock with paw print face
– Command strips or two wall anchors
– Small foam brush
Instructions
Start by lightly sanding your canvas edges so the paint grips without bubbling. Brush on two coats of sage green chalk paint and let it dry between coats — this creates that matte, Pinterest-wall finish you’re after.
Dry-brush off-white paint across your block letters using barely any paint on the brush. That subtle two-tone look you see here makes the letters pop without looking plastic. Press each letter into the canvas using E6000 and hold for 30 seconds.
Mount the canvas first, centered on your wall. Then hang the clock directly below, leaving about 4-6 inches of breathing room between them. That spacing keeps it feeling intentional, not cramped.
The clock’s paw print hour markers replace numbers — so it stays playful but readable. Dog-themed design meets functional wall piece, which means your golden’s whole corner finally has a personality that matches hers.
Paint the block letters and canvas in the same color family so the name reads as one cohesive piece, not like random letters stuck on a board.
📸 Photo credit: Instagram @bendyhendy
#2: The Multi-Frame Dog Photo Wall That Makes Every Guest Stop and Stare
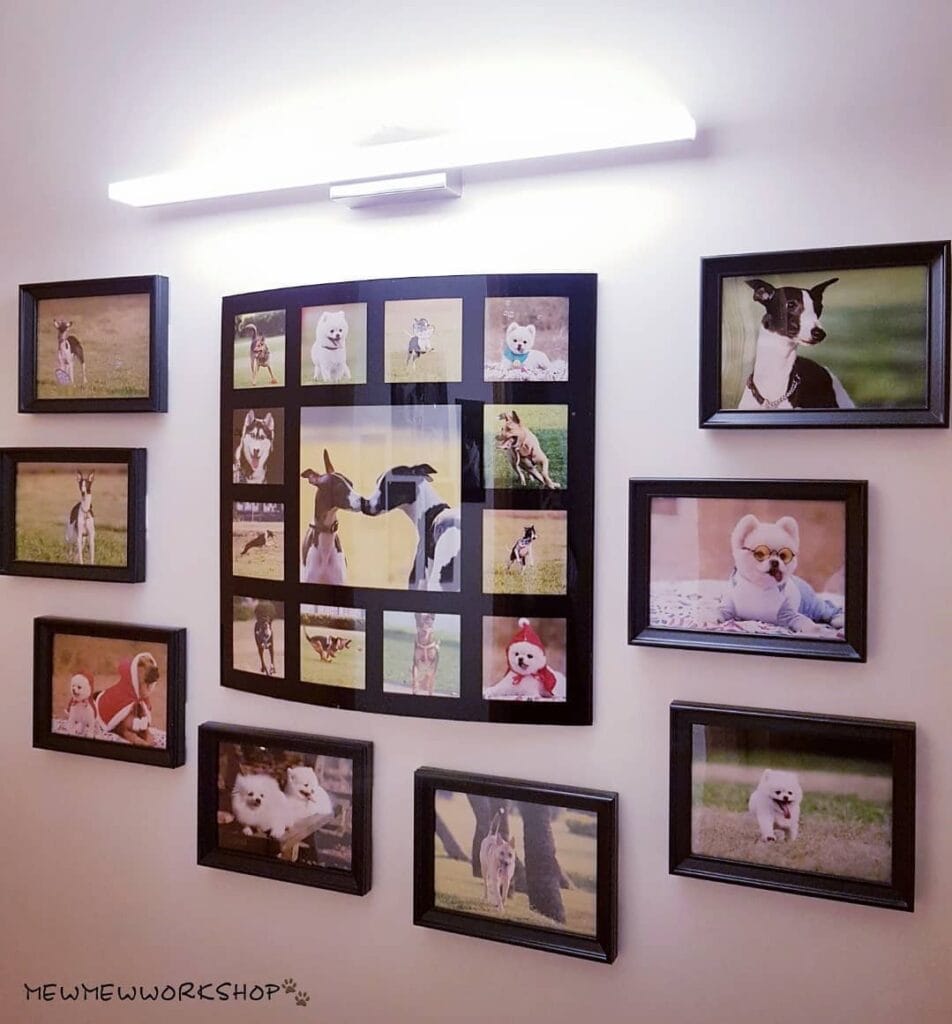
You know that moment when someone walks into your living room, spots your golden’s face plastered everywhere, and just melts? That’s the whole energy of this wall.
This setup is a layered gallery wall featuring a large multi-panel collage frame as the centerpiece — it holds 12 individual square photos arranged in a 4×3 grid format, framed in matte black wood. Surrounding it are 8 standalone frames in matching black, ranging from 5×7 inches to 8×10 inches, hung asymmetrically to keep things feeling lived-in, not staged.
A horizontal LED picture light sits above the whole arrangement — and that single detail changes everything. It pulls the warmth out of every photo like a mini gallery spotlight.
Materials & Tools You’ll Need:
– Large multi-panel collage frame (holds 12 photos, approx. 24×30 inches)
– 4–6 assorted black wood frames in 5×7 and 8×10 sizes
– LED picture light (wall-mounted, approx. 12–18 inches wide)
– High-resolution printed dog photos (matte finish works best under direct light)
– Painter’s tape
– Level tool
– Hammer and nails or adhesive wall strips
– Pencil for marking
– Measuring tape
Instructions
Start by printing your photos. Matte finish photos reduce glare under the LED light — and trust me, with a direct light source above, glossy prints will wash out half your pup’s face. I made that mistake with my cousin’s setup and we had to reprint everything.
Lay your frames out on the floor first. Arrange the large collage frame in the center of your layout, then scatter the individual frames around it — don’t overthink symmetry. The slightly off-balanced look in this photo is exactly what makes it feel personal, not like a furniture store display.
Use painter’s tape to map the layout directly onto the wall before touching a single nail. Tape out every frame’s exact footprint and step back. Walk away. Come back with fresh eyes. I always catch something I want to shift when I do this.
Hang the LED light first, centered above where your collage frame will sit. The light source being anchored before everything else helps you position the frames so the beam falls right across the photos.
Hang the collage frame next — it’s your anchor piece, so get it level before anything else goes up. Then work outward with your individual frames, keeping 2–3 inches of breathing room between frames so nothing feels cramped.
Load the collage frame with action shots, candid moments, and one or two dressed-up photos for personality. Mixing outdoor shots with indoor close-ups creates visual variety that keeps the eye moving across the whole wall.
Prep Time: 45 minutes | Active Project Time: 1.5–2 hours | Difficulty Level: Beginner-Friendly
The LED light feature bounces warm light across every frame, which means even phone photos look intentional — and your guests stop scrolling their own phones because they’re too busy looking at yours.
Swap photos seasonally. Slide new prints in without repainting or rehanging a single frame, and the whole wall feels fresh again in under ten minutes.
📸 Photo credit: Instagram @mewmewworkshop
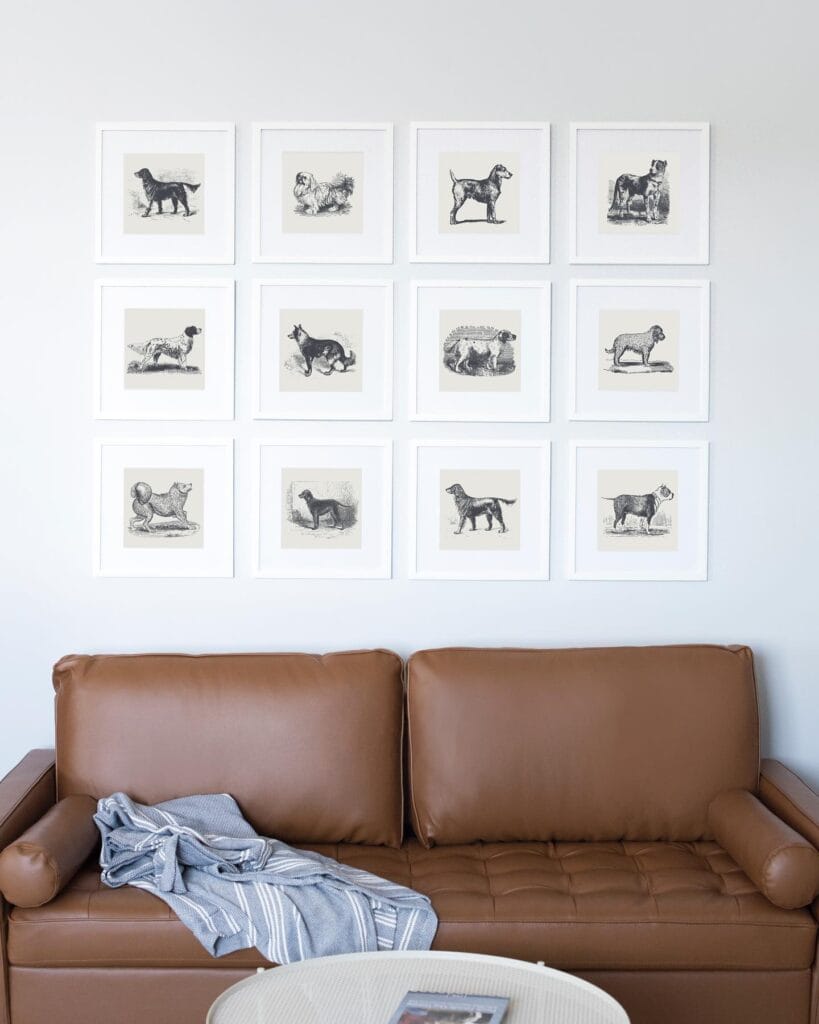
#3: Vintage Dog Print Gallery Wall (The Classic That Never Gets Old)
You know that blank wall above your couch that’s been staring at you for months? Yeah. I had the exact same problem — and honestly, one afternoon scrolling Pinterest sent me down a rabbit hole I never came back from.
This 12-piece vintage dog illustration gallery wall is everything. We’re talking black ink botanical-style prints on cream/ivory backgrounds, each matted in white frames and arranged in a tight 3-row × 4-column grid. The prints show different dog breeds — and yes, one of them looks exactly like a Golden Retriever. I almost cried a little.
Materials & Tools
– 12 matching white frames (square, approximately 10×10 inches each)
– Cream cardstock or pre-cut mats (4×4 inch opening)
– Vintage dog breed illustrations (downloadable from Etsy or public domain archives)
– Laser or inkjet printer
– Painter’s tape
– Level tool
– Pencil + measuring tape
– Command picture-hanging strips (heavyweight)
Instructions
Start by downloading 12 different vintage dog breed prints — search “antique dog engravings” on free sites like Rawpixel or Biodiversity Heritage Library. Print each one at 4×4 inches on cardstock, keeping all prints the same scale so the grid reads as one cohesive piece.
Mat each print centered inside your frame. The cream mat border creates breathing room between the illustration and frame edge — this detail is what makes it look like a real gallery, not a craft project.
Now lay all 12 frames flat on the floor first. Arrange them into your 3×4 grid, adjusting which breed goes where until the visual weight feels balanced. Mixing fluffy breeds with lean ones creates rhythm across the rows.
Measure your wall and mark the center point lightly in pencil. Work outward from that center mark. Keep 1-inch gaps between each frame — consistent spacing is what ties the whole grid together. Use painter’s tape as placeholder guides before committing to hooks.
Hang your top row first using a level. Then build downward row by row. Command strips on lighter frames save your walls completely.
The uniform framing style means the dog breeds become the star — not the frames themselves — which keeps the wall feeling curated without looking cluttered.
Swap one print for your own dog’s portrait illustration (tons of Etsy artists do custom vintage-style pet portraits) and suddenly this wall becomes yours.
Prep Time: 30 min | Active Project Time: 2–3 hours | Difficulty Level: Beginner
📸 Photo credit: Instagram @roomfortuesday
#4: Yarn Rope Dachshund Wall Art With a Mini Shelf (Yes, You Can DIY This)
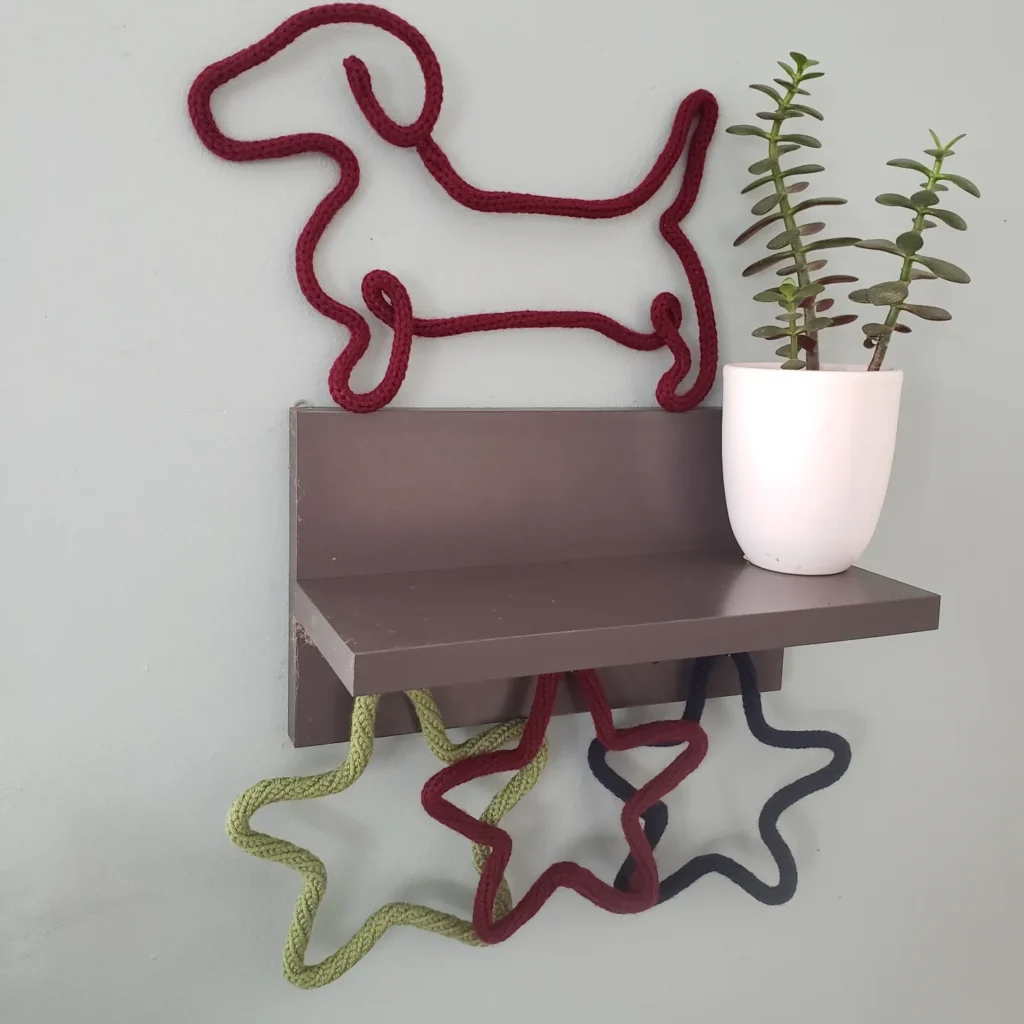
You know that moment when your golden’s wagging tail knocks something off the shelf again and you think — okay, the decor situation needs a serious rethink? Same. I started looking for wall pieces that felt playful but still looked intentional, and this one stopped me cold.
It’s a dark crimson rope dachshund outline mounted above a small taupe-painted wooden shelf, with three rope stars dangling below in olive green, burgundy, and dark navy. The whole thing sits against a soft gray wall with a little white ceramic succulent pot on the shelf. It looks like something from a boutique, but it’s 100% handmade.
Materials & Tools
– Thick cotton rope (approx. 6–8mm diameter) in crimson, olive, burgundy, and navy
– Taupe-painted wooden shelf (roughly 10″ x 6″)
– Hot glue gun + glue sticks
– Dachshund silhouette printout (use as a tracing guide)
– Foam board or cardboard for shaping the outline
– Wall-safe mounting strips or small hooks
– Scissors + painter’s tape
Instructions
Print a dachshund silhouette at your desired size — around 12–14 inches wide works well for a standard wall shelf setup. Tape it flat onto your foam board. Starting at the tail end, lay your crimson rope along the outline edges, pressing firmly as you go. Use your hot glue gun in short sections so the rope doesn’t shift before it sets — this step makes or breaks the final shape.
Once the dog outline is complete and fully dried, carefully peel it from the foam board. The rope holds its shape because the cotton fibers grip the glue without stiffening, which means your finished piece stays flexible enough to hang flush against the wall.
For the stars, loosely form each rope into a five-point star shape on a flat surface. Glue each intersection point. Make three stars in your accent colors. These hang below the shelf using tiny adhesive hooks, and the slight drape gives the whole piece that organic, handcrafted feel that’s so hard to fake.
Mount your painted shelf first, then hang the dachshund outline centered just above it. Layer the stars below. Drop a small plant on the shelf and you’ve got a full vignette.
Real talk: I made something similar last winter for my cousin’s nursery and the hardest part was just committing to the rope color. Once you start, it moves fast.
The cotton rope construction keeps the whole piece lightweight — under half a pound total — so standard adhesive strips hold it without damaging your walls.
Prep Time: 20 min | Active Project Time: 1.5–2 hours | Difficulty Level: Beginner-Friendly
Warming the glue gun for an extra minute before you start gets a cleaner bond on the rope fibers. And if your rope frays at the cut ends, a quick pass with a lighter seals it without melting the shape.
📸 Photo credit: Instagram @totallyknottygifts
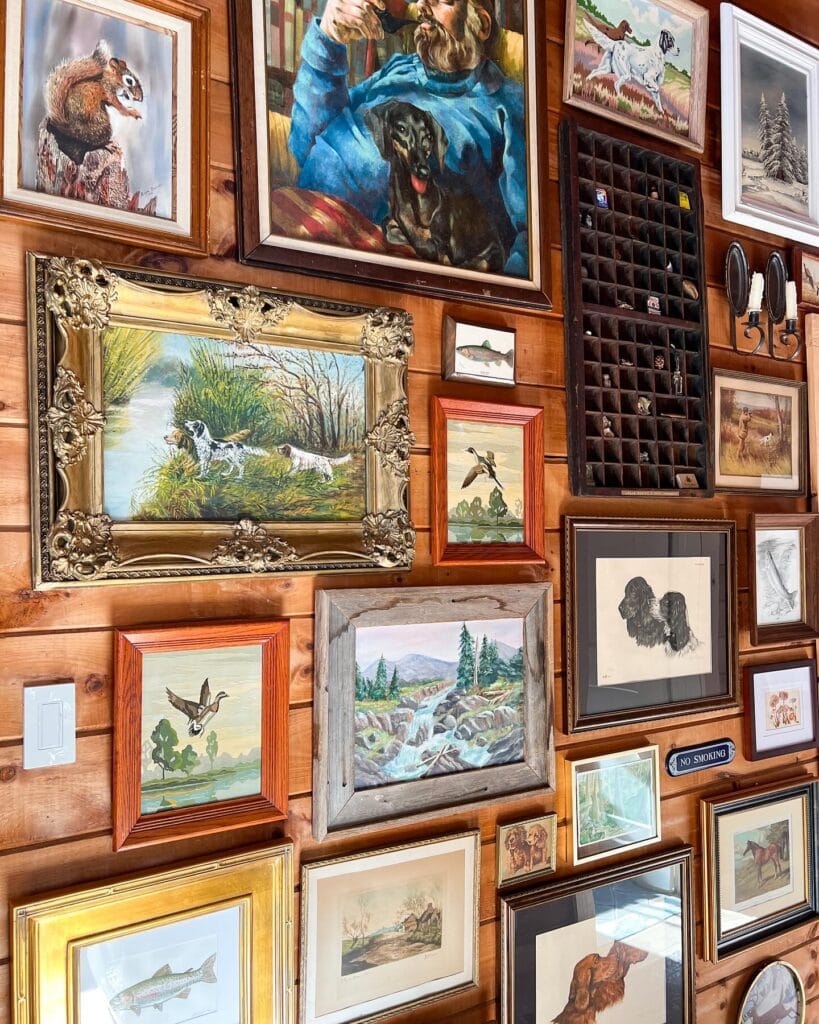
#5: The Dog Portrait Gallery Hall — A Floor-to-Ceiling Tribute to Every Good Boy Ever

You know that moment when your golden is just sitting there being ridiculously photogenic, and you think — she deserves to be on a wall somewhere?
Yeah. This hallway is exactly that energy, times twenty.
What you’re looking at is a salon-style gallery wall running the full length of a narrow corridor, packed with oil paintings on canvas, gilded ornate frames, and dark wood frames in every size from 8×10 to roughly 24×36 inches. The subjects? Dogs. Only dogs. Spaniels, Afghan Hounds, terriers, a brooding black poodle — all rendered in that moody, old-world portrait style that makes them look like Victorian aristocrats.
And honestly, it works because nothing matches.
The frames range from heavily carved gold leaf to simple ebony-stained wood to barely-there raw antique silver. That mix is the whole secret. Pair it with warm-toned hardwood floors and aged mint-green walls, and the whole thing feels like a quirky, collected-over-decades museum — not a theme store.
Materials & Tools
– Vintage or thrifted oil painting reproductions (dog portraits — check estate sales, eBay, or Etsy)
– Ornate gold frames (12×16 and 18×24 recommended for anchoring)
– Dark walnut or ebony frames for contrast
– Picture hanging strips or D-ring hooks with wall anchors
– Kraft paper and painter’s tape (for layout planning)
– Level tool and pencil
– Measuring tape
– Hammer and picture nails
Instructions
Start by tracing each frame onto kraft paper, cutting the shapes out, and taping them to the wall with painter’s tape. This is the step most people skip, and it’s the one that saves your walls from turning into Swiss cheese. Spend real time here — stand back, squint at it, move pieces around until the arrangement breathes without feeling sparse.
Once your layout feels right, mark the hanging points through the paper templates before you remove them. This gives you exact nail placement without guessing.
Now hang your largest painting first — that’s your anchor. In this hallway, it’s the Afghan Hound on canvas in the unframed silver metal frame, roughly centered at eye level. Everything else builds around it in clusters of three, mixing a large, a medium, and a small frame together. Grouping in odd numbers keeps it from looking too rigid.
Layer in your ornate gold frames near the top to pull the eye upward and make the ceiling feel taller. Tuck the smaller dark wood portrait frames lower and toward the edges to ground the arrangement. Don’t stress about perfect symmetry — the slight chaos is the point.
Common mistake: spacing everything too evenly. Real gallery walls have breathing room in some spots and intentional crowding in others. That tension is what makes it feel curated, not manufactured.
The layered, floor-to-ceiling installation fills dead wall space in a hallway — which usually gets zero decorating love — and turns it into the most talked-about spot in your home.
Hang a small painting at your golden’s eye level. Guests won’t notice at first, and then they will, and it’ll be the best thing ever.
Prep Time: 45 minutes | Active Project Time: 2–3 hours | Difficulty Level: Intermediate
📸 Photo credit: Instagram @lindseylanedesign
#6: The Vintage Dog Portrait Gallery Wall (With Ceramic Figurine Shelf)

Okay so you know that one wall in your hallway that’s just… staring back at you? Blank, boring, doing nothing? Meanwhile your golden is probably sprawled on the floor beneath it like she owns the place. This is the wall makeover she deserves.
This setup is giving full Victorian dog-lover energy — and honestly, I want it in my house yesterday. We’re talking a curated gallery wall of oil-painted dog portraits in mismatched wood frames (oak, walnut, gilt gold) hung on deep red damask wallpaper, layered with a bottom shelf displaying hand-painted ceramic dog figurines.
Materials & Tools:
– Red damask peel-and-stick wallpaper (or traditional paste wallpaper)
– 6-10 thrifted wood frames in varying sizes (5×7″ up to 16×20″)
– Vintage or reproduction oil-style dog portrait prints (Etsy has incredible options)
– Small wooden apothecary drawer unit (for figurine display shelf)
– Hand-painted ceramic dog figurines (flea markets, eBay, antique shops)
– Picture hanging strips or hammer and nails
– Level tool, pencil, measuring tape
– Painter’s tape
Instructions
Start with your wallpaper. Apply it to one focused wall only — floor to ceiling if you’re bold, or just the upper two-thirds for a wainscoting effect. Smooth out every bubble with a flat card because bumps will drive you crazy later.
Next, lay all your frames on the floor first. This is the step most people skip and then regret. Arrange them in a rough rectangle cluster, mixing portrait and landscape orientations, keeping the largest frame (14×18″ minimum) as your anchor piece on the left side. The visual weight needs something to “lean” on.
Trace each frame onto paper, cut it out, and tape those paper templates to your wall before hammering a single nail. This saves you from thirty unnecessary holes. Keep gaps between frames tight — roughly 1.5 to 2 inches — so the arrangement reads as one cohesive unit rather than scattered artwork.
Hang your prints starting from the anchor frame outward. Mix black-and-white sketched portraits with full-color oil-style paintings for that collected-over-time feeling. A pointer dog in a field landscape, a spaniel close-up, a tiny Yorkshire terrier portrait — variety in breed and style makes it feel curated, not matchy.
Once the wall art is set, position your apothecary drawer unit directly beneath the gallery cluster. This surface-plus-storage combo means the shelf holds figurines and earns its floor space. Arrange your ceramic dog figurines in odd-numbered groupings of three or five, mixing heights. Place the tallest pieces at the back, smaller ones forward. The hand-painted detailing on vintage ceramics — those little pink and blue brushstroke details — catches the light in the warmest way.
Step back. Adjust one frame if anything feels off. Done.
Prep Time: 30 min | Active Project Time: 3-4 hours | Difficulty Level: Intermediate
The mismatched frames feature works because it’s imperfect — that collected quality creates a payoff that feels personal and lived-in rather than catalog-styled. And if you’re deep in a dog-themed home decor obsession (no judgment, same), the 12 Best Dog Gift Ideas: Top Picks for Every Pooch has some seriously good finds that would sit perfectly on that apothecary shelf.
When sourcing frames, don’t overlook damaged frames with good bones — a little gold spray paint on a cracked gilt frame looks intentional and gorgeous against dark wallpaper.
📸 Photo credit: Instagram @eisleyco
#7: Geometric Rottweiler Wood Wall Art (DIY Layered Wood + Resin)
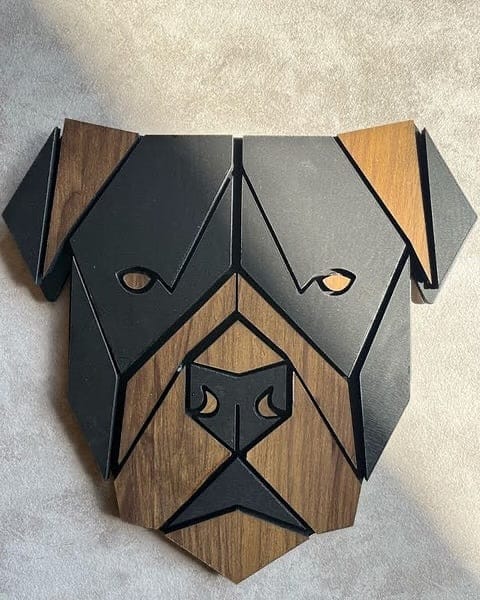
My cousin has a Rottweiler named Bear, and every time someone walks into her living room, they stop dead in their tracks staring at her wall. That’s the energy this piece brings.
This geometric dog portrait combines walnut wood panels and matte black acrylic or resin overlay pieces cut into angular, origami-style shapes. The contrast between the warm brown walnut grain and the flat black geometric sections mimics the exact coloring of a Rottweiler — right down to those signature tan cheek markings peeking through.
And honestly? Even if you have a golden retriever, this style of layered wood portrait works for any breed. You’d just swap the color palette.
Materials & Tools:
– ¾-inch walnut wood sheet (approximately 12″ x 14″)
– Black acrylic craft paint or pre-cut black MDF overlay pieces
– Jigsaw or laser cutter
– Wood glue + clamps
– 220-grit sandpaper
– Pencil, ruler, geometric template (printable online)
– Matte sealant spray
Instructions
Print your geometric dog template scaled to 12 inches wide. Trace each polygon section onto your walnut sheet using a pencil and ruler — precision here matters because the angular lines are the whole point of this style.
Cut each piece with a jigsaw following your traced lines. Sand every edge with 220-grit sandpaper so pieces sit flush against each other. Don’t skip this — gaps ruin the layered effect.
Paint the overlay sections with two coats of matte black acrylic, letting each coat dry fully before adding the next. The matte finish keeps the wood grain visible underneath without competing with it.
Arrange all pieces on a flat surface first — like a dry-fit puzzle. Once you’re happy with the layout, apply wood glue to the back of each black piece and press firmly onto the walnut base. Clamp for at least 2 hours.
Once dry, spray the entire piece with matte sealant to protect the paint and wood from humidity. This feature — the sealed layered construction — means the piece handles the dusty, pet-hair-filled air in your home without warping or fading. That payoff is a wall piece that looks gallery-quality five years from now.
Hang using a French cleat mount on the back for a clean, flush wall look.
Prep Time | 30 minutes
Active Project Time | 3–4 hours (plus drying time)
Difficulty Level | Intermediate
Leaving a small gap between some polygon sections — rather than pressing them edge-to-edge — actually adds shadow depth that makes the portrait look more three-dimensional from across the room.
📸 Photo credit: Instagram @woodworkerseg
#8: Illustrated Dog Print Trio for a Nursery or Kid’s Room (DIY Framed Wall Art Set)
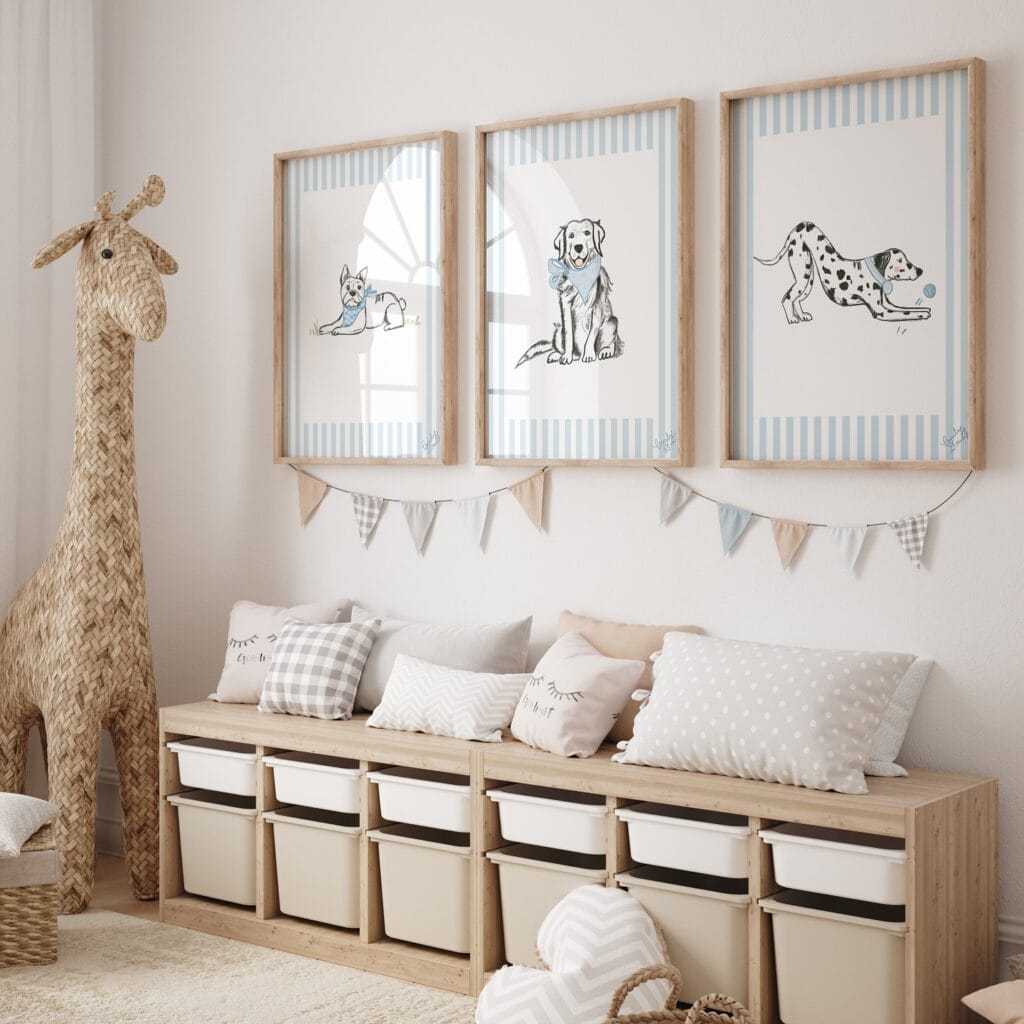
You know that moment when you walk into your golden’s space — maybe a nursery you’re setting up for a new baby, or just redoing a playroom — and it feels so close to perfect but something’s missing on the walls?
That’s exactly where this project hits.
This DIY set recreates the illustrated dog print trio you see here — a French Bulldog, Golden Retriever, and Dalmatian — each drawn in loose ink style with powder blue bandanas and soft blue-and-white vertical stripe borders. The prints sit inside natural wood frames, hung as a triptych above a storage bench. The whole palette is cream, sand, and muted blue — no harsh colors, nothing loud.
My cousin did something similar for her son’s nursery last spring and honestly I cried a little when I saw it. So warm. So personal.
Materials & Tools
– 3 sheets of 11×14″ heavyweight matte cardstock (at least 120 lb)
– Fine-tip black ink pen (Micron 0.5mm or similar)
– Light blue watercolor or ink wash
– Blue painter’s tape and a ruler for stripe borders
– 3 matching natural wood frames (11×14″, no glass preferred for a matte look — but glass works too)
– Reference photos of your own dog’s breed
– Pencil and eraser for sketching
Instructions
Start by lightly sketching your dog illustration in pencil at the center-lower third of each card — this mirrors the airy, open composition in the original prints where most of the white space lives at the top.
Keep the drawing loose and gestural rather than rigid. Ink over your pencil lines once you’re happy, then erase any leftover marks after the ink fully dries — rushing this step smears everything, so give it a full 20 minutes.
Next, use painter’s tape to mask off your stripe border along all four edges, leaving roughly 1.5 inches of border width. Paint clean vertical stripes in your blue wash, alternating white gaps of about 0.25 inches. Pull the tape before the wash dries completely to get crisp, clean lines.
Add a tiny ink bandana around your illustrated dog’s neck in the same blue tone — this detail ties the whole set together and makes each print feel intentional.
Let everything dry flat for at least one hour before framing. Mount each print into your wood frames and hang them with 2 inches of spacing between frames for that gallery-wall effect without feeling cluttered.
Hanging at 57 inches center from the floor puts the art at natural eye level, even above lower furniture like the storage bench shown here.
The illustrated style means your art grows with the room — it works in a nursery now and still feels right in a big-kid bedroom years later.
Prep Time | 15 min Active Project Time | 2–3 hours Difficulty Level | Beginner-Friendly
📸 Photo credit: Instagram @emmybabyshop
#9: Vintage Dog Portrait Gallery Wall (The Framed Art Set That Makes Your Hallway Look Like a Museum)
You know that bare wall in your entryway that’s been staring back at you for months? Yeah. I had the same thing going on, and I kept pinning all these gorgeous gallery walls but couldn’t figure out how to make it feel personal without being cheesy.
Then I found these and everything clicked.
Materials & Tools You’ll Need:
– Four dark espresso wood frames (approximately 11″ x 14″ each)
– Double mat boards in warm taupe/tan tones
– Vintage-style dog breed prints (think classic oil painting reproductions)
– UV-protective glass or acrylic glazing
– Picture hanging strips or D-ring wall hooks
– A level and painter’s tape for layout planning
Instructions
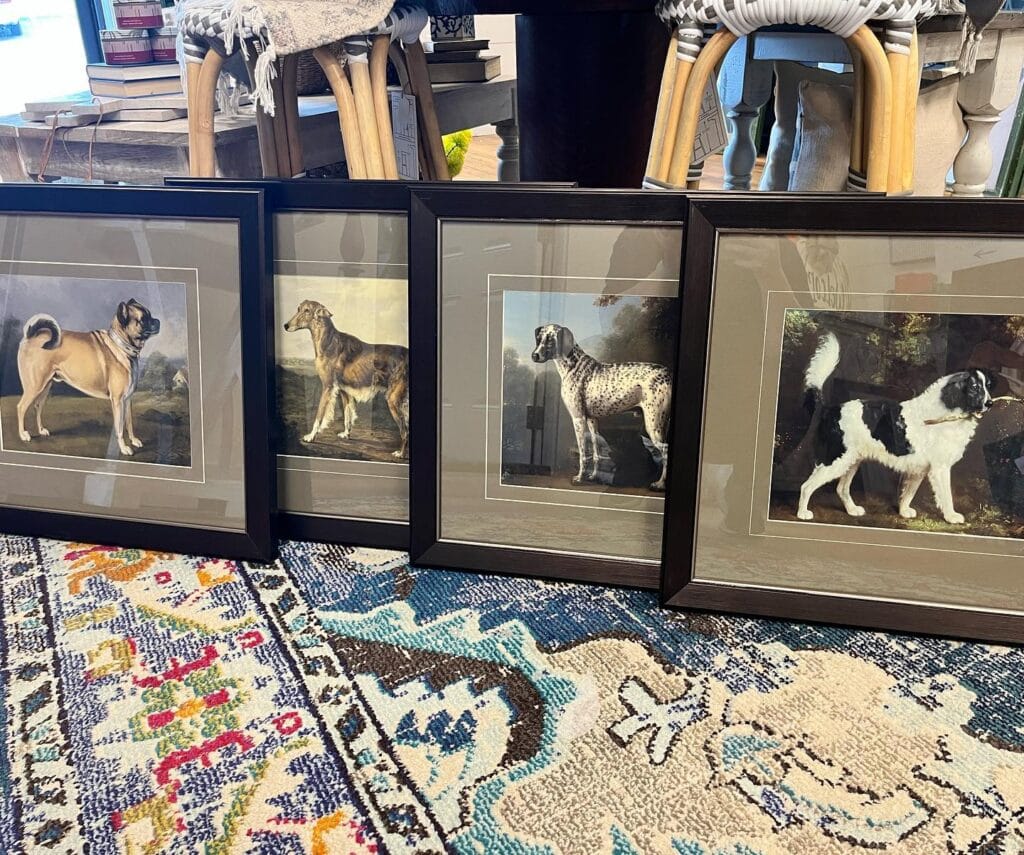
Start by laying all four frames flat on the floor exactly as you want them displayed. This lets you adjust spacing before a single nail goes in the wall. The prints in this set feature four distinct breeds — a pug, a greyhound, a Dalmatian, and a black-and-white spaniel — each rendered in that rich, warm-toned classical style that looks straight out of an English countryside estate.
Here’s the trick: tape paper cutouts of each frame size onto your wall first. Live with the arrangement for a full day before committing.
The double mat border in taupe pulls the warm wood tones together, so the set reads as a cohesive collection rather than four random prints. That cohesion means your wall looks intentional — not assembled in a panic the night before guests arrive. And because the prints are reproductions of classical paintings, they age beautifully without ever feeling trendy.
Space each frame roughly 2-3 inches apart horizontally for that tight, editorial gallery feel. Hang them at 57 inches to center — the standard eye-level gallery height most museums actually use.
The UV-protective glazing prevents fading from sunlight, which matters more than people realize when you’ve got a south-facing entryway.
Prep Time: 20 minutes | Active Project Time: 45 minutes | Difficulty Level: Easy
Keep the wall color behind them neutral — warm white or a greige tone lets the dark frames do all the talking.
📸 Photo credit: Instagram @tinlilydesign_callieshaw
#10: The Rustic Hunting Lodge Gallery Wall (That Somehow Looks Perfect With a Dog in the Room)
Okay so you know that moment when your golden retriever just plops down right in the middle of your living room and you think — this dog deserves to be celebrated, not hidden? That’s exactly the energy this gallery wall gives off.
This style is a full wood-paneled gallery wall layered with nature-themed paintings, hunting dog portraits, wildlife prints, and rustic shadow boxes. The frames are a mix — ornate gold, weathered barnwood, warm cherry wood, and dark walnut finishes. Nothing matches perfectly. And that’s the whole point.
Materials & Tools:
– Assorted vintage frames (thrift stores, estate sales, Facebook Marketplace)
– Nature prints: dog portraits, ducks, fish, landscape paintings, squirrel sketches
– One large anchor piece (think 24×30″ oil painting — dogs with their humans hit different)
– Shadow box or wooden printer’s tray for small collectibles
– Wall sconces (wrought iron works great here)
– Picture hanging strips + hammer and nails
– Kraft paper + pencil for layout tracing
Instructions
Cut kraft paper into the shape of each frame and tape them to your wall first. This saves you from twenty unnecessary nail holes — trust me, I learned that the hard way when I helped my cousin redo her entire hallway.
Start with your largest statement piece — here it’s that black lab oil painting — and anchor it slightly above center. Everything else builds around it. Place your gold ornate frame next, overlapping slightly in visual weight but not physically touching.
Cluster smaller prints in threes. Two small frames next to one medium frame feels balanced without looking staged. Tuck your wooden printer’s tray off to one side — filling those little grid squares with small figurines, vintage thimbles, or tiny dog trinkets adds texture that flat art just can’t do.
Mix vertical and horizontal orientations. The wall in this photo does this so well — it keeps your eye moving without feeling chaotic.
Add a wrought iron sconce between groupings. It breaks up the flatness and adds warmth when the candles are lit on a cozy evening.
Prep Time: 1–2 hours | Active Project Time: 3–4 hours | Difficulty Level: Intermediate
The layered frame variety — barnwood, gold, cherry, and walnut — creates depth that a matching set never could, which means your wall feels collected over years, not ordered in one Amazon haul. And that feeling? It makes guests stop mid-conversation to look closer.
Fill in gaps with small botanical or animal sketches. Negative space on a gallery wall feels unfinished, but overcrowding kills the charm — aim for 2–3 inches between frames as your minimum breathing room.
Lean one small frame instead of hanging it if a spot feels awkward. It reads as intentional.
📸 Photo credit: Instagram @thecabin_livingstonmanor
The One Sizing Mistake That’ll Ruin Your Dog Wall Decor (And How to Avoid It)
Okay, real talk — I see this happen ALL the time and it breaks my heart a little.
Most people pick their art first, then figure out where to hang it. Total backwards move. The piece ends up looking like a sad sticky note on a huge wall, or it swallows a small nook entirely.
Here’s the pro tip: tape newspaper or kraft paper to your wall in the exact dimensions you’re considering. Live with it for a day. Walk past it with your coffee, catch it from across the room. Your eye will tell you if something’s off way before you’ve hammered a single nail.
For golden retrievers specifically, scale matters MORE because their portraits tend to have a lot of warm, golden tones. A too-small piece just reads as muddy from a distance.
The best part: grouping three smaller dog prints in a triangle formation almost always beats one large statement piece — and costs less.
Also, if you haven’t named your pup yet, best female dog names for your new pup might spark some adorable personalized decor ideas too.
Your Sofa Deserves Better (And So Do You)
Pick one furniture piece you’ve been protecting with a throw blanket and swap it for a washable cover this week. That’s it. Start there.
Your golden is not going to stop being a golden. The zoomies, the wet-dog smell after rain, the way he somehow finds the one clean cushion — that’s just life with him. But you don’t have to choose between a dog you love and a home you’re proud of.
The right cover literally gives you both.
So tell me — which room in your house needs a refresh first?

Amr Mohsen is a software engineer who traded his keyboard for a leash — at least on weekends. His love for dogs inspired him to share what he learns as a dog owner and enthusiast, bringing a detail-oriented, research-driven perspective to every article he writes. If it’s about dogs, he’s probably already looked it up twice.


