Okay so hear me out — you’ve got the most Pinterest-worthy living room on the block, right? Neutral tones, that gorgeous linen sofa, the little styled bookshelf corner you spent three weekends perfecting.
And then. The cat tree.
That sad, carpet-covered tower just sitting there like a tan fuzzy eyesore, clashing with every single thing you’ve worked so hard to create. Ugh. I had the exact same situation at my place last spring and I genuinely considered just… hiding it behind a curtain.
Here’s what nobody tells you — store-bought cat trees are either ugly or wildly overpriced. Sometimes both.
But homemade? That’s where it gets good. These 7 cat trees homemade builds look like they belong in an interior design magazine. Your cat gets her kingdom. Your living room keeps its soul.
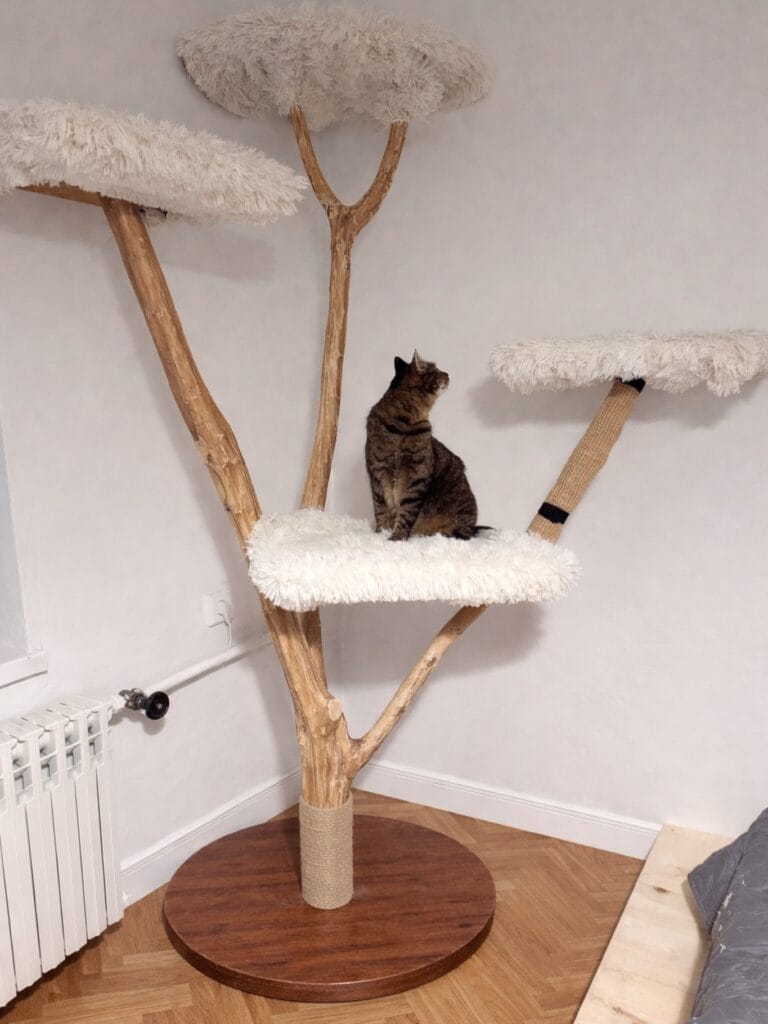
#1: This DIY Birch Cat Tree Will Make Your Living Room Look Like a Pinterest Board Came to Life

Okay so you know that feeling when your dog has finally settled on the couch, you’ve got your coffee, and the living room actually looks cute for once? That’s the energy this cat tree gives off — and honestly? It belongs in the same space.
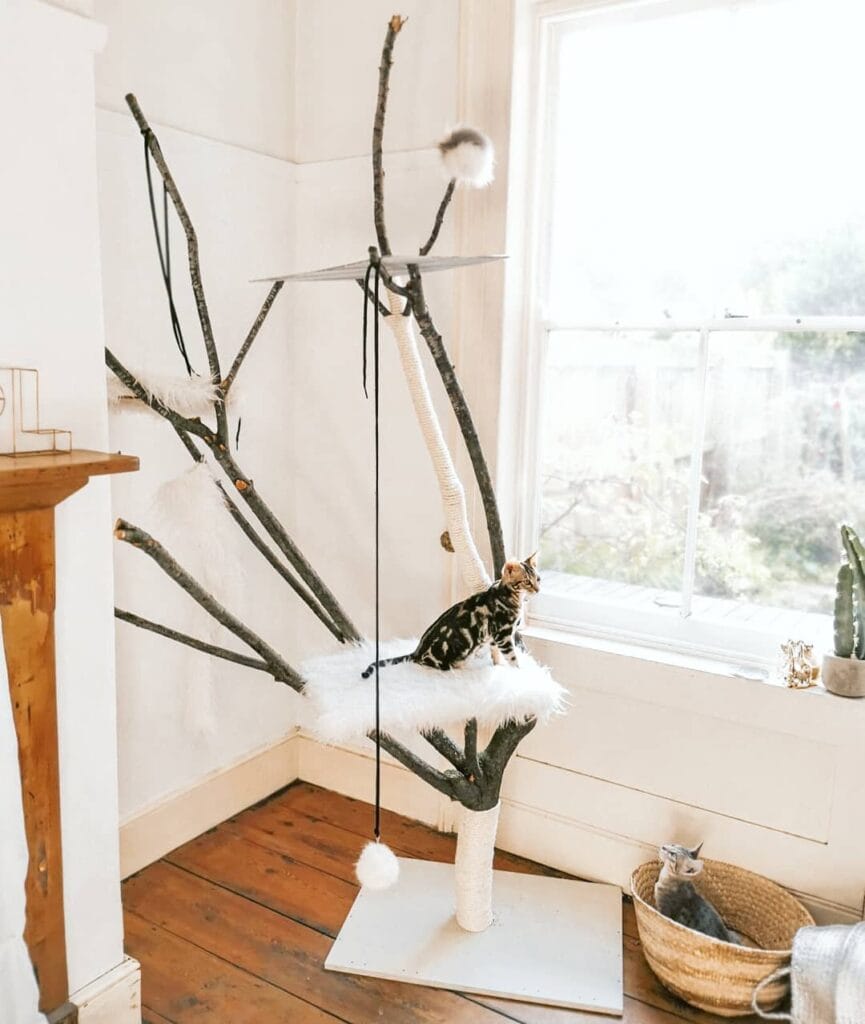
This build uses real birch tree trunks and branches as the main structure — the bark is still on, white and speckled, which gives it that organic, sculptural look. The platforms are covered in cream faux fur and gray carpet fabric, and the whole thing sits inside a wooden crate base filled with white pebbles and live grass.
Materials & Tools
– 2–3 birch trunks (varying heights, roughly 4–6 feet)
– Jute rope for wrapping the main trunk
– Cream faux fur fabric and gray carpet remnant for platforms
– Circular plywood discs (12–16 inch diameter) for platform bases
– Wooden crate (roughly 18×18 inches) for the base
– White river pebbles and decorative grass or moss
– L-brackets, wood screws, drill, staple gun, saw
Instructions
Start by securing your tallest birch trunk into the center of the wooden crate using L-brackets drilled through the crate floor — this is your spine, so make sure it doesn’t wobble before you move on.
Pack the crate base with pebbles around the trunk base. They add weight and keep the structure grounded. Tuck in live grass patches or decorative moss between the rocks for that garden-floor look you see in the image.
Wrap your main trunk from the crate up to mid-height with jute rope, pulling tight and using a dab of wood glue every few inches. Jute wrapping gives cats a built-in scratching surface — which means your couch stays untouched, and your cat actually uses what you built.
Attach your secondary birch trunks at angles using wood screws drilled through the main trunk. The image shows two additional poles branching out at the top — that’s what creates the natural “tree” silhouette.
Cut your plywood discs for platforms at 12, 14, and 16 inches. Wrap each disc in your chosen fabric using a staple gun, pulling the fabric tight around the edges. The gray carpet platform sits low, the cream fur ones go higher up.
Drill each platform into its trunk at the desired height. The image shows three main tiers — low, mid, and high — with the highest platforms close to ceiling level.
Add a wall-mounted shelf using a simple wooden plank wrapped in cream faux fur, secured with two floating shelf brackets. That’s where the light-colored cat is lounging in the photo.
Let any glue cure for 24 hours before letting your cat (or curious golden retriever snout) anywhere near it.
Real birch branches dry out over time and can get brittle — sealing them with a thin coat of natural beeswax right after assembly keeps the wood from cracking and extends the whole structure by years.
📸 Photo credit: Instagram @blh_siblings
Prep Time: 1 hour | Active Project Time: 4–6 hours | Difficulty Level: Intermediate
#2: DIY Natural Branch Cat Tree With Faux Fur Platforms
You know that moment when your golden retriever spots something new in the corner and just has to investigate? Yeah, your cat wants that same energy — their own little world to climb, scratch, and rule from above.
This build is genuinely one of my favorites I’ve come across. It uses real birch branches, a sisal rope-wrapped center post, and white faux fur platform inserts to create something that looks straight out of a Pinterest board — not a pet store.
Materials & Tools:
– 3-5 natural birch or alder branches (varying heights, 4-6 ft tall)
– 1 sisal rope spool (approximately 50-100 ft, ¼ inch diameter)
– 2 acrylic or plexiglass shelves (12×12 inch minimum)
– White faux fur fabric (cut to platform size)
– 1 flat MDF base board (24×24 inch, ¾ inch thick)
– Heavy-duty screws and L-brackets
– Black leather cord (for hanging faux fur pompom toys)
– Strong construction adhesive
– Drill, saw, scissors, staple gun
Instructions
Start by securing your MDF base flat on the floor. Drill a center hole and anchor your thickest branch or a 4-inch diameter wooden post straight up through it — this becomes your main trunk. Use L-brackets underneath for stability because this thing needs to hold real weight.
Wrap your center post tight with sisal rope from bottom to top, securing each layer with a dab of construction adhesive. The sisal does double duty here — scratch surface and structural grip — which means your cat skips your furniture entirely.
Now for the branches. Arrange 3-4 natural birch branches fanning outward at different angles from the main post. Drill pilot holes first, then drive 3-inch screws through each branch into the post at roughly 45-degree angles. Stagger the heights so there’s a clear climbing path.
Attach your plexiglass platforms at two levels — one mid-height around 24 inches, one higher near 48 inches. Cut your faux fur fabric slightly larger than each shelf, then staple it underneath so the fluffy texture faces up. This is the detail that makes the whole thing feel luxurious.
Tie your black leather cords to the upper branches with pompom toys dangling at different lengths — the movement drives cats wild.
Knot the lower pompom near floor level so if your golden retriever wanders over, she can bat it too. Zero damage done.
Keep a small tube of wood glue on hand — branches shift over the first week. A quick re-tighten at day 7 keeps everything rock solid long-term.
📸 Photo credit: Instagram @chesterandblu
#3: The Floor-to-Ceiling Cat Tree With Wooden Platforms (And a Scratching Ball Your Cat Will Actually Use)
Okay, so you know how your golden retriever has that spot on the couch she’s claimed as her throne? Cats do the exact same thing — except they want to be up high, like royalty surveying their kingdom. And if you don’t give them a vertical spot, they’ll pick your bookshelf. Or your curtains. Ask me how I know.
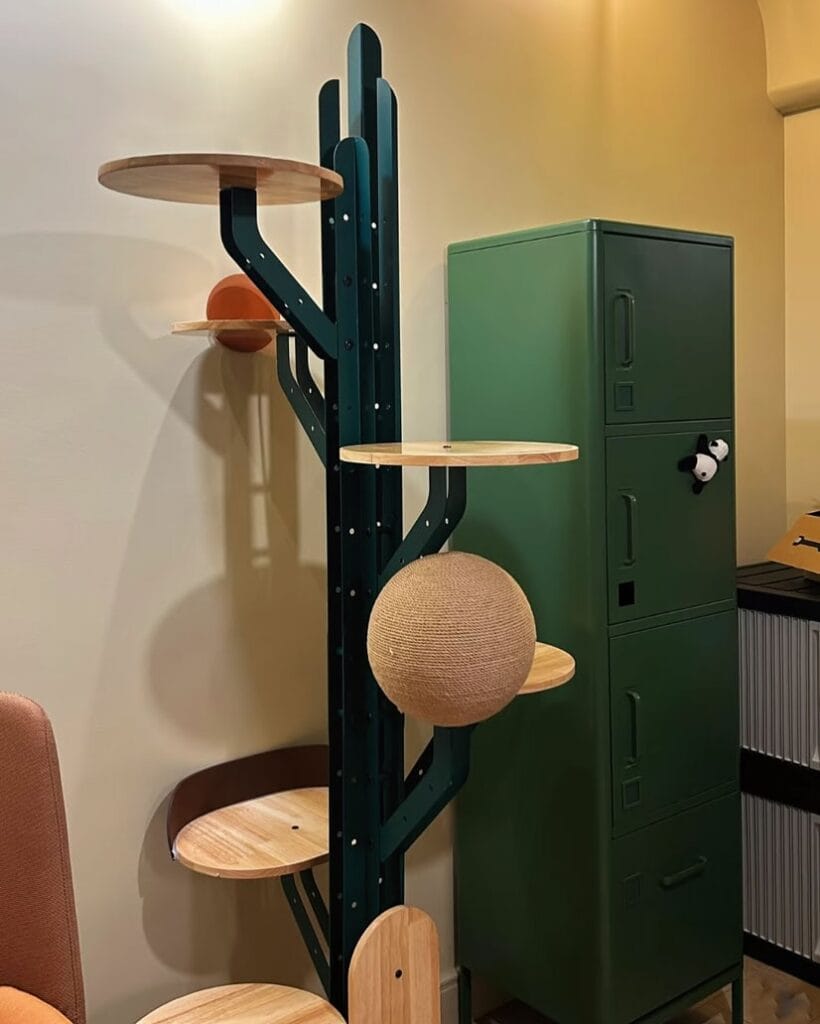
This DIY cat tree from the image is honestly one of the coolest builds I’ve seen. It uses a dark forest-green powder-coated steel frame — four parallel uprights with rounded tops — mounted floor-to-ceiling. The platforms are round solid wood discs, and the real showstopper is a natural sisal rope scratching ball sitting on one of the mid-level shelves. There’s also a smaller orange foam ball on another shelf for play.
Materials & Tools
– Dark green powder-coated steel for the vertical frame (pre-cut or custom fabricated)
– Round wooden platforms — 12–16 inch diameter, solid pine or oak, ¾ inch thick
– Natural sisal rope — at least 50 feet for wrapping the scratch ball
– A styrofoam or wooden sphere, 10–12 inch diameter, as the ball base
– Heavy-duty L-brackets and M6 bolts for attaching platforms to the frame
– Wood stain or natural oil finish
– Drill, jigsaw, sandpaper (120-grit then 220-grit)
– Tension rod hardware OR ceiling anchor kit for floor-to-ceiling stability
– Hot glue gun + strong rope adhesive
Instructions
Start by measuring your ceiling height and cutting your steel uprights to fit snugly between floor and ceiling — you want zero wobble once this thing is up. If you can’t weld, most metal fabrication shops will cut and drill your steel pieces to spec for under $80. The four parallel uprights give the tree that architectural, almost cactus-like silhouette you see in the image.
Sand your wood platforms smooth — start with 120-grit, finish with 220-grit — then rub them down with a natural tung oil. The warm honey tone of the wood against the deep green steel is exactly the contrast that makes this look designer instead of DIY.
Bolt the platforms to the frame at staggered heights — think 12 inches, 30 inches, 50 inches, and 68 inches — alternating left and right so cats can spiral upward. The staggered layout means your cat gets exercise jumping between levels, which supports healthy weight and joint movement. And a cat that moves is a cat that sleeps at night instead of knocking things off your counter at 2 a.m.
For the sisal ball, start wrapping your rope from the center of the sphere outward, pulling each loop tight and securing with a dab of rope adhesive every few rows. It takes about 45 minutes but the result is a scratch surface cats go wild for — sisal satisfies the urge to scratch, which means your sofa survives. The ball sits right on one of the mid-level platforms without any mounting needed; gravity and its weight keep it in place.
Once the frame is up and tensioned, give the whole structure a firm shake. If it moves, tighten your ceiling anchor. This build holds up to cats up to 20 lbs jumping between levels — no swaying, no drama.
The forest green frame color coordinates with the green metal locker cabinet in the background of the original image, which tells me whoever built this thought about the whole room. Matching your cat tree to existing furniture tones makes it feel like intentional decor, not an eyesore you’re hiding in the corner.
If your ceiling has a popcorn or uneven texture, add a small wooden ceiling plate — 4 inches wide, ½ inch thick — between your tension hardware and the ceiling to distribute pressure and prevent dents.
Prep Time: 1 hour | Active Project Time: 3–4 hours | Difficulty Level: Intermediate
📸 Photo credit: Instagram @mewcatslife
#4: Driftwood Cat Tree With Woven Baskets and a Rope Swing
You know that moment when your golden plops down in the corner and just stares at the most boring stretch of wall in the room? Yeah, cats do the same thing — except they want to climb that wall. This build gives them a whole vertical world to rule.
And honestly, when I first saw this style, I texted my cousin like “why does this cat have better furniture than me.”
Materials & Tools:
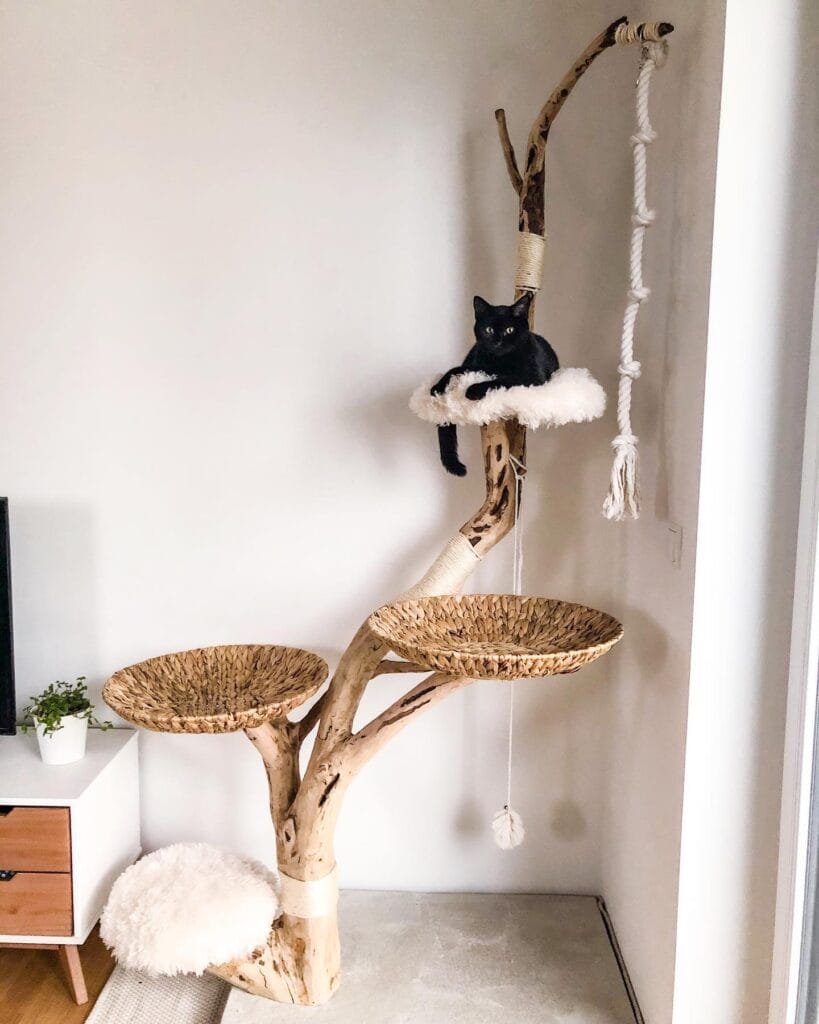
– 1 large driftwood or eucalyptus branch (roughly 5–6 feet tall), naturally forked
– 2–3 water hyacinth woven baskets (16–18 inch diameter)
– Faux sheepskin fabric (cut into 12-inch circles)
– Natural jute twine and sisal rope for wrapping
– Thick cotton macramé rope (3/4 inch diameter) for the hanging swing
– Heavy-duty L-brackets and concrete anchor bolts
– Wood screws, drill, saw, sandpaper (120-grit)
Instructions
Sand your branch until smooth — splinters are not the vibe. Mount the base branch into your corner using two L-brackets bolted directly into wall studs. This isn’t optional. A 6-foot branch holds real weight, and you want zero wobble.
Once it’s standing firm, position your woven baskets at different heights along the natural forks. Drill up through the branch into each basket’s base, then secure with wood screws from underneath. Wrap sisal rope around the trunk section between baskets — about 8–10 inches of coverage — because cats will scratch it, and this gives them a built-in post.
Cut your faux sheepskin circles and hot-glue them inside each basket. That soft landing means your cat actually uses the perches instead of ignoring your whole project. For the rope swing, loop your macramé cotton rope over the highest branch, knot it every 4 inches for grip, and finish with a fluffy pom-pom at the end. Cats go wild for the movement.
One thing to remember: the rope swing placement matters. Hang it close enough to a perch that your cat can swat it without jumping blind.
The woven baskets cradle their weight naturally, which means your cat feels held rather than perched — so they stay longer and sleep deeper.
Prep Time: 30 min | Active Project Time: 3–4 hours | Difficulty Level: Intermediate
Seal the raw wood with a non-toxic beeswax finish before assembly. It protects against scratching and keeps that beautiful pale driftwood color from graying out over time.
📸 Photo credit: Instagram @luci.and.luna.bkh
#5: The Multi-Level Crate Castle — A DIY Cat Tree Made From Stacked Wooden Crates
Okay, you know that feeling when your golden has completely taken over the couch and the armchair, and there’s just… nowhere left to sit? Cats are the same way. They want every surface, every level, every corner. And this build? It gives them exactly that — without wrecking your living room vibe.
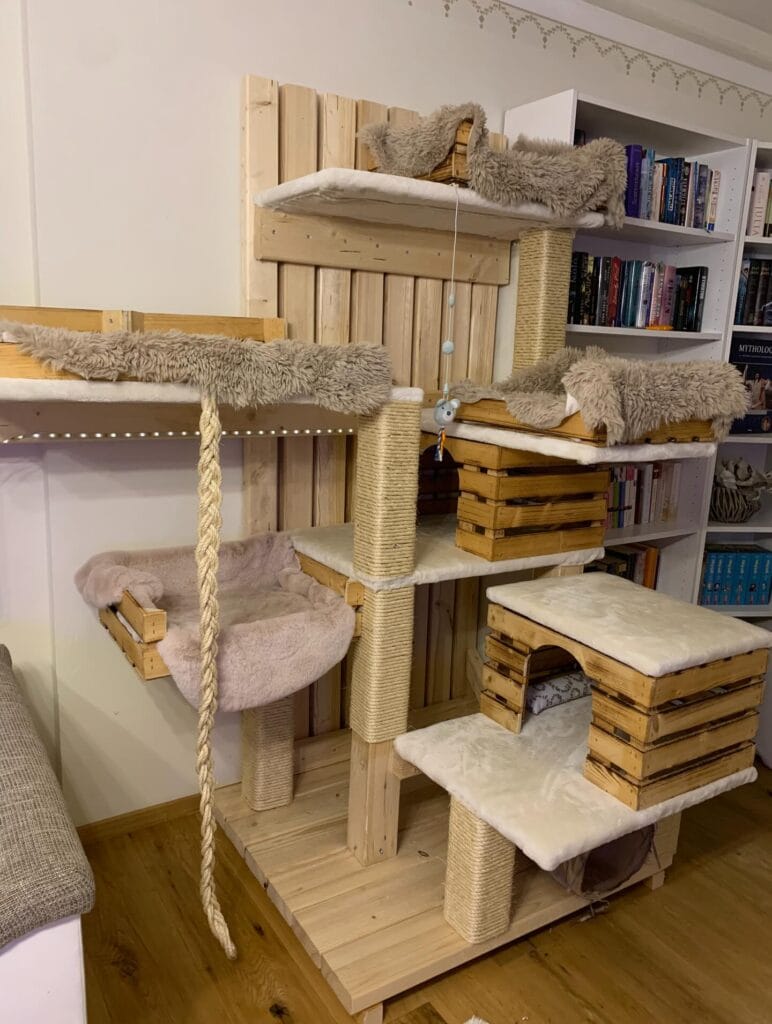
This one stopped me cold when I first saw it. It’s built from natural pine wood planks and stacked honey-toned wooden crates, wrapped in sisal rope for the scratching posts, and topped with cream faux fur fabric padding on every platform. There’s a hanging rope ladder, a cozy plush pink cuddle bowl, dangling toy mice, and even a little arched hideaway tunnel tucked into the lower crate stack. The whole thing sits flush against a pallet wood wall panel — which anchors it and makes it look like actual furniture, not a pet store eyesore.
Materials & Tools
– 6–8 wooden fruit/wine crates (honey-stained or raw pine)
– 2–3 pine plank shelves (approx. 60cm x 30cm)
– 1 heavy-duty sisal rope (6mm diameter, approx. 30 meters)
– Thick cream faux fur fabric (approx. 2 meters)
– Pale pink plush fabric for cuddle bowl lining
– 1 large braided jute rope for the climbing ladder
– Pallet wood boards for the back wall panel
– Wood screws (3.5mm x 40mm)
– L-brackets (metal, 4cm)
– Wood glue
– Staple gun + staples
– Jigsaw (for the arched tunnel cutout)
– Drill + drill bits
– Sandpaper (120 grit + 220 grit)
– Wood stain in warm amber for the crates
– Small hanging cat toys (mouse + bell)
– LED strip lights (warm white, optional — you can see them along the wall shelf in the image)
Prep Time: 2–3 hours | Active Project Time: 2 full days | Difficulty Level: Intermediate
Instructions
Start by building your back wall panel first — this is what keeps the whole structure from wobbling. Take your pallet boards and screw them together side by side into a flat vertical panel, roughly 120cm tall x 80cm wide. Sand everything with 120 grit then finish with 220 grit so there are zero splinters. Trust me on this one — I skipped sanding on a shelf project once and deeply regretted it.
Once the panel is secure, mount it against the wall using L-brackets anchored into studs. Then attach your top pine shelf — the wide one in the image — directly to the panel at about 160cm height. Wrap this shelf edge with a thin strip of faux fur fabric using your staple gun, and cut a matching cushion pad for the top surface.
Now stack your wooden crates in a staggered stair-step formation on the right side, working from the floor up. The image shows three stacks at different heights — roughly 30cm, 50cm, and 75cm — creating natural climbing stairs. Stain the crates in warm amber if you want that cohesive look. Glue and screw each crate to the one below using wood screws through the base, then add an L-bracket at the back where it meets the panel. Top each crate stack with a pine shelf, then staple your faux fur cushion on top.
For the arched hideaway, take one of your middle-height crate stacks and use a jigsaw to cut a 20cm wide x 18cm tall arch into the front-facing side. Sand the arch edges smooth, tuck a small cushion inside, and your cat has a private little den.
The sisal scratching post runs from floor to mid-height in the center — wrap a 10cm diameter pine post tightly with sisal rope starting from the bottom, securing each row with a dab of wood glue as you go. The rope wrapping means cats scratch this instead of your furniture — which keeps your sofa intact and your cat’s claws healthy — and honestly that payoff alone makes this whole build worth it.
For the climbing rope ladder on the left, knot a braided jute rope at even 20cm intervals to create rungs, then anchor the top end to the wall-mounted floating shelf with a heavy-duty hook. Cats use this to leap between levels.
Build the cuddle bowl last. Take a small rectangular pine crate piece, bend a strip of thin plywood into a curved side wall, screw it in, and line the whole interior with your pink plush fabric using a staple gun. Mount it to the main sisal post at about 80cm height using an L-bracket.
Hang your small cat toys from a thin cord attached to the top shelf — the image shows a little mouse toy swinging right in the center, right at paw-batting height.
The back wall panel connection is what makes this feel solid. A freestanding cat tree wobbles — but anchoring to the wall means even an energetic cat throwing itself between levels won’t shake the whole thing.
If you’re using LED strip lights like in the image, run a warm white LED strip along the underside of your wall-mounted floating shelf. It adds a cozy glow and highlights the whole build at night.
📸 Photo credit: Instagram @auri_and_makani
#6: Floor-to-Ceiling Rope Tower With a Suspended Bed and Wall Tunnel
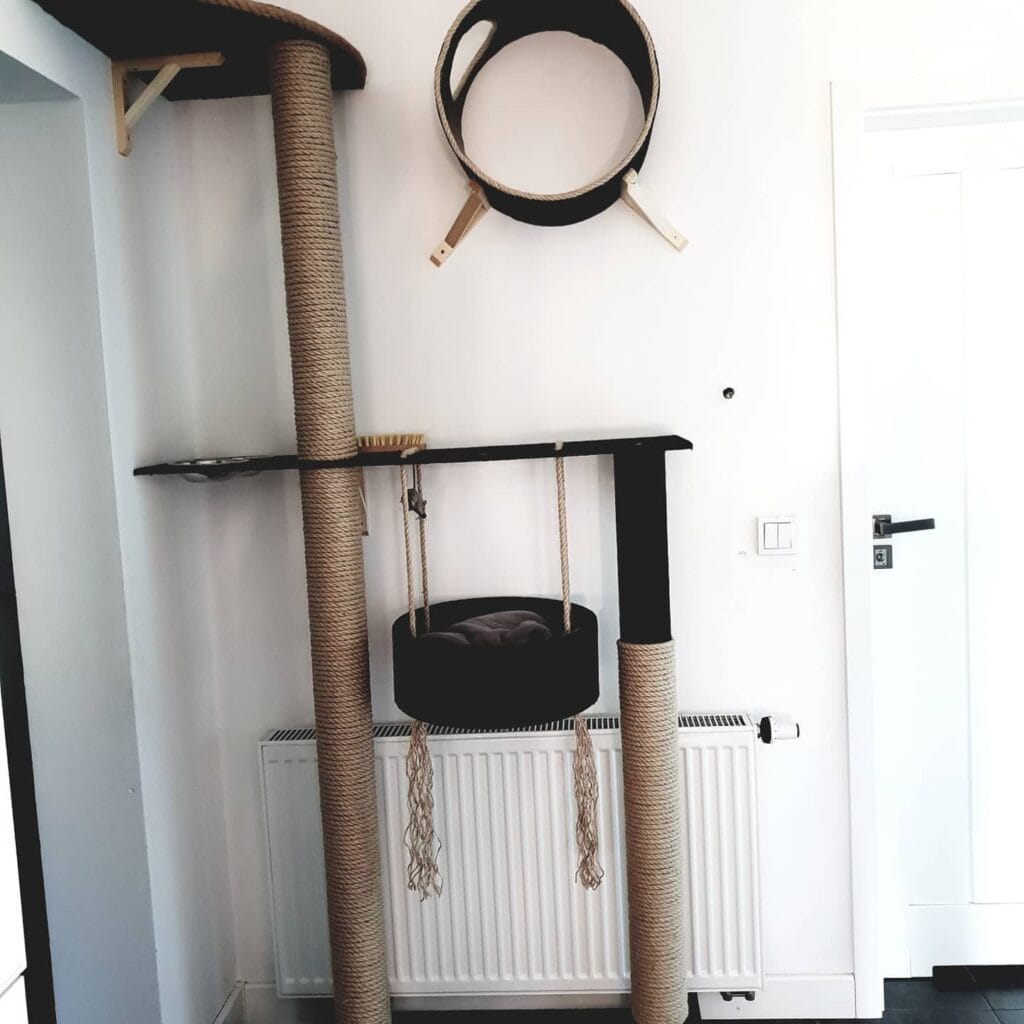
You know that moment when your golden retrieves her favorite toy from under the couch and just… stares at you like, “this is it? This is my whole life?” Yeah. Cats do that too, and honestly, they deserve better than a wobbly beige tower from the pet store aisle.
This build from the image is stunning — and totally doable on a weekend.
Materials & Tools:
– Two 4-inch diameter wooden posts (floor-to-ceiling length)
– Natural jute rope (thick gauge, roughly 0.5 inches)
– Black-painted MDF shelving boards (one horizontal platform, approx. 47 x 8 inches)
– Black fabric cylinder for the suspended bed (12-inch diameter)
– Jute rope lengths for hanging the bed (4 strands, each 18 inches)
– One circular wall tunnel made from black felt stuffed into a rope-wrapped hoop
– Wooden L-brackets for ceiling and wall anchoring
– Wood glue, staple gun, drill, screws
Instructions
Start by cutting your two posts to match your ceiling height exactly — one tall center post, one shorter side post. Wrap both from base to top with jute rope, pulling each coil tight before stapling it in place. This rope wrapping is the scratching surface, the grip, and the texture all in one — your cat gets a full-body claw workout without touching your sofa.
Attach the black MDF platform board horizontally across both posts at roughly mid-height, drilling through the posts and securing with wood screws from both sides. Sand the edges smooth so there’s no splinter risk.
And here’s the part that makes this build next level — the suspended bed. Cut your black fabric into a cylinder, stuff the base firm with batting, then thread four jute rope strands through evenly spaced holes around the rim. Knot each strand above the platform and let the bed hang freely. That gentle swing? Cats go absolutely feral for it.
For the wall tunnel, bend thick rope into a 24-inch diameter hoop and secure the shape with wire. Stretch black felt across and staple it taut around the inside edge. Mount it high on the wall using wooden cross-brackets, screwed directly into studs.
Anchor your tall post to the ceiling bracket first — this carries most of the weight. Then secure the shorter post and wall tunnel into studs. Never rely on drywall anchors alone for something a cat will actually climb.
The black-and-natural-jute color palette keeps this looking like actual furniture, not a cat accessory. It blends into the wall like it was always meant to be there.
Prep Time: 30 minutes | Active Project Time: 4–5 hours | Difficulty Level: Intermediate
📸 Photo credit: Instagram @wykonczswojdom
#7: The Rustic Log Cat Tree With a Wicker Perch (That Looks Like Home Decor, Not a Pet Store Disaster)
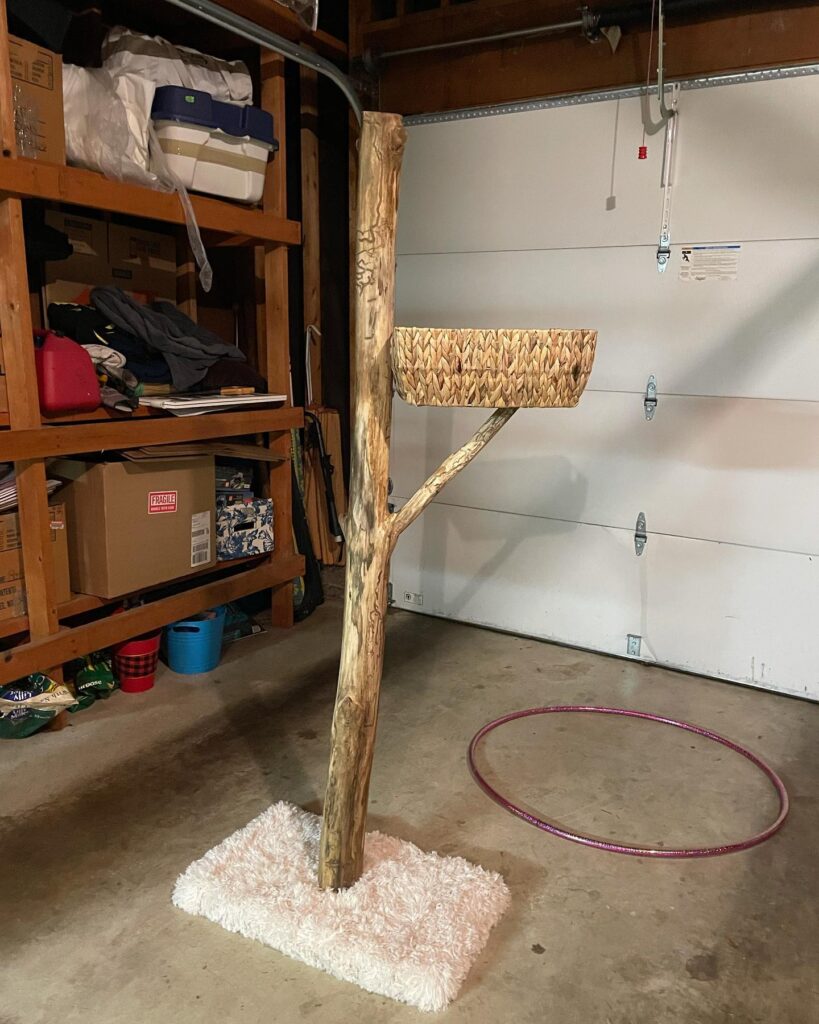
Okay, you know that moment when your golden retriever walks past your cat’s plastic tower and you genuinely cringe because it looks so out of place next to your Pinterest board aesthetic? Girl, same. My friend built this exact thing after her cat kept ignoring a $90 store-bought tree, and honestly the finished piece looks like something from a boutique home shop.
Materials & Tools:
– 1 natural driftwood or reclaimed log (approximately 4–5 feet tall, 4–6 inches diameter)
– 1 wicker/water hyacinth rectangular basket (approximately 14×8 inches)
– 1 fluffy white shag rug (approximately 24×24 inches) for the base
– Heavy-duty wood screws (2.5 inch)
– L-bracket hardware (3 inch steel)
– Concrete or plywood base (18×18 inches, at least 1 inch thick)
– Wood stain (optional, walnut tone)
– Drill with wood bits
– Sandpaper (120 grit)
– Strong adhesive or staple gun
Prep Time: 30 minutes | Active Project Time: 3–4 hours | Difficulty Level: Intermediate
Instructions
Start by sanding the entire log with 120-grit sandpaper. You want to knock off any loose bark or sharp edges, but keep that beautiful natural texture intact — that rough surface is what your cat’s claws will actually go crazy for, way more than wrapped sisal rope.
Drill a 2-inch pilot hole straight down into the center of your plywood or concrete base. Apply heavy-duty adhesive around the hole, then press the log firmly in. Let it cure for a full 24 hours before adding weight.
And here’s where the natural branch fork becomes your best friend. The image shows the log was selected specifically for its Y-shaped fork about halfway up. That fork supports the wicker basket platform from underneath, which means you barely need extra hardware — the branch does the structural work for you.
Once the base is cured, position your wicker basket horizontally into the fork. Secure it from underneath using two L-brackets and 2.5-inch screws drilled through the basket’s solid wicker weave into the branch. The basket’s woven water hyacinth material grips screw heads really well, so it’s sturdier than it looks.
Finally, glue your white shag rug square to the top of the base using strong adhesive. The fluffy texture grips the floor, acts as a scratching surface, and honestly looks like an intentional home decor moment — that’s the payoff.
The natural wood grain feature means zero toxic finishes near your cat, the open wicker basket gives them a perch they’ll actually nap in, and you get a statement piece that doesn’t ruin your living room vibe.
Pick a log with a natural fork already formed — hunting at lumber yards or fallen-tree spots saves you serious cutting work. Also, wedge a small rubber furniture pad under the base corner if the floor is uneven. Stability matters more than you’d think once a cat starts jumping.
📸 Photo credit: Instagram @shayfromthestreet
The One Mistake That’ll Make Your Cat Ignore That Beautiful Tree You Built
Okay, real talk — I learned this the hard way.
Most people build their cat tree first, then figure out placement. Big mistake. Cats claim vertical space based on sightlines, not aesthetics. Your cat wants to see the whole room from the top platform, not face a wall.
Before you cut a single piece of wood, sit on the floor and look up. Find the spot where your cat already jumps — that windowsill, that bookshelf corner. That’s your anchor point.
Here’s the pro secret nobody mentions: sisal rope tension matters more than coverage. Loose wrapping? Your cat’s claws slip right off, and they’ll stop using it within a week. Pull that rope tight enough that it compresses slightly as you wrap. You should feel real resistance.
Also — skip carpet remnants from big box stores. They trap odors fast and wear down ugly. Use indoor/outdoor carpet instead. It’s scratchier, tougher, and your cat will actually prefer the texture.
Build around your cat’s habits, not your Pinterest board. That’s what makes it stick.
Your Dog-Proof Home Is One Decision Away
You’ve got the vision — the cozy throws, the Pinterest-worthy living room, the golden retriever looking like he belongs in a Pottery Barn catalog. The only thing standing between you and that life is the right setup protecting your space.
Pick one thing this week. Just one. A washable slipcover, a dedicated mudroom mat, a furniture protector. Small wins stack up fast.
And hey — if you’re already spoiling your pup with home upgrades, you might as well spoil him with homemade soft dog treats he’ll absolutely lose his mind over.
So tell me — what’s the one spot in your home your golden has completely taken over? 🐾

Amr Mohsen is a software engineer who traded his keyboard for a leash — at least on weekends. His love for dogs inspired him to share what he learns as a dog owner and enthusiast, bringing a detail-oriented, research-driven perspective to every article he writes. If it’s about dogs, he’s probably already looked it up twice.