Ok, so my cat Luna wouldn’t even touch her kibble one morning. She sniffed it, looked me dead in the eye and walked away. Bitch.
Omg! I couldn’t believe it! So I started looking into homemade cat food. Girl, what I found!
I know, I know. You’re buying food that’s going to go straight to your cat’s belly, and you’re not going to see the results right away, but there’s the random vomiting, the dull coat, the lethargy…and all of a sudden that bargain bag doesn’t seem like such a deal anymore.
Your cat deserves the real deal. Real protein. Real ingredients. No mystery meat.
No, not complicated at all. 10 easy recipes using staples you probably already have and turn into meals Luna now dashes to the bowl for.
She’s eating. She’s thriving. And, honestly? My anxiety about her health dropped the moment I switched.
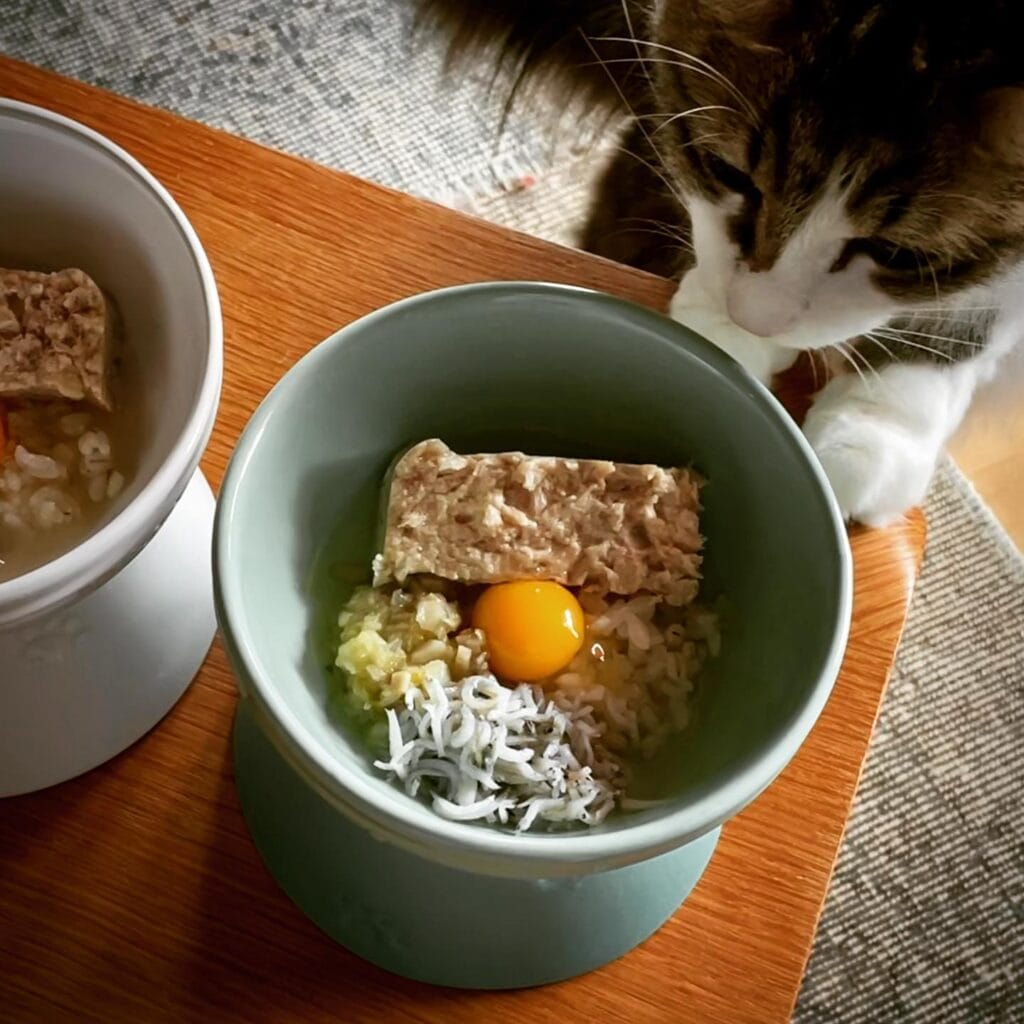
#1: Tuna & Shirasu Bowl with Egg Yolk (High-Protein Meal for Cats)
You know when your golden does something so purely golden, like dragging his bowl across the kitchen floor to get your attention? Cats do the same thing, but with way more drama and way less tail wagging.
This bowl? One of my favorite cat treats I make for my cat.
Can’t stop laughing! This post!! Green ceramic raised bowl: canned tuna in water, 1 raw egg yolk, shirasu (baby white fish), and small scoop of cooked rice with broth. 2nd bowl: extra tuna-rice. In case you have two cats like I do!
1. Canned Tuna: 3 oz canned tuna in water (no salt added)
2. Egg Yolk: 1 raw egg yolk (free-range if possible)
3. Shirasu: 1 tbsp shirasu (dried baby sardines)
4. Cooked White Rice: 2 tbsp cooked white rice
5. Chicken Broth: 1-2 tbsp low-sodium chicken broth
Instructions
Warm the rice up a little bit with a bit of broth (30 seconds in the microwave) and your cat will be running before you even set the bowl down. Put the tuna chunk on top of the rice. Separate the egg yolk and put it right in the middle. It’s a natural fat and protein boost and they digest it well raw. Then sprinkle the shirasu so you can see the different textures.
The secret isn’t to mix it all up. Cats have a texture thing going on and will probably eat it all if you separate the layers.
1. If your dog eats an egg yolk, it’s healthy fats to keep your dog’s coat from being too shiny (i.e. less shedding on your couch) 2. Shirasu is calcium with no extra effort from you.
Serve it now. If your cat has kidney problems, don’t serve it because it’s high in protein.
Prep Time: 5 min | Cooking Time: 1 min | Serving Size: 1 cat (adjust for weight)
📸 Photo credit: Instagram @chiaki014
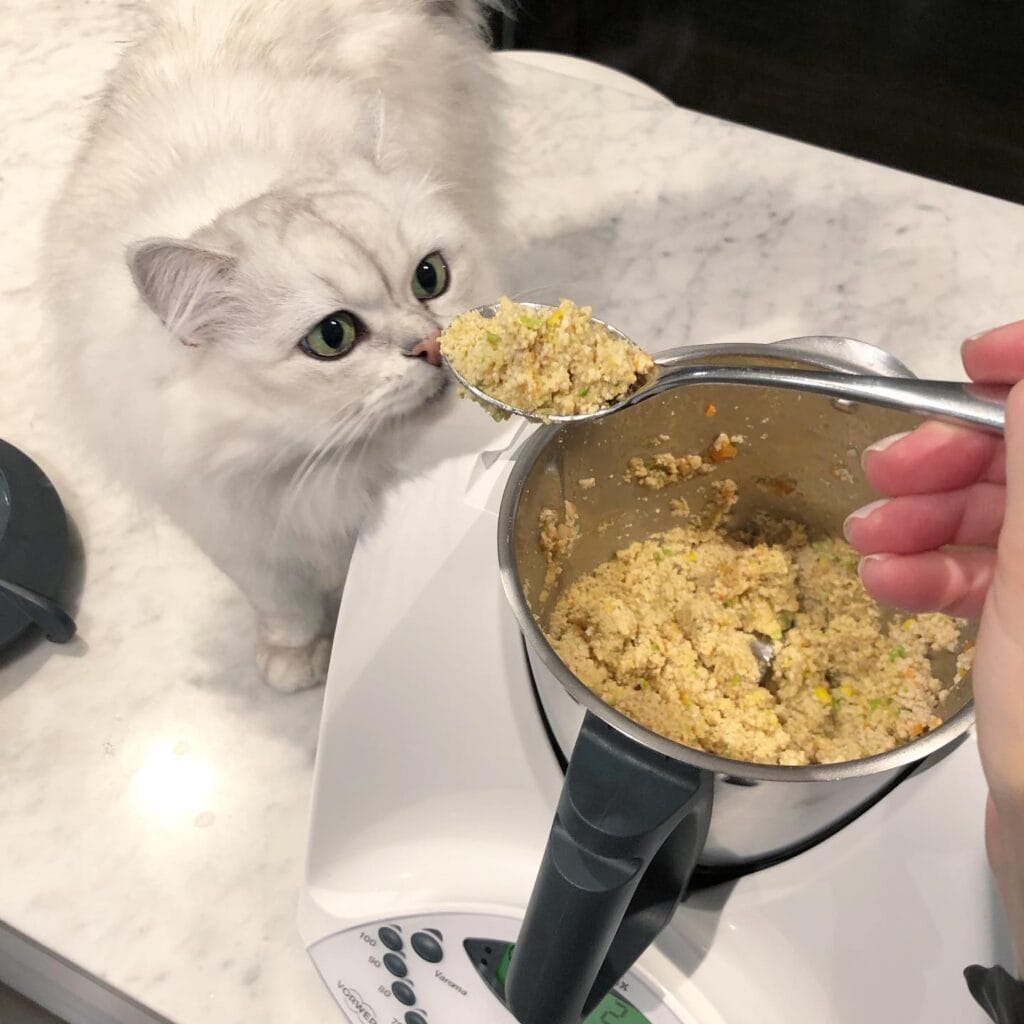
#2: Thermomix Chicken & Veggie Mash (The Recipe My Cat Goes Absolutely Feral For)
Haha. Yup. Like when your golden retriever knows you’re cooking and it will be whatever is on his plate? My cat does the same thing – paws on the counter, that look, just demanding a taste test before the bowl even hits the ground.
This is precisely why I started this blog.
Prep Time: 10 minutes | Cooking Time: 20 minutes | Serving Size: 3–4 meals for one adult cat
This is a picture of a Thermomix TM5 full of cooked mash – ground chicken breast, finely chopped zucchini, corn kernels and carrots all blitzed into that soft, crumbly texture that cats go nuts for. It’s that warm golden-tan colour with little flecks of green and yellow. It looks exactly like something you’d actually want to feed your baby.
Ingredients:
1. 300g boneless chicken breast, raw
2. ½ zucchini, roughly chopped
3. ¼ cup corn kernels, fresh or frozen
4. 1 small carrot, peeled and diced
5. 1 cup water or low-sodium chicken broth
6. 1 tablespoon salmon oil (for coat health)
Instructions
Put the chicken and water in the Thermomix bowl (or saucepan, I don’t discriminate). Cook at Varoma speed 1 for 20 minutes. Let the chicken steam so it falls apart with zero resistance.
And the best part? Cook it and then pulse at speed 4 for 5 seconds (just enough to break it up a bit). Don’t puree it. Cats actually prefer a little texture so they feel like they’re hunting something, even from a ceramic bowl.
4. Once cooked, add in the salmon oil. Not during. Heat kills omega-3s, which is why we add it. Salmon oil will give your dog’s coat from the inside out (which means less shedding on your Pinterest-worthy throw pillows). Feature → benefit → payoff.
Keep leftovers in a glass airtight container in the fridge for up to 3 days, or freeze flat in a silicone ice cube tray for meals all week.
Skip the salt. Cat’s kidneys aren’t like ours and it builds up over time.
📸 Photo credit: Instagram @classickobe
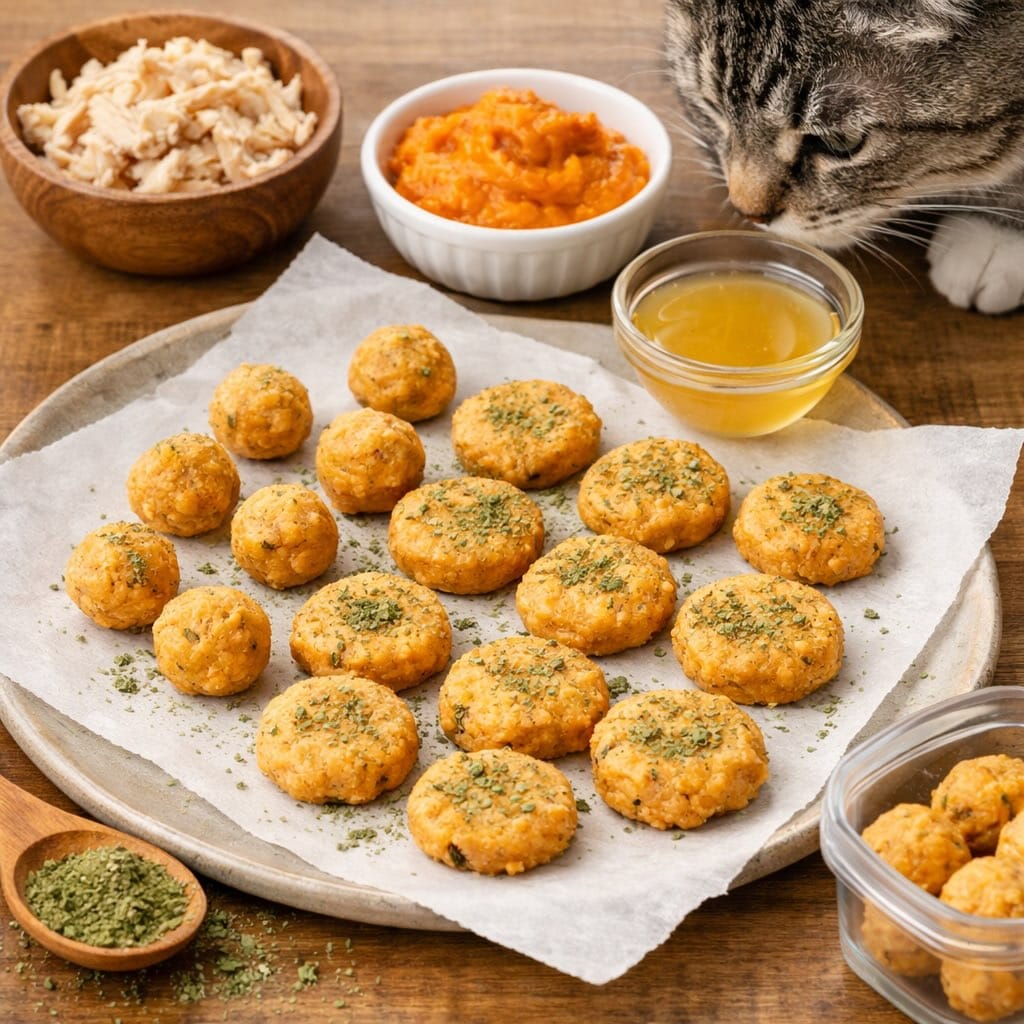
#3: Chicken & Pumpkin Bites (With a Catnip Finish Your Cat Will Go Crazy For)

How many times have you been eating your favorite snack and you’ve had your goldfish look at you with those begging eyes? Cats do too, but they’re more melodramatic.
These are great. My aunt makes these for her two rescue cats in the winter. Her list is much shorter than my Starbucks order!
Prep Time: 15 minutes | Cooking Time: 20 minutes | Serving Size: 18–20 pieces
Ingredients:
1. 2 cups shredded cooked chicken breast
2. ½ cup plain pumpkin purée
3. 3 tablespoons low-sodium chicken broth
4. 1 teaspoon dried catnip powder
5. 2 tablespoons whole wheat flour (binding only)
Instructions
In a large bowl, combine chicken and pumpkin and mix until it’s thick and clumpy. Add chicken broth 1 Tablespoon at a time until it feels like thick dough (not wet paste).
Roll into small 1-inch balls and flatten into 1/2-inch discs for the larger pieces. Sprinkle with catnip powder. Bake at 350°F for 18-20 minutes on a parchment-lined ceramic cookie sheet.
Chicken has protein, so your cat will get some lean muscle. You won’t have to drag your lazy, overweight fur ball to the vet twice a year.
Store in a glass container in the fridge for up to 4 days.
It will help everything move. So if your cat has had a sensitive stomach then yes. It will help.
📸 Photo credit: Instagram @ccf.the.abbey
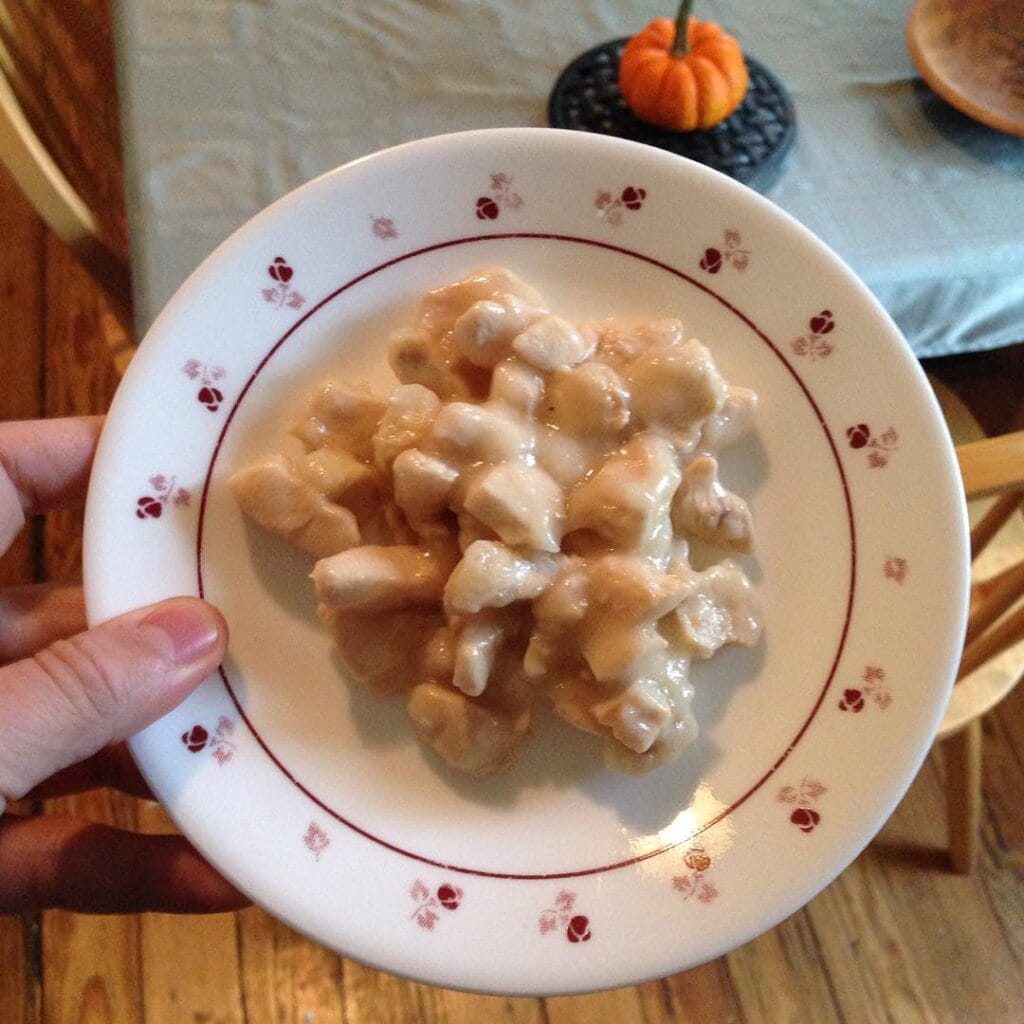
#4: Chicken and Gravy Gnocchi-Style Cat Bites
You know what that face is? It’s your cat’s face.
These are almost chicken dumplings. Soft, fluffy chicken dumplings in a pale gravy. Like comfort food…for cats. These are tiny (about 1/2 inch) beige, slightly glossy brown pieces that you know the sauce has some depth to it.
Ingredients:
1. 1 cup cooked chicken breast, shredded fine
2. ½ cup chicken broth (low sodium, no onion/garlic)
3. ¼ cup brown rice flour
4. 1 egg yolk
5. 2 tablespoons plain Greek yogurt
6. 1 teaspoon olive oil
7. Small pumpkin (decorative reference — skip for cats!)
Instructions
Mix chicken, egg yolk, brown rice flour and knead into soft dough. Roll into 1/2 inch balls (soft dough means tender bites your cat can chew). Drop into simmering broth and cook for 4-5 minutes until they float and firm up a bit.
Now add the rest of the Greek yogurt to the hot broth and oil and stir until glossy. Toss them in. Chicken is good for their muscles, broth is good for hydration, and they’ll think they’re getting a treat. But really, it’s just dinner.
Room temperature: Serve this salad at room temperature. Store leftovers in the fridge for up to 3 days in an airtight container.
Or you may prefer to cook the pancakes in small batches and serve them immediately, because they’re best when they’re hot off the griddle. If you’re using frozen blueberries, they’ll take a little longer.
Prep Time: 10 mins | Cook Time: 15 mins | Serving Size: 2-3 servings
📸 Photo credit: Instagram @joshuapelkey
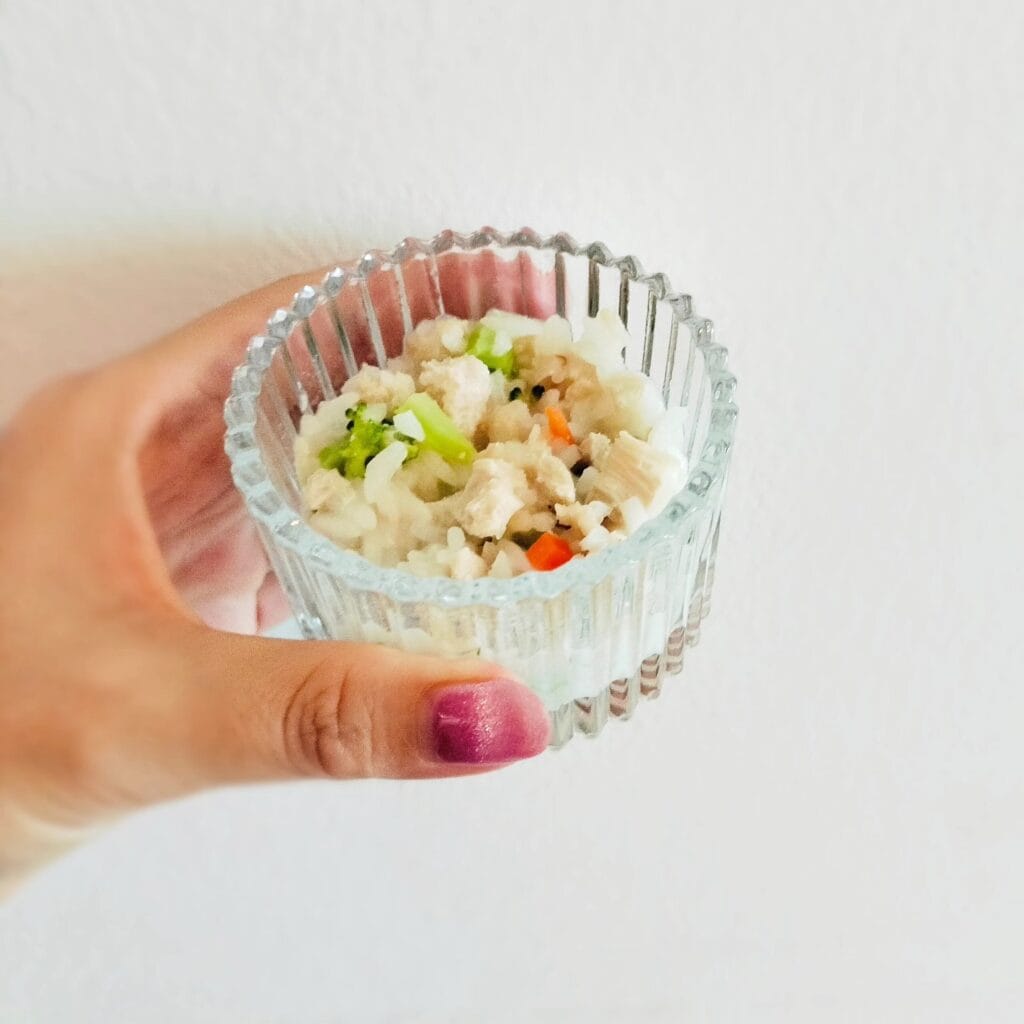
#5: Chicken & Veggie Rice Bowl — The Soft, Gut-Friendly Meal Your Cat Will Actually Finish
You know how that feels. You ate the last bite of mystery meat from the can and your cat is giving you that look. I’ve been there with my aunt’s cats on the weekends when I was babysitting them.
Oh, and that little glass bowl in the picture? All the cozy, homemade, happy vibes. You can see the shredded chicken, tiny carrot bits, broccoli florets, and those little black sesame seeds tucked into soft white rice. It’s like a meal you’d make for yourself.
Ingredients:
1. ½ cup cooked white rice (short-grain works best for soft texture)
2. 3 oz boneless, skinless chicken breast — boiled and shredded fine
3. 2 tablespoons broccoli — steamed and chopped small
4. 1 tablespoon diced carrot — cooked until soft
5. 1 teaspoon black sesame seeds (rich in calcium and healthy fats)
6. 2 tablespoons low-sodium chicken broth — no onion or garlic
Prep Time: 10 min | Cooking Time: 20 min | Serving Size: 1 small cat meal
Instructions
Cook the chicken breast in water (plain) until done. About 15 minutes. Take out and shred with two forks. Small like rice grains. Steam broccoli and carrots separately. Until both are tender. No crunch left. Cats don’t chew like dogs.
Stir in the rice, chicken, broccoli, carrots and broth. Sticky. Add sesame seeds.
OK, so what’s the easy answer? If your cat eats too fast and gets a tummy ache, don’t feed this cold from the fridge. Warm it up to room temperature and a bit warmer. The smell alone will attract them and they’ll eat slower. Digestion will be smoother.
Protein + Carbs + Veggies = Easier on the tummy. Less litter box smells.
No, it doesn’t! Give her some more water it’s great for her dry skin! She’ll love you even more!
📸 Photo credit: Instagram @kucing.neko.jakarta
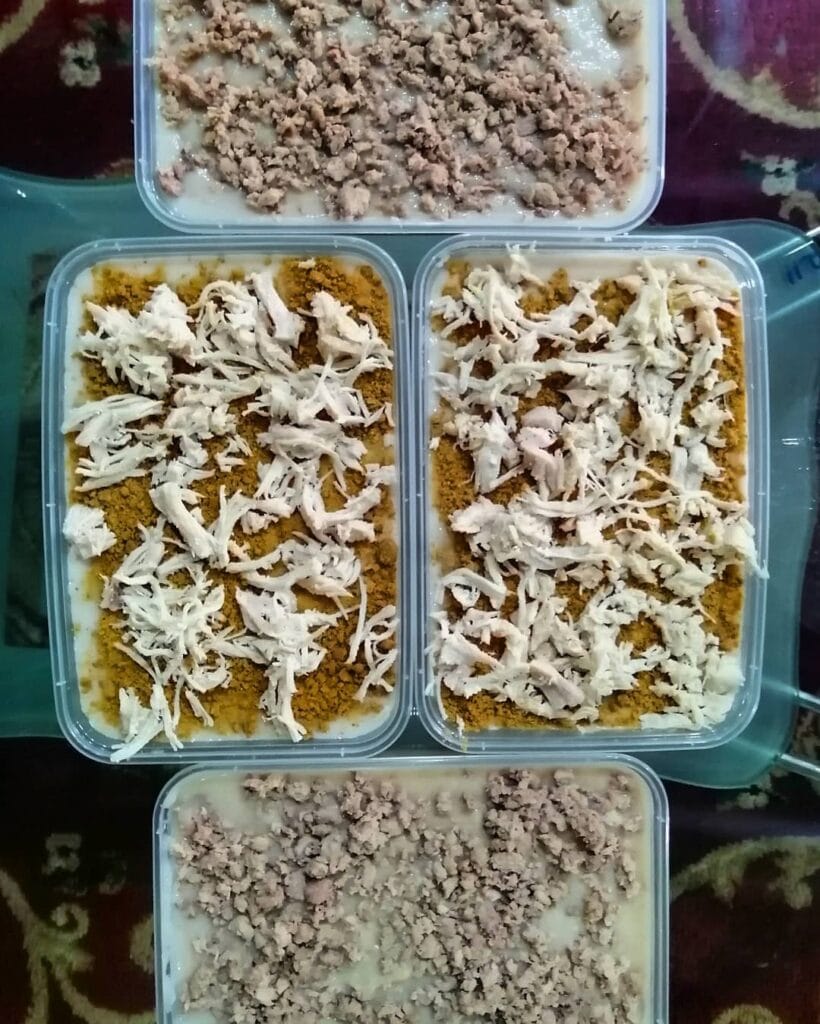
#6: Creamy Shredded Chicken & Turmeric Cat Food Bowls
Ok, so like your golden retriever has that ONE spot on the couch that he claimed forever ago? My cat did the same with my kitchen counter, she claimed it as her own, especially around dinnertime. She’d sit there judging every single thing I opened from a can.
I started making it from scratch because I didn’t want her to miss out on all that good food.
Okay, what’s in those containers? Here’s the recipe! This creamy layered dish is almost too good for a cat!
Ingredients:
1. 2 cups shredded cooked chicken breast (boiled, no seasoning)
2. ½ cup ground cooked chicken (minced fine, also boiled)
3. 1 tablespoon turmeric powder
4. ¾ cup plain unsweetened goat milk or diluted bone broth
5. 1 teaspoon sunflower oil
Prep Time: 15 minutes | Cooking Time: 25 minutes | Serving Size: 4 portions
Instructions
Cook the chicken breast, then shred with 2 forks to get long shreds.
Note: You don’t want to shred the chicken into mush.
For the bottom: Pulse the chicken in a food processor for 10 seconds, just so it is crumbly, not a paste.
Use goat milk or broth as a base. Sprinkle turmeric on top. Turmeric is good for their joints and inflammation. It’s something that can help your cat over time.
5. Place the shredded chicken on top of the turmeric, followed by the ground chicken.
3. Sunflower Oil Drizzle. Drizzle a little bit of sunflower oil on top. Seal. Keep for up to 3 days.
Room temperature. Wait for 10 minutes to let the food cool down so it doesn’t upset your cat’s tummy.
📸 Photo credit: Instagram @pet_homers
#7: Zucchini Ribbon & Lentil Salad for Cats (Yes, Really!)

OK, so let’s talk about your golden retriever. Doesn’t she have that one food that makes her go absolutely batshit crazy? Cats are the same way. And this dish? Mine went nuts the first time I made it.
13. Another light meal. Red lentils, thin zucchini ribbons, dill, basil leaves, flat-leaf parsley, pink Himalayan salt (in the little white bowl at the back) and a pinch of it, and the golden stuff? Cold-pressed olive oil. Drizzled on top.
Ingredients:
1. ½ cup red lentils, rinsed
2. 1 medium zucchini, peeled into ribbons with a vegetable peeler
3. 1 tablespoon fresh dill, roughly torn
4. 4–5 fresh basil leaves
5. 1 tablespoon flat-leaf parsley, loosely packed
6. 1 teaspoon cold-pressed olive oil
7. 1 small pinch pink Himalayan salt
8. 1 squeeze fresh lemon juice (supports iron absorption)
Instructions
Cook the lentils in 1 1/2 cups water over medium heat for 18-20 minutes or until soft but not mushy. You want them to hold their shape. Drain and let them cool to room temperature. While they cool, use your vegetable peeler to run long, slow strokes down the zucchini to create the wide, thin ribbons. Lay them flat and let them breathe for 5 minutes to release excess moisture. The water bowl won’t be watery. Arrange the ribbons loosely, pile the lentils in the center, then scatter your herbs over everything. Drizzle with 1/2 teaspoon olive oil per serving and add your lemon squeeze. Don’t salt unless your vet has cleared added minerals for your cat’s specific needs.
Lentils are another type of plant-based protein that your cat will love you for. This protein will help your cat build muscle and not feel tired and sleepy after eating a meal that is low in calories.
Prep Time: 10 minutes | Cooking Time: 20 minutes | Serving Size: 2 cat portions
Leave it in an airtight container for 48 hours. Never serve it cold. Your cat’s stomach is too sensitive to eat cold food.
📸 Photo credit: pexels
#8: Salmon and Broccoli Rice Bowl for Cats
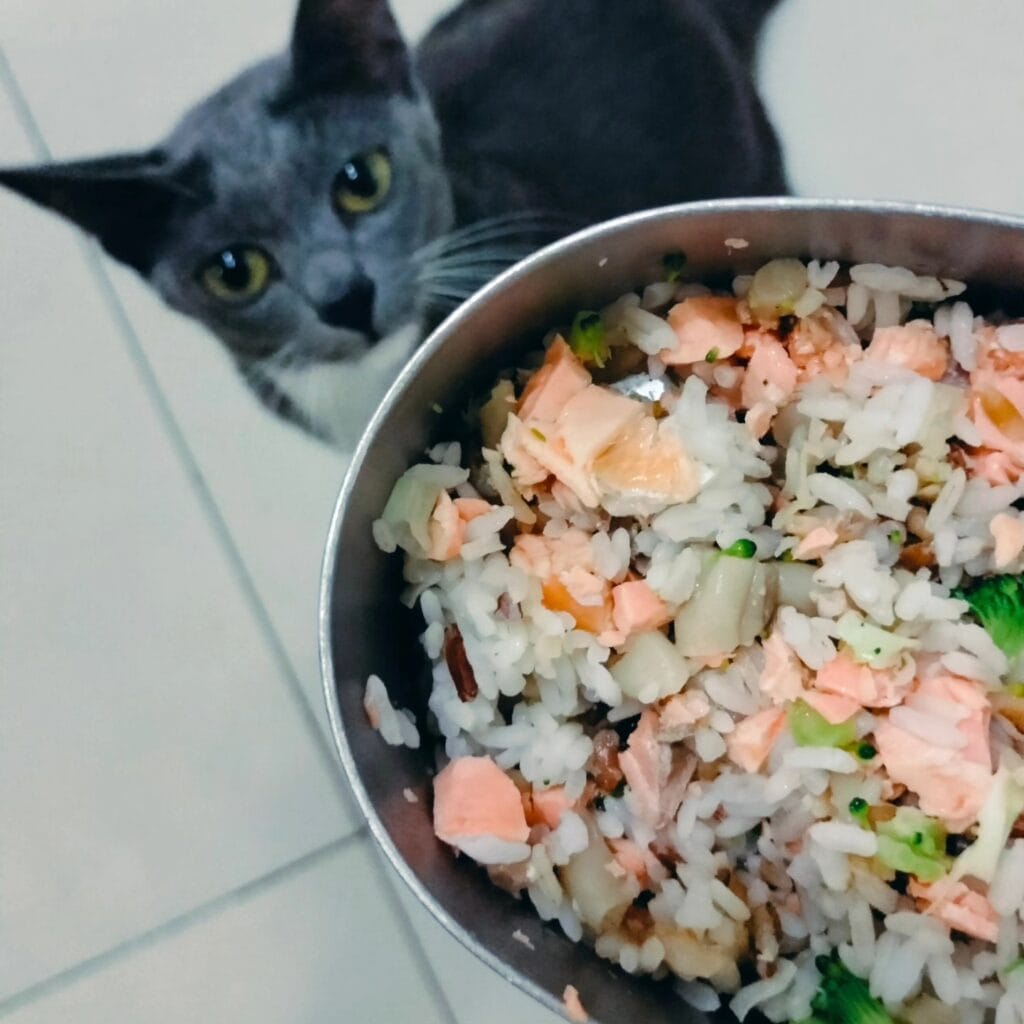
“I’ve been so busy feeding everyone else, how could I forget my cat?” you say to yourself, as your cat meows at the bowl. The gray cat in the photo above? That’s the face of a cat who knows something good is coming.
My all time favorite salmon rice bowl. It’s so easy and smells so good! And your cat will do figure eights around your legs before you even sit down.
Prep Time: 10 minutes | Cooking Time: 20 minutes | Serving Size: 2-3 meals for an average adult cat
Ingredients:
1. ½ cup cooked white rice (plain, no salt)
2. 3 oz fresh salmon fillet, skin removed
3. 2 tablespoons broccoli florets, chopped small
4. 2 tablespoons zucchini or celery, diced
5. 1 teaspoon fish oil (optional but worth it for coat health)
Instructions
Steam salmon fillet for 12-15 minutes over boiling water (or until it flakes apart with a fork). My aunt used to do this every Sunday for her cats and I swear the whole house smelled amazing.
You should also steam your broccoli florets and celery cubes for 5 minutes. Soft enough that your cat won’t just push them aside, but not so mushy that they’re no longer identifiable.
5. Break up the salmon into small pieces. Remove all bones. This is where most people fail at home made cat food.
Pour out the cooked rice, salmon and vegetables into a stainless steel bowl (this one) and stir. Make sure the salmon doesn’t clump together. Just try to spread it throughout the rice. You should have a chunky pink and white bowl of rice with green specks throughout.
Mistake: Don’t let it cool. Wait 5 minutes for the bowl to cool before serving. Cat mouths are sensitive, and if the food is fresh out of the pot it can burn them.
Your cat will receive an abundance of omega-3 fatty acids, which help keep his coat and joints healthy. He should enjoy a couple of servings a week and those dull fur days will be gone. You’ll start seeing the shiny, brushed look you’ve always wanted.
1. Broccoli – You can add fiber without throwing off the balance of protein. Keep it to less than about 10% of the bowl.
Store the leftovers in an airtight glass container in the fridge for up to 48 hours, then throw it away. Fish is best eaten fresh.
📸 Photo credit: Instagram @kucing.neko.jakarta
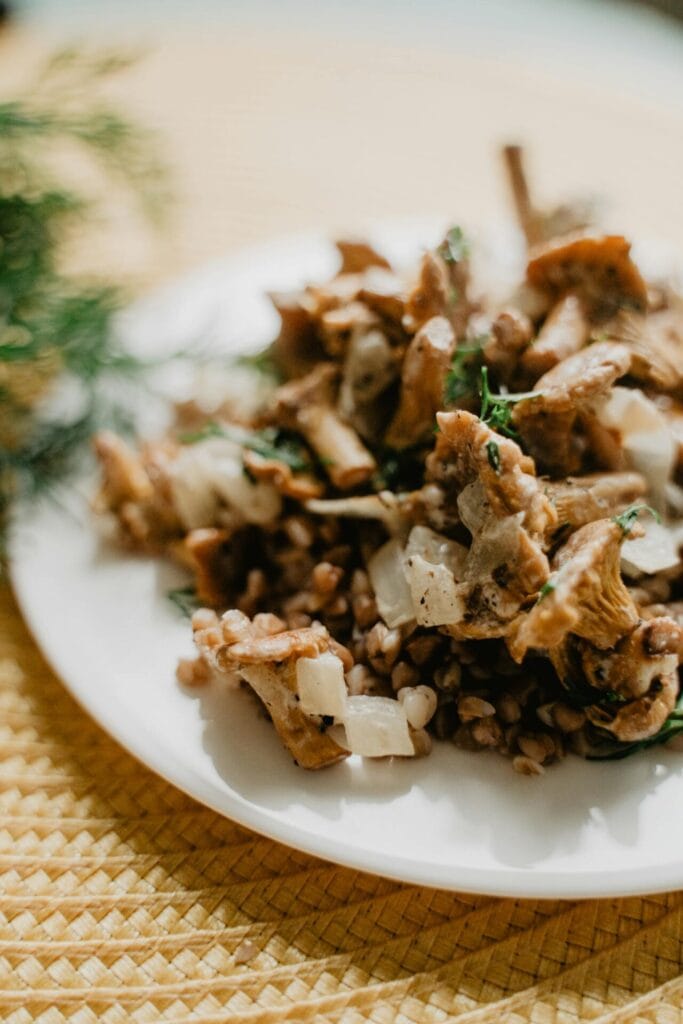
#9: Sautéed Chanterelle Mushrooms with Buckwheat for Cats
Alright, I’ll tell. You’re cooking dinner and your golden is nosing at your ankles, but your cat is just standing up there on the counter sniffing at what you’re eating. She deserves something just as good on her plate, right?
Easy one. Golden chanterelle mushrooms mixed with buckwheat groats, diced white onion and fresh dill. Pinterest, it must be good right? Wrong. Actually a healthy meal for your cat.
Ingredients:
1. 1 cup chanterelle mushrooms, cleaned and roughly torn
2. ½ cup cooked buckwheat groats
3. 2 tablespoons diced white onion (cooked down, not raw)
4. 1 tablespoon fresh dill, finely chopped
5. 1 teaspoon olive oil
6. 2 oz lean chicken breast, shredded (optional but recommended)
Instructions
In a non-stick pan with some olive oil on medium heat, put the chanterelles in and cook for 5-6 minutes or until they’re nice and brown. They smell so nutty and earthy that the whole house smells like a warm cabin.
Then add the cooked buckwheat and stir everything for 2 minutes. Then add the dill. It wilts quickly but it will keep the taste. Never serve it hot.
The Truth: While onions are safe in small quantities for cats, they can be toxic in large amounts. Stick to 1 tsp total and use it only as a flavoring.
Buckwheat is a plant protein and fiber that will help your cat digest and stay energized throughout the day.
Prep Time: 10 minutes | Cooking Time: 10 minutes | Serving Size: 1 cat, 1 meal
📸 Photo credit: pexels
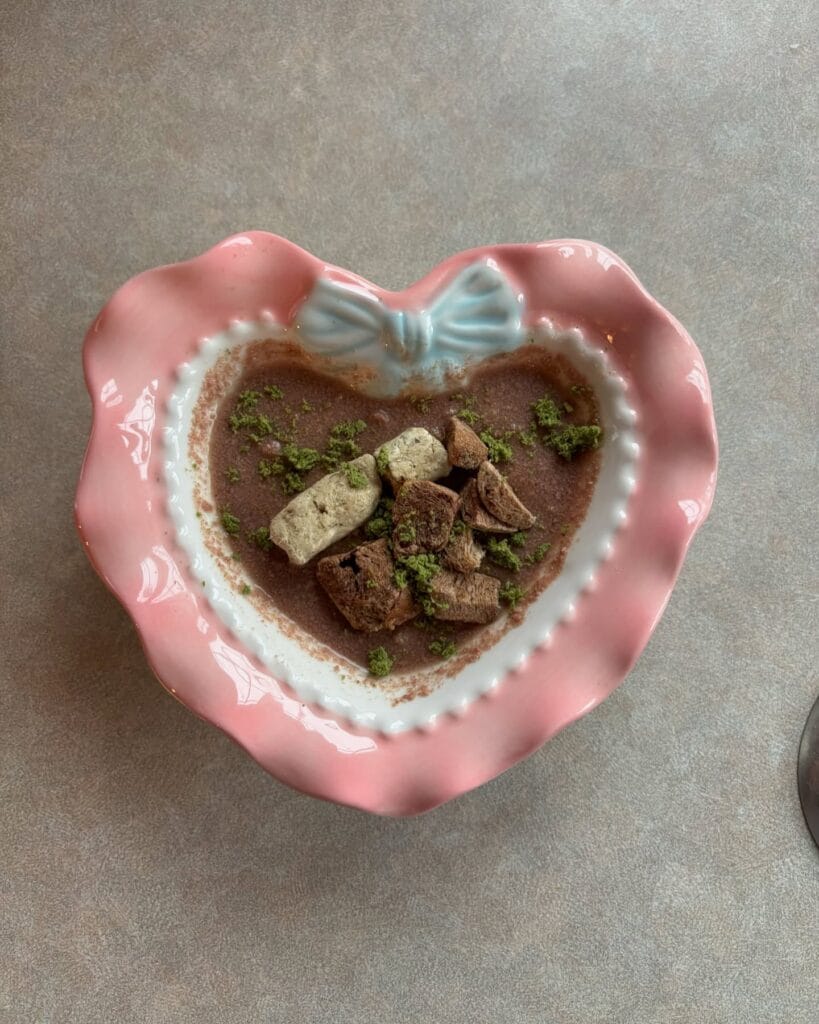
#10: Chocolate Matcha Cat Mousse With Tofu Crumbles
You’re sitting at the counter eating and your cat gives you that look. You know what he’s thinking. “The dry kibble in my bowl isn’t it?”
I did this one.
Prep Time: 10 minutes | Cooking Time: 15 minutes | Serving Size: 2–3 cats
The pink, heart-shaped bowl is a carob and pumpkin mousse with freeze-dried chicken liver crumbles, plain tofu cubes and a sprinkle of dried parsley powder. And the green stuff isn’t matcha – it’s a herb that cats love and can’t get enough of!
Here’s the ingredient list:
1. ½ cup pureed pumpkin (plain, no spice)
2. 2 tablespoons carob powder (never cocoa — carob is cat-safe)
3. ¼ cup low-sodium chicken broth
4. ¼ cup silken tofu, cubed into ½-inch pieces
5. 2 tablespoons freeze-dried chicken liver, crumbled
6. 1 teaspoon dried parsley, finely ground
Instructions
Heat chicken broth in a small saucepan on low heat. Whisk in carob powder for a few minutes until smooth. Add pumpkin puree and stir until it forms a thick mousse.
Take off the heat and let it cool down (so it doesn’t upset a cat’s tummy). Spoon it into a bowl and put the tofu cubes and liver pieces right in the middle. Sprinkle with parsley.
Excellent post! Carob gives them the taste they like, pumpkin has tons of fiber to help them digest and now you’ve got a cat who will actually eat his food for once and not walk away!
I made this for the first time and the freeze-dried liver snapped against the soft mousse. That’s the kind of contrast that drives cats crazy. Silken tofu adds a little bit of extra protein, but it won’t fill up your cat’s tummy.
📸 Photo credit: Instagram @thepeachpawz
The One Nutrient Mistake That Could Seriously Hurt Your Cat
Well, there you have it. The little secret ingredient that no other cat food recipe will ever tell you about (and yes, it does make a difference).
Taurine is your best kept secret in that home cooked meal you’ve been working on.
Cats can’t make taurine. And when you cook meat you kill a big part of its taurine. So your cat eats a beautiful, fresh, homemade meal … and slowly dies of heart disease over a few months. I found this out the hard way when my aunt’s cat got sicker and sicker until the vet finally figured out why.
Great Move: If your recipe calls for heart meat or seafood, taurine it yourself. It’s stripped in cooking. Supplement replaces it. No questions.
2. The other landmine? More than twice weekly raw fish. The enzyme thiaminase blocks vitamin B1 absorption, and a cat will suffer from thiamine deficiency symptoms – like neurological problems – in weeks.
The best part is, if you do these two things right, your homemade cat food is better than anything out of a can. Your cat’s coat, energy, digestion — everything is better.
Your Golden Retriever Deserves This (And So Do You)
Can’t stress this enough – go buy one of these things! Your floors, couch and your sanity will thank you.
I finally gave in and got one when I got sick of having to wipe muddy paw prints off my freshly mopped kitchen floor. I haven’t looked back since.
So what? Your house is Pinterest. You can still have a golden retriever! Yes, yes, yes! If you want your pet’s setup to be the cutest, check out these creative DIY dog food storage ideas .
What mess does your dog make that you hate the most?

Amr Mohsen is a software engineer who traded his keyboard for a leash — at least on weekends. His love for dogs inspired him to share what he learns as a dog owner and enthusiast, bringing a detail-oriented, research-driven perspective to every article he writes. If it’s about dogs, he’s probably already looked it up twice.